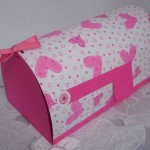
• Home
  • About
Blue Orange Green Pink Purple

Archive for the ‘Box and Container Crafts’ Category

You can use the search form below to go through the content and find a specific post or page:

Dec 09

How to Make Hanukkah Dreidel Gift Boxes Step by Step

How to Make Hanukkah Dreidel Gift Boxes Step by Step

Hanukkah is coming up this weekend and these dreidel gift boxes are just what you need to package up those presents for your family and friends. The cool thing about this project is that it turns into a fun dreidel game by just simply pushing a pencil through it. You can make these gift boxes as big as you need them to be as long as you have large sheets of paper. These Hanukkah dreidel gift boxes are  fun to make and they  look very beautiful as well.

How to Make Hanukkah Dreidel Gift Boxes Step by Step

How to Make Hanukkah Gift Boxes (That Can Also Be Dreidels with the addition of a pencil) : Arts and Crafts Activities for Kids for Kids, Teens, Preschoolers

Step 1 How to Make Hanukkah Dreidel Gift Boxes Step by Step

Craft materials required:

Scissors

Glue or Glue Stick

Ruler (if measuring out the box by hand)

Printer (if printing out template)

Marker

Tape

Watercolor paints (or poster paints, crayons, colored pencils, or markers)

paper, posterboard, or card stock

If Printing Out Template Then The Template is Below (This template is for 11 x 17 paper but you can reduce it to fit smaller paper but the box will be tiny) TO MAKE TEMPLATE BY HAND (FOR LARGER BOXES) SCROLL DOWN FOR FURTHER DIRECTIONS.

template-toprint-out

USE THE TEMPLATE BELOW TO MAKE A BOX TEMPLATE BY HAND-DRAWN METHODS. The box illustrated below is for 3″x3″ squares…but you can change this to any number that is a square – such as 5″x5″.

templatebox-directions

(1)

Step 2 How to Make Hanukkah Dreidel Gift Boxes Step by Step

Cut Out the Template after you draw it (The above template doesn’t look like the one I told you to make but it worked just the same).

Step 3 How to Make Hanukkah Dreidel Gift Boxes Step by Step

Get your watercolors (or other coloring method) out and color each square a different color (you can color the top and bottom box too if you want. I decided that I liked the brown look on the top. Also write out each Hebrew letter in English (Nun, Gimel, Hey, and Shin). You can paint a black line between each color if you want, it isn’t necessary though.

Step 4 How to Make Hanukkah Dreidel Gift Boxes Step by Step

Draw each Hebrew letter and paint them white and outline them in black to make them stand out on top of the colored squares.

(From right to left the letters are as follow -  (Hey, Nun, Shin, Gimel).

How to Make Hanukkah Dreidel Gift Boxes Step by Step

This is a picture of my gift box before I folded it up. Fold at each line (so in between each square). Also fold at each tab…this is what we will glue the box together with. After folding at each line, the box will start to take shape, just glue together and tape closed until it dries.

TO MAKE GIFT BOX INTO A DREIDEL GAME

To make the gift box into a dreidel, just stick a sharpened pencil through the top and bottom of the box. You can do this before you put the gift in, or you can do it after the box is opened. Visit This site for Dreidel Game Rules. Have fun.

Hanukkah is coming up this weekend and these dreidel gift boxes are just what you need to package up those presents for your family and friends. The cool thing about this project is that it turns into a fun dreidel game by just simply pushing a pencil through it. You can make these gift boxes as big as you need them to be as long as you have large sheets of paper. These Hanukkah dreidel gift boxes are  fun to make and they  look very beautiful as well.

How to Make Hanukkah Dreidel Gift Boxes Step by Step

How to Make Hanukkah Gift Boxes (That Can Also Be Dreidels with the addition of a pencil) : Arts and Crafts Activities for Kids for Kids, Teens, Preschoolers

Step 1 How to Make Hanukkah Dreidel Gift Boxes Step by Step

Craft materials required:

Scissors

Glue or Glue Stick

Ruler (if measuring out the box by hand)

Printer (if printing out template)

Marker

Tape

Watercolor paints (or poster paints, crayons, colored pencils, or markers)

paper, posterboard, or card stock

If Printing Out Template Then The Template is Below (This template is for 11 x 17 paper but you can reduce it to fit smaller paper but the box will be tiny) TO MAKE TEMPLATE BY HAND (FOR LARGER BOXES) SCROLL DOWN FOR FURTHER DIRECTIONS.

template-toprint-out

USE THE TEMPLATE BELOW TO MAKE A BOX TEMPLATE BY HAND-DRAWN METHODS. The box illustrated below is for 3″x3″ squares…but you can change this to any number that is a square – such as 5″x5″.

templatebox-directions

Step 2 How to Make Hanukkah Dreidel Gift Boxes Step by Step

Step 3 How to Make Hanukkah Dreidel Gift Boxes Step by Step

Step 4 How to Make Hanukkah Dreidel Gift Boxes Step by Step

Step 5 How to Make Hanukkah Dreidel Gift Boxes Step by Step

HANUKKAH CRAFTS ACTIVITIES & IDEAS FOR JEWISH CHILDREN

It is almost Hanukkah time so check out Our Mega List of Hanukkah Crafts for Kids … Mega List of Crafts for Jewish Kids

Technorati Tags: hanukkah gift boxes, hanukkah gift box crafts, make hanukkah gift boxes, make gift boxes, making gift boxes, make dreidel, making dreidels, dreidel craft,   jewish crafts, hanukkah crafts, hanukkah crafts for kids, hanukkah arts and crafts, crafts for jewish kids, crafts for jews, crafts for jewish children, chanukah crafts, channukah crafts, chanukkah crafts

hanukkah ornaments, hanukkah ornament crafts, make hanukkah ornaments, make ornaments, making ornaments, star of david crafts, star of david arts and crafts, star of david, jewish crafts, hanukkah crafts, hanukkah crafts for kids, hanukkah arts and crafts, crafts for jewish kids, crafts for jews, crafts for jewish children
Oct 23

How to Make Halloween Lanterns for Spooky Halloween Decorations Crafts for Kids

How to Make Halloween Lanterns for Spooky Halloween Decorations Crafts for Kids

Image062

How to Make Halloween Lanterns for Spooky Halloween Decorations Crafts for Kids

Here’s a lantern that is a very easy arts and crafts Halloween activity for kids to make. And guess what- you can also use it to store your Halloween treats when you go trick-or-treating. So pick up an old plastic bottle and start making it right now…easy instructions follow below:

Materials required:

Plastic bottle

Thick black paper

Orange/yellow paper

Knife

Craft glue

Scissors

Image056

Step 1

With an adult’s  help cut out the top of the plastic bottle.

Image108

Step 2

Cover the plastic bottle by covering it with a rectanglular piece of black paper and rolling it around the plastic bottle. Cut out a rectangular piece of orange- yellow paper and stick it as shown, leaving about an inch of black showing on the top and bottom.

Image058

Step 3

Cut out a strips of black paper long enough to go around the entire bottle and about 1/2 inch width.

Image059

Step 4

Stick them around the bottle as shown

Image060

Step 5

Cut some more pieces of black paper a little longer than the length of the bottle. Stick them as shown.

Image065

Step 6

Cut out a piece of black paper about 1 ft long and i inch wide for the handle. Apply glue to the ends.

Image061

Step 7

Insert it into the gap between the plastic and the first layer of black paper

Image062

Use the lantern for decoration, or for carrying and storing treats.

More Spooky Halloween Crafts Projects for Kids

Use our Main Halloween Crafts for Kids Page to find some great spooky arts and crafts project ideas for kids to celebrate Halloween such as and some of our sub-pages:

Autumn Crafts

Bats & Vampires Crafts

Black Cats Crafts

Candy Corn Crafts

Ghosts Crafts

Gravestones Crafts

Halloween Decorations Crafts

Make Halloween Treats Crafts

Making Costumes Crafts

Halloween Pins Crafts

Haunted House Crafts Crafts

Trick-or-Treat Bags Crafts

Decorate Your Window Crafts

Pumpkins Crafts

Scarecrows Crafts

Skeletons Crafts

Spider Webs Crafts

Spooky Crafts Crafts

Halloween Costume Crafts Home Page

How to Make Angel Costumes

How to Make Costume Wings

How to Make Fairy Costumes

How to Make Halo Costumes

How to Make Indian Costumes (Native Americans)

How to Make Joker Costumes (Batman The Dark Knight)

How to Make Knight Costumes

How to Make Lion Costumes

How to Make Mermaid Costumes

How to Make Mouse / Mice Costumes

Home to Make Ninja Costumes

How to Make Pirate Costumes

How to Make Princess Costumes

How to Make Superhero Costumes

How to Make Transformers Costumes

How to Make Zombie Costumes

Technorati Tags: halloween lantern crafts, halloween basket crafts, halloween container crafts, halloween treat bags, trick-or-treat crafts, trick-or-treat baket crafts, trick-or-treat bag crafts, trick-or-treat bags, make halloween decorations, halloween decorations, table decoration crafts, spooky halloween decorations, scary crafts, spooky crafts, creepy crafts, halloween crafts, halloween crafts for kids, halloween crafts ideas, trick-or-treat crafts, crafts for kids, spooky crafts, creepy crafts, crafts, arts and crafts, arts & crafts, arts and crafts for kids

Aug 31

Homework Organizer Crafts Project for Parents and Kids to Declutter Paperwork

Homework Organizer Crafts Project for Parents and Kids to Declutter Paperwork

Homework Organizer Crafts Project for Parents and Kids to Declutter Paperwork

How to Make a Homework Organizer to De-Clutter School Paperwork

My kids had their first day of school today. I spent the entire day cleaning and organizing the house because after an entire Summer of kids being at home, the entire house was a cluttered mess. After I finished de-cluttering my kitchen, I realized that as soon as the kids get home, my kitchen is going to get cluttered again within a week. Why? Because with school comes tons of school papers … homework, tests, crafts, artwork, notifications, and so much more … and all of these papers will pour into my house. I never know what to do with all of quickly growing stack of homework and school papers. I am afraid to throw things away for fear that either my children or me will need that paper soon. So I decided that I would create a school papers organizer. This school paperwork organization system is the craft that I will share with you today.

Crafts Materials Needed for Homework Organizer to De-Clutter School Paperwork

Crafts Materials Needed:

Cereal Boxes and other boxes in various sizes

Scissors

Glue or Glue Stick

Tape

Contact Paper

Wrapping Paper  or Construction Paper or Tissue Paper or Decorative Papers

Sharpie Markers (or other Permanent Markers)

Wipeable Markers

Step 1 – Planning Stage

The first step is to plan out how the boxes that you have will fit together to hold school papers and possibly folders and what ever other items that you will want to store in this schoolwork organization box. Cereal Boxes seem to be the perfecgt size to hold paper, but all cereal boxes come in many different shapes and sizes, so please make sure that looseleaf paper will fit in your cereal boxes too.

Plan out this craft and then make circles out of the tape

When you know where you want the boxes to lay, then loosely keep them in place by making tape loops (as seen above). This will hold the boxes in place long enough to tape the boxes in place more securely later.

Step 2 – Tape Boxes Together Securely

tape togeteher for Homework Organizer Crafts Project

Now, first of all, painting tape wouldn’t have been my first choice, but my kids are always stealing my tapes, so this blue tape is what I was stuck with. After you have loosely secured the boxes together with tape loops, then you can take tape and tape everything together more securely. You can see above that I didn’t go overboard, I just taped where tape was needed.

Step 3 – Cover / Wrap Your Boxes with Colored Paper

Cover / Wrap Your Boxes with Colored Paper

Now it is time to cover your boxes with colorful paper. I have four kids, and I decided to use a different color for each child. I also tried to keep in mind what colors my boys would reject as being too girly. Attach the paper with glue or glue stick.

Step 4 – Cover with Contact Paper

Cover with Contact Paper - Homework Organization Craft to Hold School work

Now you can start covering the homework organization box with contact paper. The reason we are doing this is so that you can leave notes to each of your children…or they can leave notes to you. I also like covering the box with contact paper because it laminates and protects the surface of the box from spilled drinks and other liquids. Since this will be in my kitchen, I wanted to make sure that the surface was protected.

Step 5 – Label with Permanent Markers

Homework Organizer Crafts Project for Parents and Kids to Declutter Paperwork

Now you can use Permanent Marker, such as a Sharpie marker, to label the boxes. I put each of my children’s names on each of the boxes in big bubble letters to show each of them which box is theirs. Below my children’s names are notes to my children (or notes from my children to me) that is drawn on with a wipeable marker. Every day we can wipe off the wipeable marker to leave new messages to eachother. I wrote out on the middle box to show where they should pick up notes and papers that need to go back to school. You can set up this however you feel would work best for your family.

An extra that I decided to add to this project was to pick up 2 wipeable boards, which I picked up from the dollar store. Oone  is an empty wipeable task list and one is an empty wipeable calendar. I used hot glue to glue each of these to the side of the box. But really I could have just drawn the calendar and task list on the contact paper.

Good Luck. You might also like the last 2 blog posts that we did – How to Paint Your School BookBag … How to Use Sharpies to Decorate Your School BookBag

Here are More School Book Bags Crafts

Here are More School Book Bags Crafts

Decorate Your Binders and Notebooks Crafts

Decorate Your School Lockers

Make or Decorate Bulletin Boards / Tack Boards / Cork Boards

School Work Organization and Homework Organizers Crafts

How to Make and Decorate School Book Covers Crafts

Technorati Tags: organization crafts, school organization crafts, paper organization crafts, paper organization, school organization, organize schoolwork, organize homework, organization for kids, how to organize, back to school crafts, back to school, back to school activities

Aug 02

How to Make Keepsake Boxes to Keep Little Treasures Craft Activity for Kids

How to Make Keepsake Boxes to Keep Little Treasures Craft Activity for Kids

rimg19921

How to Make Keepsake Boxes to Keep Little Treasures Craft Activity for Kids

I remember when I was a little girl, I really wanted to have my own keepsake box. There were so many things that I collected such as stones, shells and dried flowers.  There were little cards, little pictures and a few little treasures that I received from friends and family alike.  All of them had no where to really go in my room and I begged my mother for a wooden keepsake box.  Of course, with the demands of day to day life, my mother constantly forgot to purchase me a keepsake box and I never realized that I could make one myself.

That was until I got older. Then I realized that a keepsake box doesn’t have to be big and it doesn’t have to be wooden.  It can simply be a small treasure box that keeps the most important things you find.  This craft is one of those treasures.  It is easy to do and even preschool children can make their own keepsake box for their countless treasures and what is even better, it appeals to both boys and girls.

You can make the keepsake box as a present or keep it for your own treasures and you can personalize it in whatever way you want to.

Keepsake Boxes for Little Treasures : How your Child can make a Keepsake Box that is Personalized and Fun

rimg1974

Gather all the Craft Supplies That You Will Need:

  • Magazines (You will want the glossy pictures for the box)
  • White Glue
  • Paint Brush
  • Box (I found mine at a dollar store but you can use a shoebox or a packing box.  What you want is a box with a lid)
  • Scissors

rimg1976

1 – Flip through the magazines and find all the pictures that you will want.

rimg1975

2 – Cut them out and try to avoid using straight edges so the finished product has more of a collage effect to it.   Also make sure that you cut out more pictures than you need.
rimg1977

3 – Once you have everything made, take a small plastic container and mix the glue with a little bit of water.  Basically, you want to make a paste that is similar to paper mache with it so the glue should be watery but not to the point that it loses its color.

rimg1978

4 – Now that you have everything ready, start with the first side of the lower box and arrange the pictures the way you want them.

rimg1979

5 – Carefully glue them into place by adding a touch of glue to the bottom with the paint brush.  Seal the edges by running the paint brush filled with glue across the surface of the pictures and also across the box.

6 – Set it aside to allow time to dry. While you are waiting for the first side to dry, begin the lid.

rimg1980

7 – Repeat the process of laying the pictures out and then gluing them.  Make sure you seal the edges by coating the top of the pictures and lid with the glue.  Set aside to dry.

8 – Once the glue has dried on the one side of the box, repeat the process until all four sides are finished,allowing them to dry in between each step so they don’t get pulled off or stuck to other surfaces.

rimg19922

9 – When the box is complete, fill with all your treasures or give as a gift.

You can also use these little boxes as gift boxes for anyone.  People will love the idea and will treasure them just as much as the gift inside.

More Crafts Online That are Similar to This Crafts Project for Kids

Crafts with Boxes for Kids

Even More Crafts with Boxes for Kids

Cornerstone Crafts: Treasure/Jewelry Box - Popsicle stick treasure box or jewelry box that stands up well over time.  This project can be done as a gift for others (i.e. Mothers Day), or as a box for your own child to play with.

Virtual Kids’ Crafts: My Treasures! Box - They may have been marbles, rocks, treasures from the gumball machine; just about anything. But, there was nothing more fun than removing each treasure to look at it over and over again.  Today you’re going to create your own treasure box. You can use what you have around the house or you can purchase supplies from me and complete one like my daughter, Michele’s.

Give Your Next Gift in a Treasure Box! -  For kindergarten writers, all this glue squeezing and letter-practicing are invaluable kinesthetic boosts for early literacy.  Little hands need these workouts, and little kids also get a huge boost out of the shine and pizzazz they’ve created.  Expect an enjoyable time making it with your child, and then give it as a gift to a family member once you’re done.

Eco Friendly Crafts for Kids – A keepsake storage box which uses birthday/Christmas cards and a shoe box.    Children love to have secret boxes of their own and this one makes use of what would otherwise be waste.  There are three R’s to recycling and all the entries in our Green MacGyver eco friendly crafts for kids series will recognize the importance of “REUSE”.

Make a Credit Card Mailbox – My toddler LOVES getting the mail. He also loves pretending and putting stuff into holes/slots/crevices etc. To satisfy both of these hobbies, we made a little credit card mailbox!

Cardboard box castles - There are many ways to build a castle with children. Once I already made a small cardboard toy castle with my kids, but this time we wanted something more impressive. For our castle we collected cardboard boxes of different size, and toilet paper tubes. Using those building blocks, paint and some colored paper, we created this castle with floors, round towers, windows and a cone-shaped roof.

I Love to Create Kids: Recycled Craft Challenge! – Hey, Parents!  This week, I Love to Create is about getting your kids’ creative juices flowing. Kids love a challenge, so why not give them a crafty one?  With just a few supplies combined with some kitchen discards,  you’ve got an activity that’ll keep ‘em guessing…and recycling!

Technorati Tags: treasure chest, treasure chest craft, keepsake crafts, kids keepsake crafts, crafts for kids, crafts for children, family fun, treasure crafts, treasure box craft, treasure box activity, keepsake activity, keepsake activity for kids, box crafts for kids, magazine crafts, collage crafts, paper crafts, keepsake box, treasure box

Kids Crafts & Activities

    Add to Technorati Favorites
  • ABOUT
    Welcome to the Kids Crafts & Activities Blog from the Artists Helping Children Web Site. Here you will find Arts and Crafts Projects for Kids, Fun Activities for young and older children, fun handmade games that kids can make, and where to find the best coloring pages online.
    Also make sure to visit our home page - Artists Helping Children

    OTHER PAGES ON OUR SITE
    Crafts for Kids
    Coloring Pages & Printouts
    Crafts Ideas Directory
    Paper Folding & Origami Diagrams
    How to Help Sick & Needy Children with Art
  • Categories
  • Recent Posts
    • Make Spring Handprints Lambs for Easter or Spring : Preschoolers and Kids Craft
    • Easter Bunny Rabbit Treat Cups Crafts Activity Ideas for Kids
    • Easter Napkin Rings Crafts Table Decoration Ideas for Boys and Girls
    • Drawing and Making Cute Animals Out of Hearts for Valentine’s Day
    • Peeping Groundhogs Craft Activity for Groundhog day
  • Blogroll
    • A Few Nice Things
    • Activity Coloring Pages
    • Crafts Arts & Crafts Ideas
    • Family Travel Ideas
    • Momsterme
    • Preschool Education Blog
    • Step by Step Drawing Blog
  • Recent Comments
    • paige hicks on The Handbag Addiction Starts Early With a Felt Purse
    • elmy on Bunny Ears Easter Bunny Craft Idea for Kids
    • thany anariba on Easter Bunny Rabbit Treat Cups Crafts Activity Ideas for Kids
    • BHOLU on Easter Bunny Rabbit Treat Cups Crafts Activity Ideas for Kids
    • Maria on Easter Bunny Rabbit Treat Cups Crafts Activity Ideas for Kids
  • Archives
    • February 2010
    • January 2010
    • December 2009
    • November 2009
    • October 2009
    • September 2009
    • August 2009
    • July 2009
    • June 2009
    • April 2009
    • March 2009
  • Search


  • Home
  • About
  • Add to Technorati Favorites

© Copyright Kids Crafts & Activities. All rights reserved.
Designed by FTL Wordpress Themes brought to you by Smashing Magazine

Back to Top