
|
|

|
|
![]()
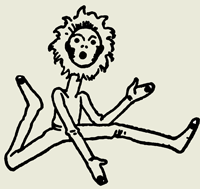
This is a fun game to play with one of your friends at lunch or just on a boring day when there is nothing else to do. One of you draws 5 dots in any pattern that you want. Your friend then has to somehow figure out how to draw a person out of those 5 dots. One dot for 2 hands, 2 feet, and one in the person's face / head. This will bring on a ton of laughs.
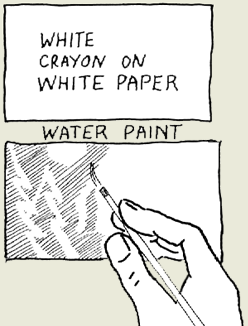
Prepare the picture before you meet up with your friends. Use white crayon on white paper or yellow crayon on yellow paper, etc. This way the drawing will be invisible. Give your friends some watercolor paints in several colors. Tell them that the magic picture will appear when the picture is painted over with the wet brush. Your friend will love when the picture appears.
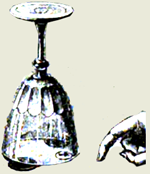
If you have a tablecloth on your table, a glass, and a few coins in your pocket, then today is the perfect day to try a trick out on your friends. Turn a glass upside down and have it stand on top of 2 coins, as you can see in the picture above. Put a 3rd coin under the elevated cup. Ask one of your friends to try to get the coin out without touching the glass. When none of your friends can figure out how to do this. Say 'Hocus Pocus' and scratch the tablecloth near the glass, the coin will start moving towards you and will soon be outside of the cup. This is a fun little game!

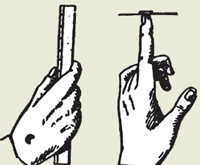
Here's a very fun game! The first player places a toothpick on top of a bottle. The second player does likewise. The object of the game is to keep on piling toothpicks on the bottle without knocking any off. If a player disturbs the pile so that a toothpick rolls off, he loses the round and his opponent scores 1 point. All the toothpicks are then removed and a new toothpick tower is started. The player who scores 10 points first, wins the game.
You can start this trick out by balancing a playing card on the tip of your pointing finger. Now place a nickel on top of the playing card ... and try to balance that. Now hit the card with a pencil or a ruler and the card will fly away quickly, leaving only the nickel balanced on your finger. If you are able to do this, next try to just snap your finger directly forward to fling the card away. It is a hard thing to master. Try to fling your finger without pushing the card up or down but just forward. Good luck.

This is a lot of fun to do. Ask your parents if it would be okay to draw on your hand before playing this game though. If they are okay with it, then clench your hand into a fist. With your knuckles facing up and your thumb covering your other fingers, draw a face on your hand. Draw the mouth on the thumb and pointer finger, as pictured above. Draw the nose and eyes right above the mouth. If you have a piece of cloth, a play wig, a handkerchief or a bandana, a doll hat, or other head piece, drape, it around the hand like it is hair. Now make the person speak by carefully moving the knuckle of your thumb up and down. It is a lot of fun and you can make everyone laugh hysterically if you are a funny kid.
Below you will find some fun crafts ideas that are all quick and easyfor kids to make with materials that you most likely have just sitting around the house. None of the following crafts will take your children a lot of time to do, and they are all great boredom busters for those rainy days when your youngsters are just stuck inside watching tv. We'll keep them up to date for all of the nearest holidays that are just around the corner.
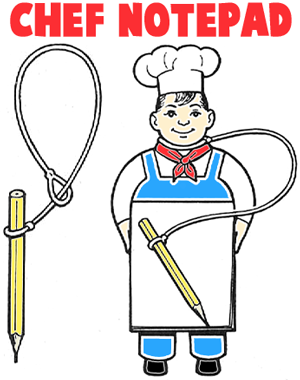
You will need the following crafts materials....Piece of white cardboard 3 1/2" x 8", scissors, pencil, , crayons, 1 small pad of paper, one 10" piece of string, 1 small pencil, and paste. Print out the chef notepad (color or black and white) and then glue chef pattern onto cardboard. Cut out and let child color one. Help children paste note pad in place. Tie one end of string to pencil, make loop by tying other end of string about 1" above pencil. Slip loop over head and draw up tightly. Here is a handy note pad.
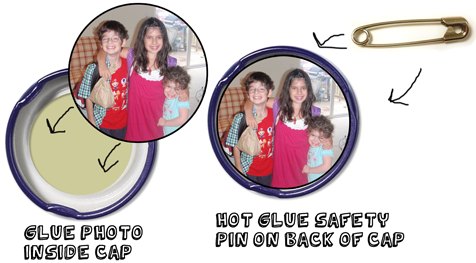
Find a lid, such as a jelly jar lid. Wash it out completely. Use the cap to trace around the kids' faces. Cut out the picture ... a little smaller. Then glue it into the cap. Tape a safety pin to back of cap or if Mom is around ask her to help you hot glue a pin to the back of the pin. Your Dad can then put this on his shirt to show off his kids all Dad.
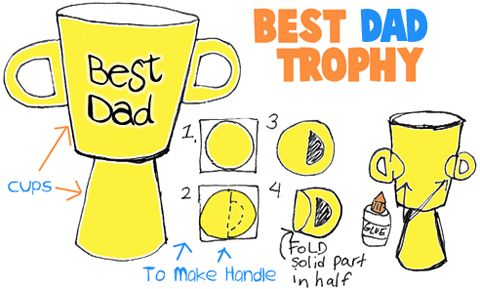
Your Dad will love this 'Best Dad' Trophy for Father's Day. He will feel like he is the best Dad in the entire world. All you have to do is find 2 plastic cups and glue them together....the bottom one should be upside down. To make the handles, all you have to do are cut 2 circles. Fold them in half and then cut a half circle out of one of the sides of the circle. Then fold the solid side in half. That is the part that you glue to each side of the cup.
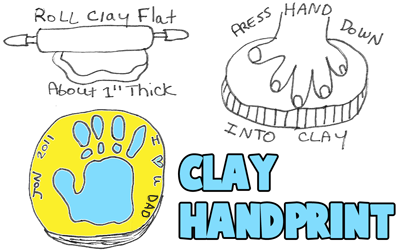
This is a great gift to give to Dad for Father's Day. He can put this handprint paper weight on his desk to hold down his papers. Get some self-hardening clay. Roll the clay out flat and then just press your hand down into the clay firmly. With a toothpick you can write your name and age as well as a message to your Dad or you can do that in paint later when you paint the hand print.
Here are Even More Father's Day Crafts