
|
|

|
|
Home > Arts and Crafts Projects > Crafts with Boxes > How to Make Elephant Party Favors or Placeholders
Favors are a very important addition to a party table. They can serve as place cards for seating guests; they can be filled with small candies or nuts, or they can be used to decorate a table. With this craft, you will make an elephant party favor that could double as a placeholder if you write each guest's name on the elephant's body. Have fun making these little buggers.
Construction Paper
Scissor
Ruler
Ice Cream Container
Paste or Glue
Nail
(1) Measure and cut, 2 circles of gray construction paper to fit the flat sides of a 1/2 pint ice cream container, and glue in place. Measure and cut a strip of the same paper to fit around the container, and glue in place.
(2) In the round side of the covered container, cut a small slit. This is where the head piece will be inserted. On the opposite side make a small hole with a nail. This is where the tail will be inserted.
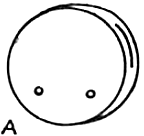
(3) On the flat sides of the container, make 2 small holes on each side for the insertion of the legs, as in illustration A.
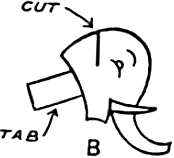
(4) On gray construction paper, draw and then cut out the elephant's head, with a tab, as in illustration B. If you can't draw, here is the head for you to print out (at the appropriate size).
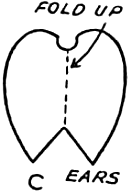
(5) Draw and then cut out the elephant's ears in one piece, as in illustration C.
(6) Fold a piece of gray construction paper in half, and draw and then cut out the legs and feet in one piece.
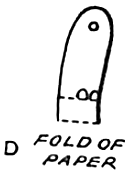
(7) Draw or paint the elephant's toe nails above the folded edge, as in illustration D.
(8) Make 2 sets of legs, one for the front, and one for the rear, the same way. Open then glue the legs to cardboard.
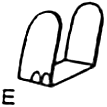
(9) Fold up the legs, making an additional fold at the toe nail line, as in illustration E.
(1) Cut a slit in the elephant's head. See illustration B.
(2) Fold the ears on the dotted line and insert into the slit in the elephant's head. Insert the tab of the elephant's head into the slit in the container.
(3) Fasten the legs to the body with metal head paper fasteners.
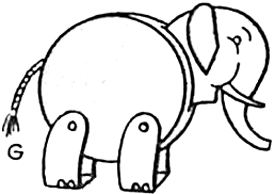
(4) Make the elephant's tail of gray yarn, and unravel one end slightly, as in illustration F.
(5) Place the unravelled end of the tail into the hole in the elephant's body. The assembled elephant should look like illustration G.