
|
|

|
|
Home > Arts and Crafts Projects > Diorama Crafts > How to Make Round Dioramas
This four-sectioned diorama can be used to display any four scenes such as; rooms in a home, stage sets for a play or story, or seasons of the year. You can place it on a Lazy Susan tray or table top and make it revolve. To make this seasonal diorama you will need the following materials:
Round hat box cover
Pencil
Cardboard
Ruler
Scotch tape
Scissors
Crayons
Paints & brush
Magazine cut-outs
Marshmallows
Cotton
Pussy willow buds
Glue or paste
Artificial flowers
Tissue paper
Self-hardening clay
Cork
Small twigs
Sand
Small rocks
Colored paper
(1)
Place the cover of the hat box on the work table, open side up. This will be the base of the diorama.
(2) With a ruler, measure the inside of the cover for the dividers. Make the dividers by cutting 2 large pieces of cardboard so that they fit snugly inside the box cover. The dividers should be about 9 inches high.
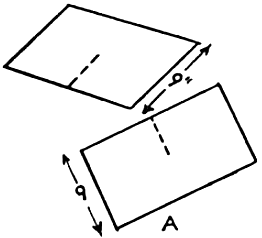
(3)With a ruler, measure half the width of the dividers. With the scissors, make a slit up the middle of each divider, extending half way up, as in illustration A.

(4) Combine the 2 dividers, slit into slit. You will now have a four-sectioned form, as in illustration B.
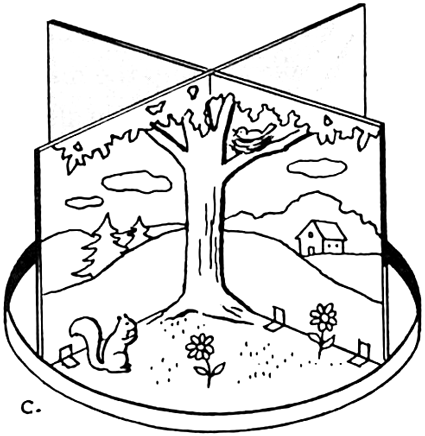
(5) Place the form inside the hat box cover and fasten it to the floor of the cover with Scotch tape, as in illustration C.
Create four different scenes, one for each section of the diorama. Separate figures to give appearance of distance.
WINTER.
For the background, draw, paint or glue-on, bare or snow-laden trees, or snow-capped mountains or houses against a bleak sky. For the foreground, spread cotton for snow, and make tiny marshmallow snow bunnies and snowmen.
SPRING.
For the background, draw, paint or glue-on, budding trees and flowers, or flocks of birds against a sunny sky. For the foreground, spread cut-up green tissue paper for grass. Stand a cardboard tree with pussy willow buds or a bird in a nest glued to its branches, or paper, artificial, or real spring flowers, in small flattened balls of self-hardening clay.
SUMMER.
For the background, draw, paint or glue-on a maritime scene, mountains, or an island or coastline against a blue summer sky. For the Foreground, spread sand with pieces of jutting rock. Whittle a lighthouse out of cork or soft wood, and a schooner with white paper sails.
FALL.
For the background, draw, paint or glue-on, trees with brown, yellow, or red leaves against a cold sky. For the foreground, spread cut-up brown tissue paper for fallen leaves, and painted haystacks, pumpkins and animals of self-hardening clay.