Today I will show you how to make this amazing friendship bracelet that has a letter ‘v’ pattern within it. This bracelet pattern is a bit more difficult than normal friendship bracelet instructions, so you will need a free afternoon to make this one. If you are still interested, find the illustrated instructions below.
You Might Enjoy Our Other Friendship Bracelets Crafts Too

How to Make V Shaped Arrows Friendship Bracelets Illustrated Instructions
Crafts Materials Needed
– Embroidery Floss (preferred) or Yarn
– Scissors
– Optional – Cardboard
– Optional – Doll Pins or Sewing Pins
Measuring the Embroidery Thread for your Bracelets

To measure the lengths of your threads, take a piece and hold it from your hand to your shoulder. This is one arm’s length of thread. However, you need 2 arms lengths for each thread, so just use the first arms length of thread to measure out a 2nd arms length. Look at the picture above to see how I folded the string over to get the 2nd arms length.
Use this first string to measure out 3 more strings. You need 4 different colors for this bracelet.
Step 2

Find 4 different colors of strings…each 2 arms lengths. Put them each end to end and then smooth them out.
[ad#ahc]
Step 3

Now fold the threads in half like in the picture above.
Step 4

We are now going to make a loop at the end to make a clasp type feature to tie the bracelet together after it is done.
Do this by holding the top of the string in a loop and then holding a bit down with your other hand, but keeping your index finger out.
Then take the loop-holding hand and wrap the string around your index finger of the other hand.
Step 5

Now, with the index finger hand, pinch the circle that was just created on the index finger….pinch it where the threads cross.
Step 6

Now slip the circle off of the index finger.
Step 7

Pull the loop through the pinched circle.

This is what my loop looks like.
The Way That is Easiest to Work

Before we start making our friendship bracelet, let me show you the way that I worked on this. I took a cut-out piece of cardboard, 2 pins, and a clip, and put them together like in the picture above. I took the clip and hooked it on the loop…to hold it down. I took the 2 pins to keep strings out of the way while I worked. It worked out AMAZINGLY. I wish I had done this when I was a child, I used to work with just tape and this works so much better.
Step 9

Okay, now lets start. You should have 8 strings hanging out from the bottom of the loop. Spread them out like I did above…like in a mirror image.
In this project, we will call the strings on the left, the left strings. We will call the strings on the right, the right strings.
It might help you to take some crayons or colored pencils and map out your colors on paper…just the way that I did above, so you don’t get confused.
Step 10

Now we will start on the left side strings. Put the right-side strings up on the pin to get them out of the way.
On the left side strings, we will go from left to right….so the blue string (string #1) will be the knotting string…in other words, the string that we will be making knots with.
Form a letter ‘L’ with the blue string…as pictured above.
Step 11

Now tuck the blue string under the yellow string and into gap between blue and yellow string. You are making a knot, think of the way that you tie a knot on your show lace, however in this case, always make sure the knotting string (blue) goes over and then under the string you are knotting over (yellow) before pulling.
Step 12

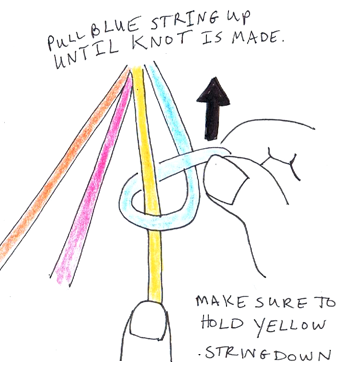
Now pull the blue string up until a beautiful blue knot is made. Make sure to hold the yellow string down, and that not other strings get in the way while pulling.
Step 13

Do the same exact thing over again to make a double knot.
Step 14

Notice that you made 2 blue knots on the top of the yellow string.
Notice that the blue string is now in place #2.
Now we will knot the blue string over the pink string.
Step 15

Knot the blue string over the pink string twice to make a double knot.
Step 16

Now this is what your friendship bracelet will look like now.
Step 17

Now double knot the blue string over the orange string.
Step 18

Now this is what your friendship bracelet will look like. You are now done with the left-side strings…for now.
Step 19

Now take all of the left-side strings and put them on the left pin to get them out of the way.
Fan out the right-side strings in the correct order…in the mirror image that you created in step #9 of this tutorial.
Step 20

Now we are making knots with the blue string on the right side.
This time, we are going from right to left.
Form a backwards letter ‘L’ with the blue string over the yellow string.
Step 21

Pull the blue string up over the yellow string, under it and through the gap between the 2 strings. Pull it up and make a blue knot. Do this a second time to make a double knot.
Step 22

Next we will pull the blue string over the pink string and make 2 blue knots over the pink string.
Step 23

Here I show you the process of making the blue knots over the pink string.
Step 24

This is what your bracelet looks like now.
Step 25

Lets now make the blue knots over the orange string.
Step 26

This is what your strings look like now. You are now done on the right (typo on the picture above where it says left).
Step 27

Now we are done with the right side and we have to knot the 2 blue strings together in the middle to make the ‘v’ shape.
Step 28

Double knot the 2 blue strings together.

This is what your letter ‘v’ shaped arrow shape looks like.
Step 29

Now lets start all over again but with the yellow string as the knotting string.
Knot over the pink, orange, and blue strings on the left-strings side.

Knot over the pink, orange, and blue strings on the left-strings side. This is what it should look like.
Step 30

Now put the left-side strings over the pin to get them out of the way.
Now fan out the strings on the right side. We will now double knot the yellow string over the pink, orange, and blue strings on the right side.
Step 31

After we have done all the right-side knotting, take the yellow string down off the left-side pin and then double knot the right-side yellow string over the left-side yellow string.
Step 32

Now put the right side strings back on the pin.
Fan out the left side strings…and then double knot the pink strings over the orange, blue, and yellow strings. Then put all of these strings back on the pin.
Take the right side strings down off of the pin and fan them out. Then double knot the pink strings over all of the strings.
Then double knot the 2 pink strings together in the center.
Step 33

Do the same thing with the orange strings.
Step 29

Now this is what your string will look like with all four colors done once.
Now just repeat again and again and again until you are sick of it.
Finished Bracelet

When you have gotten enough done to cover most of the front of the bracelet. You can then…braid the left side of the strings….the braid the right side of the strings … so you have only 2 strings now. Then you can tie the 2 strings around the loop for a closed clasped- bracelet.
I hope that you enjoyed this craft!!
You Might Enjoy Our Other Friendship Bracelets Crafts Too
Technorati Tags: friendship bracelets, making friendship bracelets, make friendship bracelets, how to make friendship bracelets, v shaped friendship bracelets, arrows friendship bracelets, arrowhead friendship bracelet, flat friendship bracelets, embroidery floss, embroidery floss crafts, girls crafts, crafts for girls, friendship crafts, jewelry crafts, bracelets

This was great and fun to make but it took a while for me to finish. I kinda got jumbled in my bracelet because i was distracted. 🙂
Don’t get down about it, it is really hard not to get distracted when a friendship bracelet has a difficult pattern. 🙂
I cant try now cause i’m going on holidays but when i return i am heading to the craft store and measuring string and choosing colours light blue, white, red and navy blue cause they look great together! I will wish for the best luck and find my way around strategies and everything :] I think there should be more bracelets because my friend made me a square bracelet in pink and I want to learn how so if that can get up there or can someone tell me??
That would help thanks
Hey! Your information is really helpful!
cool. these are the easiest directions ive found to do this so far thanks!
🙂 🙂
this really helped me i like it a lot
Best directions I have ever seen!
Thank you for letting me know – it took me hours to draw the directions up. 🙂
i love the v pattern omg and its also really easy
BEST instructions EVER!!!!!! so easy to understand!!!! 5 stars!!! :3 :3D 😀
thanks a lotthis really helped me ,I love this website 🙂
I’m ill and extremely bored, and this has been a great pass time! pretty simple and easy to do too!
yay I have a braclet making holder PERFECT 4 that!!
I scoured the internet searching for an easy to understand site that would explain how to make these!! Thank you SO MUCH!! I cant stop making them! I even make small ones for my children’s Barbies and Polly Pockets. 🙂
Thank you SOOOO much for your compliments on this. Are there any other types of friendship bracelets that you think would be a good idea to add to the site.
thks so much i learn something cool every day
WOW!!!
This is the simplest craft directions I’ve ever come across.
Thank you so much for sharing this knowledge. You just made a generation more knowledgeable cos I’m off to teach my 5th grade son’s class for a workshop.
Cheers
OMG!!!!!!!!!!!!!!!!!!!!MINE AND MY FRIENDS HEADS ARE ABOUT TO EXPLOED!!!!!!!!!!!!!!!!!!!BECAUSE WE CAN`T DO IT!!!!!!!!!!!!!!!!!!!!!!!!!!!!!!!!!!!!!!!!!!!!!!!!!AHHHHHHHHHHHHHHHHHHHHHHHHHHHHHHHHHHHHHHHHHH!!!!!!!!!!!!!!!!!!!!!!!!!!!!!!!!!!!!!!!!!!!!!!WE LOVE PIE!!!!!!!!!!!!!!!!!!!! AHHHHHHHHHHHHHHHHHHHHHHHHHHHHHHHH!!!!!!!!!!!!!!!!!!!!!!!!!!P.S. WE LOVE HOW U MAKE THE V SHAPED BRACELETS!!!!!!!!!!!!!!!!!!!!!!!!!!!!!!!!!!!!!!!!!!!!
Thank you very much! instructions are wonderfully written and drawn. It’s been too many years and I couldn’t remember how to do these and have been trying to teach my daughter.
God Bless you for wanting to help others with your skills!
Jessie (Juli’s Mom)
I’m so glad that it helped you help your daughter. Have fun!
Have e big compliment to you and your drawing pattern !
I love this !
have a nice day.. Nadine
I dont understand how to finish the bracelet. What do you mean by braid the right side and then the left so you only have two strings?
Sorry to confuse you. I was just saying that when you have knotted the bracelet enough to have a bracelet…then you will be left with the strings on the left and the strings on the right. Optionally, you can braid the left side strings together so they are one string now. And then optionally, you can braid the right side strings together so that they are also one string now. Then you will have only one string on the right and one string on the left. Now to close the bracelet, you can tie the 2 strings around the loop to clasp the bracelet closed. Is this a better description? Let me know.
omg!these are the best instructions in the history of instructions. i didnt get lost once! i cant believe how much effort you hav put. thank u so much! it made my life so much better! my friends luv it and now my whole school is addicted to it cos i emailed it to everyone. thank u again.
i made more than 3 bracelets with this design. i love it!!!!!!
it was sooo easy making it…….
i got sick of it once but since i got the hang of it it was so easy making it tnx a lot for the fun instructions!!!<3
nice bracelet i’m working on it now!! it will give me sompin to do while my sis is opening wedding presents XP
how long would it take to make one to use as a color for my dog???? she keeps breakin them and this looks pretty strong
thank you best directive I’ve ever seen
This is awesome!
I think I’m going to make it for my friend right now 😀
Absolutely GREAT instructions! I admit, I’m not a child … I’m a 50 year old woman. I haven’t finished my first one but I’ve gotten loads of compliments from the people that have seen it. Great big thumbs up to you 🙂 I’ll be sure to recommend your site to whoever is interested. Also, I’ll be trying some of your other crafts. So this site is GREAT for adults and children alike!
Thank you. Was very nice., I just got beautiful
Thanks!!!! I’m so glad it helped you!
Sorry I have only one question: what’s the bracelet that was clean? Flatten it?
I’m sorry, I don’t understand the question. Can you rephrase your question please? Thanks.
This was an easy bracelet fir me to make but I never pull the knots tight enough
hi this is a great tutorial but i was wondering if you could show how to add letters into the v shaped friendship bracelet, all i can find is how to do it on 1 colour and i want to do it on a v shaped one :/