How to Make Paper Strip Belts and Bracelets

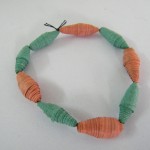
In this post I will be showing you how to make a Paper Strip Belt or Bracelet.   The choice is really yours weather you make a belt or a bracelet.  You simply will need to adjust the amount of colored paper you use for the project…. less for the bracelet and more for the belt.  Make a few and give them to your friends or loved ones…. anyone would be sure to enjoy them.  So, grab the materials needed and let’s get started with this fun craft.

Check out our other Friendship Bracelet Instructions.


How to Make Paper Strip Belts and Bracelets


Materials Needed

Thin Colored Paper, Magazine or Cellophane

Cord or Ribbon


Step 1


Thin colored paper, colored magazine pages or cellophane may be used.


Thin colored paper, colored magazine pages or cellophane may be used.  Plan 1 pattern for each inch.


Step 2


Fold on 'A' and 'B' toward 'C'.


Fold on ‘A’ and ‘B’ toward ‘C’.


Step 3


Fold again on 'C'.


Fold again on ‘C’.


Step 4


Fold on center.


Start with about 25 of these.  Fold on center.


Step 5


Fold both ends toward the center.


Fold both ends toward the center.  Completed.


Step 6


Slip one link through the loops of another like a hairpin.


Slip one link through the loops of another like a hairpin.


Step 7


Continue until the length you desire is completed.


Continue until the length you desire is completed.


Step 8


Tie a cord or ribbon on end loops.


Tie a cord or ribbon on end loops.


Completed Paper Link Belt or Bracelet


And, there you go…. you just finished making your Paper Strip Belt or Bracelet.  Wasn’t that fun?  The question I have for you though is…. Did you make a belt or a bracelet?  Let me know in the comments below.  Wear it proudly.

Technorati Tags: , , , , , , , , , , , , , ,

How To Make A Two-Tone Paper Bracelet

Today I’m going to show you how to make a Two-Tone Paper Bracelet.  This craft is a whole lot of fun…. it is even more fun if you grab some of your friends and have them make bracelets with you.  You simply need some colored papers of your choosing, a pair of scissors and glue… that’s it.  This bracelet craft is super simple, but trust me you will enjoy making it.  So, grab those craft materials and let’s get started.

Check out our other Jewelry Crafts.


Materials Needed

colored papers, 2 colors
scissors
glue


Step 1

Using the two colored papers you have chosen, cut 4 inch-wide strips each.


Step 2

Glue ends to form 1 long strip for each color.


Step 3

In a 90 degree form, place strips on top of the other and glue.


Step 4

Fold the one strip on top of the other and alternate folding with the other strip. Continue doing so until the whole strip is used. You should come up with somewhat like a springy form.


Step 5

Put on bracelet and let somebody glue ends to lock the bracelet.

And, there you have it…. you just finished your Two-tone Paper Bracelet.  How did it turn out for you?  Let me know in the comments below.  And, take a picture of the bracelet and post that too…. I’d love to see it.

Technorati Tags: , , , , , , , , , , , ,

How to Make a Paper Bead Bracelet

If you love making jewelry I have a fun craft for you today.  I’m going to show you how to make a Paper Bead Bracelet.  That’s right…. it’s a bracelet made out of paper.  With paper you actually make the beads that make up this bracelet.  Surprisingly enough….. by simply rolling paper and adding glue it creates a very strong and durable bead.  Choose your favorite color paper to make the beads and the result is a beautiful bracelet you will be proud to wear with your favorite outfit.  So, let’s get started.

Check out our other Jewelry Crafts.


Materials Needed

Colored paper

Scissors

Glue

Ruler

Pencil

Needle

Thread


Step 1

Using a ruler, on one edge of a rectangular piece of paper, mark points that are 1.5 inches apart… starting from the edge.


Step 2

On the other end of the paper, mark a point 0.8 inch away from the edge of the paper. Draw a second point 1.5 inches from this point. Mark a few more points, each 1.5 inch away from the last point. After you are done, draw lines joining the points on both ends as shown below.


Step 3

Cut along the lines to get long triangles as shown below.


Step 4

Fold the edge near the wide end of the triangle and start rolling it as tight as possible.


Step 5

Apply some glue to the end of the triangle and roll to form a bead as shown below.


Step 6

Make many beads as shown below and thread them together into a bracelet using a needle and thread.


Step 7

Wear the pretty bracelet around your wrist and show it off to all your friends.


Isn’t it unbelievable that you can make such an awesome bracelet simply out of paper and glue?  How did your Paper Bead Bracelet turn out?  Let me know in the comments below.  Take a picture of your bracelet and share it in the comment as well…. I’d love to see it.

Technorati Tags: , , , , , , , , ,

How to Make a Hearts Friendship Bracelet

If you love making friendship bracelets you are going to love this craft!!  I am going to show you how to make a Hearts Friendship Bracelet.  And, don’t worry….. I’m not going to show you a few steps and then send you off on your own.  No way…. I am going to show you every little step from the very beginning all the way to the point where you have mastered this heart friendship bracelet.  So, let’s get started.

Check out our V Shaped Arrows Friendship Bracelet and our other Friendship Bracelets


How to Make a Hearts Friendship Bracelet


Materials Needed

Embroidery Floss (preferred) or Yarn

Scissors

Optional – Cardboard

Optional – Doll Pins or Sewing Pins


Step 1

Measuring the Embroidery Thread for your Bracelets


Measuring the Embroidery Thread for your Bracelets


To measure the lengths of your threads, take a piece and hold it from your hand to your shoulder. This is one arm’s length of thread. However, you need 2 arms lengths for each thread, so just use the first arms length of thread to measure out a 2nd arms length. Look at the picture above to see how I folded the string over to get the 2nd arms length. Use this first string to measure out 3 more strings. You need 4 different colors for this bracelet.


Step 2


Find 2 different colors of strings.


Find 2 different colors of strings. You will need 2 threads from each color … each 2 arms lengths long. Put them each end to end and then smooth them out.


Step 3


Now fold the threads in half


Now fold the threads in half like in the picture above.


Step 4


We are now going to make a loop at the end to make a clasp type feature to tie the bracelet together


We are now going to make a loop at the end to make a clasp type feature to tie the bracelet together after it is done. Do this by holding the top of the string in a loop and then holding a bit down with your other hand, but keeping your index finger out. Then take the loop-holding hand and wrap the string around your index finger of the other hand.


Step 5


with the index finger hand, pinch the circle that was just created on the index finger


Now, with the index finger hand, pinch the circle that was just created on the index finger… pinch it where the threads cross.


Step 6


Now slip the circle off of the index finger.


Now slip the circle off of the index finger.


Step 7


Pull the loop through the pinched circle.


Pull the loop through the pinched circle.


This is what it looks like with a real picture.


This is what it looks like with a real picture.


Step 8

***TIP – THE WAY THAT IS EASIEST TO WORK***


The way it is easiest to work.


Before we start making our friendship bracelet, let me show you the way that I worked on this. I took a cut-out piece of cardboard, 2 pins, and a clip, and put them together like in the picture above. I took the clip and hooked it on the loop…to hold it down. I took the 2 pins to keep strings out of the way while I worked. It worked out AMAZINGLY. I wish I had done this when I was a child, I used to work with just tape and this works so much better.


Step 9


You should have 8 strings hanging out from the bottom of the loop. Spread them out like I did above


Okay, now lets start. You should have 8 strings hanging out from the bottom of the loop. Spread them out like I did above…like in a mirror image. In this project, we will call the strings on the left, the left strings. We will call the strings on the right, the right strings. It might help you to take some crayons or colored pencils and map out your colors on paper…just the way that I did above, so you don’t get confused.


Step 10


Now we will start on the left side strings.


Now we will start on the left side strings. Put the right-side strings up on the pin to get them out of the way. On the left side strings, we will go from left to right….so the pink string (string #1) will be the knotting string…in other words, the string that we will be making knots with. Form a letter ‘L’ with the pink string…as pictured above.


Step 11


Now tuck the pink #1 string under the pink #2 string and into gap between these 2 strings.


Now tuck the pink #1 string under the pink #2 string and into gap between these 2 strings. You are making a knot. Think of the way that you tie a knot on your shoe lace, however in this case, always make sure the knotting string (Pink #1) goes over and then under the string you are knotting over (Pink #2) before pulling.


Step 12


Now pull the pink #1 string up until a beautiful pink knot is made.


Now pull the pink #1 string up until a beautiful pink knot is made. Make sure to hold the pink #2 string down, so the other strings don’t get in the way while pulling.


Step 13


You can see your first knot in the picture above.


You can see your first knot in the picture above. Do the same exact thing over again to make a double knot.


Step 14


Now we will knot the pink #1 string over the blue #3 string since it is next in line.


Notice that you made 2 pink knots on the top of the pink #2 string. Notice that the pink #1 string is now in place #2. Now we will knot the pink #1 string over the blue #3 string since it is next in line.


Step 15


Knot the pink #1 string over the blue #3 string twice to make a double knot.


Knot the pink #1 string over the blue #3 string twice to make a double knot.


Step 16


Now we will knot pink #1 over blue #4 thread since it is next in line.


Now you can see that there are 2 pink knots on the blue #3 thread. Now we will knot pink #1 over blue #4 thread since it is next in line.


Step 17


Make the 2 knots over blue #4.


Make the 2 knots over blue #4.


Step 18


Now you can see the 2 pink knots on top of the blue #4.


Now you can see the 2 pink knots on top of the blue #4. You can now see that pink #1 is now in the fourth place.


Step 19


Now take all of the left-side strings and put them on the left pin to get them out of the way.


Now take all of the left-side strings and put them on the left pin to get them out of the way. Fan out the right-side strings in the correct order…in the mirror image that you created in step #9 of this tutorial.


Step 20


We will now be working on the right side strings.


We will now be working on the right side strings. We will be knotting pink string #1 (just like we did on the right). However, since we are working on the right side, when we make the letter L shape with the knotting thread (pink #1), the Letter L will be backwards…so just keep that in mind.


Step 21


Tuck string pink #1 under pink #2 and into gap between both strings


Tuck string pink #1 under pink #2 and into gap between both strings, because you are making a knot just like you did on the left side strings.


Step 22


Now pull thread pink #1 up until a knot is made, while holding pink #2 down.


Now pull thread pink #1 up until a knot is made, while holding pink #2 down.


Step 23


you made your first knot on the right side.


See, you made your first knot on the right side. Now make another knot to make a double knot.


Step 24


make a double knot with pink #1 over pink #2, blue #3, and blue #4 until pink #1 is all the way to the far left.


Now make a double knot with pink #1 over pink #2, blue #3, and blue #4 until pink #1 is all the way to the far left. This is just like you did on the left strings, but we are doing it on the right in the opposite direction(like in a mirror).


Step 25


we have to knot the 2 pink #1 strings together in the middle to make a ‘v’ shape.


Now we are done with the right side and we have to knot the 2 pink #1 strings together in the middle to make a ‘v’ shape. So Take pink #1 string off of the left side pin. Then you will have 2 pink threads on the left (see pic). You will now double knot pink Right #1 over Pink Left #1.


Step 26


In the pic above, on the left, I show you the double knot process of the 2 pink strings. On the right, I show you the Letter 'V' shape that has been made.


In the pic above, on the left, I show you the double knot process of the 2 pink strings. On the right, I show you the Letter ‘V’ shape that has been made.


Step 27


double knot pink #2 over blue #3 thread.


Now you will be putting all of the right side threads up on the pin and take down the left side threads to spread them out. We will now use pink #2 as the knotting string. So double knot pink #2 over blue #3 thread.


Step 28


Notice that the pink #2 string has moved to the 2nd spot.


As you see, you have made 2 pink knots on the blue #3 string. Notice that the pink #2 string has moved to the 2nd spot.


Step 29


We will be starting to make the blue heart now


This is where things get a little bit more confusing. We will be starting to make the blue heart now. Take string blue #4 and knot it over the pink #1 string (by making a backwards letter L shape) to make 2 blue knots.


Step 30


Now you can see 2 blue knots on top of pink string #1.


Now you can see 2 blue knots on top of pink string #1.


Step 31


Now we will be knotting blue #4 over pink #2 to make 2 more blue knots.


Now we will be knotting blue #4 over pink #2 to make 2 more blue knots.


Step 32


we will place all of the left side strings back on to the pin.


Now we will place all of the left side strings back on to the pin. We will be doing on the right side, what we just did on the left side.


Step 33


Double knot pink #2 over Blue #3.


Fan out the right side threads. Double knot pink #2 over Blue #3.


Step 34


Now double knot blue #4 thread back over pink #1 thread to make 2 blue knots.


Now double knot blue #4 thread back over pink #1 thread to make 2 blue knots.


Step 35


Now double knot blue #4 over pink #2 thread to make 2 more blue knots.


Now double knot blue #4 over pink #2 thread to make 2 more blue knots.


Step 36


we will be double knotting Right Blue #4 over Left Blue #4 Thread.


Now take the Left blue #4 thread off of the left side pin. Now we will be double knotting Right Blue #4 over Left Blue #4 Thread.


Step 37


Now place the right side strings on the pin and fan out the left sided pins.


Now place the right side strings on the pin and fan out the left sided pins.


Step 38


Now double knot blue #3 over pink #1.


We are working on the left strings now again. Now double knot blue #3 over pink #1.


Step 39


Double knot blue #3 over pink #2 and blue #4.


We know how to do this now, so I won’t baby you as much now. Double knot blue #3 over pink #2 and blue #4. You are now done with the left side again.


Step 40


Put left side threads up on pin.


Put left side threads up on pin. Take down right side strings and fan them out. Now double knot blue #3 over pink #1.


Step 41


Double knot blue #3 over pink #2 and blue #4.


Double knot blue #3 over pink #2 and blue #4. You are now done with the right side and it is time to tie the blue #3 threads together.


Step 42


Take the left side blue #3 off of the left side pin.


Take the left side blue #3 off of the left side pin. Then double knot Right blue #3 over Left blue #3.


Step 43


You made a heart shape.


Hooray! You made a heart shape. You went thru the pattern one full time now.


Step 44


You should repeat the pattern until you are done with the bracelet.


You should repeat the pattern until you are done with the bracelet. However, I will go thru part of the process quickly again. Put your right-sided threads up on the pin and take down the left threads. Double knot pink #1 over pink #2, blue #3, and blue #4. Pink #1 will now be on the far right.


Step 45


Now put the left strings on the pin and take the right strings down.


Now put the left strings on the pin and take the right strings down. Double knot pink #1 over pink #2, blue #3, and blue #4. Pink #1 will now be on the far left.


Step 46


You will now go to Step 27 and continue over and over again


You will now go to Step 27 and continue over and over again until you have a bracelet long enough to cover your friend’s wrist.


Finished illustrated hearts friendship bracelet


Finished hearts friendship bracelet


How did your Hearts Friendship Bracelet turn out?  Any friend would be proud to wear a bracelet like this.  Now, the real issue…. which friend are you going to give it to???   Hmmmmm…..

Technorati Tags: , , , , , , , , , , , ,

How to Make Woven Paper Bracelets

If you love making bracelets, but you are sick of making the same old bracelets all the time…. then I have the bracelet craft for you.  I am going to show you how to make woven paper bracelets that you can make for yourself or share with friends.  And, don’t worry… they are stronger than you might think.  These paper bracelets are woven with many, many different folds causing the bracelets to be quite strong.  So, let’s get started.

Check out our other Bracelet Crafts and Jewelry Crafts.


How to Make Woven Paper Bracelets


Materials Needed

2 Different Color Sheets of Paper

Tape or Glue

Ribbon

Scissors


Step 1


Cut 4 strips of paper that are about 10 inches long and a 1/4 inch wide


Cut 4 strips of paper that are about 10 inches long and a 1/4 inch wide… we used two different colors.


Step 2


Tape or glue 2 strips end to end twice


Tape or glue 2 strips end to end twice…. making the strips 20 inches long.


Step 3


Place one strip horizontal and the other in a letter 'V' around the first strip.


Place one strip horizontal and the other in a letter ‘V’ around the first strip.  Number them 1, 2, 3 and 4.


Step 4


Fold #4 over #3, so it is parallel with #2.


Fold #4 over #3, so it is parallel with #2.  (Like a number 11)


Step 5


Fold #1 behind #2 so it is parallel with #3.


Fold #1 behind #2 so it is parallel with #3.


Step 6


Now, push #1 in front of #4.


Now, push #1 in front of #4.


Step 7


Now, fold #3 over #1 so it is parallel with #2 and #4.


Now, fold #3 over #1 so it is parallel with #2 and #4.


Step 8


Now, fold #2 behind #4 and over #3 so it is parallel with #1.


Now, fold #2 behind #4 and over #3 so it is parallel with #1.


Step 9


Push #1 in front of #4.


Push #1 in front of #4.


Step 10


Fold #3 over #1 so it is parallel with #2 and #4.


Fold #3 over #1 so it is parallel with #2 and #4.


Step 11


Fold #2 behind #4 and over #3 so it is parallel with #1.


Fold #2 behind #4 and over #3 so it is parallel with #1.


Step 12


Fold #1 over #2.


Fold #1 over #2.


Step 13


Fold #4 under #3 and over #1.


Fold #4 under #3 and over #1.


Step 14


Continue this process until there is no more paper


Continue this process until there is no more paper, then… tape loose end together.


Step 15


Put ribbon through spaces to tie bracelet together.


Put ribbon through spaces to tie bracelet together.

Wow, doesn’t it look beautiful?!  Now, the question is…. are you going to keep it for yourself or give it to a friend?  Hmmmmm…. what are you going to do?

Technorati Tags: , , , , , , , ,

How to Make a Springy Paper Bracelet

I have a fun bracelet craft for you…. and the only materials you need for it can be found in your home.  I am going to show you how to make a springy paper bracelet made from colorful paper.  And, don’t think just because this bracelet is made out of paper that it is weak.  On the contrary, it is very strong.  The bracelet is made up of many, many folds in the paper making it very strong.  So, let’s get started.

Check out our other Bracelet Crafts and Jewelry Crafts.


How to Make a Springy Paper Bracelet


Materials Needed

2 Different Color Sheets of Paper

Glue or Tape

Scissors


Step 1


Cut 4 slits of paper from each color paper.


Cut 4 slits of paper from each color paper.  If you are using longer sheets of paper then just cut 3 slits of paper from each color paper.


Step 2


Glue or tape strips together end to end.


Glue or tape strips together end to end.


Step 3


Now, take the 2 different color strips of paper and glue or tape together at a 90 degree angle... like a letter "L".


Now, take the 2 different color strips of paper and glue or tape together at a 90 degree angle… like a letter “L”.


Step 4


Pull strip #1 over strip #2 and fold it over.


Pull strip #1 over strip #2 and fold it over.


Step 5


Now orange (#1) is folded over blue (#2).


Now orange (#1) is folded over blue (#2).


Step 6


Pull blue (#2) and fold #2 over orange (#1).


Pull blue (#2) and fold #2 over orange (#1).


Step 7


Now, blue (#2) is folded over orange (#1).


Now, blue (#2) is folded over orange (#1).


Step 8


Fold orange over blue (1 over 2).


Fold orange over blue (1 over 2).


Step 9


This is what it should look like with orange (#1) folded over blue (#2).


This is what it should look like with orange (#1) folded over blue (#2).


Step 10


Fold blue over orange (#2 over #1).


Fold blue over orange (#2 over #1).


Finished springy paper bracelet


Continue folding the bracelet in this way until it is the desired length you want.  Cut and either glue or tape.  That’s it.  You have a springy paper bracelet.  You can even make a necklace by making a longer one.  Keep it for yourself or give it to a friend.  They’ll love it.


Technorati Tags: , , , , , , , , , ,

How to Make Cardboard Beading Looms

I’m going to show you a great way to make beautiful beaded bracelets on your own.  We are going to make our very own Cardboard Beading Loom perfect for making awesome bracelets.  Do you have any idea who your first handmade beaded bracelet will go to?  How about your very best friend…. she’d love it!!

You Might Enjoy Our Other Friendship Bracelets Crafts Too


How to Make Cardboard Beading Looms


Materials Needed

Wide Box

Needle

Ruler

Pencil or Pen

Thread or Dental Floss

Scissors

Beads (Usually Perler Beads)


Materials Needed


Step 1


On both short sides of the box... mark off every quarter inch.


On both short sides of the box… mark off every quarter inch.


Step 2


Now cut the marks that you penciled off in the last step.


Now cut the marks that you penciled off in the last step.


Step 3


Push thread or floss into one of the notches that you cut.


Push thread or floss into one of the notches that you cut.  Then wrap it around to the next notch and push it into that one.  Then continue to wrap the floss around these 2 notches a few times to secure the floss to the box.


Step 4


Now pull the floss over to the notch that lies opposite to it on the other side of the box.


Now pull the floss over to the notch that lies opposite to it on the other side of the box.  Push the floss down into that notch so that the floss is taut (tightly secured).


Step 5


Now do this over and over again until you have the number of rows that you want.


Now do this over and over again until you have the number of rows that you want.  If you want your beaded bracelet or beaded creation to have 5 rows… then you need 6 strings… if you want 4 rows… then you need 5 strings across… etc.


Step 6


Then to make sure that the strings stay taut and secured, you will need to wrap the thread or floss around the next notch


Then to make sure that the strings stay taut and secured, you will need to wrap the thread or floss around the next notch, directly to the right of the last string… like you did on the first notch.


Step 7


With a second piece of thread or floss... you should thread a needle.


With a second piece of thread or floss… you should thread a needle.  Make sure the needle fits thru your beads before you use it… I learned that they hard way.


Step 8


Make sure that this 2nd string is at least 2 arms length... and then cut it off the spool.


Make sure that this 2nd string is at least 2 arms length… and then cut it off the spool.  Then tie it to the first string on the loom.  See how I tied it very close to the edge of the box?!  DON’T DO THIS.  This leaves no room for you to tie a clasp or knot on it.   TIE THE KNOT FURTHER DOWN THAN I DID.


Step 9


Since I have 4 strings... I can have 3 rows of beads.  So, place 3 beads onto your needle.


Since I have 4 strings… I can have 3 rows of beads.  So, place 3 beads onto your needle.


Step 10


Now pull the needle and beads under ALL of the strings.


Now pull the needle and beads under ALL of the strings.  Pull the needle thru beads so that the beads are now ON the string.


Step 11


Now push each between in between 2 strings and then push your fingers below the beads and strings ... pushing the beads up.


Now push each between in between 2 strings and then push your fingers below the beads and strings … pushing the beads up.  Then push the needle thru all the beads and pull thru.  The first row is the hardest row… so don’t get frustrated… because the rest of the rows will be much easier.  I didn’t get a good picture of this with the little beads so I am showing you this with bigger beads.


Step 12


Pull the thread thru and you have your first row.


Pull the thread thru and you have your first row.


Step 13


Again... put beads on the needle... Push it under ALL the threads.


Again… put beads on the needle… Push it under ALL the threads.  Pull all beads onto the thread and then push all beads in between 2 threads…which will be MUCH easier this time than the 1st time.


Step 14


Push the beads up with your fingers... then push the needle thru the beads.


Push the beads up with your fingers… then push the needle thru the beads.


Step 15


Continue doing this until it looks big enough.


Continue doing this until it looks big enough.


Step 16


Cut the floss at both ends.


Cut the floss at both ends.

Step 17


Tie a knot.


Tie a knot.


Step 18


Tie a knot.


Tie it around your friend’s wrist.

You just finished your first beautiful bracelet with your Cardboard Beading Loom.  Wasn’t it a lot of fun?  Now the only thing left to do is  find the perfect friend to give it to.  Or, keep it for yourself.

You Might Enjoy Our Other Friendship Bracelets Crafts Too

Technorati Tags: , , , , , , , , , , , , ,

Make Autographed Friends Necklaces or Bracelets on Last Day of School or Camp

School is going to be over soon and you’ll be parted from your friends until Autumn comes again. Wouldn’t be nice to keep them with you during the entire Summer? Laura from Dacian Moon Handmade will show you how 🙂 You can get your friend’s autographs and wear them around your arm or neck all Summer along with a bracelet or necklace craft.


How to Make Autographed Friends Necklaces on Last Day of School or Camp


How to Make Autographed Friends Necklaces on Last Day of School or Camp

CRAFTS MATERIALS NEEDED:

– orange paper
– yellow paper
– scissors
– string and needles
– red crystals
– line
– colored pens


Step 1.

Trace 6 parallel lines on the papers at 1 cm.


Cut them out, so you’ll have 6 orange strips of paper and 6 yellow.


Step 2.

Take a strip of paper. Start at one end and make a hoop around the other end. Take care that one of the ends to be short.


Slip through your short end into the hoop …


… and pull, but not too hard.


Turn it  and fold the short end inside.


Turn it over again.


Now you must wrap around the pentagon…


… following the red arrow…


… like this.


And again, on the dotted line, following the red arrow,


And again…


… until is just a small piece left.


Now, you’re going to tuck that little left over tail into the body of the star.


If is too long – as in my case – you can cut it with your scissors.


That’s the star.


Step 3.

It’s time to puff it 😀

Using your nail or a sharp edge, press in, half-way between two points. Make sure you are totally perpendicular to the paper.


The first star is ready.


Make stars from the other paper strips too.


Step 4.

Take the string and make a knot at 10 cm from the end. This will let you tie the necklace when is ready.


Step 5.

Let’s start to assemble the necklace. Start with a crystal – use the needle to add it…


… then add an orange star…


… a crystal, an yellow star and so on.


Step 6.

It’s almost ready. Take care to finish with a crystal and make a knot near it.


Step 7.

Now it’s fun. Ask your friends to write their name on the stars.


That way you’ll have them with you all the summer 😉


Technorati Tags: , , , , , , , , , , , ,

How to Make V Shaped Arrows Friendship Bracelets Illustrated Instructions

Today I will show you how to make this amazing friendship bracelet that has a letter ‘v’ pattern within it. This bracelet pattern is a bit more difficult than normal friendship bracelet instructions, so you will need a free afternoon to make this one. If you are still interested, find the illustrated instructions below.

You Might Enjoy Our Other Friendship Bracelets Crafts Too


How to Make V Shaped Arrows Friendship Bracelets Illustrated Instructions


How to Make V Shaped Arrows Friendship Bracelets Illustrated Instructions

Crafts Materials Needed

– Embroidery Floss (preferred) or Yarn
– Scissors
– Optional – Cardboard
– Optional – Doll Pins or Sewing Pins

Measuring the Embroidery Thread for your Bracelets


Step 1 : Making Flat Wide Friendship Bracelets Craft for Girls


To measure the lengths of your threads, take a piece and hold it from your hand to your shoulder. This is one arm’s length of thread. However, you need 2 arms lengths for each thread, so just use the first arms length of thread to measure out a 2nd arms length. Look at the picture above to see how I folded the string over to get the 2nd arms length.

Use this first string to measure out 3 more strings. You need 4 different colors for this bracelet.

Step 2


Step 2 : Making Flat Wide Friendship Bracelets Craft for Girls


Find 4 different colors of strings…each 2 arms lengths. Put them each end to end and then smooth them out.


Step 3


Step 3 : Making Flat Wide Friendship Bracelets Craft for Girls


Now fold the threads in half like in the picture above.

Step 4


Step 4 : Making Flat Wide Friendship Bracelets Craft for Girls


We are now going to make a loop at the end to make a clasp type feature to tie the bracelet together after it is done.

Do this by holding the top of the string in a loop and then holding a bit down with your other hand, but keeping your index finger out.

Then take the loop-holding hand and wrap the string around your index finger of the other hand.

Step 5


Step 5 : Making Flat Wide Friendship Bracelets Craft for Girls


Now, with the index finger hand, pinch the circle that was just created on the index finger….pinch it where the threads cross.

Step 6


Step 6 : Making Flat Wide Friendship Bracelets Craft for Girls


Now slip the circle off of the index finger.

Step 7


Step 7 : Making Flat Wide Friendship Bracelets Craft for Girls


Pull the loop through the pinched circle.


What my loop looks like


This is what my loop looks like.

The Way That is Easiest to Work


Before we start making our friendship bracelet, let me show you the way that I worked on this. I took a cut-out piece of cardboard, 2 pins, and a clip, and put them together like in the picture above. I took the clip and hooked it on the loop…to hold it down. I took the 2 pins to keep strings out of the way while I worked. It worked out AMAZINGLY. I wish I had done this when I was a child, I used to work with just tape and this works so much better.

Step 9


Step 8 : Making Flat Wide Friendship Bracelets Craft for Girls


Okay, now lets start. You should have 8 strings hanging out from the bottom of the loop. Spread them out like I did above…like in a mirror image.

In this project, we will call the strings on the left, the left strings. We will call the strings on the right, the right strings.

It might help you to take some crayons or colored pencils and map out your colors on paper…just the way that I did above, so you don’t get confused.

Step 10


Step 9 : Making Flat Wide Friendship Bracelets Craft for Girls


Now we will start on the left side strings. Put the right-side strings up on the pin to get them out of the way.

On the left side strings, we will go from left to right….so the blue string (string #1) will be the knotting string…in other words, the string that we will be making knots with.

Form a letter ‘L’ with the blue string…as pictured above.

Step 11


Step 10 : Making Flat Wide Friendship Bracelets Craft for Girls


Now tuck the blue string under the yellow string and into gap between blue and yellow string. You are making a knot, think of the way that you tie a knot on your show lace, however in this case, always make sure the knotting string (blue) goes over and then under the string you are knotting over (yellow) before pulling.

Step 12


Step 11 : How to Make V Shaped Arrowhead Bracelets


Now pull the blue string up until a beautiful blue knot is made. Make sure to hold the yellow string down, and that not other strings get in the way while pulling.

Step 13


Step 12 : How to Make V Shaped Arrowhead Bracelets


Do the same exact thing over again to make a double knot.

Step 14


Step 13 : How to Make V Shaped Arrowhead Bracelets


Notice that you made 2 blue knots on the top of the yellow string.

Notice that the blue string is now in place #2.

Now we will knot the blue string over the pink string.

Step 15


Step 14 : How to Make V Shaped Arrowhead Bracelets


Knot the blue string over the pink string twice to make a double knot.

Step 16


Step 15 : How to Make V Shaped Arrowhead Bracelets


Now this is what your friendship bracelet will look like now.

Step 17


Step 16 : How to Make V Shaped Arrowhead Bracelets


Now double knot the blue string over the orange string.

Step 18


Step 17 : How to Make V Shaped Arrowhead Bracelets


Now this is what your friendship bracelet will look like. You are now done with the left-side strings…for now.

Step 19


Step 18 : How to Make V Shaped Arrowhead Bracelets


Now take all of the left-side strings and put them on the left pin to get them out of the way.

Fan out the right-side strings in the correct order…in the mirror image that you created in step #9 of this tutorial.

Step 20


Now we are making knots with the blue string on the right side.

This time, we are going from right to left.

Form a backwards letter ‘L’ with the blue string over the yellow string.

Step 21


Pull the blue string up over the yellow string, under it and through the gap between the 2 strings. Pull it up and make a blue knot. Do this a second time to make a double knot.

Step 22


Next we will pull the blue string over the pink string and make 2 blue knots over the pink string.

Step 23


Here I show you the process of making the blue knots over the pink string.

Step 24


This is what your bracelet looks like now.

Step 25


Lets now make the blue knots over the orange string.

Step 26


This is what your strings look like now. You are now done on the right (typo on the picture above where it says left).

Step 27


Step 19 : How to Make V Shaped Arrowhead Bracelets


Now we are done with the right side and we have to knot the 2 blue strings together in the middle to make the ‘v’ shape.

Step 28


Step 20 : How to Make V Shaped Arrowhead Bracelets


Double knot the 2 blue strings together.


Step 21 : How to Make Friendship Bracelets Tutorial with Pictures


This is what your letter ‘v’ shaped arrow shape looks like.

Step 29


Step 22 : How to Make Friendship Bracelets Tutorial with Pictures


Now lets start all over again but with the yellow string as the knotting string.

Knot over the pink, orange, and blue strings on the left-strings side.


Step 23 : How to Make Friendship Bracelets Tutorial with Pictures


Knot over the pink, orange, and blue strings on the left-strings side. This is what it should look like.

Step 30


Step 24 : How to Make Friendship Bracelets Tutorial with Pictures


Now put the left-side strings over the pin to get them out of the way.

Now fan out the strings on the right side. We will now double knot the yellow string over the pink, orange, and blue strings on the right side.

Step 31


Step 25 : How to Make Friendship Bracelets Tutorial with Pictures


After we have done all the right-side knotting, take the yellow string down off the left-side pin and then double knot the right-side yellow string over the left-side yellow string.

Step 32


Step 26 : How to Make Friendship Bracelets Tutorial with Pictures


Now put the right side strings back on the pin.

Fan out the left side strings…and then double knot the pink strings over the orange, blue, and yellow strings. Then put all of these strings back on the pin.

Take the right side strings down off of the pin and fan them out. Then double knot the pink strings over all of the strings.

Then double knot the 2  pink strings together in the center.

Step 33


Step 27 : How to Make Friendship Bracelets Tutorial with Pictures


Do the same thing with the orange strings.

Step 29


Step 28 : How to Make Friendship Bracelets Tutorial with Pictures


Now this is what your string will look like with all four colors done once.

Now just repeat again and again and again until you are sick of it.

Finished Bracelet


How to Make V Shaped Arrows Friendship Bracelets Illustrated Instructions


When you have gotten enough done to cover most of the front of the bracelet. You can then…braid the left side of the strings….the braid the right side of the strings … so you have only 2 strings now. Then you can tie the 2 strings around the loop for a closed clasped- bracelet.

I hope that you enjoyed this craft!!

You Might Enjoy Our Other Friendship Bracelets Crafts Too

Technorati Tags: , , , , , , , , , , , , , ,

How to Make Friendship Bracelets Easy Step by Step Tutorial for Kids

Friendship bracelets were very popular when I was a little girl, and they are making a big come back. Our friendship bracelets resource page is our most popular page on our site, so I would say that they have come back to be a very popular arts and crafts activity. The best part is that these are super cheap to make…all you need is yarn or string, scissors, and tape. Give one to your best friends and they are supposed to return the favor. It is fun to see how many bracelets you can get back from your friends. Try it out.

You Might Enjoy Our Other Friendship Bracelets Crafts Too


How to Make Friendship Bracelets Easy Step by Step Tutorial for Kids


How to Make Friendship Bracelets Easy Step by Step Tutorial for Kids

Crafts Materials Needed

Step 1


Step 1 : Making Double Knotted Friendship Bracelets Instructions


Step 2


Step 2 : Making Double Knotted Friendship Bracelets Instructions


Step 3


Step 3 : Making Double Knotted Friendship Bracelets Instructions


Step 4


Step 4 : Making Double Knotted Friendship Bracelets Instructions


Step 5


Step 5 : Making Double Knotted Friendship Bracelets Instructions


Step 6


Step 6 : Making Double Knotted Friendship Bracelets Instructions


Step 7


Step 7 : Making Double Knotted Friendship Bracelets Instructions


Step 8


Step 8 : Making Double Knotted Friendship Bracelets Instructions


Step 9


Step 9 : Making Double Knotted Friendship Bracelets Instructions


Step 10


Step 10 : Making Double Knotted Friendship Bracelets Instructions


Step 11


Step 11 : Making Double Knotted Friendship Bracelets Instructions


Step 12


Step 12 : Making Double Knotted Friendship Bracelets Instructions


Step 13


Step 13 : Making Double Knotted Friendship Bracelets Instructions


Step 14


Step 14 : Making Double Knotted Friendship Bracelets Instructions


Step 15


Step 15 : Making Double Knotted Friendship Bracelets Instructions


Step 16


Step 16 : Making Double Knotted Friendship Bracelets Instructions


Step 17


How to Make Friendship Bracelets Easy Step by Step Tutorial for Kids


This is what the finished friendship bracelet should look like. To finish up, just put it around your friend’s wrist, and then tie it loosely around your friend’s wrist.

You can make more advanced friendship bracelets by adding more strings and using the same exact process as you did with 3 strings. You can also try using 2 knots for one color, 5 knots for another, and 1 knot for the 3rd color (and other variations) to make some cool looking patterns. You would have to vary the lengths of the strings to do this (the more knots that you want to make with a string, the longer it would have to bet).

You Might Enjoy Our Other Friendship Bracelets Crafts Too

Technorati Tags: , , , , , , , , , ,