How to Make an Autumn Brooch or Pin to Wear to Celebrate the Fall Season or Thanksgiving

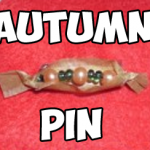
Learn how to make a cute little brooch to wear during Fall or you can even wear it on Thanksgiving day 🙂 You can even make one for all of your guests. 🙂 This step by step tutorial is offered by Laura from Dacian Moon Handmade

How to Make an Autumn Brooch or Pin to Wear to Celebrate the Fall Season


How to Make an Autumn Brooch or Pin to Wear to Celebrate the Fall Season


CRAFTS MATERIALS NEEDED:

– a piece of baking paper
– orange  / red beads
– green beads
– scissors
– a small piece of wire
– brooch base


Step 1.

Put wire through the paper at about 0.8 cm from one end…


… like this.


Step 2.

Put beads on the wire…


… making a pattern, like this.


Step 3.

Insert the other end of the wire through the paper so that the beaded part sits right.


Like this.


Cut the paper around the beads, like this.


Step 4.

Bend ends of wire to fit through the holes of the brooch base.


Tie them and cut the extra wire…


Like this.


Step 5.

Bend up the paper, besides beads…


… then twist one end…


… and the other. Your brooch is done 🙂

I hope that you enjoyed this Autumn craft and that it turned out as beautiful as you hoped it would. Come back soon for more crafts.

Technorati Tags: , , , , , , ,

How to Make a Steampunk USB Memory Stick Pendant

Here is a Back to School craft that you can work on in the next few weeks. 
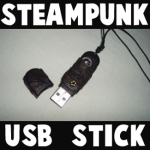
Learn how to take a normal USB memory stick and decorate it with paint and random objects…turn it into a Steampunk masterpiece.You can then wear it around your neck as a special pendant necklace. Laura from Dacian Moon Handmade  will show you today how to make this cool and useful pendant.


How to Make a Steampunk USB Memory Stick Pendant


CRAFTS MATERIALS NEEDED:

– USB memory stick
– black paint
– silver metallic paint
– bronze powder
– instant glue
– a piece of thin fabric for texture (I use tulle)
– a little wheel
– bronze bead – I use a little stylized flower
– scissors
– paintbrush
– toothpick (useful to put little pieces in place)


IMG_5462


Step 1.

First of all, remember that you don’t have to do everything we do…just use our tutorial as a guide. You won’t have the same exact materials as us…but just be creative.

Paint the stick in black.


IMG_5465


Like this. Let it dry.


IMG_5466


Step 2.

Cut a piece of fabric…


IMG_5467


… and wrap it around the stick so as to form creases.


IMG_5468


Apply some glue to fix it in place.


IMG_5469


Like this.


IMG_5470


Add the decorations among the creases. Glue them in place.


IMG_5471


Add glue on every edge to fix the fabric.


IMG_5472


Let it dry.


IMG_5474


Do the same for the cover. It will look like this.


IMG_5478


Step 3.

Use your paintbrush to paint the fabric in black. Also paint where the glue reached and bleached the paint.


IMG_5479


Like this.


IMG_5481


Prior it dry out, add a little bronze powder …


IMG_5484


… with your paintbrush.


IMG_5486


Like this.


IMG_5487


Let it dry well.


IMG_5485


Step 4.

Use the silver paint to add a metallic patina on some elements, especially the wheel.


IMG_5488


Like this.


IMG_5490


Also, add a bit of bronze powder on it, to keep the atmosphere.


IMG_5491


Let it dry completely.


IMG_5526


Step 5.

Put the cord through the hole on upper part of the stick…


IMG_5529


And make a knot. Now you can wear it as a pendant or key chain accessory.


IMG_5532


How to Make Pencil Pendants or Necklaces for Back to School

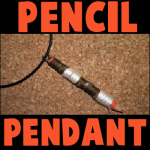
August is here and school is drawing nearer. This is a great Back-To-School Craft … make a cute pendant with a pencil that can still be used. Laura from Dacian Moon Handmade will show you, step by step, how to make it.

How to Make Pencil Pendants or Necklaces for Back to School


How to Make Pencil Pendants or Necklaces for Back to School


CRAFTS MATERIALS NEEDED:

– pencil
– glue
– scissors
– white thick thread
– khaki thick thread


Step 1.

Apply a good layer of glue on the pencil (not on the sharpened part)


Step 2.

Begin to cover the bottom of the pencil, wrapping around it the white thread.


Let the center uncovered and make another white part near the other end.


Step 3.

If the glue on the uncovered part is already dry, add another layer. Glue the end of the khaki thread beside the  white thread, and begin to cover the other parts.


The middle one…


… and the upper one (you will go with a khaki thread over the white for that). When you reach the top, make a loop of khaki thread and put glue on it to set it on top of the pendant…


… like this.

Now you can wear it on a chain or cord and, if you forget your pencils… you can use it 😉


Technorati Tags: , , , , , , ,

How to Make a Pair of Party Earrings for New Years

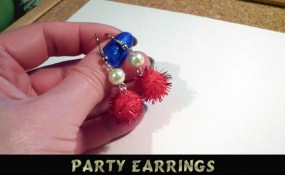
New Years is just around the corner and before New Years  the New Years Eve Parties begin.  Why not wear an amazing pair of earrings to this years New Years Eve Parties.  Today I’m going to show you how to do just that…. I’m going to show you how to make a pair of party earrings for New Years.  These New Years earrings have a lot of flash…. perfect for New Years Eve.  And, these earrings don’t have to be just worn on New Years Eve…. they are so beautiful you will want to wear them year round.

Check out our other New Years Crafts and Jewelry Crafts.

Step by step tutorial offered by Laura from Dacian Moon Handmade


party earrings


Materials Needed

– 2 sparkle pom-poms
– 2 glass pearls
– 2 head pins
– 2 eye pins
– 2 earring findings
– 1 flat nose pliers


IMG_3062


Step 1

Take a head pin…


IMG_3063


… and put it through a pom-pom.


IMG_3064


Use the pliers to make a loop…


IMG_3065


… like this.


IMG_3066


Step 2

Take the eye pin…


IMG_3067


… and put a glass pearl on it.


IMG_3068


Cut the extra pin (with your pliers if it has a cutting side. If not, you’ll need a cutting pliers too), then make an open loop.


IMG_3069


Put the earring finding through the loop…


IMG_3070


… and close it. Like this.


IMG_3071


Step 3

Open the eye of the pin…


IMG_3072


… and put it through the loop of the pom-pom.


IMG_3073


Close the pin’s eye and you have an earring.


IMG_3074


Repeat to make the second one. Now is time to shine at the party.


IMG_3077


Aren’t these New Years Earrings beautiful?  I am sure you will get tons of compliments about these earrings…. even well after New Years Eve has passed.

Technorati Tags: , , , , , , , , , , ,

How to Make a Spider Pendant for Halloween

I have a treat for you crafters today….. I’m going to show you how to make a Spider Pendant for Halloween.  Made from jewelry wire and beads this Spider Pendant turns out beautifully.  Make it for yourself or as a gift for someone special…. they will surely love it.  What is awesome about this Spider Pendant is that you can wear it all year long…. not just for Halloween.  It turns out that amazing….. you don’t want to just save it for Halloween.  So, grab the materials needed and let’s get started.

Check out our other Halloween Crafts.

Laura from  Dacian Moon Handmade  will show you, step by step, how to make this Spider Pendant.


How to make Spider Pendants for Halloween


Materials Needed

– black crystal
– red coral (you can use any red bead, just keep in mind it should be bigger than the black one)
– 2 little beads (seed beads)
– one piece of wire (about 3 cm)
– 3 pieces of wire (about 4.5 cm)
– chain
– round nose pliers

NOTE: Wire should be neither too soft nor too hard.


Step 1

Take the small piece of wire…


…and begin making a loop on one end.


Put the 2 seed beads on it…


… and close the loop. These will be the eyes.


Step 2

Add the black crystal…


… and the red coral bead.


Using the pliers make another loop on the other end.


Take care to let about 5mm between the black bead and the red one.


Step 3

Take the 3 pieces of wire…


… and bend them in half, like this.


Continue to press on the ends until it looks like this.


Put the spider body through it, like this…


… and tighten the knot.


Press on the ends again…


… and make another knot, like this.

NOTE: It is not actually a knot. You just wrap the 3 wire around the spider body 2 times.


Step 4

Separate spider legs.


Fold down the first leg almost half (smallest side towards the body)…


… and make a little loop on the end, using the pliers.


Repeat for all the legs…


… and your spider is ready.


Add a chain to it (you can put it through the head – between the eyes) and is ready to be worn.


Ok, how awesome is this Spider Pendant?  It is perfect for the Halloween season…. or really any time of year.  It is that beautiful to wear… wear it all year long.

Technorati Tags: , , , , , , , , , , ,

How to Make Spider Web Bracelets for Halloween

I have a fun girly craft for you today.  In this post I’m going to show you how to make a festive Halloween bracelet that any girl would love to wear this Halloween season.  Made from a recycled soda bottle and some paint this bracelet craft is an easy and fun one.  Plus, you will get a good feeling from recycling an old soda bottle instead of throwing it away.  Isn’t that wonderful?!  So, grab that cleaned out used soda bottle and let’s get this fun craft started.

Check out our other Halloween Crafts.

Laura from  Dacian Moon Handmade  will show you, step by step, how to make this.


How to Make Spider Web Bracelets for Halloween


Materials Needed

– recycled plastic bottle
– black multi-surface paint
– scissors
– nail file


Step 1

Cut the middle part of the recycled plastic bottle (the one without writing or patterns)…


… like this. Now you have the base of the bracelet.


Step 2

Round the edges using nail file.


Step 3

Take the lower part of the bottle…


And put the bracelet around it.   This will help you to paint it.


Step 4

Make a line on the lower part with the black paint.


Then, choose a point somewhere and make some rays around it, like this.


Connect them with curves, like this.


Continue until you have a full spider web.


I added two more smaller cobwebs on one side and the other.


Step 5

Let it dry overnight.


Take it off the bottle…


… and you have the coolest bracelet for this Halloween!


How cool is this bracelet?!  Any girl will love wearing this bracelet for Halloween.  And, I can promise you no one will have one exactly like it.  Enjoy!!

Technorati Tags: , , , , , , , ,

How to Make Paper Strip Belts and Bracelets

In this post I will be showing you how to make a Paper Strip Belt or Bracelet.   The choice is really yours weather you make a belt or a bracelet.  You simply will need to adjust the amount of colored paper you use for the project…. less for the bracelet and more for the belt.  Make a few and give them to your friends or loved ones…. anyone would be sure to enjoy them.  So, grab the materials needed and let’s get started with this fun craft.

Check out our other Friendship Bracelet Instructions.


How to Make Paper Strip Belts and Bracelets


Materials Needed

Thin Colored Paper, Magazine or Cellophane

Cord or Ribbon


Step 1


Thin colored paper, colored magazine pages or cellophane may be used.


Thin colored paper, colored magazine pages or cellophane may be used.  Plan 1 pattern for each inch.


Step 2


Fold on 'A' and 'B' toward 'C'.


Fold on ‘A’ and ‘B’ toward ‘C’.


Step 3


Fold again on 'C'.


Fold again on ‘C’.


Step 4


Fold on center.


Start with about 25 of these.  Fold on center.


Step 5


Fold both ends toward the center.


Fold both ends toward the center.  Completed.


Step 6


Slip one link through the loops of another like a hairpin.


Slip one link through the loops of another like a hairpin.


Step 7


Continue until the length you desire is completed.


Continue until the length you desire is completed.


Step 8


Tie a cord or ribbon on end loops.


Tie a cord or ribbon on end loops.


Completed Paper Link Belt or Bracelet


And, there you go…. you just finished making your Paper Strip Belt or Bracelet.  Wasn’t that fun?  The question I have for you though is…. Did you make a belt or a bracelet?  Let me know in the comments below.  Wear it proudly.

Technorati Tags: , , , , , , , , , , , , , ,

How to make a Tricorn Hat Badge

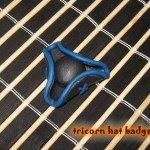
Today I’m going to be showing you how to make a Tricorn Hat Badge.   The Tricorn Hat was a very popular hat in the 18th Century.  The turned-up portions of the brim formed gutters that directed rainwater away from the wearer’s face, depositing most of it over his shoulders.  Well, in this post I’m going to show you had to make this style Hat into a brooch that you can wear.  Because we’ll use oven-hardening polymer clay you’ll need a little help from an adult.

Check out our other Jewelry Pin Crafts.

Laura from Dacian Moon Handmade will show you, step by step how to make this tricorn hat badge.


Materials Needed

– toothpick
– black and blue polymer clay
– roll (you can use anything tubular – I used a vitamins container)
– baking paper
– baking tray
– cutter
– brooch base
– craft glue


Step 1

Cut a piece of black clay.


Condition it by hand, simply mix it and squish it with your fingers. You may want to roll it into a log between your palms, fold it in half, and then roll again.
Finally, make a ball with it.


Step 2

Cut another piece (about the same size as the first).


Condition it too and make another ball.


Place it on a piece of baking paper and flatten it.


Use the roll to flatten it well, until is thin enough.


Like this.


Step 3

Place the ball on the flatten one, in the center.


Step 4

Lift the margins around the ball to form three corners.


Step 5

Take the blue polymer clay…


… and condition it.


Make a roll from it, moving your fingers forward and backward, as in the picture.


Do that until your roll is as thin as the toothpick.


Step 6

Gently, place the blue roll on the edge of the hat, pressing a little bit.


It will look like that.


Cut the extra blue clay…


… and with it make another roll, thinner than the first.


Step 7

Cut the new roll in 6 pieces.


Step 8

Place them two by two into “x’s” on the hat’s sides.


It will look like that.


Step 9

Now you’ll need the help of an adult.
Place the hat (with it’s piece of baking paper) on the baking tray, and bake it according to the instructions on the polymer clay package (they depend on the brand you use: fimo, cernit, sculpey…, but usually it is one half of hour at 230 F or 110 C)


Step 10

Let it cool down.


Step 11

Apply a layer of craft glue on the brooch base…


… place it on the back side of the hat. Let it dry well, and…


… the badge is ready !


And, there you have it…. you just finished making your Tricorn Hat Badge.  How did your badge turn out?  Let me know in the comments below.  And, make sure to take a picture of it too and add it to the comment…. I’d love to see it.  Now, go wear your Tricorn Hat Badge proudly.

Technorati Tags: , , , , , , , , , ,

How To Make a Fresh Flower Bracelet

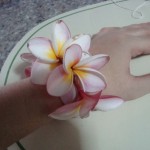
Spring is so close you could almost taste it.  And, with that being said I thought we would celebrate Spring with doing a craft that is totally about flowers.  Today I’m going to show you how to make a Fresh Flower Bracelet.  If you would prefer you could make this into a garland by making the Fresh Flower bracelet even longer.  The choice is yours.  I used the Temple Flower for this craft.  Fresh flowers look best.  So, let’s get started.

Check out our other Spring Crafts.


Materials Needed

8-10 pieces of fresh flowers (per bracelet, more for garland)
string
needle (medium hole)
scissors


Step 1

Clean flowers, make sure bugs or insects are not present. You do not necessarily need to wash them.


Step 2

Place string inside the needle hole and poke it inside the flower, with its petals facing towards you.


Step 3

With the needle point slightly out on the back, gently pull it out and do the same procedure until the desired length.


Step 4

Check length if it is enough to cover the wrist. With a scissors, cut the string.


Step 5

Make a knot to securely tie both ends. Adjust accordingly.

And, your gorgeous Fresh Flower Bracelet is complete.  Doesn’t it look absolutely beautiful…. and if you used fresh flowers like I did it should smell equally lovely.  Enjoy!!

Technorati Tags: , , , , , , , , , ,

How To Make A Two-Tone Paper Bracelet

Today I’m going to show you how to make a Two-Tone Paper Bracelet.  This craft is a whole lot of fun…. it is even more fun if you grab some of your friends and have them make bracelets with you.  You simply need some colored papers of your choosing, a pair of scissors and glue… that’s it.  This bracelet craft is super simple, but trust me you will enjoy making it.  So, grab those craft materials and let’s get started.

Check out our other Jewelry Crafts.


Materials Needed

colored papers, 2 colors
scissors
glue


Step 1

Using the two colored papers you have chosen, cut 4 inch-wide strips each.


Step 2

Glue ends to form 1 long strip for each color.


Step 3

In a 90 degree form, place strips on top of the other and glue.


Step 4

Fold the one strip on top of the other and alternate folding with the other strip. Continue doing so until the whole strip is used. You should come up with somewhat like a springy form.


Step 5

Put on bracelet and let somebody glue ends to lock the bracelet.

And, there you have it…. you just finished your Two-tone Paper Bracelet.  How did it turn out for you?  Let me know in the comments below.  And, take a picture of the bracelet and post that too…. I’d love to see it.

Technorati Tags: , , , , , , , , , , , ,

How to Make a Popcorn Bracelet

I have a super fun and easy craft for you today.  I’m going to show you how to make a Popcorn Bracelet.  This just might be the only jewelry you can make that while you make it you can eat it as well.  Just keep it mind that once you have painted the popcorn you CAN NOT eat it.  But, until the popcorn has been painted it is a tasty treat.  So, grab your friends, a good movie to watch and some popcorn and let’s make this fun craft.

Check out our other Jewelry Crafts.

Tutorial offered by Laura from Dacian Moon Handmade


Materials Needed

– popcorn
– thread and needle
– paints
– paintbrush


Step 1

Paint the popcorn in your favorite colors.


Step 2

Let them dry.


Step 3

Make a knot on one side of the thread, leaving enough extra thread to tie the bracelet.


Step 4

Start placing the popcorn on the thread, using the needle.


It will look like that.


Step 5

After the last popcorn is on the thread, make another knot near it…. and cut the thread (letting again enough extra thread to tie the bracelet).


Now, you have a cute bracelet.


Isn’t that adorable?  And, it was so much fun to make, wasn’t it?    How did your Popcorn Bracelet turn out?  Let me know in the comments below.  And, take a picture of the Popcorn Bracelet and add that to the comment as well… I’d love to see it.

Technorati Tags: , , , , , , , , , , , , ,

How to Make a Crab Ring

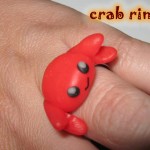
Oh boy…. do I have a fun craft for you right now.  I am going to be showing you how to make a Crab Ring out of Clay.  Yep…. and it’s going to be a lot of fun.  You might need a little bit of adult help as the clay will need to be baked for a little bit to harden the clay.  But, other than that you should be good on your own.  This crab ring will be perfect for you to wear this coming Spring….. or better yet, give it as a gift.  Either way…. this crab ring is sure to be loved.  So, let’s get started.

Check out our other Clay & Sculpting Crafts.

Laura from Dacian Moon Handmade will show you how to make this crab ring.


Materials Needed

– toothpick
– polymer clay : white, black, red – I used transparent red for this project, but any red will do
– acrylic paints (white, black and red/pink)
– metallic ring base
– baking paper
– baking tray


Step 1

Take a small piece of red clay and condition it.

(Condition polymer clay by hand – simply mix it and squish it with your fingers. You may want to roll it into a log between your palms, fold it in half, and then roll again.


Press it well on the back of the base.


This way we will incorporate the base in the clay and we don’t risk breaking it.


Step 2

Take a little bit more than a half of the red clay, condition it …


… and make a ball with it.


Step 3

Place the ball over the base…


… and raise one part. This will be the face.


Take care to merge the sides of the clay from the back of the base with that new ball of clay, to incorporate the base.


Step 4

Let’s make the claws.


Take the remaining red clay and part it in half. Make an oval shape from one half…


… and press on head with your fingers.


On the other head make a crease – you can use the toothpick for that.


Now we have a claw. Place it on the crab body, like in the picture.


Step 5

Repeat the previous step to make the other claw, then place it on the crab body too.


Step 6

Part the small piece of black clay in half.


Condition it and make the eyes from it.


Then add small white circles to the eyes…


… like that.


Step 7

Place the ring on the baking tray, and bake it according to the instructions on the polymer clay package (they depend on the brand you use: fimo, cernit, sculpey…, but usually it is one half of hour at 230 F or 110 C) – this is the part when you could use a little help.

Let it cool down.


Step 8

If you used transparent red clay, like me, you’ll notice that the color has become more alive and intense because of the baking.


Step 9

Use black paint to draw the crab mouth.  Make it cute … or fierce! Just have fun.


And, there you have it…. you just finished making your Crab Ring.  How did it turn out for you?  Let me know in the comments below.  And, take a picture of your crab ring and share that in the comments as well.  I’d love to see it.

Technorati Tags: , , , , , , , , , , , ,

How to Make a Valentines Gift for Her

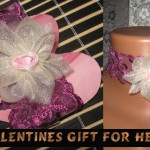
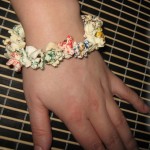
Today I’m going to show you how to make a Valentines Gift for Her.  It is a lace choker and the end result is just simply beautiful.  Any female would love to receive this as a gift.  It is a perfect gift for your Mom, Aunt or even your someone special.  We will even make a cardboard heart that the choker is placed on to make presenting this gift even more lovely.  So, grab the materials needed and let’s get started.

Check out our other Valentines Day Crafts.

Laura from Dacian Moon Handmade will show you how to make this lovely gift.


Materials Needed

– patterned cardboard
– organza (a rectangle of about 10 cm x 10 cm)
– lace (it will be a choker so you can measure to fit your neck )
– satin ribbon
– scissors
– needle and thread
– pencil
– card punch


Step 1

Cut the organza piece in half.


Take one half and fold it in two.


Now, sew the two parts (of the folded half) around the corners…


… like this.


Pull thread to form the petals.


Make a knot to keep it in place.


It will look like this.


Step 2

Repeat the first step to make anther one.


Step 3

Take about 12 cm of the satin ribbon…


And wrap it around your finger…


… like this.


When you reach the end, sew it to keep it in place.


Step 4

Put the satin part through the middle of one piece with petals and sew it there.


Like this.


Add the second part with petals…


And sew it.


Now the flower is ready.


Step 5

Take the lace…


… and find its middle.


Sew the flower there …


… like this.


Step 6

Cut the remaining satin ribbon in two…


… and sew them at lace ends.


The necklace is now ready.


Step 7

Take the cardboard…


… and draw a heart on it (about 12 cm x 12 cm)


Cut it out.


Make a hole in the upper right part…


… like this.


Fold the necklace like this…


… and place it on top of the heart, under the hole.


Mark a point under the folded necklace…


… and make another hole there.


We will put a small ribbon through these holes to keep the necklace on the base.


It is looking like this on the backside.


You can tie the two parts of ribbon or you can use a double adhesive band to keep them in place.


So, this is the gift…


… and this is the necklace.


Doesn’t this Choker Valentines Gift for Her turn out lovely?  Any girl would love receiving this as a gift.  How did your Choker turn out?  Let me know in the comments below.  And, don’t forget to add a picture…. I’d love to see it.

Technorati Tags: , , , , , , , , , ,

How to Make a Daisy Book Pendant

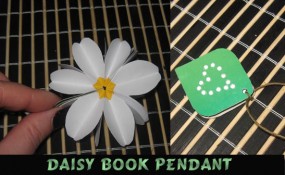
I know Valentines Day is coming up in 6 days…. and you were probably expecting a Valentines Day craft.  I took a break from showing you another Valentines Day craft to show you how to make this Daisy Book Pendant.  I thought this Daisy Book Pendant would make for a wonderful Valentines Day Present to someone special.  Anyone will surely love to wear it.  I will even show you later in the craft how to put a special hidden message inside the pendant.  So, let’s get started.

Check out our other Jewelry Crafts.

Laura from Dacian Moon Handmade  will show you how to make this, step by step.


Materials Needed

– cardboard (for the covers – I used green)
– white and yellow paper
– scissors
– thick thread and needle
– pencil
– paper glue


Step 1

Draw 9 squares on the white paper (6 cm size)


Cut them out.


Cut another 9 squares (6 mm size) from the yellow paper.


Step 2

Take one white square…


… and fold it diagonally from point to point. Press well.


Unfold it.


Fold paper in half…


… Unfold it…


… and then in half again the opposite way.


Unfold.


Step 3

Take a small square…


… and glue it in the middle of the creases.


Do the same for all 9 squares.


Step 4

Take one piece and place it with the clear diagonal in front of you (the one without a crease).


Press the sides back until they unite.


It will look like this.


Cut the corners round (except the yellow corner)


Like this. Do the same for the rest of pieces. Now we have 9 petals.


Step 5

Place one petal over cardboard and draw the cover…


… like this.


Cut it out and make the second one.


Turn one of them upside down and draw something simple. Because Valentines Day is coming up…. I am drawing a heart.


Use the needle to make some holes on the heart outline. Make another hole in the corner. (Do this for the other cover too)


Step 6

Apply a layer of glue on one side of a petal…


… and place the cover over it, aligning it to the yellow corner.


Press well. It will look like that.


Turn it over…


… and add another layer of glue on the petal.


Place another petal on top, aligning the yellow corners…


… and so on, until you add the last petal and the other cover. Let it dry well (it is better to use dry glue).


Step 7

Now… open up.  Surprise!!


Isn’t it beautiful ?!


And you can add a secret message too! With the book almost open, place a finger under one petal, like this, and push up.


A secret place is open where you can write the message.


Close the book, put the thread through the corner holes…


… and you can wear it or give it as a present to someone special.


And, there you have it.  How did your Daisy Book Pendant turn out?  Are you going to wear it yourself or give it to someone special this Valentines Day?   The choice is yours… either way people will surely love it.

Technorati Tags: , , , , , , , , , , ,

How to Make Velcro Bullseye Game Rings

Oh boy….. do I have a fun craft for you today!!  I’m going to show you how to make Velcro Bullseye Game Rings.  The ring is made with felt and when you throw a small little Velcro ball at it the ball actually sticks.  The craft is a fun one…. almost as much fun as it is to wear this adorable ring.   This ring craft would be an awesome craft to make party favors for a birthday party.  Imagine the excitement of the kids attending the party when they see they get Velcro Bullseye Game Rings to take home with them.  They’d love it!!

Check out our other Jewelry Crafts.


How to Make Bullseye Game Rings


Materials Needed

Pull Tabs for Juice or Milk Cartons

4 Different Size & Colors of Felt

Glue

Velcro

Small Ball


Step 1


Juice and some milk cartons have pull tabs for when first opened.


Juice and some milk cartons have pull tabs for when first opened.  Grab one of these.


Step 2


Flatten it a bit.


Flatten it a bit.


Step 3


It should now stand like this.


It should now stand like this.


Step 4


Cut out 4 different sized colors of felt.


Cut out 4 different sized colors of felt.


Step 5


Glue 4 pieces of felt together.


Glue 4 pieces of felt together.


Step 6


Glue felt onto front of pull tab.


Glue felt onto front of pull tab.


Step 7


You can stand it up to play.


You can stand it up to play.


Step 8


You can glue a piece of Velcro onto a small ball.


You can glue a piece of Velcro onto a small ball.


Finished Velcro Bullseye Game Ring


Awesome…. you just finished making your Velcro Bullseye Game Ring.  Isn’t it simply adorable?  Plus, you can take off the ring and play the Bullseye Game anytime you want.  Or simply wear the ring and play the game with the ring still on your finger…. So much fun!!

Technorati Tags: , , , , , , , , , , , ,

How to Make Cute Fruit Pendants

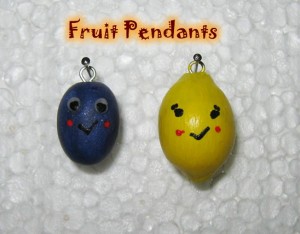
If you were looking for a super fun craft that turns out equally super cute…. then I have the craft for you today.  I’m going to show you how to make Cute Fruit Pendants.  These pendants are made from Polymer Clay, so they turn out really durable…. another words, they will last.  Add a little paint and a couple of eye pins and you have the materials needed to do this craft.  Keep in mind that the polymer clay will need to be baked, so you will need an adult for this part.  So, grab the materials needed and let’s get this craft started.

Check out our other Jewelry Crafts.

Step-by-step tutorial offered by Laura from Dacian Moon Handmade.


Materials Needed

– toothpick
– polymer clay: blue and yellow – we will make a plum and a lemon
– cutter
– acrylic paints (white, black and red/pink)
– 2 eye-pins
– baking paper
– baking tray


Step 1

Let’s start with the plum. Take the blue clay.


Condition polymer clay by hand, simply mix it and squish it with your fingers. You may want to roll it into a log between your palms, fold it in half, and then roll again.


Step 2

Make a little egg with it by rubbing it gently between your hands.


Step 3

Take one pin…


… and fix it on top of the blue egg.


Press until only the eye stays outside.


Step 4

Because we don’t bake every piece separately, we must do the lemon too. So, take the yellow clay…


… and condition it.


Step 5

Repeat the 2nd and 3rd steps: make a yellow egg…


… and place the pin on top of it.


Step 6

With three fingers squish the head.


Now it looks like a lemon.


Step 7

Place the fruits on the baking tray, and bake them according to the instructions on the polymer clay package (they depend on the brand you use: fimo, cernit, sculpey…, but usually it is one half of hour at 230 F or 110 C) – this part you need a little help from an adult.

Let them cool down.


Step 8

Use the toothpick to paint them. Add two white circles…


… then two black smaller circles to complete the eyes


Draw the mouth – make them smile.

That is the plum.


Now take the lemon…


… and paint it too. Be creative.


You can add red cheeks, for a drop of color.


Now, you can attach them to a chain or a thread or a bracelet… even to a key chain. Either way it will be super cute.  What way did you decide to display your Cute Fruit Pendants?  Let me know in the comments below.  And, take a picture of your fruit pendants and share that in the comment at well… I’d love to see how they turned out.

Technorati Tags: , , , , , , , , , ,