There are a few basics you need to know before you work with leather. Leather is one of those things that might need to be cut, so always make sure that you have adult assistance nearby. This is a great craft for Summer Camps, which is why many times kids come home with handmade leather wallets and billfolds. This article will help you with some of the basics and techniques that you might not know about. You will also learn the different lacing methods. You Might Enjoy Our Leather Crafts
Goatskin, cowhide, steer-hide, calfskin and Morocco are the most commonly used leathers. Leather can be bought in whole, half and quarter skins, and is priced by the square foot. Scrap leather, useful for small articles, can be bought by the pound. Only bark-tanned leathers are suitable for tooling. The center back part of the skin is the strongest and is used in the making of wallets, billfolds and key cases. Leather lacing is usually made of 3/32″ goatskin and can be obtained in colors.
How to Work with Leather : Leatherworking Techniques for Kids Working with Adults
TOOLS FOR LEATHER-CRAFT
1. Cutting knife — for cutting and skiving leather. (ADULT ASSISTANCE NEEDED FOR THIS TOOL)
2. Spacing wheel — for making evenly spaced marks for punching lacing holes.
3. Spoon and tracer — for tracing, line tooling, flat repousse’.
4. Drive punch — to make holes for lacing.
5. Wooden mallet — for striking tools used in leather-craft.
6. Fid or belt awl — for enlarging holes, stippling, and tightening laces.
7. Revolving punch—for punching holes. Has six different sized tubes on a revolving wheel.
HOW TO WORK WITH LEATHER
Place the craft work on a smooth, soft, clear-grained board. It is wise to keep one side of the board smooth for tooling, and the other side for cutting and pounding.
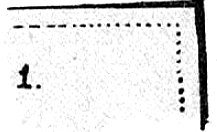
Step 1
[ad#ahc]
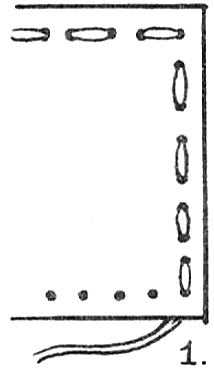
Run the spacing wheel 1/8″ in from the edge of craftwork, as in Figure 1. Punch the holes, using either the fid and mallet, or #0 punch (for 3/32″ laces) on revolving punch. Make larger holes for heavier laces.
Step 2A
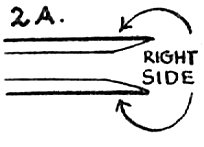
If two pieces of leather of equal thicknesses are to be laced, edges must be “skived” so that when glued together, they will be no more than one thickness. To skive leather, shave off about 1/2″ on the wrong side of ends to be joined, as in Figure 2A.
Step 2B
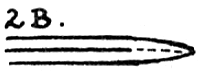
Cover skived areas with rubber cement, and when almost dry, press together and pound with mallet, as in Figure 2B.
Step 3A
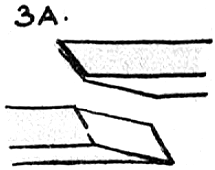
To splice or join leather, skive about 1/2″ of ends, one on the finished side, and one on the unfinished side, as in Figure 3A.
Step 3B
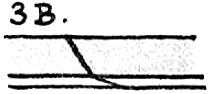
Cement skived ends, and when almost dry, press together and pound with a mallet, as in Figure 3B.
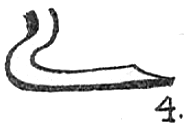
Step 4
To point lace, cut end of lace at an angle, and cover end with household cement. Allow to dry and stiffen, as in Figure 4.
HOW TO LACE STITCHES
Single Strand Running Stitches
A single strand running stitch, as seen above, is usually used for decoration or on a single thickness of leather.
Spiral – Overcast or Whip Stitch (used as an edge trimming and binding thicknesses together.)
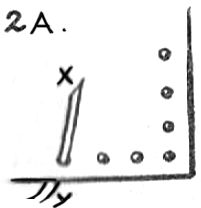
2A
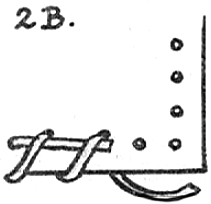
2B
Bend end of strand (X) down over the leather and continue over casting with end Y, as in Figure 2B.
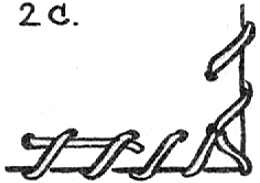
2C
Continue overcasting until corner is reached. Go through corner hole three times to make the turn, as in Figure 2C.
2D
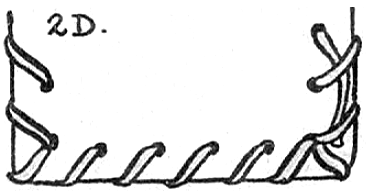
Continue overcasting with end Y until work is completed. Finish off work by slipping end Y back under two stitches and cut off, as in Figure 2D.
You Might Enjoy Some of Our Leather Crafts
Technorati Tags: leather, leather crafts, leather techniques, leather methods, leatherworking, leather for kids, leather crafts for kids

Leave a comment