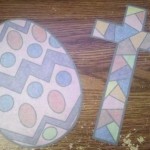
How to Make Stained Glass Easter Ornaments

For this craft you will learn how to turn normal paper into a fun, translucent stained glass decoration which you can hang on a window. It’s a definite eye-catcher.  In this craft we will be making an Easter decoration that will look gorgeous hanging from any window.  You can chose to print off the templates I have below or you can simply draw and color your own…. the choice is yours.  So, grab the materials needed and let’s get started.
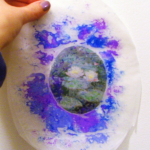
Check out our other Easter Crafts.


How to Make Stained Glass Easter Ornaments


Materials Needed

Sheet of paper
Printer, or a thick black marker
Crayons, colored pencils and/or markers
Safety scissors
Vegetable oil
Cotton ball
Paper towels
Newspaper

Step 1

Print out the design or draw your own with a thick black marker. You can print out these templates (one cross, one egg, or a sheet with one of each).

Click on template image below to make larger and to print.


Step 2


Color the design however you see fit, make sure to use brighter colors so the light shines through when finished. Markers provide the most vibrant colors but be wary of purples and reds when only using them.


Step 3


Cut out the designs, leaving some of the black outline.


Step 4


Flip the designs around and put them face down on the newspaper. Apply oil over the entire back of each design using the cotton ball or paper towel.


Step 5


Lay the designs between two sheets of paper towel and blot and/or rub off the excess oil. Be sure to be gentle, this is only paper after all.


Step 6


Hang your new beautiful stain glass decoration outside or in a window so it can catch the sunlight.

Doesn’t this make for a beautiful Easter decoration?  Any window will look beautiful with this hung up on it.  Take a picture of your Stained Glass Easter Ornament and post it along with a comment in the comment section below.  I would love to see how your ornament turned out.

Technorati Tags: , , , , , , , , , , , , , ,

Keep Kids Entertained Making Stained Glass Pictures Craft


Keep Kids Entertained Making Stained Glass Pictures Craft


How You & Your Kids Can Make This Faux Stained Glass Art Crafts Project


This “stained glass” picture is perfect for keeping kids entertained at a fun and safe activity on a rainy day. It is a bit messy so a newspaper-lined workspace is recommended, but cutting pictures from magazines and making crayon shavings will have children happily occupied for a while.


stained-glass-craft-what-youll-need


Crafts Materials That You Will Need:

Wax paper
Scissors
Crayons with a built in or separate crayon sharpener
Magazine pictures, cards, flowers, leaves – anything small and flat
Newspaper
Iron (and a grown up to use it)


stained-glass-craft-step-one


1. Cut out two pieces of wax paper in the same shape. If you’d like to incorporate an outting with this craft, take children around to look at local churches and draw the shapes of stained-glass windows they see on the trip. They can later cut out their wax paper to match one of the shapes. It’s easiest to fold a large piece of wax paper in half and cut through two pieces at once to make sure the shapes match up.


stained-glass-craft-step-two


2. Have children gather flat objects like flowers or leaves in the yard or cut up magazines or cards with pretty pictures. Place on one piece of wax paper.

3. Begin making crayon shavings by using the crayon sharpener and/or breaking up crayons. Children can choose colors that coordinate with their picture or object, or whatever strikes their fancy. This is likely to ruin crayons for further use, so you might want to buy cheap ones for the purpose.


stained-glass-craft-step-four


4. This is where the grown up steps in. Place the piece of wax paper with pictures and shavings on top of a layer of newspaper on your covered ironing board. Place second sheet of wax paper on top, and another layer of newspaper on top of that.


stained-glass-craft-step-five


5. On a medium heat setting, lightly iron over wax paper and newspaper, checking often to make sure you’re not burning anything. It should only take about a minute for all the crayon shavings to melt and the pieces of wax paper to bond together.


Keep Kids Entertained Making Stained Glass Pictures Craft


MORE FAUX STAINED GLASS CRAFTS & ACTIVITIES FOR KIDS FROM OTHER BLOGS

Crayon “Stained Glass” Cross Craft – Here is a simple craft to do with your children that would also results in some precious Easter decorations to hang from your windows.

Crafts for Kids: Stained Glass Leaves – Even if you’re not a crafty person (like myself), it’s worth trying to make crafts with your children now and then because they love it so much!

Craft Corner ~ Stained Glass Cross – Well, Easter is coming up, so here is a craft to help us remember what the Lord has done for us.  It is also quite pretty!

Easy Stained Glass – Lately I have been all about doing projects I have seen on other blogs, but here is something I actually came up with myself. (No doubt others have thought of this before me, but I patted myself on the back anyway.)

Kids Craft: Stained Glass Window – I remember growing up and making these stained glass windows with crayons with my mother – and loving to do it. Soooo I embellished a bit – being that I am now and adult – I figured it should look like someone at least over the age of 10 created this work of art!

Kisha’s Craft Corner: Beautiful Butterflies – If you’re like me, coffee brightens up your mornings. But now, with a little paint and some craftiness, those coffee filters can be used to brighten up your kitchen as well – in the form of beautiful butterflies with a stained glass look!

New Technique/Tutorial for you: Faux Stained Glass Melted Crayon Background – I love to play with techniques, especially when I can use the supplies on hand and come up with a interesting way to create backgrounds. So, I have been playing around with a technique that I saw on SCS, melted crayons. I did not want to drag out my iron and I wanted to see what would happen if I used waxed paper instead of foil.

Paper Stained Glass Christmas Trees – These Stained Glass Trees add a beautiful glow to the kitchen windows, giving the appearance of twinkly lights on a Christmas Tree. With each triangle tree cut up like a snow flake, it leaves just the right holes for colored tissue paper to shine in.

Stained Glass Art (for kids) – We are loving these bursts of color in our windows… being in the middle of February will make you appreciate such things!

Stained-Glass Crayons – A week ago, my preschool daughter came home from school with a heart-shaped crayon. She told me she made it in class with broken crayon pieces. She thought it was the best thing ever and asked if we could make some at home.

Stained Glass Eggs –  This craft was a SIMPLE one.

Wax and Paper – Earlier this week, Serena had her playgroup and the craft of the day was wax paper and crayon art. Delaney was thrilled by the pieces that Serena brought home and has been reminding us daily that we need wax paper.

Technorati Tags: , , , , , , , , , , , , ,