Moses Parting the Sea Old Testament Bible Exodus Printable Paper Craft for Passover

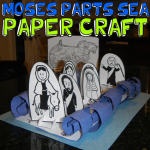
Today, I will share with you a printable paper craft for Passover. This craft is good for Jewish and Christian children as both study the old testament. In this craft, Moses is parting the sea while escaping the Egyptians. All of the Israelites are able to cross the sea, but then the Egyptians are all swallowed up by the sea when it closes back up. This is a perfect craft to celebrate Passover.

You Might Like Our Other Passover Crafts


Moses Parting the Sea Old Testament Bible Exodus Passover Craft


Crafts Materials Needed:

Printer

Printer Paper

Blue Paper

Scissors

Templates

Click Below on Each of the template images. These images will open up as a larger image. Then save these images to your computer and then print them.


template1-moses-parting-sea-paper-craft


template2-moses-parting-sea-paper-craft


template3-moses-parting-sea-paper-craft


Step 1


step1


Print out the 3 templates that you see above.


Step 2


step2


Cut out all the people, the chariot, and the stands. Cut 2 slits in each stand.

Step 3


step3


Fold the stands by folding the tabs inwards.

Step 4


step4


Now put all of the people and the chariot into the slits that are in the stands.

Step 5


step5


Get 2 blue sheets of paper. Cut lots of slits in the blue paper. Then curls them up and let go. The curls should look something like in the picture above.

Step 6


step6


Cut down the fish template to be less wide.

Step 7


step7


Now put the fish template page on top of both of the blue pieces of paper. The waves (curls) should be above the fish page so it looks like waves are on either side of the open sea floor.

Place all the people on top of the sea floor. Moses should be in the back as he is letting all of the freed slaves go before him. Behind Moses is the Egyptian chariot.

If you are using this craft to celebrate Passover, then happy Passover!

You Might Like Our Other Passover Crafts

Technorati Tags: , , , , , , , , , , , , ,


Ideas for Kids to Make Seder Plates for Passover


Ideas for Kids to Make Seder Plates for Passover


Passover will be here in just a couple of days.  And with Passover comes the wonderful Passover Seder.  And, even though we know how fantastic Passover Seder is…. we know how difficult it is to get the kids to sit still and enjoy the Passover Seder.  Well, how about if they help out with the Seder?  The kids can make the Seder Plate for Passover.  Even if it isn’t the main Seder Plate you use for the Seder they can at least work on the Children’s table Passover Seder Plate.  Beings that the children helped make the Passover Seder Plate will hold their attention a little more as they will want to pay attention to see how it will be used during the Seder.  So, scroll through the many Passover Seder Plates crafts below…. you are sure to find the one that works for you and your children.  Have a Happy Passover.

Ideas for Kids to Make Seder Plates for Passover

(1)  Spring Seder Plate


Spring Seder Plate


I found this awesome Seder Plate over at Kaboose.  Here they keep the color green to remind you of spring and all the good times ahead.  What a clever idea!!


(2)  Star of David Seder Plate


Star of David Seder Plate


 Nick Jr. has this Seder Plate Craft all figured out.  They use 6 six inch paper plates to create the Passover Seder Plate…. not to mention a Star of David Coloring Page.  Put it all together to create this awesome Passover Seder Plate.


(3)  Printable Seder Plate Craft


Printable Seder Plate Craft


If you are looking for a super easy Passover Seder Plate Craft then this is the one for you.  Free Kids Crafts gives you this craft that is simply a printable…. print off and cut.  Doesn’t get much easier than that.


(4)  Bright Passover Seder Plate


Bright Passover Seder Plate


Isn’t this a beautiful Passover Seder Plate?  I love the use of bright colors.  Nothing keeps the attention of the little ones more than bright colors.  Parent Dish shows you step-by-step how to make this Seder Plate.


(5)  Porcelain Passover Seder Plate


Porcelain Passover Seder Plate


Family Fun uses an ovenproof plate and glaze paint to prepare their Passover Seder Plate.  They have the right idea as once baked this item is quite durable.  These Seder Plates become special to the child as they will be painting them themselves.


(6) Model Clay Passover Seder Plate


Model Clay Passover Seder Plate


Crayola has an original spin on the traditional Passover Seder Plate.  Their craft is constructed from Model Clay.  Check out their site to get the full details and make this Passover Seder Plate yourself.


(7)  Jeweled Passover Seder Plate


Jeweled Passover Seder Plate


This is a beautiful Passover Seder Plate.  In case you can’t see it, there are lovely stones all around the outside of this plate.  My Activity Maker shows you how you too can make this beautiful Passover Seder Plate.


(8)  Paper Seder Plate


Paper Seder Plate


If you are looking for an easy Passover Seder Plate than this is the craft for you.  Made from a Paper Plate and pictures of the Ceremonial Food this craft doesn’t get any easier.  Check out Joyful Jewish to see how to do this craft.


(9)  Tissue Paper Passover Seder Plate


Tissue Paper Passover Seder Plate


Here is a fun craft to do with the youngest of kids for Passover.  Kids love to work with tissue paper and this Passover Seder Plate Craft has plenty of tissue paper.  Check out Delicate Construction for the full details of the craft.


(10)  Denture Cream Passover Seder Plate


Denture Cream Passover Seder Plate


Yes, you read this right…. this craft was made with Denture Cream.  Holidash used Denture Cream to hold the dishes to the Seder Plate.  Check out the full details on their site… you will have to scroll to the 2nd slide.


(11)  Passover Prep


Passover Prep


I found this Passover Seder Craft over at Maybe Sew.  She has the right idea on how to teach the kids a little bit about each of the foods on the Seder Plate…. she uses different items other than the norm and has the kids guess what they should be.  Check out the site for the full details.

Technorati Tags: , , , , , , , , , , ,

How to Make a Flying Bird Decoration

Today I’m going to show you how to make a flying bird decoration.  When made correctly this bird will flap his wings with just a bit of movement of the string.  Crafters of all ages will enjoy making this craft…. even the youngest.  We provide many templates that you can choose from to make this flying bird.  You can choose one of the colored templates or you can print off the black & white template and color the bird yourself.  The choice is yours.  So, grab the materials needed and let’s get started.

Check our our other Toy Crafts.


How to Make a Flying Bird Decoration


Materials Needed

Printer & Paper

Scissors

Glue or Tape

String

Crayons, Markers or Colored Pencils (optional)


Click on template images below to make larger and to print.

Black & White Template


flying bird black & white template


Aqua template


flying bird aqua template


Blue Template


flying bird blue template


Red template


flying bird red template


Yellow template


flying bird yellow template


Step 1


Print template.


Print template.


Step 2


color in your bird and wings


If you printed the black & white template…. color in your bird and wings.


Step 3


Cut out wings and bird.


Cut out wings and bird.


Step 4


Fold wings in middle.


Fold wings in middle.


Step 5


Glue or tape wings on bird's body cut-out.


Glue or tape wings on bird’s body cut-out.


Step 6


Fasten string to bird.


Fasten string to bird.  Raise string up and down and bird will flap wings.

And, that’s it… you just finished making your flying bird decoration.  Isn’t it cool with just raising your string up and down you can make the bird appear as if he is flying.  Enjoy playing with your flying bird.

Technorati Tags: , , , , , , , , ,

How to Make Stained Glass Easter Ornaments

For this craft you will learn how to turn normal paper into a fun, translucent stained glass decoration which you can hang on a window. It’s a definite eye-catcher.  In this craft we will be making an Easter decoration that will look gorgeous hanging from any window.  You can chose to print off the templates I have below or you can simply draw and color your own…. the choice is yours.  So, grab the materials needed and let’s get started.

Check out our other Easter Crafts.


How to Make Stained Glass Easter Ornaments


Materials Needed

Sheet of paper
Printer, or a thick black marker
Crayons, colored pencils and/or markers
Safety scissors
Vegetable oil
Cotton ball
Paper towels
Newspaper

Step 1

Print out the design or draw your own with a thick black marker. You can print out these templates (one cross, one egg, or a sheet with one of each).

Click on template image below to make larger and to print.


Step 2


Color the design however you see fit, make sure to use brighter colors so the light shines through when finished. Markers provide the most vibrant colors but be wary of purples and reds when only using them.


Step 3


Cut out the designs, leaving some of the black outline.


Step 4


Flip the designs around and put them face down on the newspaper. Apply oil over the entire back of each design using the cotton ball or paper towel.


Step 5


Lay the designs between two sheets of paper towel and blot and/or rub off the excess oil. Be sure to be gentle, this is only paper after all.


Step 6


Hang your new beautiful stain glass decoration outside or in a window so it can catch the sunlight.

Doesn’t this make for a beautiful Easter decoration?  Any window will look beautiful with this hung up on it.  Take a picture of your Stained Glass Easter Ornament and post it along with a comment in the comment section below.  I would love to see how your ornament turned out.

Technorati Tags: , , , , , , , , , , , , , ,

How to Make Easter Standup Animals

I have a fun and easy craft for you today.  I’m going to show you how to make Easter Standup Animals.  These Easter Standup Animals are a perfect decoration for inside your house this Easter.  And, the youngest of crafters will enjoy making these as they are made from a template.  You can choose to print off the colored templates or print off the black & white templates and color them yourself.  The choice is yours.  So, grab the materials needed and let’s get started.

Check out our other Easter Crafts.


How to Make Easter Standup Animals


Materials Needed

Printer & Paper

Scissors

Glue

Crayons


Click on template images below to make larger and to print.

Baby Chick Black & White


Baby Chick Black & White


Baby Chick Color Template


Baby Chick Color Template


Baby Chick 2 Black & White


Baby Chick 2 Black & White


Baby Chick 2 Color Template


Baby Chick 2 Color Template


Bunny Rabbit Black & White


Bunny Rabbit Black & White


Bunny Rabbit Color Template


Bunny Rabbit Color Template


Step 1


Print out template.


Print out template.


Step 2


Cut the figures out.


Cut the figures out.


Step 3


If you printed out the black and white template..... color them now.


If you printed out the black and white template….. color them now.


Step 4


Paste and fold where images above tell you to.


Paste and fold where images above tell you to.  Spread paste near the top on the back of each figure, and paste them together. The bottom part should not be pasted, as it spreads apart. Fold the bases (bottoms) outwards, each side in an opposite direction.


Step 5


Then stand your figures up for Easter.


Then stand your figures up for Easter.

There you go…. you did it.  You finished making your Easter Standup Animals.  Now you are all set to begin decorating your house for Easter.  Enjoy!!

Technorati Tags: , , , , , , , , , , , , , ,

How to Make Thanksgiving Place Cards

I have a great Thanksgiving craft for you that will be not only useful, but very memorable as well.  I am going to show you how to make Thanksgiving place cards.  But, not just ordinary place cards…. these are place cards that your guests at your Thanksgiving feast will write down what they are thankful for.  Keep the place cards as a keepsake for years to come.

Check out our other Thanksgiving Crafts.


How to Make Thanksgiving Place Cards


Materials Needed

Printer

Paper

Scissors

Crayons (if printing off black & white template)

Glue

Pen


Below are printable templates for this craft.  You can choose to print off  a colored template or the black and white version.

Click on template image to make larger and to print.


Printable color template for Thanksgiving place cards


Printable black & white template for Thanksgiving place cards


Step 1


Print out paper template.


Print out paper template.


Step 2


Cut out the Pilgrims from template.


Cut out the Pilgrims from template.


Step 3


If you printed out the black and white template.... color it in.


If you printed out the black and white template…. color it in.


Step 4


Fold white paper in half and then cut it a bit smaller than width of the pilgrim cutout.


Fold white paper in half and then cut it a bit smaller than width of the pilgrim cutout.


Step 5


Glue the top of the back of the white folded paper to Pilgrim's hands.


Glue the top of the back of the white folded paper to Pilgrim’s hands.  Write a message at the top of the place cards…. such as, “I Give Thanks For…”, “I Thank God For…” or “I’m Thankful For…”.  Every guest at your Thanksgiving feast can write what they are thankful for.  You can save the cards as a keepsake.


Finished Thanksgiving Place Cards


Aren’t these Thanksgiving place cards fantastic?  I can almost guarantee that your Thanksgiving guests will love this idea.  Plus, you will have something to remember this Thanksgiving…. your “I’m thankful for” place cards.

Technorati Tags: , , , , , , , , , , , , , , ,

How to Play the Turkey Game – Turkey Printable

If you are looking for a cute game to occupy the kids during the Thanksgiving Holiday I have one for you.  It’s a Turkey printable that is actually a game too.  Simply print off for the kids and with just a few materials you should be good to go.  No more bored children during the Thanksgiving football games…. just let them play the Turkey game.

Check out our other Thanksgiving Crafts.


How to Play the Turkey Game – Turkey Printable


Materials Needed

Printer & Paper

Brown Construction Paper

Pen or Marker

Glue

Crayons

Scissors


How To:

Print off the Turkey template below.  Click on the image to make larger and to print.


Print off the above Turkey Template


Cut out turkey then color.  Cut slits on broken lines around tail feathers.  Print letters on all feathers.  Paste turkey on brown piece of construction paper, being careful not to paste near the slits.  Cut extra feathers, crayon and print letter on each.  Mix the extra letters.  When they are slipped through the correct slit on the turkey, they spell GIVE THANKS.


Finished Turkey Printable


And, that’s it….  simple and fun.  Gotta love that!!  Enjoy playing the Turkey game.

Technorati Tags: , , , , , , , , , , , ,

Make a Groundhogs Day Board Game Crafts Idea for Kids

This activity starts as a coloring page, then a craft, and finally a board game to play with friends or family.  We have provided you with two templates to print out: a game board and a sheet of six movers.  However, if you do not have a printer, or do not have permission to use one, you can get two sheets of plain white paper and make your own.

Here are More Groundhogs Day Crafts


Make a Groundhogs Day Board Game Crafts Idea for Kids


Make a Groundhogs Day Board Game Crafts Idea for Kids

Crafts Materials Needed:

  • Paper
  • Printer
  • Colored pencils, crayons or washable markers
  • Index cards
  • Tape
  • Safety scissors
  • Pen or pencil
  • Imagination

To start with print out the two pages provided, or draw your own.


Groundhog Gameboard


Groundhog Movers

STEP 1 – PREPARE THE BOARD

Color in the groundhog with your colored pencils, crayons, or washable markers.  I used colored pencils to get the details.  Then you can decide which side is start and which is finish, mark those.  I put START and FINISH, but you could also put WINTER and SPRING.


Add special instructions to spaces, if you want to make the game a little harder.  I put “See shadow.  Go back 3 spaces” and “No shadow.  Go forward 2 spaces” on mine.  Make sure you don’t put too many, and that you don’t put one where another space will end.  I accidentally put “Go back 3 spaces” 3 spaces in front of a “Go forward” space, so I had to change it to “Go back 2 spaces”.  If you make a mistake like this, it’s very easily fixed.


STEP 2 – MAKE THE PLAYING PIECES

First you will pick 6 different colors and color your groundhogs.  Make sure the colors are different enough you won’t get confused during game play.


Now, cut them apart leaving each pair together.  Once you have 6 pieces of paper, fold them in half so the groundhogs of the same color are both facing out.  You can hold it up towards a light to make sure the holes that the groundhogs are popping out of line up.  Then, cut a flat bottom and up around the ground hog.  Make sure you leave the two sides attaches by the heads.  I have included a picture of the pieces at various stages.


Now, take an index card and fold it lengthwise.  Cut along the fold and discard one half.  Cut the other into 3/4″ strips, you will have a little left over that you can also discard.  Now take a 1 1/2″ length of tape and lay it on your work surface, sticky side up.  Place a strip of index card on it, and tape it to the bottom of a playing piece.  Do this for each piece.  Again, I have including a picture with various stages.


STEP 3 – MAKE CARDS

If you are short on time you can grab a die from another board game, just make sure you have permission first.   If you want to play the game following the rules below then you will need 8 index cards.  Cut each one on half the short way and write Groundhog Day on the blank side.  You should now have 16 cards that look like this:


Now flip them over to the lined side and write down how many moves each card is worth.  You will need 4 each of 1, 2, 3 and 4.  Mine has the number at the top and instructions underneath, but you can make yours however you wish.


STEP 4 – PLAY THE GAME

  1. Mix the numbered cards and lay them face down to the left of the board.
  2. Place all colored playing pieces in front of the “start” space.
  3. Youngest player (or whoever made the game) goes first.  They pick the top card from the pile, move the amount of spaces stated, and discard face up to the right of the board.
  4. Play moves clockwise around the board.
  5. If a player lands on a special space they must follow all instructions on that space.
  6. The goal is to be the first player to reach the end of the game.


Here are More Groundhogs Day Crafts

Technorati Tags: , , , , , , , , , ,

Make an Easter Duck Sitting on Eggs in Nest Card Arts & Crafts for Kids

This is an adorable Easter Card Idea for kids. We have provided both a color and black and white coloring page printout version of this Easter Mother duck sitting on eggs in nest card. The duck can have an Easter card message and slip right into and out of the nest. It is a great idea for preschoolers, school aged children, and teens as well.


Make an Easter Duck Sitting on Eggs in Nest Card Arts & Crafts for Kids


Cut out duck, eggs, and the nest with tabs.


Paste the eggs in all different directions, on a gray piece of paper (if you have one)…otherwise paste it on any color paper. Cut this gray paper about the size of the nest.


Now paste the nest’s flaps around the eggs (that are mounted on paper) that are behind it.


You can write an Easter message on the back of the duck or the front of the duck (or both). Now slip the duck in front of the eggs.


Click on Image to Open up New Page to Print Colored Template


Click on Image to Open up in New Page to Print Out B & W Template

Technorati Tags: , , , , , , , , , , , ,

Make Easter Baby Duck Paper Folding Craft for Kids

Do you want a baby duck chick arts and crafts activity for Easter time? This is a great paper folding crafts activity for kids to make an Easter duck.


Make Easter Baby Duck Paper Folding Craft for Kids


Click Above Image to Open New Page and Print if You Want Color Image


Click Above Image to Open New Page and Print B & W Image

Technorati Tags: , , , , , , , , , , ,

Easter Bunny and Baby Chick See-Saw Paper Toy Card Craft

Children love crafts projects that make real working moving parts. This is an adorable Easter card that has real working parts with little work at all. This is an adorable, working see-saw with the Easter bunny on one side and a baby Easter chick on the other. The see-saw goes up and down with the use of a simple fastening clip. All you have to do is print, cut out, and then fasten the 2 parts together. You can make a tone of Easter cards in no time at all. Print the 2 items below.


Easter Bunny and Baby Chick See-Saw Paper Toy Card Craft

Step 1 – Print Out The See Saw Parts


Print Out the See Saw Base – Click on Image


Print Out the Bunny and Chick on See Saw – Click on Image

Step 2

Now find the center of the see-saw  (the piece with the baby Easter chick and the Easter bunny). Then take a fastening clip and push it through the see-saw base and the blue see-saw piece and you have a working see-saw Easter card.

Technorati Tags: , , , , , , , , , , , , , , , , , , , , , ,

How to Make Pop Up Easter Bunny Rabbit Cards Crafts Idea and Coloring Printable

Easter is coming up and I have an Easter Bunny Pop Up Card craft for kids, teens, or adults to try. You have the choice of printing out the cards or you can follow the measurements and directions below without printing. Either way, this is a fun, and attractive Easter craft to work through. Good luck and Happy Easter.


How to Make Pop Up Easter Bunny Rabbit Cards Crafts Idea and Coloring Printable

You have 2 options…either print out the Easter pop-up card already drawn out (at the bottom of this page) OR read the directions that are directly below. These directions give measurements for you to make this pop-up card. There are also bunny rabbits below for you to trace, print and cut out, or try to draw. This would work best on card stock, but can be completed on construction paper or any other type of paper.


Below are some Bunny Rabbits to either print out, trace, or attempt to draw to put on your card.


Above are some bunny rabbit images that you can print out, cut out, color in, and then paste on to your Easter card. OR, you can try to draw or trace these bunnies onto a piece of paper. OR if you want to learn how to draw bunny rabbits by yourself – here are many bunny rabbit drawing tutorials.

If you would prefer to print out Easter Cards, and color them in? It isn’t necessary, but this will work out if you can print this card out on card stock….otherwise, just print it out on paper. Below are 2 different Easter cards that you can print out. Most of the directions still apply….such as folding the card in half. Cut out the part of the bunny rabbit that is above the half line. Now you can stand the card up…and the bunny rabbit should stand up above the card and look pretty cool.

PRINT THE GREETING CARDS OUT BELOW


Click on This Image to Print it Out Full Size


Click on This Image to Print it Out Full Size

Technorati Tags: , , , , , , , , , , , , , , , , , , ,

Thanksgiving Activities and Thanksgiving Coloring Pages for Kids


small-thanksgiving-turkeysprintablescoloringpages


Thanksgiving Activities and Thanksgiving Coloring Pages for Kids


Have a free afternoon and want to do cool Thanksgiving activities and coloring pages?  We have added many Thanksgiving activities and coloring pages to our site recently and thought that we would share with you the updates. Look below to see what you can print out and color and work on. Come back for more updates.


Thanksgiving Activity - Coloring and Drawing Pilgrims Faces


Thanksgiving Activities – Draw the Pilgrims Faces Thanksgiving Coloring Page and Activity


Thanksgiving Activity - Coloring and Drawing Indians Faces


Thanksgiving Activities – Draw the Indians Faces Thanksgiving Coloring Page and Activity


Printable Foldable Paper Crafts Pilgrim Girl Toy Model


Thanksgiving Activities for Kids – Printable 3D Pilgrim Girl Paper Craft Toy


Printable Foldable Paper Crafts Turkey Toy Model


Thanksgiving Activities for Kids – Printable 3D Pilgrim Toy Paper Craft Toy


make a tic-tac-toe thanksgiving game toy


Make a cool 3d Thanksgiving Game for Kids


Thanksgiving Pop Up Cards Turkeys Beaks Making Crafts for Kids


How to Make Thanksgiving Moving Beak Pop Up Card Paper Craft for Kids


Free Thanksgiving Coloring Pages - Turkey vs Pikachu Coloring Page


Thanksgiving Turkey vs. Pikachu Attack Coloring Page


Thanksgiving Activities - What to Give Thanks for Turkey


Thanksgiving Activities – Put the Thanksgiving Turkey Pieces Together and Write What You Want to Give Thanks for on the Feathers


Free Thanksgiving Coloring pages - Indians Coloring Page


Thanksgiving  Indian with Corn Coloring Page


Free Thanksgiving Coloring pages - Indian Girl Coloring Page


Thanksgiving Indian Girl with Harvest Basket Coloring Page


Free Thanksgiving Coloring pages - Pilgrim Girl Coloring Page


Thanksgiving Pilgrim Girl Coloring Page


Free Thanksgiving Coloring pages - Pilgrims Coloring Page


Thanksgiving Pilgrim with Turkey Coloring Page


Free Thanksgiving Coloring pages - Scared Turkeys Coloring Page


Thanksgiving Scared Don’t East Turkeys Turkey Coloring Page


Free Thanksgiving Coloring pages - Happy Thanksgiving Turkeys Coloring Page


Thanksgiving Happy Thanksgiving Turkey Coloring Page


Free Thanksgiving Coloring pages - Turkeys Coloring Page


Thanksgiving Turkeys Coloring Page

MORE THANKSGIVING COLORING PAGES AND THANKSGIVING ACTIVITIES & ARTS AND CRAFTS IDEAS BELOW

It is almost Thanksgiving time so check out our Thanksgiving Coloring Pages & Thanksgiving Crafts for Kids Page to find some great turkey and thanks-giving crafts project ideas for kids to celebrate Thanksgiving such as

Autumn / Fall Crafts ..
Cornucopia Crafts
..
Indian Corn Crafts
..
Pilgrim Crafts
..
Preschoolers & Toddlers Thanksgiving Crafts
..
Scarecrow Crafts
..
Thanksgiving Coloring Pages & Printouts
..
Thanksgiving Decorations Crafts
..
Thanksgiving Table Decorations Crafts ..
Thanksgiving Turkey Crafts ..
Thanksgiving Worksheets & Printouts

Technorati Tags: , , , , , , , , , , , , , , , , , , , , , , , , , , , , , , , ,