How to Make Handprint Elephants and Lions for Preschoolers

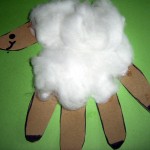
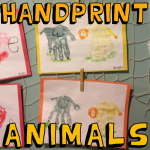
This is an adorable craft for toddlers, Preschoolers, Kindergarteners, and even slightly older children. My friend Erin has a son who goes to Little Monster’s Home Daycare and they made this cute craft today. The bodies of the elephant and lion are created with the child’s hand prints, and they couldn’t come out any cuter. Below you will find the step by step tutorial for making these adorable handprint pictures.

How to Make Handprint Elephants and Lions for Preschoolers


handprint-lions-and-elephants


Crafts Materials Needed:

Paint

Markers

How to Make the Handprint Lion

Lion: Step 1


lion-step1


Paint the child’s hand yellow and then push the child’s hand down onto the paper. Let the handprint dry thoroughly.

Lion: Step 2


lion-step2


After the handprint is completely dry, you can start drawing the features of the lion.  Take out an orange marker and draw curly Qs all around the thumb print for the lion’s hair. Draw 2 black dots for eyes. And with a yellow marker, draw a rectangle tail.

Lion: Step 3


lion-step3


With the orange marker, draw a circle on the tail. Draw black rectangles on the feet. And draw a black dot for a nose and a letter ‘w’ mouth.

Lion: Step 4


lion-step4


Take a green marker and scribble grass below each of the feet. There you have it…an adorable handprint lion.

How to Make the Handprint Elephant

Elephant: Step 1


elephant-step1


Paint the child’s hand gray and then push the child’s hand down onto the paper. Let the handprint dry thoroughly.

Elephant: Step 2


elephant-step2


When you are sure that the handprint is dry, you can then start drawing the elephant’s features. With a grey marker, draw a gray rectangle for the tail. With a black marker, draw 3 lines on the thumb. Draw a letter ‘W’ on the center of the handprint.

Elephant: Step 3


elephant-step3


Draw rectangles on the bottom of the 4 bottom fingers.  Draw a dot for an eye.

Elephant: Step 4


elephant-step4


With a green marker, scribble grass at the bottom of all the feet. And there you have it, an adorable handprint elephant.

The Final Handprint Animal Picture


handprint-lions-and-elephants


Here is what the pictures turn out like (above). Aren’t they adorable!!!! Have fun making these gems.

Technorati Tags: , , , , , , , , , ,

How to Make Coffee Filter or Napkin Butterfly

This is a cute project for little ones – a cheerful butterfly made of napkin or a coffee filter 😀 This is perfect for Kindergarteners or Preschoolers. They can do everything on their own with a little bit of guidance. Laura from Dacian Moon Handmade  will show you, step by step, how to make it.


How to Make Coffee Filter or Napkin Butterfly


CRAFTS MATERIALS NEEDED:

– napkin
– laundry tongs
– paints
– black marker
– paintbrush
– coffee filter or small piece of napkin
– glue


IMG_6571


Step 1.

Unfold the napkin.


IMG_6572


Bring the middle part together…


IMG_6573


… like this.


IMG_6574


Step 2.

Put there the laundry tongs…


IMG_6575


… like this. This is the butterfly body.


IMG_6577


Step 3.

Rub the little piece of napkin between your fingers, until it look like this.


IMG_6578


Fold it in two…


IMG_6579


… and stick it on the upper part of the body.


IMG_6580


Step 4.

Use black marker to draw eyes and mouth …


IMG_6581


and to darken the antennas.


IMG_6582


Step 5.

Use the paintbrush to add color to the wings


IMG_6583


like this.


IMG_6584


When you have added all the color you want, gently smudge it.

Let it dry. The butterfly is ready.


IMG_6585


Technorati Tags: , , , , , , ,

How to Make Fairy Lights with Bubbles and Paint

This is a cool and fun project for summer. What can be more pleasant than playing with water on a hot Summer day? How about painting with colorful bubbles, just the way a fairy would. Laura from  Dacian Moon Handmade will show you, step by step, how to make this.

How to Make Fairy Lights by Blowing Bubbles


How to Make Fairy Lights with Bubbles and Paint


CRAFTS MATERIALS NEEDED:

– plastic bottle
– 1 sock
– paints
– tape
– scissors
– liquid soap / shower gel… mixed with water


IMG_6670


Step 1.

Cut off the lower part of the bottle.


IMG_6672


Like this.


IMG_6673


Step 2.

Put the sock on the cut.


IMG_6674


Like this. You can use tape to fix it in place.


IMG_6676


Step 3.

Add some paint on the sock.


IMG_6677


Dip the sock in the soap / water mixture …


IMG_6678


Then gently blow through the mouth of the bottle. Take care not to suck in air through the bottle, because of the soap and paint.


IMG_6681


It is a fun project and you can make very beautiful fairy lights 😉


IMG_6679


Technorati Tags: , , , , , , , , , , , , ,

Using Legos to Learn Sight Words and How to Read and Sound Out Words

My youngest daughter is in Kindergarten and she is learning how to read. Her teacher sends home lists of sight words that she has to learn and although we use flash cards to help her learn them, using Legos / Duplo Blocks  sounds a lot more fun to her. I saw someone else online use Legos to make sight words fun and I just loved the idea. Legos are also great for alphabet letters. The child can snap the Legos together to form and sound out words.

My daughter was getting bored with playing with these ‘little kid’ blocks as she now only wants to play with the little Lego blocks that older kids use. So this is a great way to recycle these Duplo / Lego blocks.


1st-pic-learning-sight-words-and-reading-with-legos


Crafts Materials Needed

Legos / Duplo Blocks

Labels (These are the ones I used   … Avery Removable Rectangular Labels, 0.5 x 0.75 Inches, White, Pack of 525  -6737  )

Step 1


Write Sight Words and Alphabet Letters on Labels


If you want to use the Legos to practice sight words and making sentences, then write sight words on the labels. If you want your child to practice creating words and sounding out letter combinations, then write alphabet letters on labels. I repeated consonants a few times and I repeated vowels many times.


Step 2


Add Alphabet Letters to 4 Sides of Blocks


I used the 4 peg Duplo squares for the Alphabet letter blocks. I put a letter on each side, so then the child can spin the blocks to make different words. My child loved forming words with the letters. I used blank squares to for spaces.

Step 3


Put Word Labels on the blocks


Then I put sight words on bigger Duplo blocks. They would fit on the square blocks but I didn’t have any more left. I put a label on 2 sides of the blocks, but you can definitely put them on all 4 sides if you want to. I also added other words that my child knows. I also made several blocks with words such as ‘I’, ‘and’, ‘my’, ‘too’, and ‘the’. I also added labels for people and animals that she knows so that she can talk about specific people. She LOVES playing with these blocks now.


How to Make a St. Patrick’s Day Matching Game

St. Patrick’s Day will be here before you know it…. so in the spirit of that this craft is all about St. Patrick’s Day.  In this post I will be showing you how to make a St. Patrick’s Day Matching Game.  This craft is perfect for the Preschool crafter as this game is all about matching the size of each shape of the shamrocks.  Get a couple Preschoolers together and listen to them giggle as they try to match the shape of the shamrocks.  So, with that being said…. let’s get started.

Check out our other St. Patrick’s Day Crafts.


Materials Needed

Crayons

Markers

Scissors

Thick paper

Cardboard/ thick paper for base


Step 1

Draw and color shamrocks of different shapes and sizes.


Step 2

Cut them out as shown below.


Step 3

Place them on your cardboard/ thick paper which is going to be your base and trace the outline of each shamrock on it.


Step 4

The game is to match each shamrock to its outline.


Now grab some friends or your parents and start playing the St. Patrick’s Day Matching Game.  Enjoy!!

Technorati Tags: , , , , , , , , , , , , , ,

How To Make Hand Print Rainbows for St. Patrick’s Day Preschooler Activity

Rainbows bring smiles to faces everywhere and these hand print rainbow are very easy for children of all ages to make. This is a perfect activity for toddlers, preschoolers, and Kindergartners. They are fun to make and parents just love handprints from their children.

You Might Like Our Other St. Patrick’s Day Crafts Ideas


How To Make Hand Print Rainbows for St. Patrick's Day Preschooler Activity


How To Make Hand Print Rainbows for St. Patrick’s Day Preschooler Activity

Crafts Materials Needed

*Construction Paper in Rainbow Colors (Red, Yellow, Orange, Green, Blue, Indigo, and Violet)

* Pencils or Markers

* Scissors

* Glue


Hand Print Rainbow Instructions

Step 1

Teach the kids about the rainbow and the spectrum of light and all that jazz. If they are very young….teach them the order of the colors in a rainbow by telling them about the name Roy G. Biv (Red, Orange, Yellow, Green, Blue, Indigo, Violet)


Step 2

Have the child trace his or her hand on each color of paper (or trace it for them if they are very young)

Step 3


How To Make Hand Print Rainbows for St. Patrick's Day Preschooler Activity


Glue each hand together, in order (Red, Yellow, Orange, Green, Blue, Indigo, and Violet) in a rainbow-like arc.

You Might Like Our Other St. Patrick’s Day Crafts Ideas

Technorati Tags: , , , , , , , , , ,

How To Make A Potato Face Leprechaun Preschool Crafts Activity for St. Patricks Day

St. Patrick’s Day must have Leprechauns and this one is sure to make everyone smile. This is a Mr. Potato Head Leprechaun craft for Saint Patrick’s Day. This one is great for younger kids such as Kindergartners, Preschoolers, and First Graders.

You Might Like Our Other St. Patrick’s Day Crafts Ideas


How To Make A Potato Face Leprechaun Preschool Crafts Activity for St. Patricks Day


How To Make A Potato Face Leprechaun Preschool Crafts Activity for St. Patricks Day

Potato Face Leprechaun Supplies

* Small paper bag
* Scissors
* Pencil
* Glue
* Green, red, purple, black and white construction paper

Potato Face Leprechaun Instructions

Step 1


Take the paper bag and cut into the shape of a potato.


Take the paper bag and cut into the shape of a potato.


Take the paper bag and cut into the shape of a potato.

Step 2


Use the white and black construction paper to cut our the eyes and the mouth and glue to the bag piece.


Use the white and black construction paper to cut our the eyes and the mouth and glue to the bag piece.


Step 3


Step 3 Make a Potato Head Leprechaun


Glue a Red Circle to his face…for the nose.

Step 4


step 4.1


Make a hat by folding a green piece of paper in half lengthwise and then drawing a slanted capital Bubble Letter ‘L’ shape (like seen above), along the fold and the cut it out and open it up … it makes a hat.


Step 4 Make a Potato Head Leprechaun


Like this.

Glue this hat to the potato head.

Step 5


Step 6 Make a Potato Head Leprechaun


Cut out a black strip and glue it on the hat.

Step 6


Cut out a yellow square with the center cut out to the hat's black strip.


Cut out a yellow square with the center cut out to the hat’s black strip.


Step 7 Make a Potato Head Leprechaun


Glue the gold buckle to the black paper strip.

Step 7


Step 8 Make a Potato Head Leprechaun


Cut out 2 big green circles and one small green circle and glue them together to look like a bow tie. Glue them to the bottom of the potato head.

Step 8


Step 9 Make a Potato Head Leprechaun


Take an orange piece of paper and cut strips of paper out. Glue them as a beard to the bottom of the face.


You Might Like Our Other St. Patrick’s Day Crafts Ideas

Technorati Tags: , , , , , , , , ,

Making an Alphabet Letters Memory Game from Milk Jug Caps with Printables and Instructions for Kids

Today I will show you how to make a really cool Memory game that is great for any age child, but especially good for preschoolers and Kindergarteners who are still working on Alphabet Letters recognition. If you don’t have enough Milk Jug caps, you could also use coins, checkers, cardboard, or whatever else you have lying around the house.

DON’T USE WATER BOTTLE CAPS – USE LARGE MILK CAPS TO ENSURE THE CHILD WON’T BE ABLE TO SWALLOW THEM! EITHER WAY, WATCH THE CHILD TO MAKE SURE THEY DON’T INGEST THE CAPS!


Making a Memory Game from Bottle Caps with Printables and Instructions for Kids


Making a Memory Game from Bottle Caps with Printables and Instructions for Kids

Crafts Materials Needed

– 52  Milk Bottle Caps

– Glue

– Printer and Paper

– Scissors


Step 1 : Print Out the Bottle Cap Letters

Pick the Letters that you want below (choose from color or black and white, as well as milk jug bottle caps or water bottle caps). Print out the templates twice as you are going to be playing a matching game in which you need 2 of every letter.


Black and White Water Bottle Caps Letters


Click on Above Image for BLACK AND WHITE WATER BOTTLE CAPS


Colorized Water Bottle Caps


Click on Above Image for COLORIZED WATER BOTTLE CAPS


Black and White Milk Bottles Caps Letters


Click on Above Image for BLACK AND WHITE MILK BOTTLE CAPS


Black and White Milk Bottles Caps Letters


Click on Above Image for BLACK AND WHITE MILK BOTTLE CAPS Part 2


Colorized Milk Bottle Caps Letters


Click on Above Image for COLORIZED MILK BOTTLE CAPS


Colorized Milk Bottles Caps Letters Part 2


Click on Above Image for COLORIZED MILK BOTTLE CAPS Part 2


Step 2 : Attaching Letters to Bottle Caps


Making a Memory Game from Bottle Caps with Printables and Instructions for Kids


To attach the letters to the milk jug caps, either glue them to the top or simple insert them inside the cap (which depending on the size of the cap, might not even need glue. If you are using coins…simply tape the letters to the coins.

How to Play Alphabet Memory Game

(1) Make sure that all the caps are messed up so that they aren’t in order.

(2)  Turn all of the caps over so you cannot see the letters anymore.

(3) Place them in neat rows.

(4) A player turns over 2 caps.

….. If there is a match, they put those caps in their own pile and then gets to take another turn.

….. If there is NOT a match, the player then turns the caps back over ( in the same spot that they found them) .   The next player then gets to take a turn.

(5) The game is over when all of the matches are found. The player with the most caps wins the game.

Technorati Tags: , , , , , , , , , , , , ,

Make Keepsake Hand Print Poster Gift for Mom on Mother’s day Craft

Moms and Dads always love hand print crafts AND they are very easy to make. Here is a cute arts and crafts project for kids to make for Mom on Mother’s Day or Dad on Father’s Day. This is also great for toddlers and preschoolers. Make this beautiful hand print poster for your Mom this Mother’s day. She’ll treasure it forever.

Make Keepsake Hand Print Poster Gift for Mom on Mother’s day Craft


Craft materials required:

Red acrylic paint

Brush

Thick paper

Ribbon

Red colored paper

Scissors

Glue

Tape

Crayon


Step 1

Cut out a piece of paper larger than the size of your hand. Use the paintbrush to apply paint on your palm and stamp your hand on the paper.


Step 2

Write a message for your mom below the print.


Step 3

Cut out strips of red paper and glue it on the sides to make a border.


Step 4

Cut a piece of ribbon and tape it to the back as shown.


Step 5

Your poster is ready! Gift it to your mom on mother’s day and she can hang it up on the wall.


Technorati Tags: , , , , , , , , , , , , ,

Make Easter Counting Game Craft Activities for Preschoolers & Young Kids


Make Easter Counting Game for Easter or Spring : Preschoolers Craft

Here’s a fun game to learn counting this Easter. This craft can also be done as a group activity, every child makes one basket and in the end the kids can play a game of putting the right number of Easter bunnies  in each basket.

Craft materials required:

Thick colored paper

Broad ribbon

Scissors

glue

tape

markers

Ruler

Small bunny shaped erasers or candy

Colored tape


Step 1

Cut out strips of paper about 4 in wide and 9 in long


Step 2:

Roll it around and glue the ends together to form cylinders.


Step 3

Trace the outline of the circle formed on a piece of paper of the same colour.


Step 4

Remove the cylinder and add tabs to the design as shown below.


Step 5

Cut it out and fold the tabs as shown below.


Step 6

Place the cylinder over this piece so that the tabs are on the inside. Tape the tabs to the inside walls of the basket.


Step 7

Take a long piece of tape and stick it along the bottom as shown.


Step 8

Fold the tape over the edge to make the basket strong.


Step 9

Cut a piece of ribbon and tape it to the insides of the basket as shown.


Step 10

Stick some colored tape along the bottom of the basket as shown.


Step 11

Write a number on each basket. The game is to put the right number of objects- Easter bunnies, miniature eggs or candy into the baskets.


Technorati Tags: , , , , , , , , , , ,

Make Spring Handprints Lambs for Easter or Spring : Preschoolers and Kids Craft


hand-lamb-finished


Make Spring Handprints Lambs for Easter or Spring : Preschoolers and Kids Craft

One thing that I have always loved as a parent is handprints.  There have been days where I have winced at having to wash them from the walls, partly because they are there and partly because I am taking them off, but I always seem to lovingly place my own hand over top of them as though I might remember them through touch.  It has been this way ever since my children were babies.  The first thing I did was count all the little fingers on their small hands and since that day I have continued to count them over and over again.  Of course, I need to do it discreetly now so I’m not “bothering” my children.

Since I am so in love with little handprints, I enjoy doing crafts where I can capture my children’s handprints once again for posterity reason. This craft, handprint lamb, is a great way to capture a handprint but it also adds a touch of spring to your crafts and gives your child a new way to use his hands.


hand-lamb-supplies


Gather all the materials you need:

  • Brown, White or Black Construction Paper (Or if you want to create a colorful lamb, use any brightly colored construction paper.)
  • Black Marker
  • Cotton Balls
  • Your Child’s Hand
  • White Glue


Step 1


hand-lamb-hand


1.  Have your child place his hand on the construction paper and either help him or have him trace it out onto the paper.

Step 2


hand-lamb-cutout


2.  Cut out the handprint.  For older children, this is an excellent activity to build up their cutting skills.

Step 3

3.  Flip the hand over so the fingers are facing down.  The fingers are the legs of the lamb and the thumb is the head so make sure that the hand is spread out when you do trace it.

Step 4


hand-lamb-glue


4.  Cover the palm of the hand, and part of the legs with white glue.

Step 5


hand-lamb-spread-cotton


5.  Pull the cotton ball so it becomes billowy, like soft wool or a fluffy cloud.

Step 6


hand-lamb-cotton-ball


6.  Place it onto the white glue so it covers the lamb’s “body.” Make sure to leave the legs and head uncovered.

Step 7


hand-lamb-feet


7.  Draw little feet onto the bottom of the fingers with the black marker.

Step 8


hand-lamb-finished


8.  Draw a face onto the head (the thumb) of your lamb with the black marker.

Once your lamb is finished, you can either hang it up as is, or you can paste it to a sheet of construction paper and then add green for grass, white construction paper (or cotton balls) for clouds and anything else that you would like to decorate it with.

Technorati Tags: , , , , , , , , , ,

Easter Bunny Rabbit Treat Cups Crafts Activity Ideas for Kids


bunny-cups-x3


Easter Bunny Rabbit Treat Cups Crafts Activity Ideas for Kids

Every once in a while, I come up with this wonderful little idea that I just need to do as a craft and I enjoy sharing it.  While I would love to say that this little craft is one that I thought up myself, I can’t.  In actuality, I discovered this little craft only this week when my four year old came home from his kindergarten class.  He happily hopped up to me and showed me this cute little bunny that his class had made for Easter and I was so delighted by the end result that I just had to share it with many other parents and crafters out there.

I would like to say a big thank you to his kindergarten teacher before I do start on the craft itself.  I would also like to mention that this craft is great for children of all ages.  At home, I did this craft with a 4 year old and an 8 year old and both were delighted with both the process and the end product.  It is very easy to do and can make a beautiful little gift or grab bag for the Easter season.

Bunny Rabbit Cups: How to Make these Delightful Little Bunny Cups with only a Few Supplies


bunny-cup-supplies


Gather all the materials you need:

  • Markers (I used red, purple and black but you can use anything you want)
  • White Glue
  • Cotton Balls
  • Styrofoam Cup
  • Easter Grass (I used green but feel free to use any color)
  • Construction Paper, white and pink
  • Stapler
  • Scissors


bunny-cup-eyes


1.  Take a Styrofoam cup and carefully draw the eyes of the bunny around the mid-range of the cup.  You can use any shape you want so don’t feel the need to use my cup design.  Also, allow your child to draw the face she wants or simply let her scribble on it if she would like.  For my cup, I used black for the outline and purple for the iris.


bunny-cup-nose


2.  Next, draw the nose slightly under the eyes and in the middle of the “face.”  I used red for my nose.


bunny-cup-mouth


3.  Finally draw the mouth and teeth (if your bunny has teeth) and add any other embellishments to the face.  My oldest drew drool coming out of the mouth (see center cup in top picture).  Once the face is drawn, set it aside to work on the ears.


bunny-cup-whie-ears


4.  Draw out a set of bunny ears on the white construction paper.  These should be fairly large but still manage to fit inside the cup.


bunny-cup-pink-ears


5.  Repeat the process on the pink construction paper but make these ears slightly smaller since they will be the inside of the bunny ears.  When I was creating this craft with my kids, they didn’t want the white ears so if you find your children don’t either, just let them create on their own terms.  There is no need for every bunny cup to look the same.


bunny-cup-scissors


6.  Cut out the ears.


bunny-cup-glued


7.  Glue the pink bunny ears into the center of the white bunny ears.  Make sure the bottoms of the ears match up when glueing.


bunny-cup-staple


8.  Once the ears are glued together, secure them to the inside of the cup with the stapler.  You will want to put them on the side that is furthest from the face so the staples are on the back of the bunny and not in the middle of his forehead.


bunny-cup-fold-ear


9.  This is optional, but if you want the folded ear finished look, crease one of the ears about a quarter of the way down.


bunny-cup-tail


10.  Take a small cotton ball and glue it into place below the staples on the back of the cup.


bunny-cup-finished


11.  Fill the cup with Easter grass and add a few eggs.

And that is all it takes to create one very cute little Easter Bunny cup.

Technorati Tags: , , , , , , , , , , , , , ,

Peeping Groundhogs Craft Activity for Groundhog day

Make this cute craft which shows the groundhog peeping out of his burrow as you celebrate ground hog day. The groundhog pops out of his burrow when you slide the Popsicle stick upwards, and it goes into hiding when you pull the stick down. The simple steps to make this craft follow.

Here are More Groundhogs Day Crafts


Craft Materials Required:

Thick white paper

Thick brown paper

green paper

scissors

glue

one Popsicle stick

markers and crayons


Step 1

Take a piece of white paper, of the size you want. Make sure it is longer than your Popsicle stick.


Step 2

Take another piece of paper, about 1/3 of its length, but of the same width , as shown.


Step 3

On the brown paper, draw out the face of a ground hog as shown.


Step 4

Glue the face on to the top of the Popsicle stick.


Step 5

Glue a strip of brown paper below the groundhog as shown.


Step 6

Glue the second paper on top of the first paper as shown. leave space in the center for the groundhog on the Popsicle stick. The groundhog should be able to easily slide up and down.


Step 7

Cut out grass shapes in green and glue them on the picture.


Step 8

Decorate the rest of the picture with crayons


Here are More Groundhogs Day Crafts

[tags]groundhog day, groundhogs day, crafts for groundhogs day, groundhog day crafts, groundhog day activities, crafts for kids, activities for kids, arts and crafts, groundhogs, woodchucks, crafts for preschoolers[tags]

Turkey Plant Poke Garden Thanksgiving Crafts Activity for Kids


Image115


Turkey Plant Poke Garden Thanksgiving Crafts Activity for Kids


Plant pokes are a great way to brighten up and decorate plants in your house and gardens in your backyard. Now that Thanksgiving is getting closer, how about we make a Thanksgiving Turkey Plant Poke to decorate your garden. This turkey plant poke is easy to make and lots of fun to look at. Easy directions for this crafts project follow below.

Materials required:

Scissors

Glue

Thick colored paper- yellow, mustard, red

Popsicle sticks

Crayons

A plant


Image098


Step 1

On a piece of paper, draw a large circle and a smaller cirle as shown. Then draw around both the circles as shown.


Image084


Image085


Step 2

Cut out two pieces of the second shape you drew. Stick an ice cream stick on one as shown.


Image087


Step 3

Break a few ice cream sticks into 2.


Image089


Step 4

Arrange them and stick them as shown in the picture.


Image090


Step 5

Stick the second shape on top of the ice cream stick so that the ice cream stick is between the two shapes which are glued together.


Image091


Step 6

Now cut out 4 shapes of the exact same size as shown. These will be the wings.


Image093


Step 7

Stick a wing as shown.


Image094


Step 8

Now, turn it over and stick a second wing exactly over the first one as shown.


Image095


Step 9

Add all 4 wings in this manner. Cut out white paper for the eyes and red paper for the beak and glue it as shown on both sides.

Color the sticks on top with crayons.

Your plant poke will look like this on both sides.


Image097


Step 10

Insert it into the soil next to a  plant.


Image115


MORE THANKSGIVING ARTS AND CRAFTS IDEAS BELOW

It is almost Thanksgiving time so check out our Thanksgiving Coloring Pages & Thanksgiving Crafts for Kids Page to find some great turkey and thanks-giving crafts project ideas for kids to celebrate Thanksgiving such as

Autumn / Fall Crafts ..
Cornucopia Crafts
..
Indian Corn Crafts
..
Pilgrim Crafts
..
Preschoolers & Toddlers Thanksgiving Crafts
..
Scarecrow Crafts
..
Thanksgiving Coloring Pages & Printouts
..
Thanksgiving Decorations Crafts
..
Thanksgiving Table Decorations Crafts ..
Thanksgiving Turkey Crafts ..
Thanksgiving Worksheets & Printouts

Technorati Tags: , , , , , , , , , , , , , , , ,

Thanksgiving Turkey Pencil Topper Crafts Project for Kids


Image106


Thanksgiving Turkey Pencil Topper Crafts Project for Kids


Here’s a great idea to celebrate thanksgiving at school- a turkey on the top of your pencil…a Turkey pencil topper craft for kids!! This craft is really easy to make and will surprise your teacher and your friends.

Materials required:


Image140


Coloured paper ( thicker paper works better)- Red, mustard, brown

White paper

A pencil

Scizzors

Glue

Marker

Step 1

Cut out a piece of paper about 1 inch by 1 inch and roll it around the pencil. Apply glue on the end of the paper and roll, so that the paper sticks on itself to form a cylinder.


Image099


Step 2

Pull your cylinder out. Cut out a small circle in a different color as shown.


Image100


Step 3

Stick the circle on the cylinder as shown. Draw eyes. Now put it back on the pencil .


Image101


Step 4

Cut out a shape as shown. Draw lines as shown with a pencil. Cut along those lines. This will be the turkey’s feathers.


Image103


Step 5

Stick the turkey’s feathers behind the cylinder. Bend the strips of paper forward and backward alternatively as shown.


Image111


Step 6

Your turkey is now ready. Place your pencil in your bag and get ready for school!!


Image106


MORE THANKSGIVING ARTS AND CRAFTS IDEAS BELOW

It is almost Thanksgiving time so check out our Thanksgiving Coloring Pages & Thanksgiving Crafts for Kids Page to find some great turkey and thanks-giving crafts project ideas for kids to celebrate Thanksgiving such as

Autumn / Fall Crafts ..
Cornucopia Crafts
..
Indian Corn Crafts
..
Pilgrim Crafts
..
Preschoolers & Toddlers Thanksgiving Crafts
..
Scarecrow Crafts
..
Thanksgiving Coloring Pages & Printouts
..
Thanksgiving Decorations Crafts
..
Thanksgiving Table Decorations Crafts ..
Thanksgiving Turkey Crafts ..
Thanksgiving Worksheets & Printouts

Technorati Tags: , , , , , , , , , , , , ,

Napkin Holder Doll for Thanksgiving Dinner Table Decorations Crafts Idea for Kids


Image094


Napkin Holder Doll for Thanksgiving Dinner Table Decorations Crafts Idea for Kids


This pretty doll will hold your napkins or cutlery for you at thanksgiving dinner. Today we are going to share an idea for making a ‘Happy Thanksgiving’ Dinner Table Napkins or Silverware Holder to use  as a decoration at your Thanksgiving dinner table. Below you will find instructions for this Thanksgiving table decoration.

Materials required:

Crepe paper

Toilet paper roll

Colored paper

Marker

Yarn- black

Thick white paper

Some thread/ twine

Cut out a piece of clored paper thats wider than half the length of the toilet paper roll and long enough to go around the roll once. Roll it around the roll and stick with glue.


Image077


Image078


Step 1

Cut a circle on white card for the head.


Image079


Step 2

Cut yarn into pieces as shown. Use glue to fix them to the top of the face like hair.


Image081


Image082


Step 3

Cut out a long piece of crepe paper. Make sure the natural creases of the paper are the same as shown in the picture. This paper shoudd be a little less than half the width of the roll and should go around the roll at least twice.


Image083


Step 4

Make a fold about one inch from the edge as shown.


Image084


Step 5

Apply glue to the edge of the paper only as shown.


Image085


Step 6

Place thread or twine along the fold. Fold the edge over it.


Image086


Step 7

Pull the thread to make the skirt fold


Image087


Step 8

Tie the skirt around the roll as shown. in the back, pull the edges together and glue as shown.


Image088


Image089


Step 9

Draw buttons on the dress


Image090


Step 10

Fix the head. Add eyes, nose and a wide smile.


Image094


Step 11

Your doll is ready. You can use the inside of the doll to store napkins or cutlery.


Image093


MORE THANKSGIVING ARTS AND CRAFTS IDEAS BELOW

It is almost Thanksgiving time so check out our Thanksgiving Coloring Pages & Thanksgiving Crafts for Kids Page to find some great turkey and thanks-giving crafts project ideas for kids to celebrate Thanksgiving such as

Autumn / Fall Crafts ..
Cornucopia Crafts
..
Indian Corn Crafts
..
Pilgrim Crafts
..
Preschoolers & Toddlers Thanksgiving Crafts
..
Scarecrow Crafts
..
Thanksgiving Coloring Pages & Printouts
..
Thanksgiving Decorations Crafts
..
Thanksgiving Table Decorations Crafts ..
Thanksgiving Turkey Crafts ..
Thanksgiving Worksheets & Printouts

Technorati Tags: , , , , , , , , , , , , , , , , , ,