School is about to start yet again and we thought you would love this craft to make a hand-sewn notebook cover. It is a super cute notebook cover that includes a stuffed bunny rabbit at the top. You love to write on it!
How to Make Cool Stuff
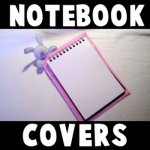
School is about to start yet again and we thought you would love this craft to make a hand-sewn notebook cover. It is a super cute notebook cover that includes a stuffed bunny rabbit at the top. You love to write on it!
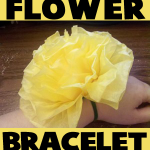
Find out how to make a tissue paper flower bracelet for Mom on Mother’s Day. This would also be a great bracelet to wear in Spring or for Easter. Find out how to make it with this great crafts tutorial.
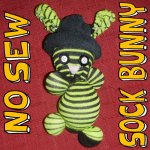
Today we will show you how to make a no-sew stuffed bunny rabbit for Easter….this craft is easy enough to make in twenty to thirty minutes. All you need are 2 socks, some rubber bands, and a few buttons. This is a great craft to make for Easter celebrations.
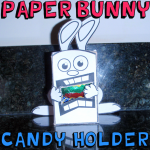
Here is a free printable template that you can use to make an adorable Easter Bunny that holds candy in his mouth. This could be used as an Easter decoration or to give candy to your friends. Either way, it is simple enough to make with a little effort. Find the free printable template below as well as the instructions for putting it together.

Instead of using an Easter Basket to give out Easter treats to people, have you thought of using a Treat Bag? Today I’m going to show you how to make a Bunny Rabbit Treat Bag for Easter. These are great if you have a bunch of people to hand out candy to. Instead of buying an Easter Basket for everyone…. why not just make these cute Bunny Rabbit Treat Bags. They are super easy and a ton of fun…. plus they are super cute. So, grab the materials needed and let’s get started.

I have a fun Easter Craft for you today….. In this post I’m going to show you how to make a Woven Paper Easter Basket. This Easter Basket is made out of sheets of construction paper and ribbon and when put together correctly it makes for an awesome Easter decoration. You can fill it with plastic Easter Eggs or Paper Easter Eggs you made yourself and display it proudly in your house for all to see. So, grab the materials needed and let’s get this craft started.

Get ready for a fun and creative craft because I have just that for you today. In this post I am going to show you how to make a Glove Bunny for Easter. That’s right…. it’s an Easter bunny made out of a Glove. This is a great craft to do to actually use that glove that you no longer have the pair for. After stuffing the glove you have a nice, cuddly Easter Bunny that would be perfect as an Easter decoration or a nice cuddly friend. The choice is yours. So, let’s get started.

Today I’m going to show you how to make a Handkerchief Bunny Cup Cover. If you don’t have a Handkerchief available…. you might have to ask one of your grandparents to borrow one for this craft. You are going to be folding the handkerchief to create an Easter Bunny. Once completed, this craft is perfect to use as an Easter decoration this Easter. It would look great on any tabletop. So, grab the materials needed and let’s get started.

Today I have a fun and creative craft for you. In this post I’m going to show you how to make a Glued String Easter Basket perfect to fill with Easter eggs and candy. The Easter Basket turns out beautifully and it is simply made with a balloon, yarn, flour and water. Don’t use the same boring Easter Baskets that every child uses from the store…. make your very own Glued String Easter Basket. The Easter Bunny will love it. So, let’s get started.

I’m sure you have all heard of the edible Easter Bunnies you get for Easter…. they are usually milk chocolate bunnies or white chocolate bunnies. Well, today we are going to make an edible Easter Bunny, but it is going to be made with fruits and vegetables. That’s right…. I’m going to show you how to make a Bunny Rabbit with Food for Easter. When you are finished making the Easter Bunny you can display it proudly as an Easter decoration or eat it up… the choice is yours. So, let’s get started.

Are you looking for a way to hand out the Easter Candy this year instead of using the normal Easter eggs? Well, then I have the craft for you today. In this post I will be showing you how to make Candy Filled Baby Chicks for Easter. Make a few and give them to your friends and loved ones this Easter. Or, if you are having guests over for Easter why not use these Candy Filled Baby Chicks for the Children’s table. They are sure to be a huge hit. So, let’s get started.

Today I’m going to show you how to make Easter Bunny Straws. This would be a great craft to present the kids that you are having over this Easter Holiday. Simply print off enough templates for the amount of Children you are having over… place them at the Children’s table and let them color and put the straws together. Not only will they be entertained by the craft, but also by drinking through the fun Easter straws. You can choose to print off the colored template or the black and white and let the children color them themselves. So, let’s get started.

I have a fun and creative craft for you in this post….. today I’m going to show you how to make a Cork Bunny. Made from a cork, toothpicks and a template this craft turns out really cute. It is a perfect craft for Easter. Make a few and decorate your house in time for Easter. You will need some help from an adult as there is a part in this craft that a knife is needed. An Adult should do this section of the craft. So, grab the materials needed and let’s get started.

Have you ever made a people chain with paper? If so, I have an Easter craft that is very similar to that. Today I’m going to show you how to make an Easter Bunny Chain out of paper. This craft can be made by the youngest of crafters. And, it is so much fun. Once you are done cutting out the Easter Bunny Chain decorate it and hang it up as an Easter Decoration. People will love it!! So, grab the materials needed and let’s get started.

I have a fun and creative craft for you today. I am going to show you how to take a paper bag and make it into a bunny puppet. Sounds like fun, right? It really is. And, the timing of it couldn’t be any more perfect. After all, Easter is in just a few weeks. Made with string or yarn the arms and legs of the puppet actually move. When you aren’t using it as a puppet hang the Paper Bag Bunny up as an Easter decoration. People are sure to love it when they see it. So, let’s get started.

For this craft you will learn how to turn normal paper into a fun, translucent stained glass decoration which you can hang on a window. It’s a definite eye-catcher. In this craft we will be making an Easter decoration that will look gorgeous hanging from any window. You can chose to print off the templates I have below or you can simply draw and color your own…. the choice is yours. So, grab the materials needed and let’s get started.