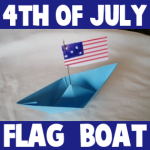
How to Make a Patriotic American Flag Boat for 4th of July

Are you looking for a unique Fourth of July craft? Here is a fun craft to celebrate America’s birthday…this craft (by Laura from Dacian Moon Handmade)  will show you, step by step, how to make a paper boat with an American flag– a simple craft for 4th July.


How to Make a 4th of July Patriotic Flag Boat


CRAFTS MATERIALS NEEDED:

– blue paper
– white paper
– red and blue pen
– needle (or toothpick)
– scissors


IMG_5920


Step 1.

Take the blue paper …


IMG_5925


… and fold it in half by bringing the upper part over the lower one.


IMG_5926


Fold again in half by bringing the left part over the right one this time.


IMG_5927


Unfold, because we need only the crease at this point.


IMG_5928


Step 2.

Bring the right upper corner to the center.


IMG_5929


Do the same for the left corner, like this.


IMG_5930


Fold the remaining strip upward.


IMG_5931


Turn over …


IMG_5932


… and fold the strip upward.


IMG_5933


Step 3.

Open…


IMG_5934


… like this…


IMG_5935


… until it became flatten on the other direction.


IMG_5936


Fold the lower parts upward…


IMG_5937


… like this.


IMG_5938


Open again until it became flatten on the other direction.


IMG_5939


Like this.


IMG_5940


Step 4.

Take the upper corners and stretch out.


IMG_5941


Like this.


IMG_5942


Now the boat is ready.


IMG_5945


Step 5.

Let’s make the flag. Cut a rectangle of white paper…


IMG_5947


Draw the contour of the blue part…


IMG_5948


… and the stars.


IMG_5950


Start filling this part with blue color.


IMG_5951


Like this.


IMG_5952


Use red color to draw the lines on the rest of the flag.


IMG_5953


Like this.


IMG_5954


Step 6.

Now we assemble the components. Put the needle through the flag…


IMG_5956


and stick the tip in the middle of the boat, like this.


IMG_5957


The boat is ready to be used as a decoration or as a toy.


IMG_5958


Technorati Tags: , , , , , , , , , ,

How to Make a Paper Bird Cage Craft Idea for Kids

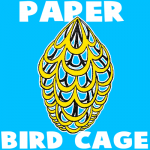
This is another fun paper craft that would be fun to make on a rainy day. These foldable paper bird cages turn out so beautifully, you can even give them away as gifts.

NOTE: The steps might seem simple, but they need to be followed carefully. Don’t be discouraged if you need to try this more than once  to get it just right.


How to Make a Paper Bird Cage Craft Idea for Kids


Crafts Materials Needed:

Paper

Scissors

Step 1


step1


Start with a square piece of paper or cut down a piece of paper into a square.  Then fold the lower right corner inward and upward to the upper left.

Step 2


step2


Now you have a triangle. Now fold its lower left corner inward and upward  to the upper right corner.


Step 3


step3


You now have a smaller triangle. Fold its right corner inward and to the left, as a final fold.

Step 4


step4


The result should look like this triangle. The single edges of the paper running along the top as in the picture above.

Step 5


step5


The folded sheet is now ready to be cut. Cut the paper the way you see it in the above picture. If you need me to verbalize how it is being cut…I have told you below.

(In cutting the paper, start from the diagonal of the triangle and make a cut parallel to the top edge, stopping  just short of the folded edge at the right. Then cut from the folded edge back toward the diagonal, stopping short of the diagonal. Continue with these alternating cuts.)

Step 6


step6


Now, open out the paper carefully  and it will look like this.

 Step 7


gilded paper bird cage papercraft for kids


Gather the corners of the paper and shake the center downward. By twisting the corners, or setting them together  with tape or a rubber band, you form the fancy paper cage as shown in the picture.

Technorati Tags: , , , , , , , ,

How to Make Paper Flowers – Make a Daisy for Mom on Mothers Day

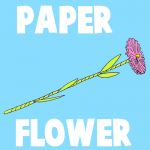
Oh no! Mother’s Day is coming up and you didn’t make your Mom a Mother’s Day present!!! No worries…here is a fun and easy craft that will knock the socks off of your mother. This paper flower craft sort of looks like a daisy, but you can use any colors you want to make it look like any type of flower. Find out how to make this paper daisy below.


How to Make Paper Flowers - Make a Daisy for Mom on Mothers Day


Crafts Materials Needed:

Colorful Paper

Scissors

Step 1


step1


Take a long strip of colorful paper and roll it up as in the picture seen above. Now paste the rolled paper shut.

Step 2


step2


Now cut slits in one end of the rolled paper tube.


Step 3


step3


Now flatten out the slitted side and turn it upside down, as seen in the picture above.

Step 4


step4


This part is a little hard to explain, but basically take a small piece of colorful paper (in the finished picture this part would be orange) and twist it into a rounded stump.

 Step 5


step5


Now put this rounded stump into the center of the flatten flower.

Step 6


step6


Now take a narrow strip of green paper. Paste one end on the short stump below the flower. Start twisting the strip round and round, each time a little more downward, in a spiral fashion…as seen in the pic above.

Step 7


step7


Now get a green piece of paper and fold it forwards/backwards/forwards/backwards, etc like an accordion.

 Step 8


step8


Now draw the shape of half of a leaf on top of the fold and then cut it out. You will now gets tons of leaves out of this.

Step 9


step9


Flatten out the leaves and then work them into the spiral folds on the stem as seen in the picture above.

Finished Paper Daisy Craft


Finished paper flower for mom on mothers day


Now you have a beautiful paper flower or daisy for your Mom on Mother’s Day. I hope you enjoyed this craft!

Technorati Tags: , , , , , , , , ,


Make a Turtle Paper Toy Model

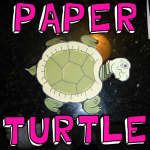
Here is a fun printable turtle papercraft that you can make. This is super easy to print, fold, and then play with. Find out how to make it below.


Make a Turtle Paper Toy Model


Crafts Materials Needed

Paper or Cardstock

Scissors

Printer

Optional – Cereal Box

Optional – Butter Knife

Optional – Ruler

Templates

PDFs

Black and White Template – Open PDF and then Print Out ( template-bw-paper-turtle-neck-in-and-out )

Color Template – Open PDF and then Print Out ( template-color-paper-turtle-neck-in-and-out )

OR

PICTURES TO SAVE AND PRINT OUT


Click on Thumbnail - Then Save Bigger Image That Opens Up


Click on Thumbnail – Then Save Bigger Image That Opens Up


Click on Thumbnail - Then Save Bigger Image That Opens Up


Click on Thumbnail – Then Save Bigger Image That Opens Up


Step 1


step1


Print out either a color or a black and white template. Then glue it onto a cereal box.


Step 2


step2


Cut it out.

Step 3


step3


To make it easier to fold, you can do something called scoring. Do this by taking a butter knife and a ruler and drag the butter knife along the ruler and line you want to score.

Then fold the legs and tail in. Then fold the neck forwards and backwards on the lines several times. You then have your turtle finished.

Technorati Tags: , , , , , , , , , ,

Pixelated Shamrock with Paper Weaving Craft for Saint Patricks Day

This is a great craft for Saint Patrick’s Day. Have you ever heard of pixel art…well it is drawing with blocks (pixels)…this is how graphic images that you see on the screen are made. Anyways, it is sort of like mosaics with tiles because tiles are square blocks as well. Even if you don’t understand what I’m trying to say, you can appreciate this craft for its coolness factor. This is an interesting form of paper weaving as you will see when you take a look at the steps. Happy St. Patrick’s Day everyone.


Pixelated Shamrock with Paper Weaving Craft for Saint Patricks Day


Crafts Materials Needed:

White Paper

Green Paper

Scissor

Tape

Template to Print


Pixelated Shamrock Template


Click on Image and It Will Open Larger. Then Save Image to Your Computer.

Step 1


step1


Firstly, cut strips of paper. You can cut them to any width, but I cut them each 1/2 inch wide. Cut about 15 of each color.

 Step 2


step2


Now lay strips of white paper down as seen above. Tape either the right or left side down. I taped it down on the right.


 Step 3


step3a


Then start weaving. You just look at the paper template provided and see how many green are needed on each line. In the pic above, 2 blocks are needed. (I taped too many white strips down and that is why the green starts 5 blocks away instead of 3 like in the template).

 Keep Going


step3b


Keep going.

 Until Completed


step3c


This is what the shamrock looks like when completed.

 Step 4


step4


I taped the white strips to the green strips on the bottom and top ( as seen in the picture ). Now that it is secured, you can turn it over and tape it in place on the back as well. You then have a really cool shamrock. I hope that this was fun for you.

Technorati Tags: , , , , , , , , , , , , , , , ,


How to Make a Stand-Up Dress-Up Doll

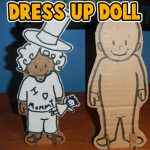
When I was a little girl I would have so much fun dressing up paper dolls.  You know…. the paper dolls you buy in a book at the store where you cut out the clothes to put on them?  I loved them.  I used to spend hours dressing up the paper dolls and changing their clothes over and over again.  Well, today I’m going to show you how to make with your children a stand-up dress-up doll.  I got the idea from a post I saw on another site ( ikatbag.com). You are going to make the doll out of cardboard… it is much stiffer and will hold up to many, many clothes changes.  Also, in this craft you will find 4 different template sheets of different accessories for your dress-up doll.  That means hours of fun for you and your children dressing up the doll.  So, grab the few materials needed and let’s get started.

Check out our other Doll Making Crafts.


How to Make a Stand-Up Dress-Up Doll


Materials Needed

Printer & Paper

Scissors

Black Marker

Cardboard

Paste or Glue (optional)

Glue Dots


Click on template images below to open and to print off.

Accessories Template 1


Accessories Template 1


Accessories Template 2


Accessories Template 2


Accessories Template 3


Accessories Template 3


Accessories Template 4


Accessories Template 4


Stand Up Dress Up Doll Template


Stand Up Dress Up Doll Template


Step 1


Print out template.  Cut it out.  Then trace it or paste it onto cardboard.


Print out template.  Cut it out.  Then trace it or paste it onto cardboard.


Step 2


Draw a face on the doll.


Draw a face with ovals for eyes.  A letter “C” for the nose.  A curved line for the smile.


Step 3


Cut around the figure.


Cut around the figure.


Step 4


 Cut two cardboard rectangles out.  Cut slits as the image shows you.


Cut two cardboard rectangles out.  Then cut the following slits out…. On one cardboard cut a slit on the top and a slit on the bottom.  On the other cardboard rectangle cut two slits on the top.


Step 5


Now put the cardboard rectangle's slits into the doll's feet slits.


Now put the cardboard rectangle’s slits into the doll’s feet slits.


Step 6


Turn doll around.  Put these two slits into each other.


Turn doll around.  Put these two slits into each other.  One rectangle has a slit on the bottom and one has a slit on the top.


It should look like this.


Like this.


Here is a different view.


Here is a different view.


Step 7


It should stand.


It should stand.


Step 8


Print out accessories.


Print out accessories.


Step 9


Cut them out.


Cut them out.


Step 10


I used glue dots to stick the clothes on the doll.


I used glue dots to stick the clothes on the doll.  They stay sticky time after time of changing clothes.


Here are some examples of how to dress up your new stand up dress up doll.

Example 1


Example 1


Example 2


Example 2


Example 3


Example 3


Example 4


Example 4


Example 5


Example 5


I bet you and your children had fun making these stand up dress up dolls….. but wait till you see the amount of fun they have dressing them up too.  They will love it.  I gave you 5 examples of ways to dress up your doll…. How many other ways can your child come up with?  Have fun!!

Technorati Tags: , , , , , , , , , , , , , , , , , ,

How to Make a Pen Holder by Weaving Magazines Together

Each of us have at home a lot of magazines that we do not need anymore, how about you recycle them by making something useful out of them. This is called upcycling. Here’s a useful way to use them…this would make a great gift for Mom or Dad on Mother’s Day or Father’s Day. It would also be good for your desk when you are doing your homework

Tutorial offered by Laura from  Dacian Moon Handmade  .


CRAFTS MATERIALS NEEDED:

– Magazines
– Transparent tape

Step 1


Open the magazine on the middle and take one (double) page.


Start folding it at 1.5 cm …


… until you have this band.


Repeat until you have about 11 – 12 bands.


Step 2.

Place some of them on the table, like this. Initially I started with 6 but I took one out because my support would be too wide. So you can start directly with 5.


Bring another band and place it perpendicular to the others, putting it over a band, then under the next … and so on… like in the picture.


Add another two, in negative. Where the first band is over, the second band will be under.

It will look like this.


Step 3.

Bend up the remaining part of the bands…


… and put another band through them…


… form the corners…


… and where the band is ending, place a little piece of tape to keep it in place.


Continue adding bands until you reach the top.


Step 4.

Add tape on the upper edge to keep it in place…


… and you have a new pen holder 😀


Technorati Tags: , , , , , , , , , , , , , ,


Cool Candy Valentine’s Day Card Ideas for Kids


Cool Candy Valentine’s Day Card Ideas for Kids


Valentine’s Day will be here before we know it.  Kids love handing out Valentine’s Day Cards…. they just love it.  Plus, they love receiving them as well.  I don’t know about you, but every year I try to help my kids come up with different Valentine Card ideas than the year before.   It gets difficult after a while to keep coming up with unique ideas.  Well, I thought I would help you with that by showing you some really cool Candy Valentine’s Day Card Ideas for Kids.  I found them all while scrounging the internet for you.  Each are unique and a ton of fun to make.  I’m sure you and your kids will find something here that they will enjoy making and giving to their friends and family.  So, let’s get started.

Check out our other Valentine’s Day Crafts.


Cool Candy Valentine’s Day Card Ideas for Kids

 (1) Now or Later Valentines Cards


Now or Later Valentines Cards


Better Homes and Gardens shows you how to combine these tasty treats with a clever written label to make a wonderful Valentine’s Day Card.  “Will You Be Mine Now or Later?”  How clever is that?!  The receivers will love it.


(2)  Dynamic Duo Valentine Cards


Dynamic Duo Valentine Cards


We’re two of a kind.   That is the saying you can use when you are putting together this tasty Valentine Card.  I found this cool candy Valentine’s Day card over at Spoonful.  They also offer some other clever sayings to use on other Valentine Cards so you don’t say the same thing to everybody.


(3)  Candy Doggy Card


Candy Doggy Card


Made with Tootsie Rolls this Candy Dog Valentine Card is sure to be a big hit in the classroom this year.  This is one of our fun crafts.  It is an easy craft and is inexpensive too…. gotta love that.  Check it out to find out how to make this Candy Doggy Card.


(4)  Candy Rings


Candy Rings


Here is a fun Candy Valentines craft that the children will love…. both the receiver and the giver.  These are Candy Rings…. perfect for Valentine’s Day.  I found this over at Kaboose.  Here they use a chenille stem per ring plus a wrapped candy.  These are so cute!!


(5)  Cupcake Goodies


Cupcake Goodies


These are simply brilliant…. and I’m sure absolutely delicious.  Made with cupcake liners and your favorite candy these are sure to be a big hit with your family and friends.  Add a special Valentine’s note to add a loving touch.  Check out this craft at Martha Stewart.


(6)  You Rock Valentines


You Rock Valentines


Show somebody how much you love them with this unique Valentines idea.  Made with Pop Rocks candy this Valentines sends out an awesome message…. that the receiver “Rocks”.  I found this Candy Valentines Card at Fiskars.  Check it out for yourself.


(7)  You Make Me Snicker


You Make Me Snicker


This Candy Valentine’s Day card is just simply adorable.  I found this craft over at Craft-O-Maniac.  Here she uses pictures of her daughter with the words, “I Like You, You Make Me Snicker!” on it.  Add a snicker candy and you have yourself a Valentine’s Card.


(8)  Valentines Critter


Valentines Critter


Here is another one of our very own Candy Valentine’s Day Cards.  It is an adorable little critter holding a yummy lollipop and a heart that reads, “Happy Valentine’s Day”.   That pretty much says it all, right?  Check out our How to Make a Valentines Critter for yourself.


(9)  Butterfly Valentines


Butterfly Valentines


This butterfly is so super cute!!  And, it is really a fun and easy Candy Valentine’s Day Card to make.  You can find the craft details at Skip To My Lou.  At that site they offer a printable template that you can print off on card stock.  Do a bit of cutting and add a lollipop.  You will be good to go.


(10)  I’ve Got a Crush on You


I've Got a Crush on You


I just love this Valentine’s Day Card idea…. I just couldn’t pass up adding it to this post.  It is not quite a Valentine Card, but it is definitely an adorable Valentine message to give to a special someone.  Use Crush soda along with a special message…. “I’ve Got a Crush on You”  They will surely love it.  Check out all the details at Design Aglow.


(11)  M&M Tic Tac Toe


M&M Tic Tac Toe


This Candy Valentine’s Day Card is really awesome.  And, it is sure to be so much fun for anyone who receives it.  I found this great Valentine idea at Shim & Sons.  Here they used 2 different color M&M’s and placed plenty in resealable bags.  They also used card stock to create the Tic Tac Toe Valentine Cards.  These are sure to be a ton of fun.


(12)  Lip & Mustache Lollipops


Lip & Mustache Lollipops


This is an awesomely clever idea.  Here Blonde Designs shows you how to use craft foam to trace some mustaches and lips.  Add them to a lollipop with a Valentine note and you have a fun Candy Valentine’s Day Card.  Watch how silly everybody looks sucking on the lollipop… they will look like they have mustaches and funny looking lips.  It is sure to get a lot of laughs.


(13)  Valentine Mice


Valentine Mice


I know what you are thinking…. when you think of Valentine’s Day you don’t think of mice.  I understand that.  But, take a look at these delicious mice made from Hershey Kisses and think again.  The receiver of this special Valentines gift will surely love it.  So much so that they probably will not want to eat it.  Check out Floral Showers for all the details.


(14)  Valentine’s Fuzzy Cake Balls


Valentine's Fuzzy Cake Balls


I found this yummy Valentine’s Day treat at Hungry Happenings and just had to share it with you.  Here they use shaved coconut to make these adorable creatures.  But, as they share with you if you do not like coconut feel free to use shaved chocolate instead.  Add a cute and loving message to your fuzzy cake ball and you have yourself the perfect Valentines.

Top photo by StuartWebster

Technorati Tags: , , , , , , , , , ,

How to draw a Valentine Dragoness Valentine’s Card

Today I will show you how to draw a fantasy style Valentine’s Day Card…. specifically a Valentine Dragoness Valentine’s Day card.  You can use regular paper for this craft or if you would like something more durable feel free to use Card Stock.  Whatever you have in your house is fine.  I will show you how to make every detail of this Valentine Dragoness perfect for your someone special.  So grab a paper and pencil and let’s get started.

Check out our other Valentine’s Day Crafts.

Laura from Dacian Moon Handmade will show you step-by-step how to make this.


Materials Needed

Paper or Card Stock

Pencil

Black Pen or Thin Marker


Step 1

Let’s start with one simple circle (is not necessary to be perfect). Now draw the X’s below.


Step 2

We’ll draw the basic parts of her face: eyebrow, jaw and snout.


Step 3

Now outline the head, over the new added parts, and then add the neck.


Step 4

Now we will sketch the nose…


And the mouth.
The mouth should be from the edge of the snout to the jaw.


Step 5

Let’s give her life: add the eye.
It should be drawn keeping the shape of the eyebrow.
Add definition to the nose, the jaw and the mouth.


Step 6

The basics are done so we can start adding details. Let’s give her horns and a little crest.


Step 7

Her head is ready but feel free to add as many details as you want – this will make your dragoness one of a kind.
It’s time to sketch the heart she is holding…


… and the hands.


Step 8

Let’s complete her with some wings. We draw it the same way we drew the crest, just bigger.


Step 9

Of course, she has claws. So, we draw them.  Also, draw her crest to go down over her back (between the wings), and add the last details.

Now our sketch is ready.


Step 10

Clean the unneeded lines. If you want you can copy it on a new paper (by placing it up against a window and tracing it).


Step 11

You’ll see that after cleaning… the lines are too thin… so outline and emphasize the important features, especially the eye.


Step 12

Apply shadows with thin and light lines.


Step 13

Now, with a little piece of paper, smudge the shadows.


Step 14

Add “Be my Valentine” on the heart and our dragoness is ready.


Give this handmade Valentine Dragoness to someone special this Valentine’s Day.  They will love it.

Technorati Tags: , , , , , , , , , , ,

How to Make a Fast Straight Paper Airplane

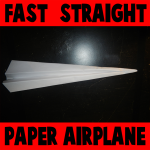
I have a wonderfully fun craft for you today.  And, you only need one material for this craft…. paper.  I’m going to show you how to make a fast straight paper airplane.  It’s so much fun and it will give you hours of enjoyment well after you are finished making it.  Here I will show you step-by-step how to make this paper airplane.  Also, if you scroll down to the bottom of the steps you will see there is a video on how to make this paper airplane as well.  So, grab a piece of paper and let’s get started.

Check out our other Paper Folding Crafts.


How to Make a Fast Straight Paper Airplane


Materials Needed

Paper


Step 1


Fold a piece of paper in half the long ways.


Fold a piece of paper in half the long ways.


Fold a piece of paper in half the long ways.


Like this.


Step 2


Open the paper back up


Open the paper back up…. like this.


Step 3


Fold the top corners in towards the center.


Fold the top corners in towards the center.


Step 4


 Fold in towards center line another time.


Fold in towards center line another time.


Step 5


Fold inwards again.


Fold inwards again.


Step 6


Now fold the entire plane in half.


Now fold the entire plane in half.


Step 7


Now fold down both sides as shown above.


Now fold down both sides as shown above.


And the other side too.


And the other side too.


Step 8


There it is.  Watch the video below if you have any issues.


There it is.  Watch the video below if you have any issues.

Here is our video on How to Make a Fast Straight Paper Airplane

Technorati Tags: , , , , , , , , ,

How to Make a Pop-up Christmas Card

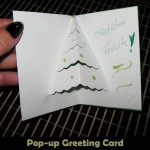
Today I’m going to show you how to make a very special greeting card for the Christmas Holiday.  In particular I’m going to show you how to make a Pop-up Christmas card.  Anyone receiving this Christmas card will love it… not only because it came from you, but also because of the 3-D effect of the card.  In this post I will show you how to make a Pop-up Christmas tree that actually sticks out of the card when opened.  Add a special note to your card and it is ready to send out for Christmas to a friend or family member.

Check out our other Christmas crafts.

Laura from  Dacian Moon Handmade will show you how to make this, step by step.


Materials Needed

– cardboard
– green paper
– green pen
– glue
– scissors
– green glitter glue


Step 1

Fold the cardboard in half.


Fold the upper corners outward at about 2/3 of their height…


… like this.


Step 2

At 2/3 of height, cut in waves until you reach the crease…


… it will look like this.


Make another 2 – 3 waved cuts…


… like this.


Step 3

Press the lower part (under the first cut) behind…


… like this. It will look like the tree stem.


Step 4

Fold the green paper in half.


Apply a layer of glue on the cardboard until you reach the creases…


… and place it over the green paper, like this.


Do the same on the other part.


Step 5

Take the green pen …


and write “Seasons Greetings” beside the tree.


Add some glitter glue globes on the tree and your greeting card is ready .


And, there you have it.  You just made a beautiful and festive Pop-up Greeting card for Christmas.  The receiver will love it!!

Technorati Tags: , , , , , , , , , , , ,

How to Make a Christmas Paper Toy

I have a fun Christmas craft for even the youngest of crafters.  Today I’m going to show you how to make a Christmas Paper Toy.  With just some paper, printer, scissors and a few other materials you and your child will be able to make this cute Christmas paper toy that they will enjoy playing with…. just as much fun as they will have making the craft.  If you want, feel free to color the templates before cutting them out to add even more fun to this craft.  So, let’s get started.

Check out our other Christmas Crafts.


How to Make a Christmas Paper Toy


Materials Needed

Printer

White Paper

Green Paper

Scissors

Tape

Pen

Glue

Cereal Box


Click on the template images below to open a new page and to print.

Christmas Background Template


Christmas Background Template


Christmas Presents Template


Christmas Presents Template


Christmas Table Template


Christmas Table Template


Christmas Characters Template


Christmas Characters Template


Christmas Tree Extras Template


Christmas Tree Extras Template


Step 1


Print templates


Print Templates.


Step 2


Cut out items from template.


Cut out items from template.


Step 3


This is the background.


This is the background.


Bend both dotted lines away from you.  Crease.


Bend both dotted lines away from you.  Crease.


Now fold the next line (solid) towards you.


Now fold the next line (solid) towards you.  Crease.  Do this on both sides.


Fold both of these tabs away from you so it acts as a stand.


Fold both of these tabs away from you so it acts as a stand.


Cut slits.


Cut slits.


Fold tabs up.


Fold tabs up.


Place the paper in the slits on both sides.


Place the paper in the slits on both sides.


Step 4


 Place each character in the stands.


Place each character in the stands.


Step 5


To make the Christmas tree... get some green paper and... Fold green paper in half twice.


To make the Christmas tree… get some green paper and… Fold green paper in half twice.


Use the template to... draw half of the tree along fold.


Use the template to… draw half of the tree along fold.


Cut both trees apart between both of them.


Cut both trees apart between both of them.


Cut down center... one on top of one and one at bottom of the other.


Cut down center… one on top of one and one at bottom of the other.


Now use the slits to slide the tree together to look like the tree above.


Now use the slits to slide the tree together to look like the tree above.


Tape some seams together.  Draw on tree if you want to.


Tape some seams together.  Draw on tree if you want to.


Write family member's names on ornaments or draw a design on each one.


Write family member’s names on ornaments or draw a design on each one.


Glue both stars together and put on top of tree.  Glue ornaments on tree.


Glue both stars together and put on top of tree.  Glue ornaments on tree.


Step 6


Cut out each of the legs.


Cut out each of the legs.


Glue on cereal box cardboard.


Glue on cereal box cardboard.


Cut out and fold and crease very well.


Cut out and fold and crease very well.


Cut out cardboard long and wide enough for legs.


Cut out cardboard long and wide enough for legs.


Glue on white paper like this.


Glue on white paper like this.


Have adult cut slits in the top of the table.


Have adult cut slits in the top of the table.


Put the food tabs in the slit.


Put the food tabs in the slit.


On the bottom of table push tabs in opposite directions.


On the bottom of table push tabs in opposite directions.


Step 7


 Cut out presents.


Cut out presents.


Fold on dotted lines and cut on slits.


Fold on dotted lines and cut on slits.


Put tab in slit.


Put tab in slit.


Completed present.


Completed present.


Step 8


Finished.


Finished.

Awesome job!!  You just finished making your Christmas Paper Toy.  Have fun playing with it…. Christmas will be here in no time.

Technorati Tags: , , , , , , , , , , , , , , , ,

How to Make a Simple Christmas Ornament out of Paper

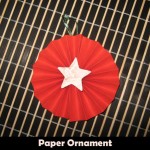
The Christmas season is upon us.  And, with the Christmas season comes the time for decorating the Christmas tree.  In this post I will show you how to make a simple Christmas ornament that is made out of paper.  But, don’t let the idea of this ornament made out of paper fool you…. the ornament turns out quite elegant.  Make a few of these paper Christmas ornaments with your kids and spread them around the Christmas tree.  It will be a lot of fun.  So, let’s get started.

Check out our other Christmas Crafts.

Tutorial offered by Laura from Dacian Moon Handmade.


Materials Needed

– red paper
– pattern cardboard
– pencil
– glue
– scissors
– a small piece of ribbon


Step 1

Cut a rectangle from the red paper…


…and fold it accordion style…


… like this.


We will make a fan from it.


Step 2

Repeat step 1 to make another fan.


Step 3

Glue the margins of the two fans…


… it will look like that. Let it dry.


Step 4

Using your pencil…


… draw a star on the cardboard.


Cut it out.


Apply a layer of glue on the back of the star…


… and place it on the middle of the fans…


… like this.


Now your decoration is ready.


Step 5

Next you must glue a piece of ribbon on the back of it…


… like this.


Wow, what an amazing Christmas ornament!!  It will look fantastic on your Christmas tree.  Make a few more to spread the paper ornaments around your tree.  How festive!!

Technorati Tags: , , , , , , , , , , , ,

How to Make Circle Paper Snowflakes – 4 Patterns

When you think of winter what do you think of?  I know what I think of….. snow.  Today I’m going to show you how to make circle paper snowflakes.  And, not just one type…. I will show you four different patterns.   These snowflakes are a lot of fun to make.  But, what is really cool about paper snowflakes…. they look great as winter decorations around your house.  Put them up in your windows to add to your Winter Holiday decorations.  So, let’s get started.

Check out our other Winter crafts.


How to Make Circle Paper Snowflakes - 4 Patterns


Materials Needed

Lid or Bowl

Paper

Pencil

Scissors


Step 1


Trace a lid or a bowl to make a perfect circle.


Trace a lid or a bowl to make a perfect circle.


Step 2


Fold circle in half.


Fold circle in half.


Step 3


Fold in half again.


Fold in half again.


Step 4

Draw a pattern.  Here are 4 pattern ideas….


Pattern 1


Pattern 1


Pattern 2


Pattern 2


Pattern 3


Pattern 3


Pattern 4


Pattern 4


Step 5


Cut out patterns and open up.


Cut out patterns and open up.

Aren’t these snowflakes great?!  And, you don’t have to limit yourself to the patterns we are showing you here.  Feel free to use your imagination and create some of your very own unique snowflakes.

Technorati Tags: , , , , , , , , , , , , , ,

How to Make a Hanukkah Dinner Paper Craft Toy

Hanukkah will be here before you know it.  After all, Hanukkah begins on the evening of December 8th.  Today I will show you how to make a craft that is perfect for Hanukkah.  I’m going to show you how to make a Hanukkah Dinner Paper Craft Toy that any child will enjoy playing with.  Your children will enjoy cutting out all the characters and images from the template…. folding them and gluing them together.  Even the youngest of crafters will enjoy this craft…. with just a little help from an adult.  So, let’s get started.

Note to everyone…I know in the picture the menorah only has 7 candles…I used the wrong type of menorah. A Hanukkah menorah has 9 candles…I updated it in the template. Thank you!

Check out our other Hanukkah Crafts.


How to Make a Hanukkah Dinner Paper Craft Toy


Materials Needed

Printer & Paper

Scissors

Glue


Click on template images below to open a new window and to print off.

Hanukkah Paper Characters Template


Hanukkah Paper Characters Template


Hanukkah Presents Template


Hanukkah Presents Template


Hanukkah Room Template


Hanukkah Room Template


Hanukkah Table & Menorah Template


Step 1


 Print out templates.


Print out templates.


Step 2


Fold the background scene.


Fold the background scene.


Step 3


Cut out characters and rectangles.


Cut out characters and rectangles.


Cut slits.


Cut slits.


Fold tabs up.


Fold tabs up.


Put a character in the slits... This is a stand for the character.


Put a character in the slits… This is a stand for the character.


Step 4


Cut out table, rug and menorah.


Cut out table, rug and menorah.


Fold on dotted lines.  Cut on slits.


Fold on dotted lines.  Cut on slits.


Glue together.


Glue together.


Step 5


Fold and glue together bottom of table.


Fold and glue together bottom of table.


Here it is from the side.


Here it is from the side.


Have an adult cut a slit in middle of table.


Have an adult cut a slit in middle of table.


Place menorah in the slit.


Place menorah in the slit.


Bend one tab forward and one tab back.


Bend one tab forward and one tab back.


Now the menorah should stand up.


Now the menorah should stand up.


Step 6


Cut out presents.


Cut out presents.


Fold on dotted lines and cut on slits.


Fold on dotted lines and cut on slits.


Put tab in slit.


Put tab in slit.


Completed present.


Completed present.


Step 7


Completed present.


Finished paper toy.

And there you have it…. you just made a Hanukkah Dinner Paper Craft Toy.  Enjoy it.

Technorati Tags: , , , , , , , , , , , , , ,

How to Make a Pop-Up Hanukkah Dreidel Greeting Card

Now is the time to start to get your Holiday greeting cards ready to be given out.  Well, today I’m going to show you how to make a Pop-Up Hanukkah Dreidel Greeting Card.  Anyone who receives this Hanukkah greeting card will love the 3D look of this card.  With some simple paper, scissors and some markers for decorating you too can make this Hanukkah Dreidel Greeting Card.  Your kids will love making this pop-up card.  Plus, they will be preparing a special card for someone they love…. they will truly get a kick out of that.

Check out our other Hanukkah Crafts.


How to Make a Pop-Up Hanukkah Dreidel Greeting Card


Materials Needed

Piece of Paper

Colorful Piece of Paper

Scissors

Markers, Crayons or Colored Pencils to Decorate Card


Step 1


Get a piece of paper.


Get a piece of paper.


Step 2


Fold in half.


Fold in half.


Step 3


Cut slits on fold.


Cut slits on fold.


Step 4


Open up page.


Open up page.


Step 5


Fold this part in.... the other direction.


Fold this part in…. the other direction.


Step 6


Now turn card in this direction.


Now turn card in this direction.


Cut down in a V shape, but don't cut all the way!


Cut down in a V shape, but don’t cut all the way!!!


Step 7


Fold right here upwards to make a crease.


Fold right here upwards to make a crease.


Step 8


Bring top part of card down on this square


Bring top part of card down on this square (not bottom of card).


Cut 2 slits.  As you can see... You are NOT cutting bottom of card as seen here.


Cut 2 slits.  As you can see… You are NOT cutting bottom of card as seen here.


 Step 9


Fold this part in opposite direction.


Fold this part in opposite direction.


Step 10


Make a crease here.


Make a crease here.


Step 11


Glue down the outer edges of white paper onto colorful paper


Glue down the outer edges of white paper onto colorful paper (the side that doesn’t pop out).


It should look like this.


Like this.


Step 12


Decorate the card.


Decorate the card.

Anyone who receives this Hanukkah card will love it!!  I love the 3D look of this greeting card…. as will the receiver.

Technorati Tags: , , , , , , , , , , , , ,