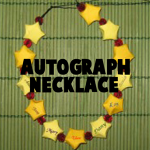
Make Autographed Friends Necklaces or Bracelets on Last Day of School or Camp

School is going to be over soon and you’ll be parted from your friends until Autumn comes again. Wouldn’t be nice to keep them with you during the entire Summer? Laura from Dacian Moon Handmade will show you how 🙂 You can get your friend’s autographs and wear them around your arm or neck all Summer along with a bracelet or necklace craft.


How to Make Autographed Friends Necklaces on Last Day of School or Camp


How to Make Autographed Friends Necklaces on Last Day of School or Camp

CRAFTS MATERIALS NEEDED:

– orange paper
– yellow paper
– scissors
– string and needles
– red crystals
– line
– colored pens


Step 1.

Trace 6 parallel lines on the papers at 1 cm.


Cut them out, so you’ll have 6 orange strips of paper and 6 yellow.


Step 2.

Take a strip of paper. Start at one end and make a hoop around the other end. Take care that one of the ends to be short.


Slip through your short end into the hoop …


… and pull, but not too hard.


Turn it  and fold the short end inside.


Turn it over again.


Now you must wrap around the pentagon…


… following the red arrow…


… like this.


And again, on the dotted line, following the red arrow,


And again…


… until is just a small piece left.


Now, you’re going to tuck that little left over tail into the body of the star.


If is too long – as in my case – you can cut it with your scissors.


That’s the star.


Step 3.

It’s time to puff it 😀

Using your nail or a sharp edge, press in, half-way between two points. Make sure you are totally perpendicular to the paper.


The first star is ready.


Make stars from the other paper strips too.


Step 4.

Take the string and make a knot at 10 cm from the end. This will let you tie the necklace when is ready.


Step 5.

Let’s start to assemble the necklace. Start with a crystal – use the needle to add it…


… then add an orange star…


… a crystal, an yellow star and so on.


Step 6.

It’s almost ready. Take care to finish with a crystal and make a knot near it.


Step 7.

Now it’s fun. Ask your friends to write their name on the stars.


That way you’ll have them with you all the summer 😉


Technorati Tags: , , , , , , , , , , , ,

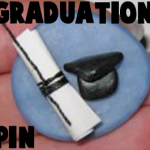
Make a Graduation Cap and Diploma Pin in 6 Easy Steps

Graduation day is very important and everyone wants to remember it. What are the symbols of this day? The graduation cap / hat and diploma … so, we will add those to our badge pin 🙂 Learn how to make the following decorative pin in easy step by step lesson below … great for the last day of school.

This step by step tutorial is offered by Laura from Dacian Moon Handmade


How to Make Graduation Cap and Diploma Pin Badges


How to Make Graduation Cap and Diploma Pin Badges

CRAFTS MATERIALS NEEDED:

– toothpick
– polymer clay : blue – or any other colour for the background – and black – for the hat
– cutter
– 1 badge base
– thread
– craft glue
– white paper
– baking paper
– baking tray


Step 1

Condition polymer clay by hand, simply mix it and squish it with your fingers. You may want to roll it into a log between your palms, fold it in half, and then roll again.

Fortunately, in the summer the clay is conditioning more easily.

So, condition the blue clay.


Let a small part and from the rest make a ball and flatten it on a piece of baking paper.


Step 2

Place the badge base on it and press.


Use the small piece of blue clay to fix the base…


… like that.


Turn it with the face to you.


Step 3

Take a half of the black clay, condition it…


… and make a almost square form of it.


Place it to the blue background.


From the other half, make a triangle form and place it on top of the square.


Step 4

Place the on the baking tray, and bake it accordingly to the instructions on the polymer clay package (they depend on the brand you use: fimo, cernit, sculpey…, but usually is one half of hour at 230 F or 110 C)

Let it cool down.


Step 5

Take the white paper, make a roll with it…


…and tie it with the thread.


Step 6

Apply a layer of glue on it…


…and place it on the badge.

You can use paints to add the year or anything else you want.


Now you can wear it on your shirt or coat proudly. Congratulations!

Technorati Tags: , , , , , , , , ,