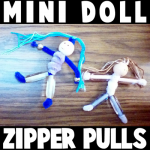
How to Make Mini People or Dolls as Zipper Pulls as Back to School Craft for Kids

This makes a great back to school craft as this can be used to decorate your backpack! My daughter and I made a few of these to give to her special friends at school. We landed up having to make more than 20 of them to give out to everyone who was asking for them. She couldn’t make enough of them because they were so popular. I think you will love these too. They are very easy to make and you can use different materials each time. Any bead size or thread color will work. Just have fun and be creative with it!

How to Make Mini People or Dolls as Zipper Pulls as Back to School Craft for Kids


mini doll zipper pulls


Crafts Materials Needed:

– beads

– embroidery thread, yarn, string, or thread

– pipe cleaners

– scissors

– (Optional) metal snap spring hooks

Step 1


finished-step01-beaded-people-zipper-pulls


I started off with a round bead that already had a face drawn on it. You can use paint or a Sharpie to draw 2 eyes and a mouth on a round bead if you don’t have face beads already.

Then put a pipe cleaner thru the bead. The  beaded head should be in the center of the pipe cleaner, as seen above.

Step 2


finished-step02b-beaded-people-zipper-pulls


– Now put the pipe cleaner that is thru the top of the head back down into the top of the head again until there is a loop….as seen above. The legs (bottom 2 pieces of the pipe cleaner) should match up too.


Step 3


finished-step03-beaded-people-zipper-pulls


Take some embroidery thread (or whatever you have available) and fold it in half a few times (as you see that I did above). Then stick it in the loop hole, as seen above.


finished-step04a-beaded-people-zipper-pulls


If you want to make this a zipper pull, put a metal hook on it (optional…only for zipper pulls). Then Pull the pipe cleaner legs downwards so that the pipe cleaner on top of the head closes down on the hair and hook.

Step 4


finished-step04-beaded-people-zipper-pulls


Cut the loops that are in the embroidery thread so that it resembles hair.

 Step 5


finished-step05a-beaded-people-zipper-pulls


Cut a pipe cleaner in half. Wrap it around the top of the body, so you will have arms.

 Step 5 b


finished-step05b-beaded-people-zipper-pulls


Like in the above picture.

Step 6


finished-step06-beaded-people-zipper-pulls


Take the other half of the pipe cleaner and wrap it around the chest area as I did above.

Step 7


finished-step07-beaded-people-zipper-pulls


– Now we can place beads on the arms and legs. I have long beads, but you can also use multiple small round or oval beads. Then just push the pipe cleaner back into the bead to make it so the beads can’t fall off.

 Step 7 b


finished-step08-beaded-people-zipper-pulls


– This is what it looks like when all the beads are on there.

Finished Bead People


Finished Mini Figures


– My daughter originally only made a few of these for her to give to her closest friends. It lands up everyone in the class were BEGGING her to give them one. We landed up making enough for the entire class. Kids do Love these! Even boys! I hope that you had fun!

Technorati Tags: , , , , , ,

How to Make Macaroni Weavers or Looms for Kids

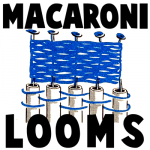
This is a very unique weaving loom craft…and you probably haven’t seen it anywhere else. Here is a craft idea for making weaving looms out of 3 inch long macaroni noodles, string, buttons, and a few other items. Macaroni noodles work perfectly for making a loom as the noodles are hallow and allow string to be pushed through them. Find out how to put this unique loom together…the sooner you start, the sooner you can begin your weaving projects.

Here are More Weaving Crafts.

How to Make Macaroni Weavers or Looms


How to Make Macaroni Weavers or Looms


Crafts Materials Needed:

5 pieces of macaroni each 3″ long

5 pieces of heavy string each 3-feet long

5 buttons slightly larger than hole in macaroni

yarn

5″ needle

How to Make the Macaroni Loom

Step 1


Pull a length of string through each of the macaroni pieces.


Pull a length of string through each of the macaroni pieces.

Step 2


Fasten a button to the top end of each string to prevent string from slipping through macaroni hole.


Fasten a button to the top end of each string to prevent string from slipping through macaroni hole.


Step 3


Thread the needle with yarn, and starting with the middle macaroni piece, weave the yarn over and under the macaroni pieces.


Thread the needle with yarn, and starting with the middle macaroni piece, weave the yarn over and under the macaroni pieces.

Step 4


Slide yarn onto strings as weaving progresses, pulling macaroni downward.


Slide yarn onto strings as weaving progresses, pulling macaroni downward. Add additional yarn by overlapping ends.


Woven scarf


When desired length of belt is reached, remove macaroni pieces and tie ends of yarn

Here are More Weaving Crafts.

Technorati Tags: , , , , , , ,

How to Make Wind-Up Moving Cardboard Carousels or Merry-Go-Rounds

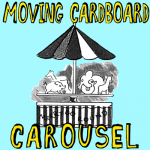
Today we will show you how to make a moving carousel / merry-go-round. You will be able to make this moving toy with some spools, some string, a pencil, and a few cardboard boxes. The motor works by winding string around a spool by spinning the pencil…then it moves on its own. Pretty cool…and you don’t have to use any difficult-to-use materials. Learn how to make your very own working carousel with the following step by step tutorials.


400x400-cardboard-carousel-merry-go-round


How to Make Wind-Up Moving Cardboard Carousels or Merry-Go-Rounds

CRAFTS MATERIALS NEEDED:

2 boxes (A shoe box and a small pill box)

2 spools (A button hole twist spool and a regular size spool)

A new pencil with an eraser

Cardboard

String

Glue

Paints

Step 1


cardboard-carousel-merry-go-round-01


1. Cut a shoe box with cover in half. It will measure 6″ square and about 31/2″‘ high. With a pencil, make a small hole in the center of the shoe box cover (A ). Glue a small pill box with cover (about 1″ high) to the center at the bottom of the shoe box. With a pencil, punch a hole in the cover of the small box, directly under the top hole, as in Figure 1.

Step 2


cardboard-carousel-merry-go-round-02


2. Cut a cardboard circle 6 1/2 ” in diameter. In the exact center, on the underside, glue the small twist spool, as in Figure 2.

Step 3


cardboard-carousel-merry-go-round-03


3. Cut 6 small colored pictures of animals from a magazines or from the Internet (with parental assistance or permission) and mount on coardboard. Make small cardboard easel backs and glue to backs of animals to make them stand, as in Figure 3.

Step 4


cardboard-carousel-merry-go-round-04


4. Glue animal pictures, easel side in, around edge of cardboard circle, as in Figure 4.

Step 5


cardboard-carousel-merry-go-round-05


Tie one end of a four-foot piece of string tightly around the regular sized spool, as in Figure 5.

Step 6


cardboard-carousel-merry-go-round-06


For the canopy, cut a circle of heavy white paper, about 8″ in diameter. Scallop the edges. Paint red stripes radiating from the center of the canopy to the middle of each scallop. (shaded area) Make a straight cut from the edge to the center of the canopy, as shown by the broken line in the illustration. Lap over the cut edges about 1″ and glue together, as in Figure 6.

Step 7


cardboard-carousel-merry-go-round-07


To assemble merry-go-round, stick pencil through center cardboard circle; through the twist spool; through the cover of the large box; through the spool wound with string, and then through the hole in the pill box. Stick a thumb tack through the center of the canopy and pin firmly to the maser at the top of the pencil, as in Figure 7.

Step 8


cardboard-carousel-merry-go-round-08


Paste colored paper around three sides of the merry-go-round, and decorate with paint, as in Figure 8.

Step 9 : MAKING THE MERRY-GO-ROUND TURN!!!


cardboard-carousel-merry-go-round


Pull the string at the open end of the box. To rewind, remove canopy top and twirl pencil so that the string rewinds around spool. Make sure end of string is at the right, otherwise animals will whirl around backwards when string is pulled.

And there you have it…enjoy making your moving merry-go-round carousels!!! Don’t forget to post your pictures!

Technorati Tags: , , , , , , , , ,

How to Make Simple Gift Tags

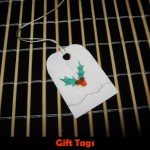
How you present your gifts this holiday season is so important.  The right gift wrap, the right bows and of course the right gift tags.  But, instead of buying store bought gift tags why not do something more original.  In this post I will show you how to make a simple gift tag for your gifts.  Whether you celebrate Christmas or Hanukkah you can make this gift tag craft work for you.  Simply alter the design on your gift tags to fit your needs.  So, let’s get started.

Check out our other Christmas Crafts.

Today, Laura from  Dacian Moon Handmade will show you how to make a simple but beautiful gift tag.


Materials Needed

– transparent paper
– cardboard
– green pen
– glue
– scissors
– glitter glue
– card punch
– thick thread


Step 1

Cut a rectangle from the cardboard (3 cm x 4.5 cm)


Cut another rectangle of the same dimensions from the transparent paper. You can measure or you can use the cardboard as a template.


… like this.


Try to cut a pattern out of the transparent paper – at about 1 cm of the lower side…


… like this.


Step 2

Apply a layer of glue on the cardboard…


… and place the transparent paper over it, like this. Let it dry.


Step 3

Using your green pen…


… draw two holly leaves on the transparent paper..


Add three red berries with glitter glue.


Let it dry.


 Step 4

Using the card punch make a hole on the upper part.


… like this.

Take the thread and fold it in half…


Put it through the hole, like in the picture…


…then bring the back through the loop, like this.


You can round the corners and your gift tag is ready.


And, there you have it….. simple gift tags that won’t look simple at all on any gift.  How did your gift tags turn out?  Let me know in the comments below.

Technorati Tags: , , , , , , , , , , , ,

How to Make a Decorative Corn Filled with Treats for Thanksgiving

Today I am going to continue with the fun Thanksgiving crafts.  In this post I’m going to show you how to make a decorative corn filled with treats for Thanksgiving.  If you are having Thanksgiving dinner at your house then this is a great craft for you.  You can make these treat filled corns for the children attending your Thanksgiving feast.  Sure, they can’t eat the treats before dinner, but these festive corns will be perfect for the children to take home with them.  They will truly get a kick of out them.  So, let’s get started.

Check out our other Thanksgiving Crafts.


How to Make a Decorative Corn Filled with Treats for Thanksgiving


Materials Needed

Two 12 Inch Pieces of Manilla Paper

Pen or Pencil

Scissor

Green & Yellow Crayons, Markers or Colored Pencils

Glue or Paste

Treats or Candy

String


Step 1


Take a 12 inch piece of manilla paper and draw a pattern like this.


Take a 12 inch piece of manilla paper and draw a pattern like this.


Step 2


 Cut out the pattern like this.


Cut out the pattern like this.


Step 3


Color this green.


Color this green.


Step 4


From a piece of about 5 inches square make a roll similar to a cone.


From a piece of about 5 inches square make a roll similar to a cone.  Before rolling color paper yellow.  Make sure to not get it too pointed.  Paste.


Step 5


You can fill corn with treats or candy.  Fold green part around cone and tie with a string.


You can fill corn with treats or candy.  Fold green part around cone and tie with a string.


Step 6


Lightly draw little ovals for corn kernels.


Lightly draw little ovals for corn kernels.

And there you have it.  You have just made a decorative corn filled with treats.  These are a great idea if you are having a Thanksgiving dinner with children.  They will love these.

Technorati Tags: , , , , , , , , , , , ,

How to Make a Trick-or-Treat Paper Toy

Today I have a fun and festive Halloween craft.  It can be either a spooky Halloween decoration as well as a fun Halloween toy for the little ones.  In this post I’m going to show you how to make a Trick-or-Treat Paper Toy.  Using the 4 templates included in this craft you are going to make a little town with people that you can actually pretend they are going Trick-or-Treating.  Kids love pretending and even more than that they will love pretending to trick-or-treat with this toy because they made it themselves.  Let’s get started.

Check out our other Halloween Crafts.


How to Make a Trick-or-Treat Paper Toy


Materials Needed

Printer & Paper

Scissors

Cereal Box

Tape

Black Paint

Glue

Thread


Click on template images below to make larger and to print off.

Template 1


Template 1


Template 2


Template 2


Template 3


Template 3


Template 4


Template 4


Step 1


Print out first three templates.


Print out first three templates.


Step 2


Cut out parts.


Cut out parts.


Step 3


Cut both slits.  Then fold sides in to center.


Cut both slits.  Then fold sides in to center.


It should look like this.


Like this.


Step 4


Place a person in the slots.


Place a person in the slots…


Step 5


Here's the line up of figures.


Here’s the line up of figures.


Step 6


The cat and pumpkin just need to be folded in half.


The cat and pumpkin just need to be folded in half.


Step 7


Cut everything out.


Cut everything out…. Leave a white outline around the edges…


Step 8


Cut off the front of a cereal box so you get this


Cut off the front of a cereal box so you get this…


Step 9


Tape outside of box together.


Tape outside of box together.


Step 10


Paint the inside of box black.


Paint the inside of box black…


Step 11


Glue pieces of cardboard to back of paper cutouts so they appear like they are sticking out from box.


Glue pieces of cardboard to back of paper cutouts so they appear like they are sticking out from box.


Step 12


It should look like this.


Like this.


Step 13


Tape thread to back of moon and clouds and tape to top of box.


Tape thread to back of moon and clouds and tape to top of box.  Now, they pop out at you.


Step 14


Print out houses paper


Print out houses paper (template 4).


Step 15


Cut out like this... then fold on the dotted lines.


Cut out like this… then fold on the dotted lines.


Step 16


If first dotted line is folded towards you... then fold the next away from you.


If first dotted line is folded towards you… then fold the next away from you.


Step 17


Notice you also fold the right and left side away from you


Like this…. Notice you also fold the right and left side away from you…


Step 18


Here are all the pieces... Now you can play pretend Trick-or-Treat games.


Here are all the pieces… Now you can play pretend Trick-or-Treat games.

Technorati Tags: , , , , , , , , , , , ,

How to Decorate a Notebook with Yarn or Crepe Paper

I have a super fun craft for you today!!  And, it’s totally perfect for back to school.  In this craft I will show you how to decorate a notebook with yarn or crepe paper.  Your notebook will be an original…. no one else will have a notebook like yours.  This craft is not only a lot of fun, but it is really simple.  Simply use crepe paper or yarn to make a one of a kind design on the front of your back to school notebook.  So, grab the materials needed and let’s get started.

Check out our other Back to School Crafts.


How to Decorate a Notebook with Yarn or Crepe Paper


Materials Needed

Yarn or Crepe Paper

Glue

Scissors

Notebook


Step 1


Put glue down where you are going to glue yarn or paper.


Put glue down where you are going to glue yarn or paper.


Step 2


Place yarn or crepe paper on glue.


Place yarn or crepe paper on glue.

And, that’s it!!  What kind of awesome design for your notebook did you come up with?  Let me know in the comments below.  And, don’t forget to take a picture of the notebook and share that too in the comment.

Here is our video on How to Decorate a Notebook with Yarn or Crepe Paper

Technorati Tags: , , , , , , , ,

How to Make a Milk Carton Row Boat

Today I have a craft for you that is perfect for the nice warm summer season.  In this post I will show you how to make a Milk Carton Row Boat.  Made from a couple of milk cartons this row boat will actually float.  What is nice about milk cartons is that their waxy surface makes them completely water proof…. perfect for the water.  So, grab the materials needed and let’s get started.

Check out our other Milk Carton Crafts.


How to Make a Milk Carton Row Boat


Materials Needed

2 Milk Cartons

Pen or Pencil

Scissors

Tape

Nail

String


Step 1


Rinse out 2 finished Milk Cartons.


Rinse out 2 finished Milk Cartons.  Let dry.


Step 2


Put carton on its side... draw a line 2 inches from bottom.


Put carton on its side… draw a line 2 inches from bottom.  Cut along this line.

Step 3


Draw what you see above along the top edge of the carton.


Draw what you see above along the top edge of the carton.  For the oar locks…. make a dot in the center of each.


Step 4


Cut along the unwanted part using guidelines from last step.


Cut along the unwanted part using guidelines from last step.


Step 5


Use 2nd milk carton.


Use 2nd milk carton.  Cut a seat that is about 1.5 inches wide.


 Step 6


Cut strips that are a bit wider than the width of the first milk carton.


Cut strips that are a bit wider than the width of the first milk carton.  Fold tabs as seen.


Fold tabs down.


Fold tabs down.


Step 7


Draw oars on extra milk carton.


Draw oars on extra milk carton.  Cut out 4 of them.


Step 8


Tape the seats into the boat.


Tape the seats into the boat.


Step 9


With a nail, poke a hole in each oar lock.


With a nail, poke a hole in each oar lock.  Also, poke a hole in front of boat.  Put an oar in each oar lock.  Tie string around the hole in the front of the boat.  Now go play with your boat.

And that’s it.  You just made yourself your very own Milk Carton Row Boat.  Use it in your pool, bath tub or any body of water.  Enjoy!!

Technorati Tags: , , , , , , , , ,

How to Make a Paper Wave Sculpture – Exercise 1

Believe it or not you can actually make sculptures out of paper.  That’s right, you can actually compose items that are built up from a simple paper and molded into shapely items.  In this post I’m going to show you how to make a Paper Wave Sculpture.  With a little bit of patience and following the steps provided below you too will be able to make a Paper Wave Sculpture.  So, grab the materials needed and let’s get started.


How to Make a Paper Wave Sculpture


Materials Needed

Paper

Ruler

Hole Punch

Thread or Fine Wire


Step 1


Cut a strip of paper, hold the ruler firmly across it and pull it through and upwards.


Cut a strip of paper, hold the ruler firmly across it and pull it through and upwards.


Step 2


the paper becomes flexible and easy to handle.


Keep doing this…. the paper becomes flexible and easy to handle.


Step 3


By doing this on opposite sides of the paper you obtain a waved effect.


By doing this on opposite sides of the paper you obtain a waved effect.


Step 4


A thread or fine wire is drawn through a series of holes along the top edge of the paper.


A thread or fine wire is drawn through a series of holes along the top edge of the paper.


Step 5


The thread is drawn up and the edges of the paper fastened together.


The thread is drawn up and the edges of the paper fastened together.

That’s it…. you just made your own Paper Sculpture called the Paper Wave.  Isn’t it amazing?  I think the most amazing part is that this wave is actually just made from paper.  Very cool!!

Technorati Tags: , , , , , ,

How to Make a Glued String Easter Basket

Today I have a fun and creative craft for you.  In this post I’m going to show you how to make a Glued String Easter Basket perfect to fill with Easter eggs and candy.  The Easter Basket turns out beautifully and it is simply made with a balloon, yarn, flour and water.  Don’t use the same boring Easter Baskets that every child uses from the store…. make your very own Glued String Easter Basket.  The Easter Bunny will love it.  So, let’s get started.

Check out our other Easter Crafts.


How to Make a Glued String Easter Basket


Materials Needed

Balloon

Flour

Water

Shallow Bowl

Yarn

String

Needle

Scissors


Step 1


Blow up balloon and tie a knot at the end.


Blow up balloon and tie a knot at the end.  Tie a string to this, and hang it from an overhead point, so that it is about eye level for the child.


Step 2


Mix flour and water.


Mix flour and water.  Do this by mixing 1/4 cup of flour into 1 cup of water. You will want the mixture to be thin-sh and a bit runny.


Step 3


Dip the yarn into the flour mixture


Cut yarn in lengths of about 4 feet lengths. Dip the yarn into the flour mixture and wet each piece of yarn thoroughly.


Step 4


Start at top and criss-cross.


Start at top and criss-cross.


Step 5


Wrap more yarn around balloon and then you should pop the balloon.


Wrap more yarn around balloon and then you should pop the balloon.


Step 6


Cut top side of string on both sides to make basket.


Cut top side of string on both sides to make basket.

And there you have it…. you just made a Glued String Easter Basket.  How did it turn out for you?  Let me know in the comments below.  And, make sure to take a picture of your Easter Basket too and share it in the comment…. I’d love to see it.

Technorati Tags: , , , , , , , , , , , , ,

How to Make a Flying Bird Decoration

Today I’m going to show you how to make a flying bird decoration.  When made correctly this bird will flap his wings with just a bit of movement of the string.  Crafters of all ages will enjoy making this craft…. even the youngest.  We provide many templates that you can choose from to make this flying bird.  You can choose one of the colored templates or you can print off the black & white template and color the bird yourself.  The choice is yours.  So, grab the materials needed and let’s get started.

Check our our other Toy Crafts.


How to Make a Flying Bird Decoration


Materials Needed

Printer & Paper

Scissors

Glue or Tape

String

Crayons, Markers or Colored Pencils (optional)


Click on template images below to make larger and to print.

Black & White Template


flying bird black & white template


Aqua template


flying bird aqua template


Blue Template


flying bird blue template


Red template


flying bird red template


Yellow template


flying bird yellow template


Step 1


Print template.


Print template.


Step 2


color in your bird and wings


If you printed the black & white template…. color in your bird and wings.


Step 3


Cut out wings and bird.


Cut out wings and bird.


Step 4


Fold wings in middle.


Fold wings in middle.


Step 5


Glue or tape wings on bird's body cut-out.


Glue or tape wings on bird’s body cut-out.


Step 6


Fasten string to bird.


Fasten string to bird.  Raise string up and down and bird will flap wings.

And, that’s it… you just finished making your flying bird decoration.  Isn’t it cool with just raising your string up and down you can make the bird appear as if he is flying.  Enjoy playing with your flying bird.

Technorati Tags: , , , , , , , , ,

How to Make a Paper Bag Bunny Puppet

I have a fun and creative craft for you today.  I am going to show you how to take a paper bag and make it into a bunny puppet.  Sounds like fun, right?  It really is.  And, the timing of it couldn’t be any more perfect.  After all, Easter is in just a few weeks.  Made with string or yarn the arms and legs of the puppet actually move.  When you aren’t using it as a puppet hang the Paper Bag Bunny up as an Easter decoration.  People are sure to love it when they see it.  So, let’s get started.

Check out our other Easter Crafts and Puppet Crafts.


How to Make a Paper Bag Bunny Puppet


Materials Needed

Paper Bag

Newspaper

String or Yarn

Several Sheets of Paper

Scissors

Glue

Pencil


Step 1


Wad up several sheets of newspaper and put in paper bag until 3/4 full.


Wad up several sheets of newspaper and put in paper bag until 3/4 full.


Step 2


Close the open end of bag with string or yarn.


Close the open end of bag with string or yarn.


Step 3


Cut 8 strips of paper each approximately 3/4 inch by 18 inches long.


Cut 8 strips of paper each approximately 3/4 inch by 18 inches long.


Step 4


Glue ends of 2 strips of paper together at right angle


Glue ends of 2 strips of paper together at right angle (so it looks like a letter L).


Step 5


Keep folding each strip over the other strip until entire strips are used.


I colored each strip a different color to help you visualize how to fold these.  1)  did #1 in last step.  2)  fold blue strip over and crease.  3)  fold red strip over and crease.  4)  fold blue strip down and crease.  Keep folding each strip over the other strip until entire strips are used.  Glue last fold together.


Step 6


You will need 4 all together.


Now you have a springy arm or leg.  You will need 4 all together.


Step 7


Draw and cut out bunny hands, feet, ears, eyes and mouth.


Draw and cut out bunny hands, feet, ears, eyes and mouth.


Step 8


On each side of the bag, glue on arms.


On each side of the bag, glue on arms.  Spread out extra edges of the top of the bag to form a skirt.  Under skirt, glue legs.  Glue on hands and feet to legs and arms.


Step 9


Glue string to hands and feet.


Glue string to hands and feet.

There you go….. you just finished your paper bag bunny puppet.  Isn’t it adorable?  Now move the strings and watch the the bunny dance.  What else can you make him do?

Technorati Tags: , , , , , , , , , , , , , , ,

How to Make Paper Sculpture Birds

Today I have a fun craft for you.  I’m going to show you how to make a Paper Sculpture Bird.  When made correctly the birds are 3 dimensional and look so cool hanging from a ceiling.  These Paper Sculpture Birds can be used to decorate a classroom or  child’s bedroom.  A great number of birds and animals can be made by using this technique…. so feel free to use your imagination,  Grab the materials needed and let’s get started.

Check out some other Paper Folding Activities.


How to Make Paper Sculpture Birds


Materials Needed

8 1/2″ x 11″ typewriting or mimeograph paper

Scissors

Ruler

Pencil Paper punch

Thread


Step 1


8 1/2 x 11" typewriting paper is folded in half and a freehand cut is made to suggest the bird form.


8 1/2 x 11″ typewriting paper is folded in half and a freehand cut is made to suggest the bird form.


A paper punch is used to make the eyes.


A paper punch is used to make the eyes.


Step 2


Unfolding the paper reveals a symmetrical design.


Unfolding the paper reveals a symmetrical design.


Step 3


Using a ruler as a straight edge, fold upward the wings of the bird at points "A''.


Using a ruler as a straight edge, fold upward the wings of the bird at points “A”.


Step 4


draw two triangular peaks lightly with pencil as shown in Figure 4


In making the pleat, draw two triangular peaks lightly with pencil as shown in Figure 4. Carefully fold the pleats down; this will bring the tail of the bird up.


Step 5


The wing tips are curled by rolling them tightly around a pencil.


The wing tips are curled by rolling them tightly around a pencil.


Step 6


In Figure 6 another pleat is made at the neck; and the bird is suspended from the ceiling with thread.


In Figure 6 another pleat is made at the neck; and the bird is suspended from the ceiling with thread.

And, there you have it…..you just finished making a Paper Sculpture Bird.  This Paper Sculpture Bird would look so cool hanging from your bedroom ceiling.  Where are you going to hang your bird?

Technorati Tags: , , , , , , , , , , , ,

How to Doodle with String

I have a fun and creative craft for you today.  I am going to show you how to Doodle with String.  The cool part about this craft is that you will have to use your imagination and creativity to draw within the strings to create an image.  Every Doodle you do will be different than the last one.  I have given you 5 examples of some doodles you can create.  Simply scroll down within this post to see them.  Or, use your creativity to make your own designs.  The choice is yours.  So, grab the materials needed and let’s get started with this craft.

Check out our other Crafts made with String.


How to Doodle with String


Materials Needed

String

Glue

Paper

Markers, Crayons, Paints or Colored Pencils


Step 1


Dip string in glue.


Dip string in glue.


Step 2


Hold string over paper and drop.


Hold string over paper and drop.


Step 3


Let dry.


Let dry.


Step 4


Draw a picture that you see within this string.


Draw a picture that you see within this string.


Here are a few examples:

Example 1


Example 1 - Worried


Worried


Example 2


Example 2 - Alien


Alien


Example 3


Business Man


Business Man


Example 4


Example 4 - Angry Whale


Angry Whale


Example 5


Example 5 - Teacher


Teacher


Doodling with string is so much fun…. isn’t it?  Now, of course, your Doodling with String will look different than mine.  So make sure to take a picture of your Doodling with String and post it with your comments below.  I’d love to see your Doodles.

Here is our video on how to Doodle with String

Technorati Tags: , , , , , , , , ,

How To Make a Fresh Flower Bracelet

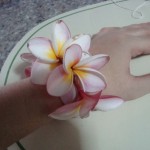
Spring is so close you could almost taste it.  And, with that being said I thought we would celebrate Spring with doing a craft that is totally about flowers.  Today I’m going to show you how to make a Fresh Flower Bracelet.  If you would prefer you could make this into a garland by making the Fresh Flower bracelet even longer.  The choice is yours.  I used the Temple Flower for this craft.  Fresh flowers look best.  So, let’s get started.

Check out our other Spring Crafts.


Materials Needed

8-10 pieces of fresh flowers (per bracelet, more for garland)
string
needle (medium hole)
scissors


Step 1

Clean flowers, make sure bugs or insects are not present. You do not necessarily need to wash them.


Step 2

Place string inside the needle hole and poke it inside the flower, with its petals facing towards you.


Step 3

With the needle point slightly out on the back, gently pull it out and do the same procedure until the desired length.


Step 4

Check length if it is enough to cover the wrist. With a scissors, cut the string.


Step 5

Make a knot to securely tie both ends. Adjust accordingly.

And, your gorgeous Fresh Flower Bracelet is complete.  Doesn’t it look absolutely beautiful…. and if you used fresh flowers like I did it should smell equally lovely.  Enjoy!!

Technorati Tags: , , , , , , , , , ,

How to Make a Wooden Beads Bracelet with an African Mask Charm

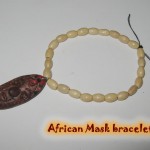
Black History Month will be coming to a close in the next couple of days.  With that being said…. I thought we could use this opportunity to make a craft for Black History Month.  Today I’m going to show you how to make a Wooden Beads Bracelet with an African Mask Charm.  The bracelet turns out just absolutely beautiful…. it truly does.  And, when using the ochre paint it ages the charm to give it an authentic look.   Because we’ll use oven-hardening polymer clay for the mask, you’ll need a little help from an adult.  So, grab the materials needed and let’s get started.

Check out our other Jewelry Crafts

Laura from Dacian Moon Handmade will show you how to make this craft.


Materials Needed

– toothpick
– brown polymer clay (I placed the toothpick beside it to show you how much polymer clay you’ll need)
– thread and needle
– scissor
– wooden beads
– paints (ochre, red and green)
– paintbrush
– baking paper
– baking tray


Step 1

Condition polymer clay by hand, simply mix it and squish it with your fingers. You may want to roll it into a log between your palms, fold it in half, and then roll again. Part it in two:  a small part and a bigger part.


Step 2

Take the bigger part and make a roll with it.


Gently squish one part, to have a pointy end.


Do the same with the other part.


Step 3

Place it on a piece of baking paper and flatten it.


Step 4

Using the toothpick, start to sculpt the eyes…


… like this.


Add eyebrows.


Make an outline of a nose.


Step 5

Take a small part of polymer clay and make it as a shape of a tear.


Place it inside the nose markings. Press gently to “glue” it.


Step 6

Sculpt the mouth.


Step 7

With the toothpick make a hole in the upper part of the mask.


Take care that the toothpick goes through the mask and gets out on the other side.


Step 8

Place the mask on the baking paper again and take another small part of polymer clay.


Roll it and place it under the hole.


Flatten it and make an “x” on the lower part of it.


Step 9

Sculpt the markings on the forehead, like in the picture.


Step 10

Now you’ll need the help from an adult.  Place the mask (with it’s piece of baking paper) on the baking tray, and bake it according to the instructions on the polymer clay package (they depend on the brand you use: fimo, cernit, sculpey…, but usually it is one half of hour at 230 F or 110 C).


Step 11

Let it cool down.


Step 12

With the ochre paint… coat the markings on the sides.


Make points around the bar on the forehead…


… and on the face, like this:


Step 13

With red paint coat the upper part …


… and add a line on the middle of the lower lip.


Step 14

With green paint mark the lines between the red and ochre. Let it dry.


Step 15

Now we’ll need the beads, needle and thread and the mask.


Make a knot near the end of the thread…


… and start adding beads on it (using the needle, of course).


Step 16

Measure on your hand to know when you are at the middle of the bracelet.


Put a jump ring on the mask and put it on the thread too (or just knot it on the thread).


Step 17

Continue to add wooden beads to complete the other half of the bracelet, then make a knot.


Now, you can wear your bracelet.


Isn’t this bracelet just absolutely gorgeous?  The ochre paint makes this African Mask Charm look very old, doesn’t it?  Just like it should.  I hope you had fun making it…. now enjoy wearing it.

Technorati Tags: , , , , , , , , , , , , , , ,