How to Make Wind-Up Moving Cardboard Carousels or Merry-Go-Rounds

Today we will show you how to make a moving carousel / merry-go-round. You will be able to make this moving toy with some spools, some string, a pencil, and a few cardboard boxes. The motor works by winding string around a spool by spinning the pencil…then it moves on its own. Pretty cool…and you don’t have to use any difficult-to-use materials. Learn how to make your very own working carousel with the following step by step tutorials.


400x400-cardboard-carousel-merry-go-round


How to Make Wind-Up Moving Cardboard Carousels or Merry-Go-Rounds

CRAFTS MATERIALS NEEDED:

2 boxes (A shoe box and a small pill box)

2 spools (A button hole twist spool and a regular size spool)

A new pencil with an eraser

Cardboard

String

Glue

Paints

Step 1


cardboard-carousel-merry-go-round-01


1. Cut a shoe box with cover in half. It will measure 6″ square and about 31/2″‘ high. With a pencil, make a small hole in the center of the shoe box cover (A ). Glue a small pill box with cover (about 1″ high) to the center at the bottom of the shoe box. With a pencil, punch a hole in the cover of the small box, directly under the top hole, as in Figure 1.

Step 2


cardboard-carousel-merry-go-round-02


2. Cut a cardboard circle 6 1/2 ” in diameter. In the exact center, on the underside, glue the small twist spool, as in Figure 2.

Step 3


cardboard-carousel-merry-go-round-03


3. Cut 6 small colored pictures of animals from a magazines or from the Internet (with parental assistance or permission) and mount on coardboard. Make small cardboard easel backs and glue to backs of animals to make them stand, as in Figure 3.

Step 4


cardboard-carousel-merry-go-round-04


4. Glue animal pictures, easel side in, around edge of cardboard circle, as in Figure 4.

Step 5


cardboard-carousel-merry-go-round-05


Tie one end of a four-foot piece of string tightly around the regular sized spool, as in Figure 5.

Step 6


cardboard-carousel-merry-go-round-06


For the canopy, cut a circle of heavy white paper, about 8″ in diameter. Scallop the edges. Paint red stripes radiating from the center of the canopy to the middle of each scallop. (shaded area) Make a straight cut from the edge to the center of the canopy, as shown by the broken line in the illustration. Lap over the cut edges about 1″ and glue together, as in Figure 6.

Step 7


cardboard-carousel-merry-go-round-07


To assemble merry-go-round, stick pencil through center cardboard circle; through the twist spool; through the cover of the large box; through the spool wound with string, and then through the hole in the pill box. Stick a thumb tack through the center of the canopy and pin firmly to the maser at the top of the pencil, as in Figure 7.

Step 8


cardboard-carousel-merry-go-round-08


Paste colored paper around three sides of the merry-go-round, and decorate with paint, as in Figure 8.

Step 9 : MAKING THE MERRY-GO-ROUND TURN!!!


cardboard-carousel-merry-go-round


Pull the string at the open end of the box. To rewind, remove canopy top and twirl pencil so that the string rewinds around spool. Make sure end of string is at the right, otherwise animals will whirl around backwards when string is pulled.

And there you have it…enjoy making your moving merry-go-round carousels!!! Don’t forget to post your pictures!

Technorati Tags: , , , , , , , , ,

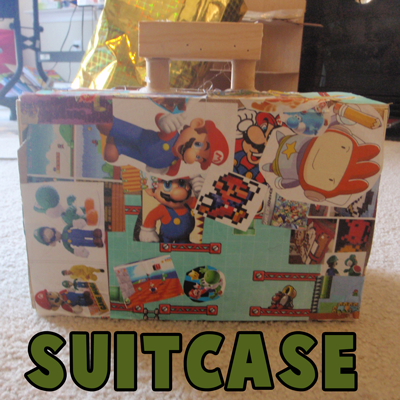
How to Make a Super Mario Wooden Suitcase From Clementines Boxes Crafts Idea

Today we will show you how to make an old-fashioned looking wooden suitcase out of Clementines Boxes and Wooden Thread Spools. You can decorate the box with any cartoon characters that you want, but my son is obsessed with Nintendo and Super Mario Bros characters so I decided to make this for him. He LOVES it…and I hope you will too. The illustrated instructions can be found below.

By the way…Yes, it does open and close. The pieces fit together so snugly, that you don’t even need a strap to keep it closed.


How to Make a Super Mario Wooden Suitcase From Clementines Boxes Crafts Idea


How to Make a Super Mario Wooden Suitcase From Clementines Boxes Crafts Idea

Crafts Materials Needed

– 2 Wooden Clementines Boxes
– Screwdriver (Prying out Staples with Parental Help)
– Elmer’s Glue
(optional) Glue Gun (with Parental Help)
– Duct Tape
– Wooden Spools
– Magazine Cutouts

Step 1


Step 1 : Making Wooden Suitcases Arts and Crafts Idea for Kids


Take out 2 Clementines Boxes (or other wooden fruit boxes).


Step 2 : Making Wooden Suitcases Arts and Crafts Idea for Kids


There are 4 wooden posts in each clementines box. With parental supervision or permission, take a screwdriver and pry out the staples to take out the 4 posts.


Step 3 : Making Wooden Suitcases Arts and Crafts Idea for Kids


Now you have all 4 posts out.

Step 2

Now glue all 4 sides back together. If your parents are around have them hot glue the sides together so you don’t have to wait for the glue to dry.

Step 3


Step 4 : Making Wooden Suitcases Arts and Crafts Idea for Kids


After the glue has dried, the boxes should fit together now, like the above picture.

Step 4


Step 5 : Making Wooden Suitcases Arts and Crafts Idea for Kids


Now stick duct tape all long the bottom so that the bottom of the boxes looks like this.


Step 6: Making Wooden Suitcases Arts and Crafts Idea for Kids


If you take the boxes apart, this is what it should look like from the inside.

Step 5


Step 7 : Making Wooden Suitcases Arts and Crafts Idea for Kids


To make the handles…use will be using all 4 posts that you took out in step #1.

If you glue 2 posts together, you will get a rectangle like the white illustration above.

Then take 2 spools and glue them to the box as seen above…notice that they are slightly off the box in to the center of the box….Then glue 1 rectangle to the top of each set of spools.

Step 6


Step 8 : Making Wooden Suitcases Arts and Crafts Idea for Kids


Cut out all the pictures that you want to glue to the box. My son loves Super Mario Bros and Donkey Kong and Scribblenauts so I made sure to cut out a lot of those video games characters.

Step 7


Step 9 : Making Wooden Suitcases Arts and Crafts Idea for Kids


We aren’t just going to glue these to the box, we are going to use a process called decoupage.

Decoupage (or découpage) is the art of decorating an object by gluing colored paper cutouts onto and object and then sealing it with a varnish over and over again until it is sealed. It will appear as if it is part of the wood or object.

So take some Elmer’s glue (or any brand obviously) and make a mixture of 50% water and 50% Elmer’s Glue.  Mix it together with a paint brush. Or if you have Modge Podge use that (something that they sell at crafts stores.

Step 8


Step 10 : Making Wooden Suitcases Arts and Crafts Idea for Kids


Brush your  mixture directly on to your suitcase surface.

Step 9


Step 11 : Making Wooden Suitcases Arts and Crafts Idea for Kids


Now start sticking on your pictures, making sure to brush the glue mixture onto the pictures as you put them down. Put more pictures down, continuing to brush the glue mixture all over the surface.


Step 12 : Making Wooden Suitcases Arts and Crafts Idea for Kids


Wrap pictures all around the box…making sure to put plenty of glue mixture all over everything. Make sure to flatten the pictures out and not to make it so wet that there are globs.

Let it dry and then put another coat on. I put 4 coats on … each time letter it dry in between putting more coats on.

Finished Nintendo Suitcase


How to Make a Super Mario Wooden Suitcase From Clementines Boxes Crafts Idea


This is my son’s finished suitcase…he loved it and all my kids want me to make one for them or to help them make one…so I guess we need to eat a LOT of Clementines (I have 4 kids) . I hope that you had fun.

Technorati Tags: , , , , , , , , , , , , , , ,

How to Make a Flying Butterfly Toy Arts and Crafts Project for Kids

Kids love playing with this flying butterfly toy. This is an arts and crafts project to make a  butterfly toy that will really fly up to 15 feet up in the air. This is for older kids as it is too difficult for younger kids to master…although they can with some supervised guidance from an adult.


How to Make a Flying Butterfly Toy Arts and Crafts Project for Kids


How to Make a Flying Butterfly Toy Arts and Crafts Project for Kids

Crafts Materials Needed

– Paper

–  Thread Spool

– Pins

– Dowel or Stick

– Strong String or Cord

Step 1


Firstly, fold an oblong piece of paper 4 inches by 5 1/2 inches on its short diameter.


Firstly, fold an oblong piece of paper 4 inches by 5 1/2 inches on its short diameter.

Step 2


One fourth inch from fold draw a line and mark an 'x' halfway down on it.


One fourth inch from fold draw a line and mark an ‘x’ halfway down on it.


Step 3


Draw butterfly like in the drawing that you see above.


Draw butterfly like in the drawing that you see above. The dashed line is the line that we drew in the previous step. Cut out this pattern and trace on to a piece of cardboard, making a large pin hole through the ‘x’ on each side of the body. Cut out cardboard butterfly and color on both surfaces.

Step 4


Step 4 : Butterfly Flier Flying Toy


Fasten 2 pins, securely, in the top of an empty thread spool. Make sure to let them stick out about an eighth of an inch. Also, try to placed the pins so that they are exactly opposite each other across the hole and about a half inch apart from each other.

Step 5


A piece of dowel or any round stick about a half inch in diameter and a foot in length is the next requirement.


A piece of dowel or any round stick about a half inch in diameter and a foot in length is the next requirement.


Step 4 How to Make a Flying Butterfly Toy Arts and Crafts Project for Kids


Parental help / permission might be require for this part of the craft, depending on your age. Shave off some of the wood on the stick or dowel so that the stick is a little less as wide as the diameter (width) of the spool’s hole. Do this on the end of the dowel…the same length as the length of the spool. Finish so that the spool has a little platform on which to rest when thrust over end of stick.

Step 6


Step 6 in making butterfly flyer toy


Tie a knot near the end of a piece of strong string or cord about 2 feet long. Place the end with NO knot on the spool and start winding the string on the spool.

Step 7 – The Fun Part – How to Play With Your New Butterfly Toy.


Step 7 - The Fun Part - How to Play With Your New Butterfly Toy.


Now for the fun. Put the spool on the stick. Now slip pinholes in butterfly’s body over the pins that are in the spool. Then catching hold of a knot, give the string a quick jerk. Away will fly the butterfly … sometimes 15 feet or more up into the air.

Alternative to Butterfly : A Pair of Bird’s Wings


Alternative to Butterfly : A Pair of Bird's Wings


Technorati Tags: , , , , , , , , , , , , , ,