How to Make Autumn Dolls or Figurines in Easy Craft Idea for Kids

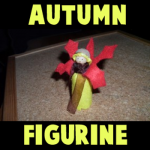
You can make this Autumn themed doll or figurine to celebrate fall, using an acorn cap for the hat and making a leaf out of felt for the “wings” of this little Autumn Fairy. This is a great Autumn-time craft that you will enjoy.
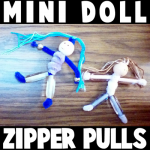
 Step by step tutorial offered by Laura from Dacian Moon Handmade


How to Make Autumn Dolls or Figurines in Easy Craft Idea for Kids


How to Make Autumn Dolls or Figurines in Easy Craft Idea for Kids

CRAFTS MATERIALS NEEDED:

– yellow and red felt
– pens (or permanent markers) – for eyes and mouth
– wooden bead
– scissors
– cork
– toothpick
– acorn cap
– toothpick
– brown ribbon
– craft glue


Step 1.

Glue the wooden bead on toothpick.


Step 2.

Stick toothpick in cork…


… until there are about 0.5 cm left.


Step 3.

Draw a circle and a rectangle on yellow felt. The circle must be a little bigger than the wooden bead and width of the rectangle must be from the bottom of the cork to the wooden ball.


Also draw a shape like this on red felt.


Step 4.

Cut them out.


Step 5.

Apply a layer of glue on the yellow circle…


… and place it on the wooden bead, like this.

Let it dry.


Next, put a bit of glue inside the acorn cap and on the edges…


… then fix it over the yellow circle.


You have now the head with yellow hair and acorn hat.


Step 6.

Adjust the upper part of the cork…


… like this.


Step 7.

Apply a layer of glue on the rectangle…


… like this…


And cover the cork with it.


Let it dry well.


Wrap the ribbon around the neck, over the yellow rectangle but take care to let the hair free.


Make a knot to keep it in place. You can cut the ribbon ends if they are too long.


Step 8.

Apply a stripe of glue on the lower part of red shape…


… and fix it over the ribbon, like this. Let it dry well.


Now use your pens / markers to add eyes and mouth and your cute doll is ready 😉


I hope your Autumn Fairy Doll turned out great. This would be a great decoration for the Thanksgiving table or any dinner in Autumn. I hope that you had fun. Come back soon for more crafts.

Technorati Tags: , , , , , , ,

How to Make Mini People or Dolls as Zipper Pulls as Back to School Craft for Kids

This makes a great back to school craft as this can be used to decorate your backpack! My daughter and I made a few of these to give to her special friends at school. We landed up having to make more than 20 of them to give out to everyone who was asking for them. She couldn’t make enough of them because they were so popular. I think you will love these too. They are very easy to make and you can use different materials each time. Any bead size or thread color will work. Just have fun and be creative with it!

How to Make Mini People or Dolls as Zipper Pulls as Back to School Craft for Kids


mini doll zipper pulls


Crafts Materials Needed:

– beads

– embroidery thread, yarn, string, or thread

– pipe cleaners

– scissors

– (Optional) metal snap spring hooks

Step 1


finished-step01-beaded-people-zipper-pulls


I started off with a round bead that already had a face drawn on it. You can use paint or a Sharpie to draw 2 eyes and a mouth on a round bead if you don’t have face beads already.

Then put a pipe cleaner thru the bead. The  beaded head should be in the center of the pipe cleaner, as seen above.

Step 2


finished-step02b-beaded-people-zipper-pulls


– Now put the pipe cleaner that is thru the top of the head back down into the top of the head again until there is a loop….as seen above. The legs (bottom 2 pieces of the pipe cleaner) should match up too.


Step 3


finished-step03-beaded-people-zipper-pulls


Take some embroidery thread (or whatever you have available) and fold it in half a few times (as you see that I did above). Then stick it in the loop hole, as seen above.


finished-step04a-beaded-people-zipper-pulls


If you want to make this a zipper pull, put a metal hook on it (optional…only for zipper pulls). Then Pull the pipe cleaner legs downwards so that the pipe cleaner on top of the head closes down on the hair and hook.

Step 4


finished-step04-beaded-people-zipper-pulls


Cut the loops that are in the embroidery thread so that it resembles hair.

 Step 5


finished-step05a-beaded-people-zipper-pulls


Cut a pipe cleaner in half. Wrap it around the top of the body, so you will have arms.

 Step 5 b


finished-step05b-beaded-people-zipper-pulls


Like in the above picture.

Step 6


finished-step06-beaded-people-zipper-pulls


Take the other half of the pipe cleaner and wrap it around the chest area as I did above.

Step 7


finished-step07-beaded-people-zipper-pulls


– Now we can place beads on the arms and legs. I have long beads, but you can also use multiple small round or oval beads. Then just push the pipe cleaner back into the bead to make it so the beads can’t fall off.

 Step 7 b


finished-step08-beaded-people-zipper-pulls


– This is what it looks like when all the beads are on there.

Finished Bead People


Finished Mini Figures


– My daughter originally only made a few of these for her to give to her closest friends. It lands up everyone in the class were BEGGING her to give them one. We landed up making enough for the entire class. Kids do Love these! Even boys! I hope that you had fun!

Technorati Tags: , , , , , ,

How to Make Abe Lincoln Finger Puppets for Presidents Day

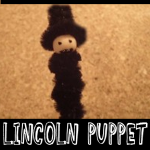
It is February which means that it is time for Presidents Day again. How about celebrating this great holiday with an Abe Lincoln Finger Puppet? Laura from Dacian Moon Handmade  will show you today how to make a Lincoln puppet out of pipe cleaners.

How to Make Abe Lincoln Finger Puppets for Presidents Day


How to Make Abe Lincoln Finger Puppets for Presidents Day


CRAFTS MATERIALS NEEDED:

– black pipe cleaner
– wooden bead (~1 cm diameter)
– instant glue
– scissors
– 2 toothpicks
– black and red paints


IMG_4060


Step 1.

Glue the wooden bead on top of one toothpick – this will be the head.

Start wrapping the pipe cleaner around the toothpick.


IMG_4061


You stop when you go over the middle. Cut the extra pipe cleaner.


IMG_4062


Like this.


IMG_4063


Step 2.

Make a spiral of pipe cleaner…


IMG_4064


Like this.


IMG_4065


Expand bottom to form the hat.


IMG_4066


Step 3. 

Apply glue on the head…


IMG_4067


… and quickly fix the hat there. (Quickly because we use instant glue)


IMG_4068


Step 4.

Use paints to add a beard…


IMG_4069


… eyes …


IMG_4070


… nose and hair.

Your puppet is ready 😀


IMG_4072


I hope that you enjoyed making this finger puppet for Presidents Day. Come back for more crafts.

Technorati Tags: , , , , , ,

How to Make a Cute Little Fabric Snowman

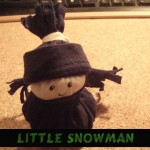
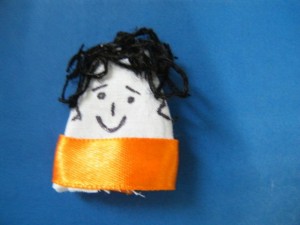
Today we will show you how to make this cute little fabric snowman. He is a lot of fun to make and even more fun to play with. On this cold Winter day, I thought this would be a great craft to share with you.

Step by step tutorial offered by Laura from Dacian Moon Handmade

How to Make a Cute Little Fabric Snowman


CRAFTS MATERIALS NEEDED:

– dark blue fabric
– white fabric
– filling material (I use some cotton pads broken into pieces)
– scissors
– ribbon
– black paint or marker
– button


Step 1.

Cut a disc of blue fabric and a smaller one of white fabric.


Step 2.

Start sewing around the edges…


… like this.


Pull the thread ends …


… and fill the inside with the filling material.


Tie the thread ends.


Do the same for the white disc.


Step 3.

Put the needle and thread through the middle of white part…


… then through the middle of the blue part…


… and through the button (we will use the button to make a solid part on the base. It will help our snowman to stay.)


Get back through the blue part and the white part to fix all parts together.


Step 4.

Cut two rectangles of blue fabric, one wider than the other.


Fold the lower part on the big one…


… and wrap it around the snowman’s head (the white part)


Use the ribbon to tie it, like this. Now the snowman have a hat.


Step 5.

Let’s make a scarf now. Take the other blue fabric rectangle…


… and wrap it around the neck of your snowman, then tie it.


Make some cuts on both ends of the scarf and on the upper part of the hat.


Thus, the hat and scarf will have fringes.


Use black paint / marker to draw eyes and mouth, and your little snowman is ready.


Technorati Tags: , , , , , ,

How to Make Your Own Personal Microphone Broadcast System

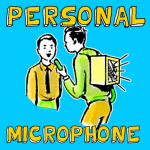
This is a craft to make a simple & personal microphone machine that you wear on your back. There are no wires or technology here, it is made simply with a box, hose, funnel, and a few other items. Any boy or girl can make this simple home broadcasting system, through which you can really “broadcast.” However, mom or dad should probably be there to assist you. This might be good to include with a Halloween costume as you can make creepy sounds broadcast out of your back…depending on what your costume is.

How to Make Your Own Personal Microphone Broadcast System


How to Make Your Own Personal Microphone Broadcast System


CRAFTS MATERIALS NEEDED:

Large cardboard box

Brass paper fasteners

Piece of garden hose (ask mom or dad first)

Piece of window screening (ask mom or dad first)

Funnel

Scotch tape

Old belt or strap

Paints & brush

Scissors

Long nail (ask mom or dad first)

Glue

How to Make Them:

Step 1

Remove the cover from the box and throw it away as you will not need it. On the opposite side of the opening, cut out a window, leaving a 2 inch margin all around.

Step 2


Cut a piece of window screening a little larger  than the window opening, and glue it over the opening from the inside


Cut a piece of window screening a little larger  than the window opening, and glue it over the opening from the inside, as in illustration A.


Step 3


Drive a long nail through the hose to prevent it from slipping out of the hole in the carton


Make a small round hole in the bottom of the box, and pull a piece of garden hose up through the hole. Insert the snout of the tin funnel into the end of the hose inside the carton. Make the hose fit tightly over the funnel snout by wrapping Scotch tape around it. Drive a long nail through the hose to prevent it from slipping out of the hole in the carton, as in illustration B.

Step 4


Fasten the belt shoulder straps to the top and the bottom of the carton with brass paper fasteners


Fasten the belt shoulder straps to the top and the bottom of the carton with brass paper fasteners, as in Illustration C.

Step 5


The person who is broadcasting speaks into the loose end of the hose in the operator's hands


To broadcast thru the system, the user slips the straps over his shoulders, with the open end of the device to his back, and the loose end of the hose in his hand. The person who is broadcasting speaks into the loose end of the hose in the operator’s hands, as in illustration D.  His voice is transmitted through the hose, through the funnel, and out through the screened window at the back of the Walkie-Talkie Like Microphone Machine.

Technorati Tags: , , , , , , ,

How to Make Cellophane Dancers

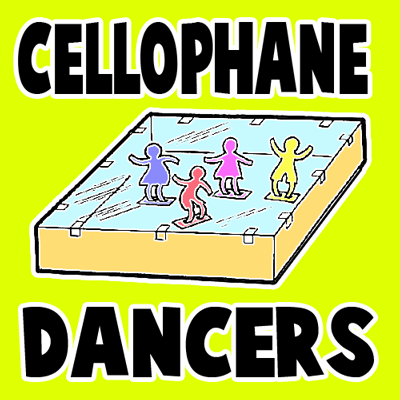
You can make a whole dance studio filled with boys and girls who will jump and dance about as if they were really alive. The trick is causing enough static electricity to make these little guys jump and dance. Find out how to make cellophane dancers below.

How to Make Cellophane Dancers


How to Make Cellophane Dancers


Crafts Materials Needed:

Large deep cardboard box

Light cardboard

Cellophane

Scotch tape

Silk handkerchief

Glue or paste

Scissors

Tissue paper

Pencil

How to Make Them:

Step 1


Fold the strips back and forth


To make the dancers, cut 2 strips of tissue paper, 5 inches long and 3/4 of an inch wide. Fold the strips back and forth, as in illustration A.

Step 2


You will have 2 square tissue paper packets


You will have 2 square tissue paper packets, as in illustration B.


Step 3


Draw Half Figures


Fold each packet down the center. On the fold of one packet, draw and then cut out, the half figure of a girl, and on the other packet, the half figure of a boy, as in illustration C.

Step 4

Open up the strips, you will have one continuous row of girls, and one of boys.

Step 5


you will have one continuous row of girls


Cut 2 strips of light cardboard 1/8 of an inch wide. Glue a standing row of dancers to each cardboard strip, bending back the feet of the dancers about 1/8 of an inch to make them stand firmly, as in illustration D.

Step 6


Glue a standing row of dancers to each cardboard strip


Cut the hands of the dancers apart, and cut the cardboard between them. Each dancer will be standing on a separate cardboard platform, as in illustration E.

Step 7


Cut a piece of celluloid to fit the top of the box, and fasten with pieces of Scotch tape


Stand the dancers in the cardboard box ballroom. Cut a piece of cellophane to fit the top of the box, and fasten with pieces of Scotch tape, as in illustration F.

To make the dancers jump and dance, rub a silk handkerchief over the celluloid top. This will generate enough static electricity to make the dancers come “alive.”

Technorati Tags: , , , , , , , ,

How to Make a Mini Puppet Theater with a Matches Box

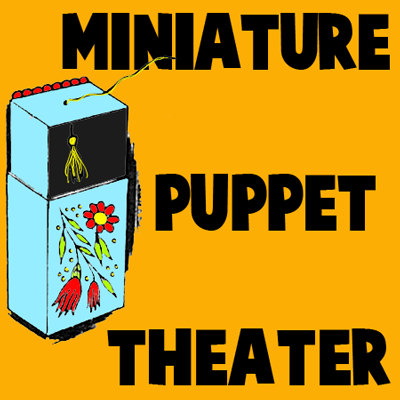
I be you will want this miniature puppet playhouse and its tiny dancing puppet for a pocket toy or to use  in your doll houses. This is a mini yarn puppet that is controlled with a matches box puppet theater. Find out how to make this little mini toy below.


How to Make a Mini Puppet Theater with a Matches Box


CRAFTS MATERIALS NEEDED:

Sliding drawer matches box

Scissors

Nail

Black paint or ink

Black thread

Paints  & brush

Colored yarn

Screw eye

How to Make These Miniature Puppet Shows

Step 1


Remove the sliding drawer from the matchbox.


Remove the sliding drawer from the matchbox. Paint the inside of the drawer with black paint or ink and allow it to dry thoroughly. Paint the outside of the drawer and the matchbox cover with a neutral color paint, and allow them to dry thoroughly.


Step 2


make the dancing puppet


To make the dancing puppet, cut several 2-inch pieces of colored yarn. Fold the yarn over the head of an ordinary screw eye, and wind a piece of black thread under the head to make the neck.

Step 3


Tie a short piece of black thread to the top of the puppet's head to make the control-thread.


Tie a short piece of black thread to the top of the puppet’s head to make the control-thread.

Step 4


Slip the end of the control-thread attached to the puppet through the hole.


With a nail, punch a small hole in the center of one of the short ends of the sliding drawer. Slip the end of the control-thread attached to the puppet through the hole. Replace the sliding drawer in the matchbox cover so that the control-thread is at the top, and the puppet is in the drawer.

Step 5

Decorate the front of the puppet playhouse with paints or wax crayons. To make the puppet perform, slide the drawer about halfway out of the cover and pull the control-thread up and down. If you want to make a larger playhouse for more puppets, use a kitchen size matchbox with a sliding drawer, and make 2 or 3 yarn puppets the same way.

Technorati Tags: , , , , , , ,

How to make a Castle Pencil Holder

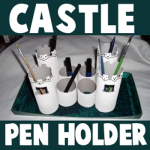
Here is a unique pencil holder made from recycled toilet paper rolls (or paper towel rolls). It is also a special pencil holder  for boys, because every boy is a knight who need a castle… of course 😉 Laura from  Dacian Moon Handmade  will show you, step by step, how to make it.

How to make a Castle Pencil Holder


Cardboard Tube Castle Pencil Holders


CRAFTS MATERIALS NEEDED:

– recycled paper rolls
– scissors
– glue
– paints
– paintbrush
– rectangle cardboard box lid


IMG_6760


Step 1.

Cut every roll in half.


IMG_6761


Like this.


IMG_6762


Step 2.

Use green paint to give the cap color – like grass. You also can use grey for paved roads…


IMG_6764


Cover all the surface with paint.


IMG_6765


Add as many layers of paint until you are happy with the result.


IMG_6769


Step 3.

Let’s give shape to the rolls.


IMG_6771


On two bigger rolls draw battlements and one window…


IMG_6772


… on the other bigger rolls draw only battlements. Like this.


IMG_6773


Cut them off.


IMG_6774


Finally, our towers will look like this.


IMG_6775


Step 4.

Let’s paint the castle. Mine will be white with some black decorations.


IMG_6778


Paint them like this…


IMG_6779


Let them dry, then draw your decorations using a toothbrush.


IMG_6780


Step 5.

Apply a layer of glue on a tower base


IMG_6781


… and put it in its place.


IMG_6782


Do the same with all rolls. Let them dry well.


IMG_6783


Now your castle is ready to be populated with pens and pencils 😀


IMG_6784


Technorati Tags: , , , , , ,

How to Make Wind-Up Moving Cardboard Carousels or Merry-Go-Rounds

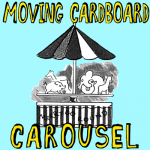
Today we will show you how to make a moving carousel / merry-go-round. You will be able to make this moving toy with some spools, some string, a pencil, and a few cardboard boxes. The motor works by winding string around a spool by spinning the pencil…then it moves on its own. Pretty cool…and you don’t have to use any difficult-to-use materials. Learn how to make your very own working carousel with the following step by step tutorials.


400x400-cardboard-carousel-merry-go-round


How to Make Wind-Up Moving Cardboard Carousels or Merry-Go-Rounds

CRAFTS MATERIALS NEEDED:

2 boxes (A shoe box and a small pill box)

2 spools (A button hole twist spool and a regular size spool)

A new pencil with an eraser

Cardboard

String

Glue

Paints

Step 1


cardboard-carousel-merry-go-round-01


1. Cut a shoe box with cover in half. It will measure 6″ square and about 31/2″‘ high. With a pencil, make a small hole in the center of the shoe box cover (A ). Glue a small pill box with cover (about 1″ high) to the center at the bottom of the shoe box. With a pencil, punch a hole in the cover of the small box, directly under the top hole, as in Figure 1.

Step 2


cardboard-carousel-merry-go-round-02


2. Cut a cardboard circle 6 1/2 ” in diameter. In the exact center, on the underside, glue the small twist spool, as in Figure 2.

Step 3


cardboard-carousel-merry-go-round-03


3. Cut 6 small colored pictures of animals from a magazines or from the Internet (with parental assistance or permission) and mount on coardboard. Make small cardboard easel backs and glue to backs of animals to make them stand, as in Figure 3.

Step 4


cardboard-carousel-merry-go-round-04


4. Glue animal pictures, easel side in, around edge of cardboard circle, as in Figure 4.

Step 5


cardboard-carousel-merry-go-round-05


Tie one end of a four-foot piece of string tightly around the regular sized spool, as in Figure 5.

Step 6


cardboard-carousel-merry-go-round-06


For the canopy, cut a circle of heavy white paper, about 8″ in diameter. Scallop the edges. Paint red stripes radiating from the center of the canopy to the middle of each scallop. (shaded area) Make a straight cut from the edge to the center of the canopy, as shown by the broken line in the illustration. Lap over the cut edges about 1″ and glue together, as in Figure 6.

Step 7


cardboard-carousel-merry-go-round-07


To assemble merry-go-round, stick pencil through center cardboard circle; through the twist spool; through the cover of the large box; through the spool wound with string, and then through the hole in the pill box. Stick a thumb tack through the center of the canopy and pin firmly to the maser at the top of the pencil, as in Figure 7.

Step 8


cardboard-carousel-merry-go-round-08


Paste colored paper around three sides of the merry-go-round, and decorate with paint, as in Figure 8.

Step 9 : MAKING THE MERRY-GO-ROUND TURN!!!


cardboard-carousel-merry-go-round


Pull the string at the open end of the box. To rewind, remove canopy top and twirl pencil so that the string rewinds around spool. Make sure end of string is at the right, otherwise animals will whirl around backwards when string is pulled.

And there you have it…enjoy making your moving merry-go-round carousels!!! Don’t forget to post your pictures!

Technorati Tags: , , , , , , , , ,

How to Make Fairy Lights with Bubbles and Paint

This is a cool and fun project for summer. What can be more pleasant than playing with water on a hot Summer day? How about painting with colorful bubbles, just the way a fairy would. Laura from  Dacian Moon Handmade will show you, step by step, how to make this.

How to Make Fairy Lights by Blowing Bubbles


How to Make Fairy Lights with Bubbles and Paint


CRAFTS MATERIALS NEEDED:

– plastic bottle
– 1 sock
– paints
– tape
– scissors
– liquid soap / shower gel… mixed with water


IMG_6670


Step 1.

Cut off the lower part of the bottle.


IMG_6672


Like this.


IMG_6673


Step 2.

Put the sock on the cut.


IMG_6674


Like this. You can use tape to fix it in place.


IMG_6676


Step 3.

Add some paint on the sock.


IMG_6677


Dip the sock in the soap / water mixture …


IMG_6678


Then gently blow through the mouth of the bottle. Take care not to suck in air through the bottle, because of the soap and paint.


IMG_6681


It is a fun project and you can make very beautiful fairy lights 😉


IMG_6679


Technorati Tags: , , , , , , , , , , , , ,

How to Make Doll Pencil Toppers for Back to School

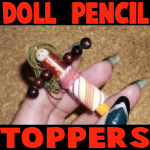
Do you want to create an adorable companion for your time back at school? Here is an easy-to-make doll that can be stored on the top of your pencil. Laura from  Dacian Moon Handmade  will show you, step by step, how to make it.


how to make doll pencil toppers for back to school


CRAFTS MATERIALS NEEDED:

– pencil
– thick tread
– wooden beads (one white and 6 brown)
– small cloth piece
– matching cord
– a piece of wire
– needle
– rubber tube


Step 1.

Take the thread …


… and spin it on your fingers, like this.


Step 2.

Tie it on the middle with the wire…


… like this.


Put the wire through the white bead – this will be the head of our doll.


Step 3.

Take the rubber tube…


… and make two holes in it with the needle.


Place it under the head, put the wire through the holes you made.


Step 4.

Is time to form her arms.


Add three brown beads like this…


… and put the wire end through the last bead one more time. That way the beads will not fall.


Repeat for the other arm.


Step 5.

Is time to place the topper on the pencil…


Like this.


Let’s dress her. Roll the piece of cloth over the rubber tube, under the arms…


… like this.


Tie it with the cord…


… and that is our doll.


You can use markers to make her eyes and mouth too. And she will make your classes easier 😉


Technorati Tags: , , , , , ,

How to Make a Patriotic American Flag Boat for 4th of July

Are you looking for a unique Fourth of July craft? Here is a fun craft to celebrate America’s birthday…this craft (by Laura from Dacian Moon Handmade)  will show you, step by step, how to make a paper boat with an American flag– a simple craft for 4th July.


How to Make a 4th of July Patriotic Flag Boat


CRAFTS MATERIALS NEEDED:

– blue paper
– white paper
– red and blue pen
– needle (or toothpick)
– scissors


IMG_5920


Step 1.

Take the blue paper …


IMG_5925


… and fold it in half by bringing the upper part over the lower one.


IMG_5926


Fold again in half by bringing the left part over the right one this time.


IMG_5927


Unfold, because we need only the crease at this point.


IMG_5928


Step 2.

Bring the right upper corner to the center.


IMG_5929


Do the same for the left corner, like this.


IMG_5930


Fold the remaining strip upward.


IMG_5931


Turn over …


IMG_5932


… and fold the strip upward.


IMG_5933


Step 3.

Open…


IMG_5934


… like this…


IMG_5935


… until it became flatten on the other direction.


IMG_5936


Fold the lower parts upward…


IMG_5937


… like this.


IMG_5938


Open again until it became flatten on the other direction.


IMG_5939


Like this.


IMG_5940


Step 4.

Take the upper corners and stretch out.


IMG_5941


Like this.


IMG_5942


Now the boat is ready.


IMG_5945


Step 5.

Let’s make the flag. Cut a rectangle of white paper…


IMG_5947


Draw the contour of the blue part…


IMG_5948


… and the stars.


IMG_5950


Start filling this part with blue color.


IMG_5951


Like this.


IMG_5952


Use red color to draw the lines on the rest of the flag.


IMG_5953


Like this.


IMG_5954


Step 6.

Now we assemble the components. Put the needle through the flag…


IMG_5956


and stick the tip in the middle of the boat, like this.


IMG_5957


The boat is ready to be used as a decoration or as a toy.


IMG_5958


Technorati Tags: , , , , , , , , , ,

Puppets for Thumb wrestling: Father’s Day Gift

Here’s a Father’s day gift that guarantees hours of fun. Make a set of thumb puppets for your dad and yourself, and play thumb wrestling. The simple illustrated instructions to make the thumb puppets follow:
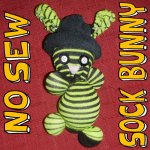


Craft materials required:

-White fabric

-black yarn

-ribbon

-scissors

-needle and thread

-fabric glue

-Permanent marker


Step 1:

Cut out a piece of cloth double the length of your thumb and about an inch wider than the width of your thumb.


Step 2:

Fold it into half and stitch along the two sides as shown.


Step 3:

Fold it inside out as shown:


Step 4:

Glue small pieces of yarn to make hair


Step 5:

Glue a strip of ribbon along the bottom as shown


Step 6:

Add facial features with a marker.


Make another one for your dad in the same way. Make sure its big enough for your dad’s thumb. Your dad is sure to enjoy this Father’s day gift.

Technorati Tags: , , , , , , , , , ,

How to Make a Simple No-Sew Sock Bunny Rabbit for Easter or for Fun

Today, we will show you how to make a sock doll bunny rabbit…the best part is that there is NO sewing involved in this craft. Anybody can make these sock bunnies and they can make it pretty quickly. I think you can probably make one of these is 20 or 30 minutes. And these sock bunnies turn out so adorable that you are going to make a few of them so your bunnies can keep each other company. This shouldn’t be played with by young kids who might eat the rubber bands if they come off!


How to Make a Simple No-Sew Sock Bunny Rabbit for Easter or for Fun


Crafts Materials Needed

– 1 Stretchy Sock  – I used Knee High Girls Socks
– 1 Normal Sock for the Hat
– Small Rubber Bands or Yarn
– Buttons or Sharpie Marker or Fabric Markers or Needle and Thread
– Stuffing
-Scissors

Step 1 Thru 9


Step 1 Thru 9 How to Make a Simple No-Sew Sock Bunny Rabbit for Easter or for Fun


We have a crafts tutorial for making a no-sew sock doll. Steps 1-9 are the same for this tutorial…so first go to the sock doll tutorial, and do steps 1-9 and then come back to this tutorial for step 10. Your doll should look like the above picture when you are done with step 9.

Step 10


Step 10


Now cut the top part in half…as seen in picture above.


Step 11


Step 11


Now, in this picture above, we have already done one of the 2 sides. The left side has been braided already…we did this by cutting the left side into three strips and then braiding that side and rubber banding the end as if it was hair. Now the right side needs to be done…we cut the right side into 3 strips…now we just need to braid it. If you don’t know how to braid, please see this tutorial.


real-pic-06


Now both sides should be braided and look like this.

Step 12


Step 12


Now both the right side and left side is looped into a letter ‘U’ shape. Then hold both loops together in the center and rubber band both sides together. I used more than one rubber band to make sure both sides stayed together.

Step 13


Step 13


Cut a second sock in half.

Step 14


Step 14


Now put the bottom of the sock (toe part) on top of the bunny.

Step 15


Step 15


Now fold up the bottom of the sock…so it is rolled up like a normal winter hat is.

Step 16


Step 17


Now cut a small slit on both sides of the hat.

Step 17


Step 18


Now pull an ear thru


real-pic14


And another ear thru.

Step 18


Step 19


Cut a nose out of fabric or felt (a triangle shape). Use a button(s) for eyes.

Step 19


Step 19


Ask mom or dad to help you hot glue the eyes and nose on. That is it…you have a stuffed bunny rabbit to play with. Wasn’t that easy?!

This shouldn’t be played with by young kids who might eat the rubber bands if they come off!

How to Sew a “Lucky Cat” for Saint Patrick’s Day

This is a cute and funny toy made especially for St. Patrick’s Day! 
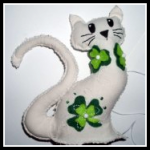
Do you want to learn how to make and sew a stuffed animal named “Lucky Cat” for Saint Patrick’s Day? This stuffed cat is covered in shamrocks and isn’t too tough to make. Learn how to make this kitty cat in the following craft tutorial.
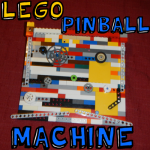
Laura from Dacian Moon Handmade  will show you how to make it, step by step.


How to Sew a Shamrock Lucky Cat


CRAFTS MATERIALS NEEDED:

– white or cream-colored fabric
– light green and dark green felt
– filling material (I use some cotton pads broken into pieces)
– scissors
– needle and threads (white and black)
– black paint marker
– pen
– 3 small white beads
– pencil
– green beads (optional)


IMG_4668


Step 1.

Fold the fabric in half.


IMG_4669


Draw a cat outline, like this…


IMG_4673


… and the tail.


IMG_4674


Cut them out, without unfolding the fabric. This way you will have two cats and two tails.


IMG_4675


Step 2.

Place one cat over the other and start sewing them together. Start on the lower part.


IMG_4676


Go up until you reach the ear.


IMG_4678


Step 3.

Draw one big clover and some smaller on dark green felt. Also, draw them a little bit smaller on light green felt.


IMG_4679


Cut them out.


IMG_4680


Group one big dark clover with one big light clover, and the smaller ones in the same way.


IMG_4681


Step 4.

Choose one place for the big clover…


IMG_4683


… and sew it in place, using white thread.


IMG_4685


Add one white bead in the middle. Be careful not to sew both cats when you sew decorations.


IMG_4687


You can let it like this or you can make some decorative stitches with white thread and green beads


IMG_4689


Like this.


IMG_4691


Choose a place for the small clovers also.


IMG_4693


I put two of them around the cat’s neck, just like a necklace. Don’t forget to add white beads in the middle and to sew only one cat.


IMG_4696


Step 5.

Is time to decorate the head. Place a folded paper or a piece of cardboard between the two cats…


IMG_4698


… and color the eyes and nose with black paint marker.


IMG_4699


Like this.


IMG_4700


Change the thread, and using the black one…


IMG_4701


Sew the whiskers.


IMG_4702


Like this.


IMG_4703


Step 6.

Change the thread back to white and continue to sew the two cats together.


IMG_4705


When you reach the neck is time to fill the head.


IMG_4706


Tamp the filling to fill all the head and the ears. Like this.


IMG_4707


Continue to sew until you almost get down. Here will be the tail, so we must prepare it.


IMG_4709


Step 7.

Place the two tails one over the other…


IMG_4710


.. and start sewing them together from the lower part.


IMG_4711


Go until you reach the tip of the tail and start to sew the other part.


IMG_4712


Stop when you make about 10 cm. Take a piece of filling and roll it between your hands.


IMG_4713


Press it on the stitched part of the tail.


IMG_4714


Continue to fill the tail while sewing the two sides together. It will look like this.


IMG_4715


Step 8.

Place the tail between the two cats, like this.


IMG_4716


Sew it in place.


IMG_4717


Step 9.

Fill the cat’s body.


IMG_4718


sew the two parts together…


IMG_4720


And the cat is ready 😀


IMG_4721


Isn’t this cat adorable!!! I hope you enjoyed the tutorial!

Technorati Tags: , , , , , , , , , , , , ,

How to Make Lego Pinball Machines with Step by Step Instructions

This is a craft idea that my 14 year old son, Ben, came up with. He actually made a Lego pinball machine when he was about 11 and I was so impressed with it that I asked if he could build one for the site. I hope that you enjoy it.

You Might Also Like VCR Tape Pinball Machines and Making Simple Pinball Machines Craft


How to Make Lego Pinball Machines with Step by Step Instructions


NOTE ABOUT THIS CRAFT: This craft is meant to push you into creatively thinking for yourself. As you probably won’t have the same Lego pieces that we have, you should push yourself to think outside the box and use trial and error to make the best Lego pinball machine for yourself from the Lego pieces that you have available. Have fun.


Step 1


step1


Make a tall stack of one block-wide blocks. Make sure that you put a lot of blocks in that have the circle holes within them. You don’t need to exactly copy what is in this picture…you can use your creativity.

 Step 2a


step2a


Now make a few rows of double width blocks (as seen in the pic below). One of these blocks should be a hinge block (circled in the pic). Soon we will place them on top of the single width blocks (from the last step).

 Step 2b


step2b


Now put this type of block on the hinge block (as seen in pic above).

 Step 2b


step2c


Now use this hinge Lego as the stand in the back of the Pinball Machine. This will give the Pinball Machine its downward slant.


 Step 3a


step3a


Find a long Technic Beam (as seen in pic above)…ours has 15 holes, but whatever you decide to use will be fine. Then connect the legos shown above to the Technic Beam.

 Step 3b


step3b


Now stick a Lego connector in the other end, as seen above.

 Step 3c


step3c


Now we will stick this one one side of the Pinball Machine base. Make one of these for the other side too.

Step 4a


step4


Now we will finally stick the double width blocks (from step 2a) on top of the single width blocks.

 Step 4b


step5a


Now connect the tower (#1) to the Legos that are connected to the Technic Beam (#2) with a 4 length block (#3).

 Step 4c


step5b


Now it Looks Like This.

 Step 5


step6


Now use connector pegs to attach Technic Beams to the bottom of the Pin Ball machine base.

 Step 6


step7


Now use connector pegs to put barriers in the way…be creative and use trial and error to create best pinball machine for you.

 More Trial and Error


step8


I like to add spinners and other barriers.

 Change it Up Some More


step9


Or just change things around to make your older brother mad. My older son made this pinball machine and wasn’t too happy that his younger brother was adding to it. 🙂

To play with the Pinball machine…find a bead that is the right size and use the levers at the bottom to make the ball go. Have fun.

You Might Also Like VCR Tape Pinball Machines and Making Simple Pinball Machines Craft

Technorati Tags: , , , , , , , , , ,