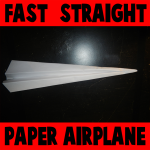
I have a wonderfully fun craft for you today. And, you only need one material for this craft…. paper. I’m going to show you how to make a fast straight paper airplane. It’s so much fun and it will give you hours of enjoyment well after you are finished making it. Here I will show you step-by-step how to make this paper airplane. Also, if you scroll down to the bottom of the steps you will see there is a video on how to make this paper airplane as well. So, grab a piece of paper and let’s get started.
Paper airplanes are a lot of fun to make and today’s paper airplane craft is no exception. Put a spin on the traditional paper airplane with this Double Edged Paper Airplane craft. This paper airplane can not only fly well, but it flies fast too. Today I will show you step-by-step how to make this plane and if you scroll down towards the end of the post I will even show you how to make this Double Edged Paper Airplane with a video. So, grab the materials needed and let’s get started.
Have you ever wanted to know how to make a fast Paper Airplane? Well, today I’m going to show you how to make one…. it’s fast enough that I even call them Paper Darts. The traditional Paper Airplanes are pretty slow…. boring. Make these Paper Darts and race them with your friends. You can even be creative and color them to give them an original look. So, let’s get started.
Oh boy….. do I have a fun craft for you today. I’m going to show you how to make a Clothespin Airplane Toy. This airplane toy actually works. After the craft is done the child will simply hold on to the airplane’s string and start running…. the airplane should start flying. Doesn’t that sound like fun? Almost as much fun as it will be putting the craft together. So, let’s get started.
Force a 6-inch stick (pencil size) into the groove of an old-fashioned clothespin.
Step 2
Glue stiff pieces of paper 3 inches square on both ends of the stick for wings.
Step 3
Tie a string to the head of the clothespin.
Step 4
You can choose to make designs or place stickers on the wings.
To fly the plane, the child holds the string and runs.
So, there you go…. you have your very own airplane toy that you made yourself. How fun is that?! How did you decorate your plane? Let me know in the comments below. You can even take a picture of the airplane toy and share it in the comments. I would love to see it.
Learn how to fold this amazing paper airplane glider that flies really, really far. All you need is a piece of paper and 2 paper clips.
How to Make a Paper Airplane Glider in Easy Illustrated Steps Craft for Kids
Crafts Materials Needed
– Piece of Paper
– 2 Paper Clips
Here is a very easy way to make an airplane glider.
Step 1
Fold a rectangular sheet of paper in half the long way as in Figure 1.
Step 2
Fold back the corner of one end of the paper. Then fold back the facing corner in just the same way. Notice how these corner folds match in Figure 2
Step 3
Now fold down the entire length of both sides of the glider to make its wings as seen in Figure 3.
Step 4
Spread the wings of the glider. Use 2 paper clips to fasten the plane together as seen in Figure 3. The weight of the paper clips will make your plane glide smoothly through the air.
Flying Your Glider
Now fly that airplane glider and have a LOT of fun.
Kids love playing with this flying butterfly toy. This is an arts and crafts project to make a butterfly toy that will really fly up to 15 feet up in the air. This is for older kids as it is too difficult for younger kids to master…although they can with some supervised guidance from an adult.
How to Make a Flying Butterfly Toy Arts and Crafts Project for Kids
Crafts Materials Needed
– Paper
– Thread Spool
– Pins
– Dowel or Stick
– Strong String or Cord
Step 1
Firstly, fold an oblong piece of paper 4 inches by 5 1/2 inches on its short diameter.
Step 2
One fourth inch from fold draw a line and mark an ‘x’ halfway down on it.
Step 3
Draw butterfly like in the drawing that you see above. The dashed line is the line that we drew in the previous step. Cut out this pattern and trace on to a piece of cardboard, making a large pin hole through the ‘x’ on each side of the body. Cut out cardboard butterfly and color on both surfaces.
Step 4
Fasten 2 pins, securely, in the top of an empty thread spool. Make sure to let them stick out about an eighth of an inch. Also, try to placed the pins so that they are exactly opposite each other across the hole and about a half inch apart from each other.
Step 5
A piece of dowel or any round stick about a half inch in diameter and a foot in length is the next requirement.
Parental help / permission might be require for this part of the craft, depending on your age. Shave off some of the wood on the stick or dowel so that the stick is a little less as wide as the diameter (width) of the spool’s hole. Do this on the end of the dowel…the same length as the length of the spool. Finish so that the spool has a little platform on which to rest when thrust over end of stick.
Step 6
Tie a knot near the end of a piece of strong string or cord about 2 feet long. Place the end with NO knot on the spool and start winding the string on the spool.
Step 7 – The Fun Part – How to Play With Your New Butterfly Toy.
Now for the fun. Put the spool on the stick. Now slip pinholes in butterfly’s body over the pins that are in the spool. Then catching hold of a knot, give the string a quick jerk. Away will fly the butterfly … sometimes 15 feet or more up into the air.
Today, we will show you how to fold a paper airplane jet. There are 7 illustrated steps, that are also lettered to make it as easy to follow as possible for kids and others. You might want to actually letter your paper to make it easier for you to follow. Ask for your parents help if you can’t follow the pictures. Have fun.
How to Fold a Paper Jet Airplane with Folding Pictures and Directions
Step 1
(1) Fold Your Paper in Half
Step 2
(2) Open Your Paper and Bring ‘A’ to Center Fold and Crease.
Step 3
(3) Bring ‘B’ to center fold and crease. Now bring ‘D’ over to the center fold and crease on line ‘C’-‘E’.
Step 4
(4) Bring ‘G’ over to center fold and crease on line ‘C’ – ‘F’.
Step 5
(5) Your shape now looks like this. Leave it in this position.
Step 6
(6) Now fold along line ‘C’ to ‘H’ so that ‘E’ falls on ‘F’.
Step 7
(7) Place your shape in position shown in picture above. Bring ‘E’ down to ‘H’ so edges meet. Crease along line ‘C’ – ‘I’. Turn shape over. Fold top edge down to bottom edge in the same way.