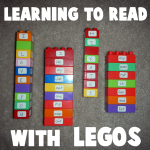
Using Legos to Learn Sight Words and How to Read and Sound Out Words

My youngest daughter is in Kindergarten and she is learning how to read. Her teacher sends home lists of sight words that she has to learn and although we use flash cards to help her learn them, using Legos / Duplo Blocks  sounds a lot more fun to her. I saw someone else online use Legos to make sight words fun and I just loved the idea. Legos are also great for alphabet letters. The child can snap the Legos together to form and sound out words.

My daughter was getting bored with playing with these ‘little kid’ blocks as she now only wants to play with the little Lego blocks that older kids use. So this is a great way to recycle these Duplo / Lego blocks.


1st-pic-learning-sight-words-and-reading-with-legos


Crafts Materials Needed

Legos / Duplo Blocks

Labels (These are the ones I used   … Avery Removable Rectangular Labels, 0.5 x 0.75 Inches, White, Pack of 525  -6737  )

Step 1


Write Sight Words and Alphabet Letters on Labels


If you want to use the Legos to practice sight words and making sentences, then write sight words on the labels. If you want your child to practice creating words and sounding out letter combinations, then write alphabet letters on labels. I repeated consonants a few times and I repeated vowels many times.


Step 2


Add Alphabet Letters to 4 Sides of Blocks


I used the 4 peg Duplo squares for the Alphabet letter blocks. I put a letter on each side, so then the child can spin the blocks to make different words. My child loved forming words with the letters. I used blank squares to for spaces.

Step 3


Put Word Labels on the blocks


Then I put sight words on bigger Duplo blocks. They would fit on the square blocks but I didn’t have any more left. I put a label on 2 sides of the blocks, but you can definitely put them on all 4 sides if you want to. I also added other words that my child knows. I also made several blocks with words such as ‘I’, ‘and’, ‘my’, ‘too’, and ‘the’. I also added labels for people and animals that she knows so that she can talk about specific people. She LOVES playing with these blocks now.


Making an Alphabet Letters Memory Game from Milk Jug Caps with Printables and Instructions for Kids

Today I will show you how to make a really cool Memory game that is great for any age child, but especially good for preschoolers and Kindergarteners who are still working on Alphabet Letters recognition. If you don’t have enough Milk Jug caps, you could also use coins, checkers, cardboard, or whatever else you have lying around the house.

DON’T USE WATER BOTTLE CAPS – USE LARGE MILK CAPS TO ENSURE THE CHILD WON’T BE ABLE TO SWALLOW THEM! EITHER WAY, WATCH THE CHILD TO MAKE SURE THEY DON’T INGEST THE CAPS!


Making a Memory Game from Bottle Caps with Printables and Instructions for Kids


Making a Memory Game from Bottle Caps with Printables and Instructions for Kids

Crafts Materials Needed

– 52  Milk Bottle Caps

– Glue

– Printer and Paper

– Scissors


Step 1 : Print Out the Bottle Cap Letters

Pick the Letters that you want below (choose from color or black and white, as well as milk jug bottle caps or water bottle caps). Print out the templates twice as you are going to be playing a matching game in which you need 2 of every letter.


Black and White Water Bottle Caps Letters


Click on Above Image for BLACK AND WHITE WATER BOTTLE CAPS


Colorized Water Bottle Caps


Click on Above Image for COLORIZED WATER BOTTLE CAPS


Black and White Milk Bottles Caps Letters


Click on Above Image for BLACK AND WHITE MILK BOTTLE CAPS


Black and White Milk Bottles Caps Letters


Click on Above Image for BLACK AND WHITE MILK BOTTLE CAPS Part 2


Colorized Milk Bottle Caps Letters


Click on Above Image for COLORIZED MILK BOTTLE CAPS


Colorized Milk Bottles Caps Letters Part 2


Click on Above Image for COLORIZED MILK BOTTLE CAPS Part 2


Step 2 : Attaching Letters to Bottle Caps


Making a Memory Game from Bottle Caps with Printables and Instructions for Kids


To attach the letters to the milk jug caps, either glue them to the top or simple insert them inside the cap (which depending on the size of the cap, might not even need glue. If you are using coins…simply tape the letters to the coins.

How to Play Alphabet Memory Game

(1) Make sure that all the caps are messed up so that they aren’t in order.

(2)  Turn all of the caps over so you cannot see the letters anymore.

(3) Place them in neat rows.

(4) A player turns over 2 caps.

….. If there is a match, they put those caps in their own pile and then gets to take another turn.

….. If there is NOT a match, the player then turns the caps back over ( in the same spot that they found them) .   The next player then gets to take a turn.

(5) The game is over when all of the matches are found. The player with the most caps wins the game.

Technorati Tags: , , , , , , , , , , , , ,

The Origami Fox Box for the Beginner Paper Folder Child


fox-box


The Origami Fox Box for the Beginner Paper Folder Child : Great for Easter Grab Gift Bags


Years ago, and I mean “years,” I had the great opportunity to try origami at school.  I actually loved it and most of the people in my class enjoyed creating various objects out of paper.  In fact, the love of paper folding quickly became a common past time in my school and we would make everything from cootie catchers to little paper balls.

One thing that I have noticed is that paper folding crafts are still a big hit with kids and my own children have brought home their own share of cootie catchers and paper balls. One of their favorite paper crafts that they have brought home is the Fox Box.  This is a very simple paper craft and is excellent for a beginner paper folder.  It doesn’t require very much skill and only uses simple folding techniques.  In addition, the Fox Box is quick to make and you can hide little treasures inside, which are perfect for grab bags. These are also great for Easter grab bags.

The Fox Box for the Beginner Paper Folder : How to Make a Fox Box with 3 pieces of paper’


fox-box-materials


Gather all the materials you need:

  • Printed or Origami Paper: You will need 3 sheets of  paper that has a print on one side or a decorative origami paper
  • Scissors or a straight-edge cutter
  • Stickers (optional)
  • Treasure or Trinket (optional)

1.    Carefully cut out 3 squares, one from each sheet of paper.  The best measurement is 6 inches by 6 inches but you can make it smaller or larger depending on the end result that you would like.  If your child is able to cut the paper by himself, then feel free to allow him to do so.


fox-box-first-triangle


2.    Give your child one piece of paper and have him fold it in half diagonally until the top edge is in line with the bottom edge.  Your child should be left with a large triangle.  Make sure that the print is on the outside of the triangle.


fox-box-smaller-triangle


3.    Fold the triangle in half to form a new, smaller triangle by bringing the corner over to the side of the other corner.  Have your child crease the paper and then fold the triangle open again to reveal the first triangle with a crease down the center.


square-fox-box


4.    Now you are ready to create a square with the paper.  Have your child take one corner from the bottom of the triangle and fold it along the crease that runs down the center of the large triangle.  Crease the paper and then unfold it.  Flip the paper over and fold the same piece to the center fold, crease and then fold it back.  This should create a hinged crease where the paper can fold both ways without difficulty.

5.    Repeat the process with the other corner of the paper.  Your child will be left with a small square of folded paper.


fox-box-small-triangle-fold


6.    At the top of the large triangle, fold down one edge so there is a small white triangle showing at the top.


fox-box-repeat-with-paper


7.    Repeat steps 2 to 6 with the other two pieces of paper.


fox-box-assembly-1


8.    Once you have all the paper folded, it is time for your child to start assembling his fox box.  At this point, depending on your child’s age, you may need to assist your child with the assembly. Take two of the folded papers and slide them together.  To do this, you slide the two small triangles, “ear shaped paper” between the folded paper at the top of the large triangle with the other paper.  This means that the two smaller triangles will slide under the small white triangle in the main body of the paper.


fox-box-assembly


9.    With the third piece of paper, repeat the process except you will need to close the box by sliding the small triangles under the third paper.  Crease the paper whenever needed as you make the paper fit together.


rimg1712


10.  Finish the fox box by decorating it with stickers (optional) and place a treasure into the fox box if you desire to do so.

The first time you and your child makes a fox box, it will feel as though you are all thumbs when you assemble the box but after the first time, it becomes very easy to create the box.


fox-box


Technorati Tags: , , , , , , , , , , , , ,

How to Make an Alphabet Letters Tactile Guessing Game with Your Preschoolers or Autistic Children

Today we are going to how to play a fun Montessori game that promotes good hand writing skills while also helping kids to learn the alphabet on their own. This is an educational, yet fun arts and craft activity for both you and your young children to do together. This crafts idea is beneficial for preschoolers, Kindergartners, as well as children who are autistic / on the spectrum / or those who have sensory disorders. (even older children enjoy it). I have a friend with an Autistic child and this game is very similar to the way she had to teach her child the alphabet since he wasn’t able to learn the alphabet through sight since he was more into sensory and tactile learning techniques. As a warning, this craft might cause random bursts of laughter from both you and your child. Comment to tell us how your child reacts to this fun tactile game and craft. Enjoy.


Have the child close his eyes and feel letters to guess for Alphabet Letters Tactile Guessing Game Craft


Photographer: Marind

How to Make an Alphabet Letters Tactile Guessing Game with Your Preschoolers or Autistic Children


CRAFTS MATERIALS NEEDED:


Gather Crafts Materials for Alphabet Letters Tactile Guessing Game Craft


Gather the crafts materials that you will need for this arts and crafts project / game.

-Magic Markers

-A spare piece of rug, cloth, felt, or craft foam

-Heavy duty scissors


Trace the Alphabet Letters on the Felt for Alphabet Letters Tactile Guessing Game Craft


1-Trace the letters you want on the material that you chose to use (rug / cloth / felt / foam) with the marker.


Now cut the alphabet letters out of the felt for Alphabet Letters Tactile Guessing Game Craft


2-Now cut out the letters as shown above.


Have the Kids Feel the Letters for Alphabet Letters Tactile Guessing Game Craft


3-Now for the fun part. Have the kids feel the letters and say the letters at the same time. Do this two or three time until they have memorized the letters.


Have the child close his eyes and feel letters to guess for Alphabet Letters Tactile Guessing Game Craft


4-Now for the game. Have the children close their eyes. Spread the letters out on the floor. Then say a letter. Have students crawl around and feel the letters till they find the correct letter. Now, have the winning student tell the other kids to close their eyes. The winning student now repeats the game. Make sure you do this a few times, it’s fun. The students should be able to play the game on their own.

Here Are Some Other Links That You Might Find Useful – It is important to practice learning all the letters of the ABC! As you do your child will become familiar with each individual letter.

Lowercase and Uppercase Floor Alphabet Game –  An uppercase and lowercase floor alphabet game for younger kids and preschoolers.

Technorati Tags: , , , , , , , , , , , , , ,