How to Make a Sunflower Full of Seeds

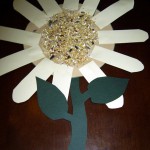
Spring is literally right around the corner.  And, I thought since Spring is almost here that we could make a beautiful sunflower full of seeds to hang up in your house to get you in the Spring spirit.  If you are feeling a bit of the early spring blah’s, or simply want an easy craft to do with your children, then this is the perfect craft for you.  The finished sunflower was made by a 4 year old so this is an excellent preschool craft.  So, grab the materials needed and let’s get this fun Spring craft started.

Check out our other Spring Crafts.


sunflower-finished


Materials Needed

  • Construction paper (brown, yellow (I used light yellow), green)
  • Scissors
  • White Glue
  • Seeds (I used a mixed seed but you can use sunflower seeds only)
  • Small Plate (to create a circle)
  • Markers


supplies


Step 1

After you have gathered your supplies, place the plate on the brown construction paper.  If you have a compass, you can use that but many times, I find that people don’t have some things handy.  Using a marker, trace around the plate to make a circle.  Cut out the circle and set aside.


circle


Step 2

With the yellow paper, cut out small finger shaped (or petal shaped) strips with a rounded edge on the top.  Cut about a dozen of the shapes and set aside for later. If your child is skilled at cutting, you can draw out the shapes and then have her cut them for you.


Sunflower Leaves


Step 3

Draw the stem and leaves in the green construction paper and either cut it out yourself or have your child cut it.


sunflower-stem


Step 4

Once you have everything cut out, it is time to assemble the sunflower.  Start by gluing the “petals” around the outer edge of the circle.  Once your child has placed all the petals, have them place a small dot of glue onto the front of the stem and then attach it to the back of the sunflower.


supplies-2


Step 5

Spread glue to the center of the sunflower on the front and then spread seeds across the glued surface.  Tap off the excess and then lay it flat to dry.


seeds


Once the artwork is dry, you can hang it on the wall or in a window to bring a bit of sunshine into your house…. even if it is raining outside.  Enjoy!!

Technorati Tags: , , , , , , , , , , ,

Make Spring Handprints Lambs for Easter or Spring : Preschoolers and Kids Craft


hand-lamb-finished


Make Spring Handprints Lambs for Easter or Spring : Preschoolers and Kids Craft

One thing that I have always loved as a parent is handprints.  There have been days where I have winced at having to wash them from the walls, partly because they are there and partly because I am taking them off, but I always seem to lovingly place my own hand over top of them as though I might remember them through touch.  It has been this way ever since my children were babies.  The first thing I did was count all the little fingers on their small hands and since that day I have continued to count them over and over again.  Of course, I need to do it discreetly now so I’m not “bothering” my children.

Since I am so in love with little handprints, I enjoy doing crafts where I can capture my children’s handprints once again for posterity reason. This craft, handprint lamb, is a great way to capture a handprint but it also adds a touch of spring to your crafts and gives your child a new way to use his hands.


hand-lamb-supplies


Gather all the materials you need:

  • Brown, White or Black Construction Paper (Or if you want to create a colorful lamb, use any brightly colored construction paper.)
  • Black Marker
  • Cotton Balls
  • Your Child’s Hand
  • White Glue


Step 1


hand-lamb-hand


1.  Have your child place his hand on the construction paper and either help him or have him trace it out onto the paper.

Step 2


hand-lamb-cutout


2.  Cut out the handprint.  For older children, this is an excellent activity to build up their cutting skills.

Step 3

3.  Flip the hand over so the fingers are facing down.  The fingers are the legs of the lamb and the thumb is the head so make sure that the hand is spread out when you do trace it.

Step 4


hand-lamb-glue


4.  Cover the palm of the hand, and part of the legs with white glue.

Step 5


hand-lamb-spread-cotton


5.  Pull the cotton ball so it becomes billowy, like soft wool or a fluffy cloud.

Step 6


hand-lamb-cotton-ball


6.  Place it onto the white glue so it covers the lamb’s “body.” Make sure to leave the legs and head uncovered.

Step 7


hand-lamb-feet


7.  Draw little feet onto the bottom of the fingers with the black marker.

Step 8


hand-lamb-finished


8.  Draw a face onto the head (the thumb) of your lamb with the black marker.

Once your lamb is finished, you can either hang it up as is, or you can paste it to a sheet of construction paper and then add green for grass, white construction paper (or cotton balls) for clouds and anything else that you would like to decorate it with.

Technorati Tags: , , , , , , , , , ,

Easter Bunny Rabbit Treat Cups Crafts Activity Ideas for Kids


bunny-cups-x3


Easter Bunny Rabbit Treat Cups Crafts Activity Ideas for Kids

Every once in a while, I come up with this wonderful little idea that I just need to do as a craft and I enjoy sharing it.  While I would love to say that this little craft is one that I thought up myself, I can’t.  In actuality, I discovered this little craft only this week when my four year old came home from his kindergarten class.  He happily hopped up to me and showed me this cute little bunny that his class had made for Easter and I was so delighted by the end result that I just had to share it with many other parents and crafters out there.

I would like to say a big thank you to his kindergarten teacher before I do start on the craft itself.  I would also like to mention that this craft is great for children of all ages.  At home, I did this craft with a 4 year old and an 8 year old and both were delighted with both the process and the end product.  It is very easy to do and can make a beautiful little gift or grab bag for the Easter season.

Bunny Rabbit Cups: How to Make these Delightful Little Bunny Cups with only a Few Supplies


bunny-cup-supplies


Gather all the materials you need:

  • Markers (I used red, purple and black but you can use anything you want)
  • White Glue
  • Cotton Balls
  • Styrofoam Cup
  • Easter Grass (I used green but feel free to use any color)
  • Construction Paper, white and pink
  • Stapler
  • Scissors


bunny-cup-eyes


1.  Take a Styrofoam cup and carefully draw the eyes of the bunny around the mid-range of the cup.  You can use any shape you want so don’t feel the need to use my cup design.  Also, allow your child to draw the face she wants or simply let her scribble on it if she would like.  For my cup, I used black for the outline and purple for the iris.


bunny-cup-nose


2.  Next, draw the nose slightly under the eyes and in the middle of the “face.”  I used red for my nose.


bunny-cup-mouth


3.  Finally draw the mouth and teeth (if your bunny has teeth) and add any other embellishments to the face.  My oldest drew drool coming out of the mouth (see center cup in top picture).  Once the face is drawn, set it aside to work on the ears.


bunny-cup-whie-ears


4.  Draw out a set of bunny ears on the white construction paper.  These should be fairly large but still manage to fit inside the cup.


bunny-cup-pink-ears


5.  Repeat the process on the pink construction paper but make these ears slightly smaller since they will be the inside of the bunny ears.  When I was creating this craft with my kids, they didn’t want the white ears so if you find your children don’t either, just let them create on their own terms.  There is no need for every bunny cup to look the same.


bunny-cup-scissors


6.  Cut out the ears.


bunny-cup-glued


7.  Glue the pink bunny ears into the center of the white bunny ears.  Make sure the bottoms of the ears match up when glueing.


bunny-cup-staple


8.  Once the ears are glued together, secure them to the inside of the cup with the stapler.  You will want to put them on the side that is furthest from the face so the staples are on the back of the bunny and not in the middle of his forehead.


bunny-cup-fold-ear


9.  This is optional, but if you want the folded ear finished look, crease one of the ears about a quarter of the way down.


bunny-cup-tail


10.  Take a small cotton ball and glue it into place below the staples on the back of the cup.


bunny-cup-finished


11.  Fill the cup with Easter grass and add a few eggs.

And that is all it takes to create one very cute little Easter Bunny cup.

Technorati Tags: , , , , , , , , , , , , , ,

How to Make Keepsake Boxes to Keep Little Treasures Craft Activity for Kids


rimg19921


How to Make Keepsake Boxes to Keep Little Treasures Craft Activity for Kids


I remember when I was a little girl, I really wanted to have my own keepsake box. There were so many things that I collected such as stones, shells and dried flowers.  There were little cards, little pictures and a few little treasures that I received from friends and family alike.  All of them had no where to really go in my room and I begged my mother for a wooden keepsake box.  Of course, with the demands of day to day life, my mother constantly forgot to purchase me a keepsake box and I never realized that I could make one myself.

That was until I got older. Then I realized that a keepsake box doesn’t have to be big and it doesn’t have to be wooden.  It can simply be a small treasure box that keeps the most important things you find.  This craft is one of those treasures.  It is easy to do and even preschool children can make their own keepsake box for their countless treasures and what is even better, it appeals to both boys and girls.

You can make the keepsake box as a present or keep it for your own treasures and you can personalize it in whatever way you want to.

Keepsake Boxes for Little Treasures : How your Child can make a Keepsake Box that is Personalized and Fun


rimg1974


Gather all the Craft Supplies That You Will Need:

  • Magazines (You will want the glossy pictures for the box)
  • White Glue
  • Paint Brush
  • Box (I found mine at a dollar store but you can use a shoebox or a packing box.  What you want is a box with a lid)
  • Scissors


rimg1976


1 – Flip through the magazines and find all the pictures that you will want.


rimg1975


2 – Cut them out and try to avoid using straight edges so the finished product has more of a collage effect to it.   Also make sure that you cut out more pictures than you need.


rimg1977


3 – Once you have everything made, take a small plastic container and mix the glue with a little bit of water.  Basically, you want to make a paste that is similar to paper mache with it so the glue should be watery but not to the point that it loses its color.


rimg1978


4 – Now that you have everything ready, start with the first side of the lower box and arrange the pictures the way you want them.


rimg1979


5 – Carefully glue them into place by adding a touch of glue to the bottom with the paint brush.  Seal the edges by running the paint brush filled with glue across the surface of the pictures and also across the box.

6 – Set it aside to allow time to dry. While you are waiting for the first side to dry, begin the lid.


rimg1980


7 – Repeat the process of laying the pictures out and then gluing them.  Make sure you seal the edges by coating the top of the pictures and lid with the glue.  Set aside to dry.

8 – Once the glue has dried on the one side of the box, repeat the process until all four sides are finished,allowing them to dry in between each step so they don’t get pulled off or stuck to other surfaces.


rimg19922


9 – When the box is complete, fill with all your treasures or give as a gift.

You can also use these little boxes as gift boxes for anyone.  People will love the idea and will treasure them just as much as the gift inside.

More Crafts Online That are Similar to This Crafts Project for Kids

Crafts with Boxes for Kids

Even More Crafts with Boxes for Kids

Cornerstone Crafts: Treasure/Jewelry Box – Popsicle stick treasure box or jewelry box that stands up well over time.  This project can be done as a gift for others (i.e. Mothers Day), or as a box for your own child to play with.

Virtual Kids’ Crafts: My Treasures! Box – They may have been marbles, rocks, treasures from the gumball machine; just about anything. But, there was nothing more fun than removing each treasure to look at it over and over again.  Today you’re going to create your own treasure box. You can use what you have around the house or you can purchase supplies from me and complete one like my daughter, Michele’s.

Give Your Next Gift in a Treasure Box! –  For kindergarten writers, all this glue squeezing and letter-practicing are invaluable kinesthetic boosts for early literacy.  Little hands need these workouts, and little kids also get a huge boost out of the shine and pizzazz they’ve created.  Expect an enjoyable time making it with your child, and then give it as a gift to a family member once you’re done.

Eco Friendly Crafts for Kids – A keepsake storage box which uses birthday/Christmas cards and a shoe box.    Children love to have secret boxes of their own and this one makes use of what would otherwise be waste.  There are three R’s to recycling and all the entries in our Green MacGyver eco friendly crafts for kids series will recognize the importance of “REUSE”.

Make a Credit Card Mailbox – My toddler LOVES getting the mail. He also loves pretending and putting stuff into holes/slots/crevices etc. To satisfy both of these hobbies, we made a little credit card mailbox!

Cardboard box castles – There are many ways to build a castle with children. Once I already made a small cardboard toy castle with my kids, but this time we wanted something more impressive. For our castle we collected cardboard boxes of different size, and toilet paper tubes. Using those building blocks, paint and some colored paper, we created this castle with floors, round towers, windows and a cone-shaped roof.

I Love to Create Kids: Recycled Craft Challenge! – Hey, Parents!  This week, I Love to Create is about getting your kids’ creative juices flowing. Kids love a challenge, so why not give them a crafty one?  With just a few supplies combined with some kitchen discards,  you’ve got an activity that’ll keep ’em guessing…and recycling!

Technorati Tags: , , , , , , , , , , , , , , , , ,

Flowers for Mom: Easy to make Paper Flowers with only 4 Materials


rimg1993


Flowers for Mom: Easy to make Paper Flowers with only 4 Materials


After a long winter with a lot of snow (Canada lived up to its reputation as the cold white snow), I am overjoyed to see my green grass and the lovely green shoots of spring flowers bursting from my garden. They are simply beautiful in a range of purples, oranges and pinks and it definitely puts me in the mood to bring in a few spring blooms.  Unfortunately, I hate to wreck the scenery in my yard but I have found an excellent way to add  a little color to your house.

It is simply to make some pretty flowers with paper.  Kids love this and what is even better is that they are so easy to make, a child of almost any age can make.  You can also do a multitude of things such as mounting them on a Popsicle stick or use them to decorate pictures or cards.  What is even better is the fact that these little flowers can be made with only a few items that can be found around the house.

How to Make The Paper Flowers for Mom :
Start of The Kids’ Crafts Instructions


rimg1981


Gather all the Craft Supplies That You Will Need:

  • Paper (Two colors, I like to use a printed paper and then a solid but you can use any combination you would like)
  • Straight Edged Cutter
  • Glue (Glue Stick but you may want to use a little dab of white glue for one step)
  • Button (or any other type of embellishment such as a small shell or little seeds)


rimg1982


  1. Take the paper and the straight edged cutter (or scissors if you don’t have the latter) and cut 2- 1 inch strips from each sheet of paper.  Cut more if you plan on doing multiple flowers.  I like to use an 11 to 12 inch length for a bigger flower.
  2. Now that you have the sheets, take one strip and place the side you want showing face down.

    rimg1987


  3. Fold the one edge to the middle of the strip to make a loop with the paper, repeat with the other edge.
  4. Once you have determined the center of the paper and the best loop size, glue the edges down to the center of the strip so that it overlaps slightly.  You will end up with three layers of paper in the center with a loop on either side.

    rimg1985


  5. Repeat the process with the second sheet of paper in the same color. (In this instance, I used two strips of printed paper.)
  6. Take one looped paper and place a dab of glue on the middle.
  7. Firmly place the second looped paper onto the first to create a “t” with the two papers.

    rimg1988


  8. Repeat steps 2 to 7 with the other paper (in this case the blue paper for me).

    rimg1989


  9. Glue the two “t’s” together the same way that you did the individual papers.  Since the paper is heavier, this is when I recommend using the white glue for extra support.  You will want the papers to be diagonal to each other to give the look of a full flower.

    rimg1990


  10. Using the white glue, attach your embellishment to the flower and you are ready to use for decorations.

A great way to use this craft is either on a Mother’s Day Card or on a pipe cleaner to give with other flowers as a bouquet for Mother’s Day or any other day that you want to make mom feel special.


rimg1991


Technorati Tags: , , , , , , , , , ,

Easy Pinwheel Pencil Craft for Kids for Independence Day on July 4th


rimg19691


Easy Pinwheel Pencil Craft for Kids for Independence Day on July 4th


This article was written in the Spring, and as Fourth of July is tomorrow, I thought of pinwheels and how with red, white, and blue paper, they could be very festive on a hot fourth of July night. Although this article was intended for Spring, when the days are windier, I think it is a good thing that this article was pushed to Fourth of July, as I think your children will have a lot of fun using these pinwheels tomorrow night.

Pinwheels are such an easy craft.  I remember making them as a young child all the way back to kindergarten and I remember being really proud of my accomplishment as the wind spun it around and around on the walk home.

Today, I love making pinwheels with my kids because they get as much enjoyment out of it as I did.  They are very easy to use and they only require a few supplies that most people have in their homes or home offices.

To Celebrate fourth of July, just use paper that is red, white, and blue and make sure to keep these pinwheels away from any sparks created by sparklers or any other types of miniature fireworks items that kids use for fun. Have fun and Happy Fourth of July.

Pinwheel Pencil Craft for Kids: How to Make a Pinwheel Pencil


rimg1957


Gather all the Craft Supplies That You Will Need:

  • Scissors
  • Pencil with an eraser
  • Paper (I like to use a printed paper that has a print on one side but you can use any type of paper)
  • Pushpin


rimg1958


1 – Cut out a square of paper.  I use about 8 inch by 8 inch paper for this craft.


rimg1959


2 – Fold the paper in half on the diagonal line so you make a triangle.  Unfold so that the paper is creased.


rimg1960


3 – Repeat the process with the other diagonal.  Unfold again.


rimg1962


4 – With the printed paper facing down, mark a line on the crease with your pencil. The line should be a third of the way up from the center of the paper.  Do this on all four diagonal lines.


rimg1963


5 – Carefully cut the diagonal crease until your scissors reach the guideline.  Repeat on all four diagonals.


rimg1964


6 – Take on corner and fold it into the center of the paper.  It should form a loop and you shouldn’t flatten it at all.  Leave it loose.


rimg1965


7 – Take the next corner, it should be every other corner, and bring that in the exact same way.

8 – Repeat the process until you have one loop, then one straight, then one loop, then one straight paper; forming a pinwheel.


rimg1966


9 – Connect together in the center with a pushpin.


rimg1967


10 – Push the pin into the eraser on the tip of your pencil.

And that is all it takes to make a pinwheel.  Easy but with hours of fun and a few cute decoration for your pencil.

More Online Crafts for Kids That You Might Enjoy

Homemade Pinwheel Kids Craft – Kids love to make things move and work. Homemade Pinwheels are a fun children’s activity to make and kids love to play with them.

Flower Pinwheels Craft for Kids – These simple pinwheels can be made for decorations, party favors, or just for fun. We made ours with colored card stock, but you might try cereal boxes, or you could use plain paper and let the kids draw or paint a design.

How to Make a Pinwheel – Easy and fun directions to Make a Pinwheel. Great summer fun for the kids and the printable paper included is great for Fourth of July, too!

Summer Crafts Pinwheel Craft – Pinwheels are a great activity for kids to make during the summers. The bright colors and spinning of the spiked disc is representative of the sun.

Easy-to-make Patriotic Pinwheels: Great craft to celebrate July 4th – What is it about a pinwheel that makes every child smile? Make these with your kids this weekend and use them in your Fourth of July celebration.

3 Kids Craft Ideas for Independence DayThere are many fun ways that you can craft the way to July 4. There are many things you can do to make this day truly extraordinary. If you are ready to celebrate, here are some ideas to consider craft. You can find full details about how to create them in the web or use your own creativity.

10 of the best fourth of July crafts – For US residents celebrating fourth of July – here are my picks for the best fourth of July crafts to get you in the patriotic mood.

Technorati Tags: , , , , , , , , , , , , ,

Painting with Sand – A Fun Kids Crafts Activity


finished1


Painting with Sand – A Fun Kids Crafts Activity


Paint.  It is a staple of every childhood and is almost a right of passage for all of them. Children love to paint.  They will paint at home, on sidewalks, and at school.  In the classroom, it seems to be the one area that draws all the kids to it and no matter how many interesting toys are out in a preschool room, the children are always willing to done a paint smock and get busy creating.

I love painting myself, although I lack a lot of the skill needed.  Still, whenever I get a chance to paint with my children, I am there doing it.  Sure, they have far surpassed me in a lot of areas, I can still create a nice abstract piece without too much problem.

Although painting is so popular with children, I find at times that it can become rather boring.  This is probably why I am always thinking up new ways to take a break from the norm.  Painting doesn’t have to be with paintbrushes, it doesn’t have to be done on paper, and it doesn’t have to be just painting.  What it does need to be is creative and most children bring more than their share of creativity to the painting table.

This craft, while it still relies on paint brushes, is a popular craft with children.  It brings in both the creative and a sensory stimulation that is not always there in a painting craft.  In addition, the finished pieces have a 3D-effect to them and it looks amazing under the glass of a frame.  My personal favorite is to use blue, white and silver, since the children often create pictures that resemble beautiful ocean scenes.

Painting with Sand : How to Break from the Norm with Paint


rimg2008


  • Paint (acrylics work well but you can use any type of paint except oils and water)
  • Sand
  • Paper (try to use a heavier paper since this paint has some weight to it)
  • Dish Soap
  • Container(s) for paint (I find that old Popsicle makers work well because they take enough paint and you can put a lot of colors in them.  Also, you can wrap them in saran wrap for storage if you don’t use all the paint.
  • Paint Brushes (one for each color)


rimg2009


1 – Decide on the colors that you would like to use and pull out the paint.  Pour the first color into the container (if you are using separate containers, simply put the paint in and then repeat in each container you have).


rimg2010


2 – Repeat until you have all the colors that you want to use.  Make sure that you only fill them up between a quarter of the way to half way since the sand will increase the volume quickly.


rimg2011


3 – Now for an old teacher’s secret (shh…don’t tell anyone), place a few drops of dish soap into each container of paint.  This makes it a bit easier to clean off of things and whenever I use paint, except oils and water, I use dish soap in it.


rimg2012


4 – Once you have your paint ready, add in the sand.  This is usually done to the eye but you will probably want about 2 teaspoons to every 3 or 4 tablespoons.


rimg2013


5 – Repeat with all the paint


rimg2015


6 – Stir the and into the paint until it is well blended.  You will want to have a paint that has a lot of texture to it but is still wet and easily applied to the paper so add more sand if necessary.  Repeat with all the paint, using a different paint brush with each paint color.


rimg2017


7 – And now your paint is ready for painting.  Have your child paint whatever they would like but encourage them to really play with the paint.  You will find that it has a bumpy texture on the paper and it will clump at some parts but don’t try to remove them, this is the whole reason behind the sand paint.


rimg2018


8 – Allow the art piece to dry completely on a flat surface before you hang it up.  This is very important since the paint is heavier than others and it can ruin the picture if you hang it before it is ready.


rimg2020


One of the best points about this paint is how it blends together.  Since the paint is so heavy, it keeps most of the color and when you blend, you are less likely to have one big brown mess and more likely to have a range of shades.  This makes it an excellent paint for blending and other painting techniques that rely on pulling colors into another.

Here is our video on How to Paint with Sand

HERE ARE MORE SIMILAR SAND CRAFTS FOR KIDS

Sand Crafts for Kids

How To Make a Sand Painting

Make a Native American Sandpainting

9 Summer Craft Ideas For Toddlers And Preschoolers Fun Summer Crafts For Kids

Colored Sand – June 26, 2009 – Quick and Easy Daily Crafts for Kids

Colored Sand Candleholder

Make a Portable Mini-Sandbox

How to Make Sand Art With Kids

Mother’s Day Crafts for Kids to Make for Their Moms

Technorati Tags: , , , , , , , , , , , , , ,

Sculpting with Fimo: The Goldfish Crafts Project for Kids


goldfish-finished


My husband is a toy sculptor and he can do some pretty amazing things with his sculpting medium and at times it can be rather depressing when my sculpting abilities are very basic. I mean, I can create with paper but I have a bit of a hard time creating anything that is three dimensional, which is why I always delight when I can create something that is worthy of even a little bit of praise.  For this reason, I love working with fimo or clay and I enjoy the time spent with my kids as we make little critters that can be hardened into masterpieces that I can enjoy for a lifetime.

Sculpting is a wonderful activity for children and most have some experience with it through playdough.  While I love playdough, I find that not being able to really keep the finished product can be disheartening at times so I find that giving children an opportunity to make some lasting pieces is worth the extra expense that clay or fimo can present (although fimo isn’t that expensive, usually around 5 dollars for a small block that goes a long way).

In this craft, I will teach you how to create a very basic fimo sculpture fish that most children will enjoy making again and again.

Sculpting with Fimo: The Goldfish : How to Make a Goldfish with basic supplies


supplies1


Gather all the materials you need:

  • Fimo (you can use any color, in the step by step I use grey so I can paint it later but in the finished product I used orange, white and black.)
  • Toothpicks
  • Paint Brush or a round chopstick (if you have any)
  • Paint (optional)

1.  Remove a 2 or 3 inch piece of the Fimo from the block and knead it until it softens.  Usually this doesn’t take too long but if the Fimo is harder, you should expect about 5 minutes of kneading to soften it enough.


ball


2.  Take a small piece from the softened Fimo and roll it into the a ball to form the body of your goldfish. This will be the biggest piece and the size you take will depend on how big you want your goldfish to be. Once you have rolled it into a ball, flatten the bottom slightly so it will rest on the table without falling over.


making-a-tail


3.  Now that you have the body, it is time to make the fins of your goldfish.  To do this, create a small triangle with the Fimo.


tail


4.  When the triangle is formed, cut away a small “v” in the largest part or base of the triangle and then cut away the excess from the top of the triangle.

5.  Using the toothpick, carve a small “v” design into the tail and then attach it to the end of the ball by gently pressing it into


making-the-fins


6.  Once the tail is attached, it is time to work on the fins.  To do this, create two small tear drop shapes with the Fimo and then draw a few lines on your fins before you attach them.


putting-on-a-fin


7.  Attach the fins to the ball and smooth the Fimo with the flat side of the toothpick.  Fix any of the lines that were erased.


making-the-mouth-part-one


8.  Roll a small ball with the Fimo for the mouth and place it onto the front of the ball.


making-the-mouth


9.  Using the rounded tip of a paint brush or chopstick, gently press it into the small ball until you have an indent that looks like fish lips.


fish-finished


10. Roll two more small balls, smaller than the mouth, and carefully press them into the large ball above the mouth. These are the eyes.  Finish them off with a smaller ball that works as the pupil.  If you are painting, you can do all of this in one color but if you don’t want to paint the finished piece, use white Fimo for the eyes and black Fimo for the pupils.

11.  Bake in the oven according to the package until the sculpture hardens.


goldfish-finished


12.  At this point you will be done, unless you used all one color.  If you did, take the time to paint the sculpture with acrylic paints.

Fimo is an excellent craft for children that are 8 and up but I have seen children as young as 4 make some truly spectacular sculptures with this medium.  One word of advice; however, is to make sure that the children wash their hands after they are finished using it.

Technorati Tags: , , , , , , , , , , ,

Homemade Easter Egg Dye: How to Make Easter Egg Dye from Things in your Cupboards


dye-finished


Homemade Easter Egg Dye: How to Make Easter Egg Dye from Things in your Cupboards

Obviously, I like to dye Easter Eggs, I mean, I go to the painstaking effort of blowing out each shell and I spend several hours decorating eggs to place around the house the night before Easter morning.  I’m not sure why I like the eggs, since I don’t eat them but I do.  For this reason, I am always looking for new ways to do the eggs and new ways to create wonderful dyes for the eggs.  Usually, I will purchase a nice kit from the store and I have done them all; neon, pastels, glow in the dark, speckled, you name it, I have probably used the product.

One thing that I had never done, was make my own dyes so I finally decided that I would gather a few things together and create some homemade dyes.  It does take a little more effort but the effect can be some truly beautiful eggs that are unique and truly yours.

The best point about this craft is it brings your children’s crafts into the kitchen, and as any chef or baker knows, you can create some true masterpieces on a stove.

Homemade Easter Egg Dye: How to Make Easter Egg Dye from Things in your Cupboards


dye-supplies


Crafts Materials That You Will Need:

  • Saucepan
  • 1 cup of water
  • Measuring Cup
  • Measuring Spoons 1tsp and 1 tbsp
  • Item for Dye (see the list below)
  • Stove

Dye Colors:

Orange:  Paprika

Green: Spinach

Blue: Blueberries

Red: Red Onions

Pink: Raspberries

Yellow: Orange peels

1.   The first thing that you should do before you start making your own dyes is talk to your child about kitchen safety.  Depending on the age, your child may not be able to help with the stove portion of this craft but there are other things that your child can do, such as measure out ingredients.


dye-add-water


2.   Measure out 1 cup of water and have your child pour it into the saucepan.

3.   Place the saucepan on the stove and set the temperature to medium-high.

4.  While the water is beginning to heat, have your child measure out the ingredients.  Usually, you will want about 2 or 3 tablespoons of the ingredient.  Sometimes you may need more, especially if you are trying to leach the color from a fruit or vegetable.


dye-add-paprika


5.   Add the ingredients to the water.  In this case, I am using a paprika to create orange dye.


dye-boiling


6.   Bring the water and ingredients to a slow boil.


dye-stirring


7.  Lower heat to a low-medium and simmer.  Usually it can take about 15 minutes but for vibrant colors, you will want to simmer for about an hour.  Lower the heat if your water is evaporating too quickly.  Make sure you occasionally stir the mixture.


dye-cooked-dye


8.  Once the simmering time has passed, remove from the heat and pour into a small container or bowl for dying the eggs.


dye-add-vinegar


9.  Add two to three teaspoons of vinegar to the dye and stir until it is blended in.


dye-eggs-in-dye


10.  Take out the eggs you will be dying out of the fridge, or blow them out if you want them hollow, and place them into the bowl.

11.  Allow the eggs to sit in the dye until you get the desired color.  If you want dark, full color, let the eggs sit in the dye overnight.  Make sure you put it in the fridge or close the container to prevent the dye from spilling.


dye-eggs


12.  Remove the eggs from the dye and wipe off the excess dye.

The eggs that are produced from these types of dyes are flat and do not produce a shiny finish.  If you want to have a shiny finish, coat the eggs with a spray sealer that you can pick up at most craft stores in the ceramics section.


dye-finished


MORE EASTER CRAFTS ON THIS BLOG

MORE EASTER CRAFTS ON OUR CRAFTS FOR KIDS SITE

Easter Basket Crafts for Kids

Easter Bunny Crafts for Kids

Easter Chicks Crafts for Kids

Easter Lambs Crafts Ideas for Kids

Easter Hats & Bonnets Crafts Activities for Kids

Easter Eggs & Egg Decoration Crafts Activities for Kids

Crafts with Egg Shells

Crafts with Egg Cartons

Jesus Crafts Ideas for Kids

MORE EASTER FLOWER CRAFTS & ACTIVITIES FOR KIDS FROM OTHER BLOGS

Dyeing Easter Eggs the Natural Way – With a lot of us here having our own chickens or access to fresh eggs this could be a great project for kids!  Let us know if you have any favorite recipes for natural dye for the eggs!

How To Naturally Dye Easter Eggs – With everyone ‘going green’, why not have a green Easter? Healthy, all-natural alternatives exist and make beautifully colored eggs (and are just as much fun to use).

5 Great Reasons to Dye your own Easter Eggs – Sans Boxed Kits – Until I get a mini-farm and raise Araucana Chickens (Easter Egg Chickens)I am dependant on dying my own Easter Eggs.  This year I wanted to dye them with found things from my kitchen.  I refused to be dependant on what was offered me from the mega-chains.

Easter Egg Fun! – Egg dyeing is a fun and educational Easter tradition to start with your little one. Follow these tips and instructions for making homemade and easy designs that your kids will love. PLUS: Learn how to make eco-friendly dye from vegetables!

Simple Ways to Dye Easter Eggs – While growing up the only method I knew for dying Easter eggs was to use PAAS dyes. Something about those slim boxes filled with little plastic cups and colored tablets excited me much more than they should have.

Improving on natural Easter egg dyeing – Seattle photographer Emily Weaver Brown has produced some spectacular dyed Easter eggs. She made a bright yellow using a paste made of turmeric and vinegar, and made other colors out of blackberries, beets, and pomogranate juice. Here’s the kicker:

Fun This Week: Dyeing Easter Eggs – No matter what else you have going on, take some time this week to dye a few Easter Eggs.

The Easiest Easter Eggs of All – I’d never before heard of the “tie dye” egg method—but after spending an afternoon trying it out, I can vouch that not only is it completely mess- and hassle-free, the results look amazing. In fact, this weekend, I’m planning on hitting the flea market to pick up a few silk neckties for my own eggs. Want to give this technique a try? Here’s how.

Naturally Dyed Easter Eggs – The canned food selection in Germany is nothing like it is in The United States.  Back home, I could find anything from spinach to sweet potatoes in a can.  In German, we’ve got cans of peas and cans of corn.  And at the risk of getting really wild, the grocery store where I shop also has peas and corn in the same can.

Coloring Easter Eggs Naturally – The gorgeous copper color came from onion skins and the blue from red cabbage leaves. I used about 3 tablespoons of  turmeric and 1 Tbs. vinegar to acheive  this sunny golden color and red beets produced a light mauve.

Technorati Tags: , , , , , , , ,

Keepsake Easter Eggs Decorating Craft for Kids


eggs-finished


Every year, there are a hundred celebrations and events that I want to keep something from.  Sometimes my keepsakes are countless photographs, while at other times, those keepsakes are little toys, pieces of artwork, or a dozen other little things. The main point is that I have something to remember the event by.  Easter, while filled with many photographs, has always been something that I could never keep something from.  Every year, a few days before Easter Sunday, I would break out the eggs and boil them up for dying.  Then my children and I would spend a few hours creating small masterpieces on the eggs.  Unfortunately, hard boiled eggs never last and I would have to throw away everything that had taken so long to make.

That was until I realized that there was a way to keep the eggs without any worry of them becoming rotten and that is what I will share with you today; making your own keepsake Easter eggs.

Keepsake Easter Eggs Decorating Craft for Kids : How to Make These Decorated Easter Eggs with Your Children


materials


Gather all the crafts materials you need:

  • Eggs (about a dozen and I prefer to use the large sized eggs)
  • Easter Egg Dye Kit
  • Bowl
  • Needle
  • Stickers (optional)
  • Vinegar (for the dye)

1.     Before you begin, take a few minutes to wash the eggs since you will need to put your mouth on the shell. This cuts down on any risk of salmonella.


needle


2.    This stage of the project will need to be done by an adult to prevent any injuries.  Once the eggs are washed, take the needle and carefully push it through the tip (or top) of the egg.  Carefully remove a few pieces of shell so you have a small whole in one end of the egg.  Repeat the process with the other end so that you have a hole on both ends of the egg. (Note: This should be the top and bottom of the oval and not the sides of the egg.)


egg-and-needle


3.   When you have a hole in both sides, insert a long needle into the hole and swirl it around the inside of the egg.  The goal is to break the yolk and remove the membrane from the sides of the egg.  If you miss this stage you won’t be able to clean out the egg.


blowing-egg


4.   Wipe off the egg white that has leaked out of the top of the egg and then place your lips around the hole.  Firmly blow into the egg while you have the egg resting over a bowl.  The egg should pour out of the other hole but if it doesn’t, repeat the swirling with needle until you are sure that the yolk has broken.  Continue to blow until all the yolk and egg white is removed from the inside of the shell.


blown-egg


5.    Now that the eggs are ready, wipe off any excess egg white or yolk and set aside.  Prepare the egg dye according to the directions on the package.  (Most egg dyes use vinegar but not all of them do.)


dying


6.   Have your child dye the eggs.  If you want to add layers to the design, you can actually use wax (or crayons) to draw on designs before you dye the eggs.  Once the egg is dyed, you can wipe off the wax to display the design.  When you remove the eggs from the dye, make sure that you allow them to drain completely since the shells will fill up with the dye.


dyed


7.   Dry the eggs completely and then finish decorating them with stickers (optional)


rimg1738


On Easter, the eggs can be used for the egg hunt or they can be used to make beautiful decorations.  One of the best things about blowing the eggs before you dye them is that you can use them for crafts, ornaments or you can simply pack them into an egg carton (with your child’s name and the year on each egg) and place them into your keepsake box.


eggs-finished


So if you are looking for a way to decorate eggs that you can keep, then this is definitely the way to do it.

MORE EASTER CRAFTS ON THIS BLOG

MORE EASTER CRAFTS ON OUR CRAFTS FOR KIDS SITE

Easter Basket Crafts for Kids

Easter Bunny Crafts for Kids

Easter Chicks Crafts for Kids

Easter Lambs Crafts Ideas for Kids

Easter Hats & Bonnets Crafts Activities for Kids

Easter Eggs & Egg Decoration Crafts Activities for Kids

Crafts with Egg Shells

Crafts with Egg Cartons

Jesus Crafts Ideas for Kids

MORE EASTER FLOWER CRAFTS & ACTIVITIES FOR KIDS FROM OTHER BLOGS

Craft Project: Easter Egg Duck – Kids will enjoy making these cute and easy ducks from purchased plastic Easter eggs.

Preschool Easter Crafts for Kids Inspire Young Minds – Easter crafts for kids is a great way to mark the Easter festivities, and a great excuse to get your classroom talking about Easter.

Paper Dot Easter Egg Craft for Kids – The paper dots can be used like glitter to embellish cards, decorate picture frames, and yes, even coat styrofoam Easter eggs.  With a few simple craft items that you probably have on hand, create an Easter activity workstation for your young children and make some paper dot Easter eggs for decorations and gifts this Easter season!

Tie Dyed Easter Eggs Craft for Kids –  Tie Dye Easter EggsI saw this egg dying craft on Martha Stewart’s site and I have no idea if everyone else on the planet has already seen it but I’m going to take the risk that the majority of you out there are just as behind the times as I am and this will be new to you as well.

Easter Art & Creativity Kits From ELC – Increasing numbers of people are looking for alternatives to chocolate when buying Easter gifts. If you too have noticed chocolates eggs becoming seemingly less special then you may find Early Learning Centre’s Easter Art & Creativity range a delightful way of marking this holiday.

Easter Kids Crafts – It is Easter time and with Easter comes Spring break.  Spring break means that the kids are home and need something to do.  I have been researching crafts all day to find just the right ones.  I have compiled a list with the links of crafts we are intending to try.

Easter and Spring Crafts for Toddlers, Preschoolers, and Kids – As always these crafts are suited from 18 months and up, depending on how much parental help is needed.  As for egg cartons, I prefer the cardboard type as they are easier to color, using crayons, markers and color pencils.  But this time I did the crafts with a Styrofoam egg carton, which can only be colored on with crayon and some pressure.

Easter Bunny Egg/Flower Holder – Make this cute Easter bunny holding a flower in front of an Easter egg.

Kids Crafts for Holidays & Easter – Easter is coming up which got me thinking about how I am going to keep my kids occupied this year.

Easter Craft For Kids (including a bouquet of flowers) – My absolute favorite book for Toddler Crafts is called The Toddler’s Busy Book by Trish Kuffner. It has 365 Games and Activities in it that are easy and fun to do!  There are crafts for every holiday.  It breaks the crafts down into great categories like : Rainy Day Play, Kids in the Kitchen, Water Play, Outdoor Adventures, Arts & Crafts and much more.  I highly recommend getting this book!!  It is a great resource, one I have used over and over!!  Below is one of the craft ideas for Easter that is in the book.

Easter Craft Ideas for Kids – Get crafty and create a colorful Easter holiday for the kids.  Along with the Easter egg masterpieces you have planned using some of the ideas in our article about 20 ways to decorate an Easter egg, craft your own panoramic sugar eggs, chocolate Easter lollipops, feathered Easter baskets, and more to celebrate the holiday.

Keeping Easter Fun and Frugal –   Finding great activities for your kids to do for Easter can be easier than you think, here’s a little craft making felt Easter decorations that you can use every year.

Easter and Springtime Crafts for Kids – Easter and springtime traditionally signals the turn of the year into a time of rebirth and fresh beginnings. It’s a season groaning with possibilities for so many crafts for kids to enjoy.

Easter Family Fun – For many families, Easter is a time honored tradition when the earth is reborn and loved ones reunite. A time for honey baked ham, mashed potatoes and, of course, chocolate, chocolate and more chocolate.

Free Kids Crafts for Easter – I’ve been posting mostly patterns for things tou make FOR kids, well, here’s some crafts that they can make theirselves!

Have Fun With Your Easter Egg Hunt – The tradition of Easter egg hunts goes back centuries in one form or another. As a symbol of fertility and new birth, eggs planted around the home bring to mind the rebirth of Spring. Incorporate that same feeling of joy into your hunt to make it fun for the whole family.

Preschool Easter Crafts for Kids Promotes Creativity – Children can be very trying at times, anyone with kids knows that. But there comes a time, after the terrible twos, but before pre-teens, that they are simply delightful. They haven’t learnt any bad behavior yet, and all they want to do is please you.

Two Super Easy Easter Crafts for Kids! – Easter is only two weeks away! Here are some fun and thrifty crafts to do with your kiddos.

Technorati Tags: , , , , , , , , , , , , , , , , , , ,

The Origami Fox Box for the Beginner Paper Folder Child


fox-box


The Origami Fox Box for the Beginner Paper Folder Child : Great for Easter Grab Gift Bags


Years ago, and I mean “years,” I had the great opportunity to try origami at school.  I actually loved it and most of the people in my class enjoyed creating various objects out of paper.  In fact, the love of paper folding quickly became a common past time in my school and we would make everything from cootie catchers to little paper balls.

One thing that I have noticed is that paper folding crafts are still a big hit with kids and my own children have brought home their own share of cootie catchers and paper balls. One of their favorite paper crafts that they have brought home is the Fox Box.  This is a very simple paper craft and is excellent for a beginner paper folder.  It doesn’t require very much skill and only uses simple folding techniques.  In addition, the Fox Box is quick to make and you can hide little treasures inside, which are perfect for grab bags. These are also great for Easter grab bags.

The Fox Box for the Beginner Paper Folder : How to Make a Fox Box with 3 pieces of paper’


fox-box-materials


Gather all the materials you need:

  • Printed or Origami Paper: You will need 3 sheets of  paper that has a print on one side or a decorative origami paper
  • Scissors or a straight-edge cutter
  • Stickers (optional)
  • Treasure or Trinket (optional)

1.    Carefully cut out 3 squares, one from each sheet of paper.  The best measurement is 6 inches by 6 inches but you can make it smaller or larger depending on the end result that you would like.  If your child is able to cut the paper by himself, then feel free to allow him to do so.


fox-box-first-triangle


2.    Give your child one piece of paper and have him fold it in half diagonally until the top edge is in line with the bottom edge.  Your child should be left with a large triangle.  Make sure that the print is on the outside of the triangle.


fox-box-smaller-triangle


3.    Fold the triangle in half to form a new, smaller triangle by bringing the corner over to the side of the other corner.  Have your child crease the paper and then fold the triangle open again to reveal the first triangle with a crease down the center.


square-fox-box


4.    Now you are ready to create a square with the paper.  Have your child take one corner from the bottom of the triangle and fold it along the crease that runs down the center of the large triangle.  Crease the paper and then unfold it.  Flip the paper over and fold the same piece to the center fold, crease and then fold it back.  This should create a hinged crease where the paper can fold both ways without difficulty.

5.    Repeat the process with the other corner of the paper.  Your child will be left with a small square of folded paper.


fox-box-small-triangle-fold


6.    At the top of the large triangle, fold down one edge so there is a small white triangle showing at the top.


fox-box-repeat-with-paper


7.    Repeat steps 2 to 6 with the other two pieces of paper.


fox-box-assembly-1


8.    Once you have all the paper folded, it is time for your child to start assembling his fox box.  At this point, depending on your child’s age, you may need to assist your child with the assembly. Take two of the folded papers and slide them together.  To do this, you slide the two small triangles, “ear shaped paper” between the folded paper at the top of the large triangle with the other paper.  This means that the two smaller triangles will slide under the small white triangle in the main body of the paper.


fox-box-assembly


9.    With the third piece of paper, repeat the process except you will need to close the box by sliding the small triangles under the third paper.  Crease the paper whenever needed as you make the paper fit together.


rimg1712


10.  Finish the fox box by decorating it with stickers (optional) and place a treasure into the fox box if you desire to do so.

The first time you and your child makes a fox box, it will feel as though you are all thumbs when you assemble the box but after the first time, it becomes very easy to create the box.


fox-box


Technorati Tags: , , , , , , , , , , , , ,