How to make a Pen and Pencil Holder for Fall with Seeds and a Cardboard Tube

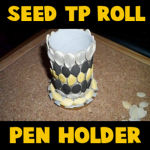
Here is a pen and pencil holder craft that is easy to make and a great craft for kids during the Autumn / Fall season. This pencil holder is made with a recycled cardboard tube from a toilet paper roll or a paper towel roll. Use seeds and paint or markers to decorate the cardboard tube. Find the crafts instructions below. Your kids will love this one. Below the Step by step tutorial is offered by Laura from Dacian Moon Handmade

How to Make an Autumn Pencil Holder with Colorful Seeds and a Recycled Toilet Paper Roll


How to make a Pen holder decorated with seeds


CRAFTS MATERIALS NEEDED:

– empty paper towel or toilet paper roll
– lid
– pumpkin seeds
– craft glue
– scissors
– paints (silver, gold, black)
– paintbrush


Step 1.

Take the roll…


… and make some cuts on one end, like this.


Bend them outward…


… like this.


Step 2.

Put glue on the folded part …


… and set it on the lid.


Step 3.

Take a seed and apply a layer of glue on one side of it…


… then place it on the roll.


Cover the roll with seeds…


… like this.


Step 4.

You can let it like this or can use metallic paints to add some style to it…or
you can use any colors that you like. If your parents don’t want you to paint,
you can use markers instead.


Like this 🙂


I hope that your pencil / pen holder looks fantastic. Keep it on your desk or give it to some one that you care about.

Technorati Tags: , , , , , , ,

How to Make an Earth Day Soda Bottle flower light

This flower light bulb craft is a great way to spend a rainy weekend, and also a terrific way to teach kids about recycling and reusing everyday objects. Explain to your child that there’s more than one way to recycle one thing into something else. You can turn used soda bottles into a string of flower lights for spring!

How to Make an Earth Day Soda Bottle Flower Light


flower-light-bulb-main


Crafts Materials Needed


flower-light-bulb-what-youll-need


String of small lights
A 16 oz soda bottle
Craft foam
Paint suitable for plastic (I used Calypso All-Purpose Acrylic Paint which dried nicely and fast)
Craft foam in green
Floral wire
Scissors
Tape (green tape or floral tape optional)


flower-light-bulb-step-one


1. Cut off the top section of the bottle.

2. Trim the cut end into petal shapes. Child-size scissors (and hands!) are good for this as they can maneuver more easily inside the bottle.


flower-light-bulb-step-three


3. Paint the outside of the bottle and allow to dry.


flower-light-bulb-step-four


4. While the paint is drying, cut two 5″ pieces of floral wire. Wrap around the base of the flower as shown, twisting the ends on each side of the base.


flower-light-bulb-step-five


5. Cut petal shapes into a 2″ x 5″ piece of green craft foam.


flower-light-bulb-step-six


6. When paint is dry, wrap petal piece around the base of the flower as shown. I used green floral tape to cover the regular clear tape I had used to make it look neater and prettier.


flower-light-bulb-step-seven


7. Insert a light into the hole in the base. Then take each set of two floral wire ends and wrap around the light string as seen above.


flower-light-bulb-finished-product


Voila, you have your own flower light! Repeat the process as many times as you’d like to string the lights around the yard for a party or in your child’s room.

Technorati Tags: , , , , , , ,

How to make a Castle Pencil Holder

Here is a unique pencil holder made from recycled toilet paper rolls (or paper towel rolls). It is also a special pencil holder  for boys, because every boy is a knight who need a castle… of course 😉 Laura from  Dacian Moon Handmade  will show you, step by step, how to make it.

How to make a Castle Pencil Holder


Cardboard Tube Castle Pencil Holders


CRAFTS MATERIALS NEEDED:

– recycled paper rolls
– scissors
– glue
– paints
– paintbrush
– rectangle cardboard box lid


IMG_6760


Step 1.

Cut every roll in half.


IMG_6761


Like this.


IMG_6762


Step 2.

Use green paint to give the cap color – like grass. You also can use grey for paved roads…


IMG_6764


Cover all the surface with paint.


IMG_6765


Add as many layers of paint until you are happy with the result.


IMG_6769


Step 3.

Let’s give shape to the rolls.


IMG_6771


On two bigger rolls draw battlements and one window…


IMG_6772


… on the other bigger rolls draw only battlements. Like this.


IMG_6773


Cut them off.


IMG_6774


Finally, our towers will look like this.


IMG_6775


Step 4.

Let’s paint the castle. Mine will be white with some black decorations.


IMG_6778


Paint them like this…


IMG_6779


Let them dry, then draw your decorations using a toothbrush.


IMG_6780


Step 5.

Apply a layer of glue on a tower base


IMG_6781


… and put it in its place.


IMG_6782


Do the same with all rolls. Let them dry well.


IMG_6783


Now your castle is ready to be populated with pens and pencils 😀


IMG_6784


Technorati Tags: , , , , , ,

How to Make Glitter Bottle Timers for Timing Reading or Homework or Time Outs

Most kids have gone back to school by now, so I’m sure that you’re kids have too. We thought that this would be a good craft to post because sometimes when doing school work, you need to know how much time has passed. With this timer you can check it in 30 minutes or one hour (60 minutes).  Laura from  Dacian Moon Handmade  will show you how to make a cute timer.

How to Make Glitter Bottle Timers for Timing Reading or Homework or Time Outs


How to Make Glitter Bottle Timers for Kids


CRAFTS MATERIALS NEEDED:

– 0.5 liter recycled plastic bottle
– one and a half glitter glue bottle
– some extra fine glitter
– instant glue
– hot water


IMG_6731


Step 1.

Fill about 3/4 of the bottle with hot water.


IMG_6734


Step 2.

Add the glitter glue…


IMG_6735


like this.


IMG_6736


Step 3.

Add the extra glitter.


IMG_6737


It will look like this. You should shake the bottle until the glue melts.  Now you can play with the quantities. If you want it go clear faster, just add more water. If you want it to clear slower, add more glitter glue.


IMG_6738


When you are happy with the result, use instant glue to fix the cap.


IMG_6742


Shake well the timer to start it.


IMG_6739


In a half of hour it will look like this.


IMG_6740


When an hour is gone, the bottle is clear.


IMG_6741


Technorati Tags: , , , , , , , , ,

How to Make Apple Lunch Boxes with Recyled Plastic Soda Bottles

This project is perfect as a “back to school” project. It is very simple and fun, as well as a great way to store your packed lunch. This is also a great way to recycle / upcycle plastic soda bottles. Laura from  Dacian Moon Handmade  got inspiration for this craft from Creative Jewish Mom. Laura will show you, step by step, how to make this new lunch box.


How to Make Apple Lunch Boxes with Recyled Plastic Soda Bottles


CRAFTS MATERIALS NEEDED:

– two 2.5l plastic bottles (the sort where the bottom looks a bit like a flower with five petals)
– scissors
– instant glue
– green felt
– pen


IMG_6745


Step 1.

Clear the bottles – remove the labels.


IMG_6746


Step 2.

Use the scissors to cut off the end of one bottle.


IMG_6747


Like this.


IMG_6748


Cut also the end of the other bottle .


IMG_6749


Take care to cut one a centimeter taller than the other…


IMG_6750


… so you could overlap them and they stick together.


IMG_6751


Like this.


IMG_6752


Step 3.

Draw two leaves on the felt…


IMG_6753


… then cut them out.


IMG_6754


Step 4.

Add a bit of glue on the middle of one “flower”…


IMG_6755


… and place one leaf on it.


IMG_6756


Add the second leaf.


IMG_6757


Let it dry and you have an apple lunch box 😉


IMG_6759


Technorati Tags: , , , , , ,

Using Legos to Learn Sight Words and How to Read and Sound Out Words

My youngest daughter is in Kindergarten and she is learning how to read. Her teacher sends home lists of sight words that she has to learn and although we use flash cards to help her learn them, using Legos / Duplo Blocks  sounds a lot more fun to her. I saw someone else online use Legos to make sight words fun and I just loved the idea. Legos are also great for alphabet letters. The child can snap the Legos together to form and sound out words.

My daughter was getting bored with playing with these ‘little kid’ blocks as she now only wants to play with the little Lego blocks that older kids use. So this is a great way to recycle these Duplo / Lego blocks.


1st-pic-learning-sight-words-and-reading-with-legos


Crafts Materials Needed

Legos / Duplo Blocks

Labels (These are the ones I used   … Avery Removable Rectangular Labels, 0.5 x 0.75 Inches, White, Pack of 525  -6737  )

Step 1


Write Sight Words and Alphabet Letters on Labels


If you want to use the Legos to practice sight words and making sentences, then write sight words on the labels. If you want your child to practice creating words and sounding out letter combinations, then write alphabet letters on labels. I repeated consonants a few times and I repeated vowels many times.


Step 2


Add Alphabet Letters to 4 Sides of Blocks


I used the 4 peg Duplo squares for the Alphabet letter blocks. I put a letter on each side, so then the child can spin the blocks to make different words. My child loved forming words with the letters. I used blank squares to for spaces.

Step 3


Put Word Labels on the blocks


Then I put sight words on bigger Duplo blocks. They would fit on the square blocks but I didn’t have any more left. I put a label on 2 sides of the blocks, but you can definitely put them on all 4 sides if you want to. I also added other words that my child knows. I also made several blocks with words such as ‘I’, ‘and’, ‘my’, ‘too’, and ‘the’. I also added labels for people and animals that she knows so that she can talk about specific people. She LOVES playing with these blocks now.


How to Make a Pen Holder by Weaving Magazines Together

Each of us have at home a lot of magazines that we do not need anymore, how about you recycle them by making something useful out of them. This is called upcycling. Here’s a useful way to use them…this would make a great gift for Mom or Dad on Mother’s Day or Father’s Day. It would also be good for your desk when you are doing your homework

Tutorial offered by Laura from  Dacian Moon Handmade  .


CRAFTS MATERIALS NEEDED:

– Magazines
– Transparent tape

Step 1


Open the magazine on the middle and take one (double) page.


Start folding it at 1.5 cm …


… until you have this band.


Repeat until you have about 11 – 12 bands.


Step 2.

Place some of them on the table, like this. Initially I started with 6 but I took one out because my support would be too wide. So you can start directly with 5.


Bring another band and place it perpendicular to the others, putting it over a band, then under the next … and so on… like in the picture.


Add another two, in negative. Where the first band is over, the second band will be under.

It will look like this.


Step 3.

Bend up the remaining part of the bands…


… and put another band through them…


… form the corners…


… and where the band is ending, place a little piece of tape to keep it in place.


Continue adding bands until you reach the top.


Step 4.

Add tape on the upper edge to keep it in place…


… and you have a new pen holder 😀


Technorati Tags: , , , , , , , , , , , , , ,


How to Make Spider Web Bracelets for Halloween

I have a fun girly craft for you today.  In this post I’m going to show you how to make a festive Halloween bracelet that any girl would love to wear this Halloween season.  Made from a recycled soda bottle and some paint this bracelet craft is an easy and fun one.  Plus, you will get a good feeling from recycling an old soda bottle instead of throwing it away.  Isn’t that wonderful?!  So, grab that cleaned out used soda bottle and let’s get this fun craft started.

Check out our other Halloween Crafts.

Laura from  Dacian Moon Handmade  will show you, step by step, how to make this.


How to Make Spider Web Bracelets for Halloween


Materials Needed

– recycled plastic bottle
– black multi-surface paint
– scissors
– nail file


Step 1

Cut the middle part of the recycled plastic bottle (the one without writing or patterns)…


… like this. Now you have the base of the bracelet.


Step 2

Round the edges using nail file.


Step 3

Take the lower part of the bottle…


And put the bracelet around it.   This will help you to paint it.


Step 4

Make a line on the lower part with the black paint.


Then, choose a point somewhere and make some rays around it, like this.


Connect them with curves, like this.


Continue until you have a full spider web.


I added two more smaller cobwebs on one side and the other.


Step 5

Let it dry overnight.


Take it off the bottle…


… and you have the coolest bracelet for this Halloween!


How cool is this bracelet?!  Any girl will love wearing this bracelet for Halloween.  And, I can promise you no one will have one exactly like it.  Enjoy!!

Technorati Tags: , , , , , , , ,

How to Make Cardboard Little People Figures

Yesterday I showed you how to make a Glue Stick Man out of your recycled glue sticks.  Today I’m going to continue showing you how to make toy figures out of recycled materials.  In this post I’m going to show you how to make Cardboard Little People Figures.  Just simply use pieces of used cardboard boxes.  This craft is a great way to recycle those cardboard boxes that you would normally throw away.  These Cardboard Little People Figures are fun to make…. almost as much fun as they will be to play with.  So, let’s get started.

Check out our other Green Environmental Crafts.


How to Make Cardboard Little People Figures


Materials Needed

Thin Cardboard

Small Circles to Trace…. One Smaller than the Other (like buttons)

Pencil

Scissors

Glue

A Couple Different Colors of Paint

Button


Step 1


Trace a bunch of circles onto thin cardboard.


Trace a bunch of circles onto thin cardboard.


Step 2


The thinner the cardboard, the more circles you will need to cut.


The thinner the cardboard, the more circles you will need to cut.

Step 3


Cut them out.


Cut them out.


Step 4


Glue together all pieces.


Glue together all pieces.


Step 5


Press down until dry.


Press down until dry.


Step 6


Get a smaller circle to trace and trace a bunch of these circles.


Get a smaller circle to trace and trace a bunch of these circles.


Step 7


Glue together.


Glue together.


Step 8


Glue smaller circles on top of large circles.


Glue smaller circles on top of large circles.


Step 9


Paint it.


Paint it.


Step 10


Paint other details.


Paint other details…


Step 11


Add button or other item for hat or hair.


Add button or other item for hat or hair.


Step 12


Make them all different sizes.


Make them all different sizes.

Aren’t these adorable little people?  Make a whole family of little people figures to play with your friends.  They will surely love it.

Technorati Tags: , , , , , , , , , , ,

How to Make a Glue Stick Man out of your Recycled Glue Sticks

With all the crafts that I do  I go through a lot of glue sticks.  I always hate the idea of throwing them away…. I always try to find crafts that I can make out of recycled items.  And, glue sticks are no exception.  Here is a great craft you can make with your used glue sticks.  Today I’m going to show you how to make a Glue Stick Man out of your recycled glue sticks.  You will see what a great feeling you get from making something out of recycled materials.  Plus, you get a very cool toy man.

Check out our other Green Environmental Crafts.


How to Make a Glue Stick Man


Materials Needed

Empty Glue Stick

Glue

Paint, Paper, Foam or Felt

Black & White Paint


Step 1


Take an empty Glue Stick and peel the label off of it.


Take an empty Glue Stick and peel the label off of it.


Step 2


Glue the cap in place like this.


Glue the cap in place like this.


Step 3


Paint on clothes or glue on clothes with paper, foam or felt.


Paint on clothes or glue on clothes with paper, foam or felt.


Step 4


If painted clothes, then use black paint to outline.


If painted clothes, then use black paint to outline.


Step 5


Paint a sleeve on each side.


Paint a sleeve on each side.  Also, draw a dot for each eye.


Step 6


Draw a circle for each hand.


Draw a circle for each hand.


Step 7


Paint each hand white.


Paint each hand white.  Also, paint white buttons on the shirt.

How adorable is this little guy?  So adorable!!  Make a few of these Glue Stick people and you can have a small family.  What a great way to recycle those used glue sticks.

Technorati Tags: , , , , , , , , ,

How to Make an Elegant Pen Holder

Since school is back in session I decided to show you how to make an Elegant Pen Holder.  This elegant pen holder will look wonderful on any desk and it is so useful.  No longer will you have pens and pencils floating around your desk…. you will now have a spot for all your pens and pencils.  This craft is so easy and a lot of fun.  It is made from recycled boxes so it is a great green craft too.  Add style to your desk with this elegant pen holder.  Let’s get started.

Check out our other Back to School Crafts.

Laura from Dacian Moon Handmade  will show you, step by step, how to make this craft.


Materials Needed

– recycled box
– cardboard
– pen
– craft glue
– scissors
– paint
– paintbrush
– aluminum foil


Step 1

From the recycled box we will make two holders.  Trace your shape on the box…  I made a wave shape.


Cut on the line…


… and you have the two pieces. You can adjust the edge until you are happy with the result.


Step 2

We will use aluminum foil to cover them. This way we will add a nice texture.


Cut a piece of foil (wide enough to cover the holder piece) and place one holder in the middle.


Cover it with foil.


Press well to preserve the shape of the holder.


Step 3

Apply a layer of glue on the base…


… and place it on the cardboard piece (also covered in foil).


Do the same with the other holder piece.  Flatten the foil well and let the glue dry.


Step 4

Use a wide paintbrush to cover it with paint. Apply as many layers that you need until it looks as you want.


I applied 3 layers of paint on mine and I think it looks good.


And, there you have it….. you now have an Elegant Pen Holder.  This pen holder will look great on any desk.

Technorati Tags: , , , , , , , , , , , , , ,

How to Make a Pencil Box using a Tie

Today I have a super creative and fun craft for you.  I’m going to show you how to make a pencil box using a tie.  Ask your Dad for one…. I’m sure he has some that he doesn’t even wear anymore.  And, what a great way to recycle those ties that aren’t worn anymore.   After you make this craft you will have a functioning pencil box… and one that no one else has.  How cool is that?!  So, grab the materials needed and let’s get started.

Check out some other Necktie Crafts.

Laura from Dacian Moon Handmade   will show you how to make this craft, step by step.


Materials Needed

– tie
– needle and thread
– scissors
– satin ribbon
– auto-adhesive velcro


Step 1

Measure the size of the pencil box. Should be slightly larger than a pen.


Bend the rest of the tie over it and mark this size.


Cut on the marking.


It will look like this.


Make a curve cut in the front, like in the picture.


Step 2

Take the satin ribbon…


… and sew it around the front part…


… to create a border, like this.


Sew the front to the rear to stay in place.


It will look like this.


Step 3

Take the auto-adhesive velcro…


… and place one part on the closing part and the other in the corresponding point on the front part. Like this.


Now you can put pencils in it…


… close it, and it’s ready to use.


And, that’s it.  You just created a pencil box using a tie.  Doesn’t it feel great to recycle something that is no longer being used?  It sure does.

Technorati Tags: , , , , , , , , , , , , , , , ,

How to Make a Simple Desk Organizer

There is not much worse than doing your homework on a cluttered unorganized desk.  Who wants to hunt for the homework supplies you need on a messy desk?  Well, you don’t have to worry about that anymore.  Today I’m going to show you how to make a Simple Desk Organizer.  It will be perfect to hold on to some paper, pencils, erasers, and pretty much anything else you want to keep organized on your desk.  So, grab the materials needed and let’s get started.

Check out our other Back to School Crafts.


How to Make a Simple Desk Organizer


Tutorial offered by Laura from  Dacian Moon Handmade  .

Materials Needed

– recycled box
– white paint
– scissors
– pencils (one with eraser head)
– paper glue
– red paper


Step 1

Take the box…


… and draw the contour of our organizer on it, like in the picture.


Cut on the line.


It will look like this.


Step 2

Place the box on its side on the paper and draw the contour.


Turn it on the other side and continue the contour. It will look like this.


Apply a layer of glue on half of the paper…


… and place the box on it.


Then glue the other half.


Like this.


Continue covering  the sides of the box.


You can cover the inside of the sides too.


It will look like this.


Step 3

Put a little bit of paint on a piece of paper…


… and use the pencil with eraser head…


… to make white dots.


Decorate the box with white dots.


Finally, let’s add a thin band of paint on the edges.


Let it dry well.


Now you can use the organizer.


Isn’t this a great Desk Organizer?  And, it was so simple to make.  Now, you have a great way to organize your desk perfect for doing your homework.  Enjoy!!

Technorati Tags: , , , , , , , , , , , ,

How to Make a Duct Tape Playing Cards Shoulder Bag

Oh boy…. do I have a fun craft for you today!!  I’m going to show you how to make a Duct Tape Playing Cards Shoulder Bag.  The front and back side of this durable bag is covered with playing cards to give it a playful style.  I used Uno Cards for this craft, but feel free to use any style playing cards you wish.  Whatever style you choose will look great.  So, grab a deck of cards, duct tape and scissors and you are good to go.  Let’s get started.

Check out our other Duct Tape Crafts.


How to Make a Duct Tape Playing Cards Shoulder Bag


Materials Needed

Deck of Cards

Purple & Yellow Duct Tape (or other colors you prefer)

Scissors


Step 1


Overlap 6 cards slightly.


Overlap 6 cards slightly.


Step 2


Duct tape these cards together.


Duct tape these cards together.


Step 3


Do this 4 times and then duct tape all together


Do this 4 times and then duct tape all together… Like this.  Duct tape only one side.


Step 4


Do step 1 thru 3 again so you have two of these.


Do step 1 thru 3 again so you have two of these.


Step 5


Make duct tape fabric.


Make duct tape fabric that is about this much bigger than the 2 card pieces you made.  ***Look below this step to see a detailed description on how to make Duct Tape Fabric***


How to Make Duct Tape Fabric


How to make duct tape fabric


  • Unroll a long piece of duct tape so that it is sticky side up.
  • Now place a piece of  duct tape, sticky side down, on top of the first piece of duct tape so that it is sealed closed.
  • Take a new piece of duct tape and place it sticky side up.  Now overlap the sealed piece of duct tape (from last step) slightly on top of this new piece, just enough so it will stick.
  • Take a new piece of duct tape and place it sticky side down on top of the piece of tape that is sticky side up.  Keep going until your duct tape fabric is as large as you need it to be.


Step 6


Place the purple pieces, card side down.


Place the purple pieces, card side down.  Place yellow piece on top of both… and then overlap a long strip of yellow duct tape over both yellow and purple fabric so they stick together.


Step 7


 Turn over and cover and add a piece of yellow duct tape, sticky side down, over both cards and yellow duct tape.


Turn over and cover and add a piece of yellow duct tape, sticky side down, over both cards and yellow duct tape.


Step 8


Pull yellow part up and duct tape to purple part like this.


The yellow part will be the sides of the bag.  Pull yellow part up and duct tape to purple part like this.  A friend should help.


Step 9


Now duct tape other yellow side up to purple fabric.


Now duct tape other yellow side up to purple fabric.


This is what you have done so far.


This is what you have done so far.


Step 10


Now tape the yellow part to the other purple side.


Now tape the yellow part to the other purple side.  Here is a pic looking down into the bag.


Step 11


This is what fronts of bag look like.


This is what fronts of bag look like.  We have to now tape edges of cards.


It should look like this now.


Like this.


Step 12


You might have these sticking up


You might have these sticking up….


Just fold them into the bag.


Just fold them into the bag.


Step 13


Make some more duct tape fabric.... make it long.


Make some more duct tape fabric…. make it long.  This will be the handle.


even longer than this


Nope…. even longer than this.


Step 14


Make a small slit, about 3 inches down on both sides of bag.


Make a small slit, about 3 inches down on both sides of bag.


Step 15


Duct tape all around hole so it won't rip later.


Duct tape all around hole so it won’t rip later.


Step 16


Place yellow strap in hole and tie large knot at end to secure in place.... do on both sides of bag.


Place yellow strap in hole and tie large knot at end to secure in place…. do on both sides of bag.


Step 17


It's done and ready to wear.


It’s done and ready to wear.

Isn’t this bag awesome?  It is so big that you can pretty much hold in it whatever you wish.  Enjoy carrying around this fun loving bag.

Technorati Tags: , , , , , , , , , , , , , , ,

13 Cool Crafts Made with Neckties


13 Cool Crafts Made with Neckties


The styles of Neckties comes and goes pretty quickly.   Many men have a ton of extra ties in their closet that they don’t even wear.  Why not put the extra ties to good use?  I am going to show you 13 Cool Crafts made with Neckties.  All of the necktie crafts shown here will have tutorials so that you too can make these crafts.  I will not show you something that you can’t make for yourself.  Whether you want a necktie purse or a necktie coffee cozy…. you will find your necktie crafts here.   So, let’s get started.

13 Cool Crafts Made with Neckties

(1)  Necktie Purse


Necktie Purse


Here is a creative way to make a purse.  Imagine the compliments you will get while you carry this bag.  This purse is made from 8 neckties….. check out Sonya Style for all the crafting details.


(2)  Necktie Daisy Pins


Necktie Daisy Pins


I found this craft over at Crafters and it is a great Necktie craft.  She will show you how you too can make these Daisies out of Neckties.  Imagine how gorgeous you will look wearing these Necktie Daisy Pins.  Check out the site for the details.


(3)  Tie Angel


Tie Angel


How gorgeous is this Angel?  So pretty.  And, she is made from a man’s necktie.  This Angel would be great for Christmas time decorating.  Make sure to check out Blue Bonnet Village for the instructions on how to make this craft.


(4)  Necktie TV Remote Holder


Necktie TV Remote Holder


I found this necktie craft over at Yahoo Voices.  Here she made this craft for father’s day…. and it is such a great idea.  Ironically people give ties for father’s day…. here she upcycles a necktie into a TV Remote Holder.  What a clever idea!!


(5)  Cellphone or iPod Bag


Cellphone or iPod Bag


Here is a clever way to hold a cellphone or iPod….. carry it in this awesome Cellphone or iPod bag made from Neckties.  How cute is that?!  So cute.  I found this necktie craft over at Mindful Momma and I love it.  Make sure to check it out for yourself.


(6)  Coffee Cozy


Coffee Cozy


What a great way to drink hot coffee and save your hands….. use this necktie coffee cozy.  I love this idea!!   I found this necktie craft over at Lime and Aqua Studio.  Check out their website for the full craft details.


(7)  Necktie Necklace


Necktie Necklace


Look how beautiful these necklaces are…. and they are made from a necktie.  Made from an old necktie and some Mardi Gras beads this necklace turns out really cute.  You can get the full craft “how-to” by going to artstar by aletha.


(8)  Necktie Pumpkins


Necktie Pumpkins


Now, these pumpkin are no ordinary fall pumpkins…. these are some of the most creative pumpkins I seen.  I found these necktie pumpkins over at Lisnaweary Quilts and the idea is super creative.  Your house will look awesome with these Necktie Pumpkins as decorations this Fall.


(9)  Necktie Headband


Necktie Headband


This necktie headband is so super cute…. I love the idea.   I found this necktie craft over at Craft Envy and she simply just picked up a necktie from a Thrift Store.  But, feel free to recycle any type of tie that is no longer being used.  Check out the website for all the details.


(10)  Necktie Glasses Case


Necktie Glasses Case


What an awesome idea….. use a necktie to make a glasses case.   What is so cool about using a necktie as a glasses case… it not only looks good, but it also has its own padding for protecting your glasses.  Check out Make Projects for the step-by-step how-to.


(11)  Flower Pin


Flower Pin


Who would have thought that a masculine necktie can be made into such a lovely flower?  But, if you check out My Heart is Yours Blog you will learn that it can.  Here she shows you how to take just a necktie and a hot glue gun to make this flower.  Make sure to check out her site.


(12)  Bow Tie


Bow Tie


Wow, what a super creative idea…. take a Necktie and make it into a Bow Tie.  Clever!!  I found this necktie craft over at Make It and Love It .  And, I must admit it…. I do love it.  She takes a necktie and simple Velcro closure for this craft… make sure to check it out.


(13)  Necktie Skirt


Necktie Skirt


Who would have thought that a few neckties can look so beautiful on a lady, but Rick Rack Ruby shows you that it can.  Check out her site to find out how she takes about 14 ties and makes them into a beautiful skirt.  So creative!!

Technorati Tags: , , , , , , , , , , , , ,

Coolest Earth Day Craft Ideas – Crafts Made from Recycled Materials


Coolest Earth Day Craft Ideas - Crafts Made from Recycled Materials


Earth Day will be here in just a couple of weeks.  In honor of Earth Day I thought I would scour the internet looking for cool ideas for Earth Day crafts.  All of the crafts that I found and have listed here are made from recycled materials.  Earth Day is a special day to celebrate the Earth and to increase awareness and appreciation of the Earth’s natural environment.  And, I think making crafts from recycled materials such as the ones found here is a great way to teach children about recycling and the importance of doing that to help save our Earth.  So, without further ado….

Coolest Earth Day Craft Ideas

(1)  Newspaper Roses


Newspaper Roses


Look how beautiful these Roses are?  They really are lovely & they are completely made from recycled newspapers.  Check out the craft and all its details over at Zakka Life.


(2)  Serving Tray


Serving Tray


I love, love, love this idea!!  Crafty Nest went to a Salvage Yard and noticed that there were old cupboards there.  She picked up a white one and with a little creativity and a lot of fun she was able to make this beautiful serving tray.  Check out her website so you too can make this.


(3)  Can-Do Robots


Can-Do Robots


Made from tin cans these robots are so freakin cute.  What is really cool is that their features are made of magnets, so they can be removed.  Which makes these robots like a Mr. Potato Head…. How fun is that?!  Check out the craft details over at Family Fun.


(4)  Cardboard Ottoman or Side Table


Cardboard Ottoman or Side Table


What a clever and creative idea!!  Made from recycled cardboard tubes you can choose to make either a side table or an ottoman…. or even make both.  When you look at them from above they are actually daisies.   Check out Esprit Cabane for all the crafting details.


(5)  Smashed Soda Can Animals


Smashed Soda Can Animals


Ok, this cow is really cute, isn’t he?!  But, wait till you check out Fave Crafts….. they have not only a cow, but they will show you how to make a pig and a bear too.  Make all three recycled can crafts and you will have a beginning to your very own recycled animal farm.


(6)  Milk Jug Shade


Milk Jug Shade


Now, this recycled craft turns out beautiful, doesn’t it?  Honestly, if I saw this I would have no idea it was actually made from recycled milk jugs.  But, it is.  I found this craft over at Mother Earth News.  Check out their site for all the wonderful craft details.


(7)  Recycled Picnic Basket


Recycled Picnic Basket


I found this recycled picnic basket over at bron marshall and for the main basket it is actually made from a recycled beer six-pack.  Isn’t that a clever idea?  They other container is actually made from a recycled half dozen egg carton…. they simply added a handle.  Make sure to check out their site for the full craft details.


(8)  Newspaper Basket


Newspaper Basket


This is an amazing basket!!  And, it is completely made from Newspaper.  Look how sturdy it looks too…. I love it.   How About Orange shows you step-by-step how to make this basket yourself.


(9)  Recycled Glass Chandelier


Recycled Glass Chandelier


Oh I just love this recycled craft idea…. it might just be my favorite.  I found this recycled craft over at Casa Sugar.    With a few recycled materials and some tea lights  you too can have this stunning glass chandelier.  I love the way they show this chandelier being outside…. it would be perfect for a fun outside party.


(10)  Creative Notepads


Creative Notepads


Here is a creative way to recycle those leftover notebook pages and even those left over paper scraps.  Esprit Cabane shows us how to take those leftover paper products and make them into cute little pocket size notepads.  Check out her site for the full details.


(11)  Toilet Paper Tube Albums


Toilet Paper Tube Albums


These Toilet Paper Tube Albums are just precious.  They are a beautiful way to store special keepsakes and pictures of events that you don’t want to lose.  Those Northern Skies shows you step-by-step how you too can make these albums from recycled toilet paper tubes.


(12)  Magazine Boxes


Magazine Boxes


Here is a creative and imaginative way to recycle those stacks of magazines you keep at home.  When made like the tutorial on Abstract Octopus you can actually store things in these boxes.  Check out the site for the full craft details.


(13)  Plastic Cup Earrings


Plastic Cup Earrings


Aren’t these earrings adorable?  You would never realize they were made from a plastic cup unless I told you.  I found this idea over at Punk Projects and I think it is a great way to recycle plastic cups… plus the craft is fun to do.  Make sure to check out her website for the details.

Technorati Tags: , , , , , , , , ,