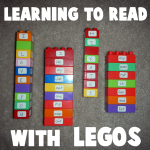
Using Legos to Learn Sight Words and How to Read and Sound Out Words

My youngest daughter is in Kindergarten and she is learning how to read. Her teacher sends home lists of sight words that she has to learn and although we use flash cards to help her learn them, using Legos / Duplo Blocks  sounds a lot more fun to her. I saw someone else online use Legos to make sight words fun and I just loved the idea. Legos are also great for alphabet letters. The child can snap the Legos together to form and sound out words.

My daughter was getting bored with playing with these ‘little kid’ blocks as she now only wants to play with the little Lego blocks that older kids use. So this is a great way to recycle these Duplo / Lego blocks.


1st-pic-learning-sight-words-and-reading-with-legos


Crafts Materials Needed

Legos / Duplo Blocks

Labels (These are the ones I used   … Avery Removable Rectangular Labels, 0.5 x 0.75 Inches, White, Pack of 525  -6737  )

Step 1


Write Sight Words and Alphabet Letters on Labels


If you want to use the Legos to practice sight words and making sentences, then write sight words on the labels. If you want your child to practice creating words and sounding out letter combinations, then write alphabet letters on labels. I repeated consonants a few times and I repeated vowels many times.


Step 2


Add Alphabet Letters to 4 Sides of Blocks


I used the 4 peg Duplo squares for the Alphabet letter blocks. I put a letter on each side, so then the child can spin the blocks to make different words. My child loved forming words with the letters. I used blank squares to for spaces.

Step 3


Put Word Labels on the blocks


Then I put sight words on bigger Duplo blocks. They would fit on the square blocks but I didn’t have any more left. I put a label on 2 sides of the blocks, but you can definitely put them on all 4 sides if you want to. I also added other words that my child knows. I also made several blocks with words such as ‘I’, ‘and’, ‘my’, ‘too’, and ‘the’. I also added labels for people and animals that she knows so that she can talk about specific people. She LOVES playing with these blocks now.


How to Make a Changing Story Board

Today I’m going to show you how to make a changing story board.  You can bring your stories to life by using your creativity and a little bit of imagination.  As the story evolves you can change your story board to depict the story you are trying to tell to your family and friends.   You will actually have moveable figures and changeable backgrounds for your story…. what better way to actually tell your story than to have visuals.  So, grab the materials needed and let’s get started.


How to Make a Changing Story Board


Materials Needed

2 poster boards

markers and / or poster paints

scissors

stapler and staples (optional)

glue or paste

tape

card stock to make figures


Step 1


Fold one of the poster boards as seen in above


Fold one of the poster boards as seen in above. Basically folding forward and then fold backwards…then forwards…backwards…etc.


Step 2


Tape folds on back of poster board.


Tape folds on back of poster board.


Step 3


Glue folds onto bottom of the second poster board


Glue folds onto bottom of the second poster board, as seen in the picture. You can cut off folds that you don’t want before you glue it down. along sides of board.


Step 4


Draw a background that depicts your story.


Draw a background that depicts your story. This should be drawn on on upper section (2nd poster board).


Step 5


Bind edges with tape.


Bind edges with tape.


Step 6


Place figures in various folds as story is told.


Make cut out figures or objects.  Place figures in various folds as story is told.


Step 7


Scenes may be changed easily.


Scenes may be changed easily. Night or stormy sky may be added by drawing and coloring on another poster board and folding along top about 2 in from edge.  Hang over top of board, as seen above. Cut the bottom of sky to show hills in background. Shrubs, houses, wells, etc. may be placed in folds.

And, that’s it.  Use your imagination to make any story line you can come up with for your story board.  Share your story with your family and friends…. they are sure to love it.

Technorati Tags: , , , , , , , , , ,

How to Make a St. Patrick’s Day Matching Game

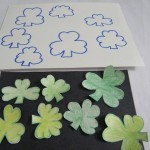
St. Patrick’s Day will be here before you know it…. so in the spirit of that this craft is all about St. Patrick’s Day.  In this post I will be showing you how to make a St. Patrick’s Day Matching Game.  This craft is perfect for the Preschool crafter as this game is all about matching the size of each shape of the shamrocks.  Get a couple Preschoolers together and listen to them giggle as they try to match the shape of the shamrocks.  So, with that being said…. let’s get started.

Check out our other St. Patrick’s Day Crafts.


Materials Needed

Crayons

Markers

Scissors

Thick paper

Cardboard/ thick paper for base


Step 1

Draw and color shamrocks of different shapes and sizes.


Step 2

Cut them out as shown below.


Step 3

Place them on your cardboard/ thick paper which is going to be your base and trace the outline of each shamrock on it.


Step 4

The game is to match each shamrock to its outline.


Now grab some friends or your parents and start playing the St. Patrick’s Day Matching Game.  Enjoy!!

Technorati Tags: , , , , , , , , , , , , , ,

How to Make a Paper Strip Dreidel – With Dreidel Game Instructions

I have a cool craft for you today.  I’m going to show you how to make a Paper Strip Dreidel.  This Dreidel craft actually produces a Dreidel that actually spins.  Not just spins…. but spins amazingly well.  So well in fact that I also am giving you the Dreidel game instructions so that you can use your Paper Strip Dreidel to play with your friends.  So grab the materials needed and let’s get started.

Check out our other Hanukkah Crafts.


How to Make a Paper Strip Dreidel


Materials Needed

Paper of All Different Colors

Scissors

Glue

Toothpick

Marker


Step 1


Cut some long strips of  paper.


Cut some long strips of  paper.  Mine were 1/4 inch wide.


Step 2


Add glue to the tip of one of the strips of paper.


Add glue to the tip of one of the strips of paper.


Step 3


Wrap paper strip tightly around the bottom of the toothpick.


Get a toothpick.  Wrap paper strip tightly around the bottom of the toothpick… but leaving some of the tip sticking out.


Step 4


glue the end of another strip to the 1st strip


When you near the end of one of your paper strips, then glue the end of another strip to the 1st strip.


Step 5


Keep rolling tightly.


Keep rolling tightly.


Step 6


Add more strips.


Add more strips.


Step 7


Add still more strips.


Add still more strips.


Step 8


It is looking like this.


It is looking like this.


Step 9


Glue the tip of the last strip down.


Glue the tip of the last strip down.  Hold tightly for a few minutes to let completely dry.


Step 10


Pull strips of paper slowly up to look like this.


After dries… Pull strips of paper slowly up to look like this.


Look how pretty.


Look how pretty.


Step 11


Each side of the dreidel has a different letter from the Hebrew alphabet.


Each side of the Dreidel bears a letter of the Hebrew alphabet:  נ (nun), ג (gimel), ה (hei) and ש (shin).


Draw these Hebrew letters on the sides of your paper strip Dreidel.


Draw these Hebrew letters on the sides of your paper strip Dreidel.


Step 12


It spins really well.


Your paper Dreidel should spin really well.


Dreidel Game Instructions

Each player begins with an equal number of game pieces (usually 10–15). The game pieces can be any object, such as chocolate gelt, pennies, or raisins.

At the beginning of each round, every participant puts one game piece into the center “pot”. In addition, every time the pot is empty and sometimes if it has one game piece left, every player puts one in the pot. Each player spins the dreidel once during their turn. Depending on which player side is facing up when it stops spinning, they give or take game pieces from the pot:

  1. If נ (nun) is facing up, the player does nothing.
  2. If ג (gimel) is facing up, the player gets everything in the pot.
  3. If ה (hei) is facing up, the player gets half of the pieces in the pot. (If there is an odd number of pieces in the pot, the player takes half the pot rounded up to the nearest whole number)
  4. If ש (shin) or פ (pei) is facing up, the player adds a game piece to the pot.

If the player is out of pieces, they are either “out” or may ask another player for a “loan”.

There you have it.  You just made your very own Paper Strip Dreidel and have the instructions for playing the Dreidel game….. now go grab your friends and play the game of Dreidel.  Let me know how you did in the comments below…. I’d love to hear about it.

Technorati Tags: , , , , , , , , , , , , , , ,

Making an Alphabet Letters Memory Game from Milk Jug Caps with Printables and Instructions for Kids

Today I will show you how to make a really cool Memory game that is great for any age child, but especially good for preschoolers and Kindergarteners who are still working on Alphabet Letters recognition. If you don’t have enough Milk Jug caps, you could also use coins, checkers, cardboard, or whatever else you have lying around the house.

DON’T USE WATER BOTTLE CAPS – USE LARGE MILK CAPS TO ENSURE THE CHILD WON’T BE ABLE TO SWALLOW THEM! EITHER WAY, WATCH THE CHILD TO MAKE SURE THEY DON’T INGEST THE CAPS!


Making a Memory Game from Bottle Caps with Printables and Instructions for Kids


Making a Memory Game from Bottle Caps with Printables and Instructions for Kids

Crafts Materials Needed

– 52  Milk Bottle Caps

– Glue

– Printer and Paper

– Scissors


Step 1 : Print Out the Bottle Cap Letters

Pick the Letters that you want below (choose from color or black and white, as well as milk jug bottle caps or water bottle caps). Print out the templates twice as you are going to be playing a matching game in which you need 2 of every letter.


Black and White Water Bottle Caps Letters


Click on Above Image for BLACK AND WHITE WATER BOTTLE CAPS


Colorized Water Bottle Caps


Click on Above Image for COLORIZED WATER BOTTLE CAPS


Black and White Milk Bottles Caps Letters


Click on Above Image for BLACK AND WHITE MILK BOTTLE CAPS


Black and White Milk Bottles Caps Letters


Click on Above Image for BLACK AND WHITE MILK BOTTLE CAPS Part 2


Colorized Milk Bottle Caps Letters


Click on Above Image for COLORIZED MILK BOTTLE CAPS


Colorized Milk Bottles Caps Letters Part 2


Click on Above Image for COLORIZED MILK BOTTLE CAPS Part 2


Step 2 : Attaching Letters to Bottle Caps


Making a Memory Game from Bottle Caps with Printables and Instructions for Kids


To attach the letters to the milk jug caps, either glue them to the top or simple insert them inside the cap (which depending on the size of the cap, might not even need glue. If you are using coins…simply tape the letters to the coins.

How to Play Alphabet Memory Game

(1) Make sure that all the caps are messed up so that they aren’t in order.

(2)  Turn all of the caps over so you cannot see the letters anymore.

(3) Place them in neat rows.

(4) A player turns over 2 caps.

….. If there is a match, they put those caps in their own pile and then gets to take another turn.

….. If there is NOT a match, the player then turns the caps back over ( in the same spot that they found them) .   The next player then gets to take a turn.

(5) The game is over when all of the matches are found. The player with the most caps wins the game.

Technorati Tags: , , , , , , , , , , , , ,

Make a Groundhogs Day Board Game Crafts Idea for Kids

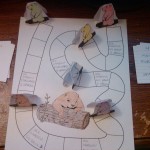
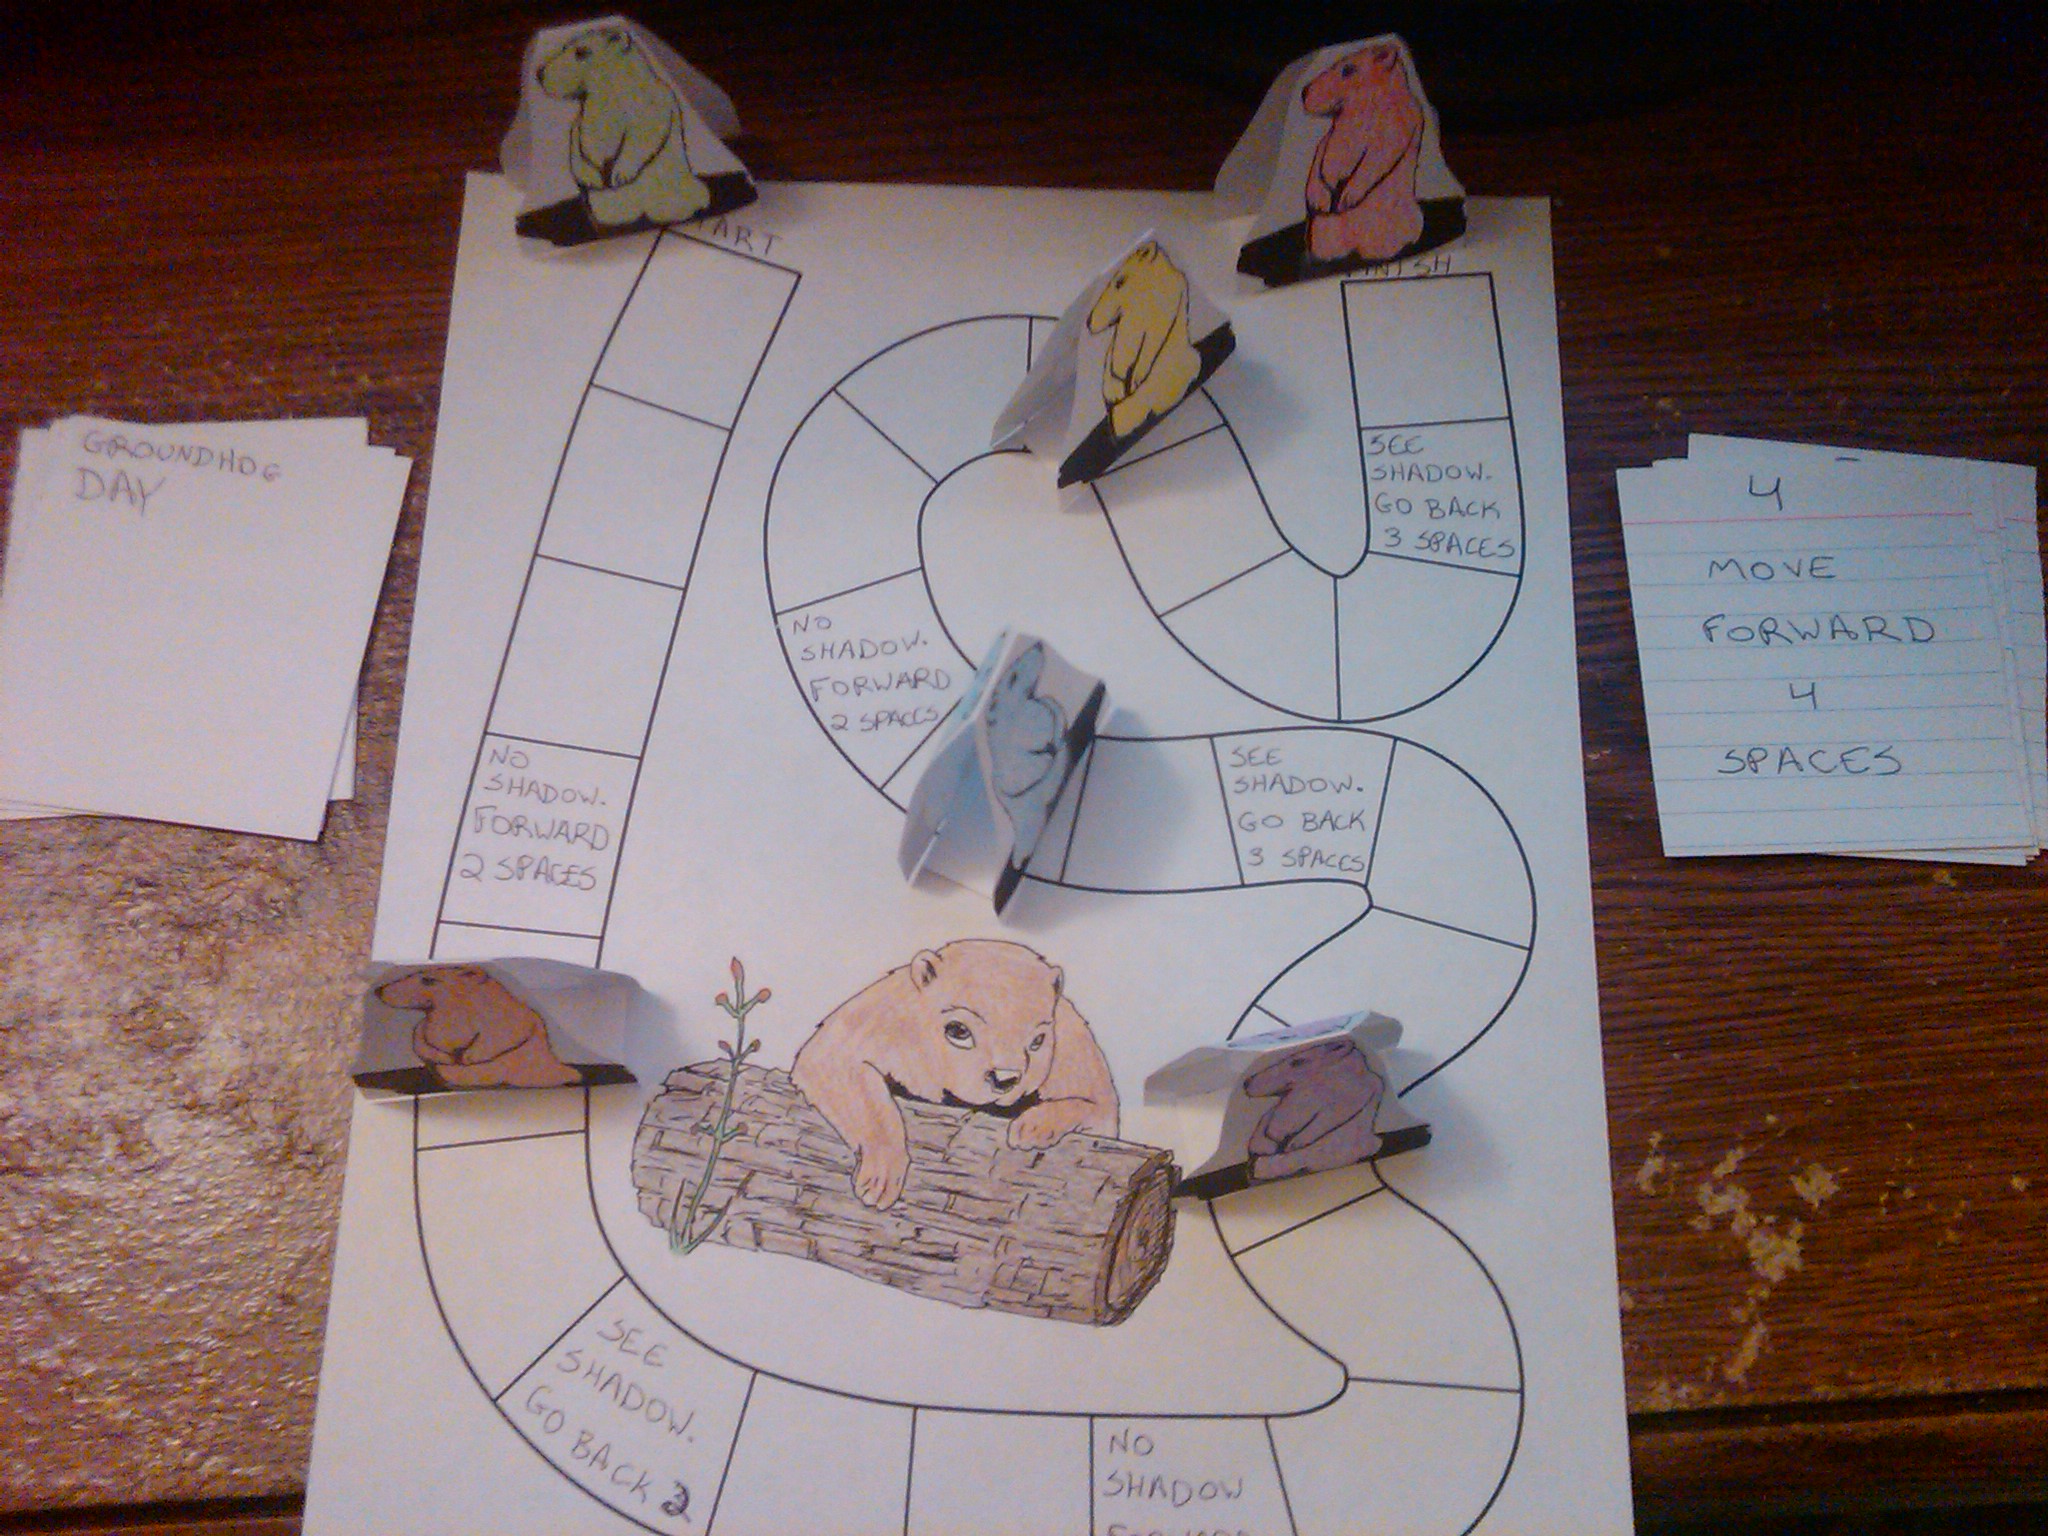
This activity starts as a coloring page, then a craft, and finally a board game to play with friends or family.  We have provided you with two templates to print out: a game board and a sheet of six movers.  However, if you do not have a printer, or do not have permission to use one, you can get two sheets of plain white paper and make your own.

Here are More Groundhogs Day Crafts


Make a Groundhogs Day Board Game Crafts Idea for Kids


Make a Groundhogs Day Board Game Crafts Idea for Kids

Crafts Materials Needed:

  • Paper
  • Printer
  • Colored pencils, crayons or washable markers
  • Index cards
  • Tape
  • Safety scissors
  • Pen or pencil
  • Imagination

To start with print out the two pages provided, or draw your own.


Groundhog Gameboard


Groundhog Movers

STEP 1 – PREPARE THE BOARD

Color in the groundhog with your colored pencils, crayons, or washable markers.  I used colored pencils to get the details.  Then you can decide which side is start and which is finish, mark those.  I put START and FINISH, but you could also put WINTER and SPRING.


Add special instructions to spaces, if you want to make the game a little harder.  I put “See shadow.  Go back 3 spaces” and “No shadow.  Go forward 2 spaces” on mine.  Make sure you don’t put too many, and that you don’t put one where another space will end.  I accidentally put “Go back 3 spaces” 3 spaces in front of a “Go forward” space, so I had to change it to “Go back 2 spaces”.  If you make a mistake like this, it’s very easily fixed.


STEP 2 – MAKE THE PLAYING PIECES

First you will pick 6 different colors and color your groundhogs.  Make sure the colors are different enough you won’t get confused during game play.


Now, cut them apart leaving each pair together.  Once you have 6 pieces of paper, fold them in half so the groundhogs of the same color are both facing out.  You can hold it up towards a light to make sure the holes that the groundhogs are popping out of line up.  Then, cut a flat bottom and up around the ground hog.  Make sure you leave the two sides attaches by the heads.  I have included a picture of the pieces at various stages.


Now, take an index card and fold it lengthwise.  Cut along the fold and discard one half.  Cut the other into 3/4″ strips, you will have a little left over that you can also discard.  Now take a 1 1/2″ length of tape and lay it on your work surface, sticky side up.  Place a strip of index card on it, and tape it to the bottom of a playing piece.  Do this for each piece.  Again, I have including a picture with various stages.


STEP 3 – MAKE CARDS

If you are short on time you can grab a die from another board game, just make sure you have permission first.   If you want to play the game following the rules below then you will need 8 index cards.  Cut each one on half the short way and write Groundhog Day on the blank side.  You should now have 16 cards that look like this:


Now flip them over to the lined side and write down how many moves each card is worth.  You will need 4 each of 1, 2, 3 and 4.  Mine has the number at the top and instructions underneath, but you can make yours however you wish.


STEP 4 – PLAY THE GAME

  1. Mix the numbered cards and lay them face down to the left of the board.
  2. Place all colored playing pieces in front of the “start” space.
  3. Youngest player (or whoever made the game) goes first.  They pick the top card from the pile, move the amount of spaces stated, and discard face up to the right of the board.
  4. Play moves clockwise around the board.
  5. If a player lands on a special space they must follow all instructions on that space.
  6. The goal is to be the first player to reach the end of the game.


Here are More Groundhogs Day Crafts

Technorati Tags: , , , , , , , , , ,

Make Easter Counting Game Craft Activities for Preschoolers & Young Kids


Make Easter Counting Game for Easter or Spring : Preschoolers Craft

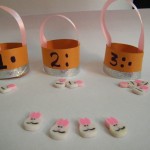
Here’s a fun game to learn counting this Easter. This craft can also be done as a group activity, every child makes one basket and in the end the kids can play a game of putting the right number of Easter bunnies  in each basket.

Craft materials required:

Thick colored paper

Broad ribbon

Scissors

glue

tape

markers

Ruler

Small bunny shaped erasers or candy

Colored tape


Step 1

Cut out strips of paper about 4 in wide and 9 in long


Step 2:

Roll it around and glue the ends together to form cylinders.


Step 3

Trace the outline of the circle formed on a piece of paper of the same colour.


Step 4

Remove the cylinder and add tabs to the design as shown below.


Step 5

Cut it out and fold the tabs as shown below.


Step 6

Place the cylinder over this piece so that the tabs are on the inside. Tape the tabs to the inside walls of the basket.


Step 7

Take a long piece of tape and stick it along the bottom as shown.


Step 8

Fold the tape over the edge to make the basket strong.


Step 9

Cut a piece of ribbon and tape it to the insides of the basket as shown.


Step 10

Stick some colored tape along the bottom of the basket as shown.


Step 11

Write a number on each basket. The game is to put the right number of objects- Easter bunnies, miniature eggs or candy into the baskets.


Technorati Tags: , , , , , , , , , , ,

Easy Easter Basket Craft for Kids to Fill with Treats


bunny-basket-finished


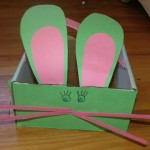
If you’ve had a new addition to the family, are having an unexpected guest, or just don’t have enough Easter baskets around the house, here is a simple an inexpensive way to create your own Easter basket to fill with goodies and put on display.

Easy Easter Basket Craft for Young Kids, Preschoolers, Kindergarteners, and Moms


bunny-basket-what-youll-need


CRAFTS MATERIALS THAT YOU WILL NEED:

A box – a shoebox or milk or orange juice carton would work nicely

Pipe cleaners

Construction paper

Scissors

Hole Punch

Glue

Stapler

Crayons or googly eyes


bunny-basket-step-1


1. First,  cut off or remove the top of your box or one side of your carton. If using a carton, staple the open end closed. Save this discarded piece for your basket handle if desired.


bunny-basket-step-2


2. Choose one color of construction paper and make sure you have enough for all sides of your box. Cut the construction paper to fit the box and glue to all sides of the outside.


bunny-basket-step-3


3. Punch a hole in the front of your box. Bend four pipe cleaners in half and stick through the hole, half on the inside of the box, half on the outside. Position the pipe cleaners so they are in place on the outside, and then staple the pipe cleaners into place on the inside. Trim pipe cleaners inside if needed.


bunny-basket-step-4


4. Draw on eyes, or glue on googly eyes if you have them on hand.


bunny-basket-step-5


5. For ears, cut out ear shapes from the original color construction paper you used to cover the box. Then cut smaller ear shapes out of pink contruction paper and glue them to the center of the larger ear shapes. Staple ears to the box so they stand up. (Hint: staple pipe cleaner scraps vertically behind the ears to help keep them upright.)

6. If your discarded box top is large enough cut out a 1″ strip and cover it with construction paper to form a handle. Or, simply use construction paper for a decorative handle.


bunny-basket-finished


MORE EASTER CRAFTS ON THIS BLOG

MORE EASTER CRAFTS ON OUR CRAFTS FOR KIDS SITE

Easter Basket Crafts for Kids

Easter Bunny Crafts for Kids

Easter Chicks Crafts for Kids

Easter Lambs Crafts Ideas for Kids

Easter Hats & Bonnets Crafts Activities for Kids

Easter Eggs & Egg Decoration Crafts Activities for Kids

Crafts with Egg Shells

Crafts with Egg Cartons

Jesus Crafts Ideas for Kids

MORE EASTER FLOWER CRAFTS & ACTIVITIES FOR KIDS FROM OTHER BLOGS

Personalized Easter Basket For Kids Will Make Then Smile – Making your Easter basket for kids in 2009 is going to be great fun for the whole family but there are a few things to keep in mind too. Things like safety and durability are the major concerns.

Egg Basket : Quick and Easy Daily Crafts for Kids – Have children cut strips of colored paper and weave them in and out of tomato

Quick And Easy Easter Decor – Daisies in a Vase – Today’s craft is going to be a super simple decoration for spring.  I hesitate to even call it a “craft”;  it’s more like an assembly of items.  All you need for this little project is: 1) a clear glass vase, 2) small plastic Easter eggs (I used pastel shimmer eggs), 3) rice, and 4) three artificial Gerber daisies on long stems.

Easter Art & Creativity Kits From ELC – Increasing numbers of people are looking for alternatives to chocolate when buying Easter gifts. If you too have noticed chocolates eggs becoming seemingly less special then you may find Early Learning Centre’s Easter Art & Creativity range a delightful way of marking this holiday.

Easter Bunny Egg/Flower Holder – Make this cute Easter bunny holding a flower in front of an Easter egg.

Felt and Button Easter Cards Craft for Kids & Adults – Flower-bouquet I created a whole bouquet of these felt button flowers for a craft magazine last year but knowing bouquets would be far too much cutting for 5 and 6 year olds I opted for a single flower for each mum.

Kids Crafts for Holidays & Easter – Easter is coming up which got me thinking about how I am going to keep my kids occupied this year.

Easter Craft For Kids (including a bouquet of flowers) – My absolute favorite book for Toddler Crafts is called The Toddler’s Busy Book by Trish Kuffner. It has 365 Games and Activities in it that are easy and fun to do!  There are crafts for every holiday.  It breaks the crafts down into great categories like : Rainy Day Play, Kids in the Kitchen, Water Play, Outdoor Adventures, Arts & Crafts and much more.  I highly recommend getting this book!!  It is a great resource, one I have used over and over!!  Below is one of the craft ideas for Easter that is in the book.

Easter Craft Ideas for Kids – Get crafty and create a colorful Easter holiday for the kids.  Along with the Easter egg masterpieces you have planned using some of the ideas in our article about 20 ways to decorate an Easter egg, craft your own panoramic sugar eggs, chocolate Easter lollipops, feathered Easter baskets, and more to celebrate the holiday.

Keeping Easter Fun and Frugal –   Finding great activities for your kids to do for Easter can be easier than you think, here’s a little craft making felt Easter decorations that you can use every year.

Easter Bouquet To Make At Home – This is a quick and easy way to make an Easter Bouquet that is cheap and fun to do – and it doesn’t make much mess either – always a plus with any Easter activities and crafts!

Easter and Springtime Crafts for Kids – Easter and springtime traditionally signals the turn of the year into a time of rebirth and fresh beginnings. It’s a season groaning with possibilities for so many crafts for kids to enjoy.

Technorati Tags: , , , , , , , ,

How to Make an Alphabet Letters Tactile Guessing Game with Your Preschoolers or Autistic Children

Today we are going to how to play a fun Montessori game that promotes good hand writing skills while also helping kids to learn the alphabet on their own. This is an educational, yet fun arts and craft activity for both you and your young children to do together. This crafts idea is beneficial for preschoolers, Kindergartners, as well as children who are autistic / on the spectrum / or those who have sensory disorders. (even older children enjoy it). I have a friend with an Autistic child and this game is very similar to the way she had to teach her child the alphabet since he wasn’t able to learn the alphabet through sight since he was more into sensory and tactile learning techniques. As a warning, this craft might cause random bursts of laughter from both you and your child. Comment to tell us how your child reacts to this fun tactile game and craft. Enjoy.


Have the child close his eyes and feel letters to guess for Alphabet Letters Tactile Guessing Game Craft


Photographer: Marind

How to Make an Alphabet Letters Tactile Guessing Game with Your Preschoolers or Autistic Children


CRAFTS MATERIALS NEEDED:


Gather Crafts Materials for Alphabet Letters Tactile Guessing Game Craft


Gather the crafts materials that you will need for this arts and crafts project / game.

-Magic Markers

-A spare piece of rug, cloth, felt, or craft foam

-Heavy duty scissors


Trace the Alphabet Letters on the Felt for Alphabet Letters Tactile Guessing Game Craft


1-Trace the letters you want on the material that you chose to use (rug / cloth / felt / foam) with the marker.


Now cut the alphabet letters out of the felt for Alphabet Letters Tactile Guessing Game Craft


2-Now cut out the letters as shown above.


Have the Kids Feel the Letters for Alphabet Letters Tactile Guessing Game Craft


3-Now for the fun part. Have the kids feel the letters and say the letters at the same time. Do this two or three time until they have memorized the letters.


Have the child close his eyes and feel letters to guess for Alphabet Letters Tactile Guessing Game Craft


4-Now for the game. Have the children close their eyes. Spread the letters out on the floor. Then say a letter. Have students crawl around and feel the letters till they find the correct letter. Now, have the winning student tell the other kids to close their eyes. The winning student now repeats the game. Make sure you do this a few times, it’s fun. The students should be able to play the game on their own.

Here Are Some Other Links That You Might Find Useful – It is important to practice learning all the letters of the ABC! As you do your child will become familiar with each individual letter.

Lowercase and Uppercase Floor Alphabet Game –  An uppercase and lowercase floor alphabet game for younger kids and preschoolers.

Technorati Tags: , , , , , , , , , , , , , ,