How to Make an Autumn Brooch or Pin to Wear to Celebrate the Fall Season or Thanksgiving

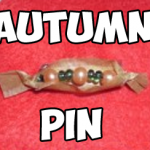
Learn how to make a cute little brooch to wear during Fall or you can even wear it on Thanksgiving day πŸ™‚ You can even make one for all of your guests. πŸ™‚ This step by step tutorial is offered by Laura from Dacian Moon Handmade

How to Make an Autumn Brooch or Pin to Wear to Celebrate the Fall Season


How to Make an Autumn Brooch or Pin to Wear to Celebrate the Fall Season


CRAFTS MATERIALS NEEDED:

– a piece of baking paper
– orangeΒ  / red beads
– green beads
– scissors
– a small piece of wire
– brooch base


Step 1.

Put wire through the paper at about 0.8 cm from one end…


… like this.


Step 2.

Put beads on the wire…


… making a pattern, like this.


Step 3.

Insert the other end of the wire through the paper so that the beaded part sits right.


Like this.


Cut the paper around the beads, like this.


Step 4.

Bend ends of wire to fit through the holes of the brooch base.


Tie them and cut the extra wire…


Like this.


Step 5.

Bend up the paper, besides beads…


… then twist one end…


… and the other. Your brooch is done πŸ™‚

I hope that you enjoyed this Autumn craft and that it turned out as beautiful as you hoped it would. Come back soon for more crafts.

Technorati Tags: , , , , , , ,

How to Make Autumn Dolls or Figurines in Easy Craft Idea for Kids

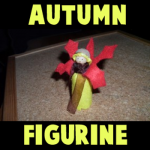
You can make this Autumn themed doll or figurine to celebrate fall, using an acorn cap for the hat and making a leaf out of felt for the “wings” of this little Autumn Fairy. This is a great Autumn-time craft that you will enjoy. Step by step tutorial offered by Laura from Dacian Moon Handmade


How to Make Autumn Dolls or Figurines in Easy Craft Idea for Kids


How to Make Autumn Dolls or Figurines in Easy Craft Idea for Kids

CRAFTS MATERIALS NEEDED:

– yellow and red felt
– pens (or permanent markers) – for eyes and mouth
– wooden bead
– scissors
– cork
– toothpick
– acorn cap
– toothpick
– brown ribbon
– craft glue


Step 1.

Glue the wooden bead on toothpick.


Step 2.

Stick toothpick in cork…


… until there are about 0.5 cm left.


Step 3.

Draw a circle and a rectangle on yellow felt. The circle must be a little bigger than the wooden bead and width of the rectangle must be from the bottom of the cork to the wooden ball.


Also draw a shape like this on red felt.


Step 4.

Cut them out.


Step 5.

Apply a layer of glue on the yellow circle…


… and place it on the wooden bead, like this.

Let it dry.


Next, put a bit of glue inside the acorn cap and on the edges…


… then fix it over the yellow circle.


You have now the head with yellow hair and acorn hat.


Step 6.

Adjust the upper part of the cork…


… like this.


Step 7.

Apply a layer of glue on the rectangle…


… like this…


And cover the cork with it.


Let it dry well.


Wrap the ribbon around the neck, over the yellow rectangle but take care to let the hair free.


Make a knot to keep it in place. You can cut the ribbon ends if they are too long.


Step 8.

Apply a stripe of glue on the lower part of red shape…


… and fix it over the ribbon, like this. Let it dry well.


Now use your pens / markers to add eyes and mouth and your cute doll is ready πŸ˜‰


I hope your Autumn Fairy Doll turned out great. This would be a great decoration for the Thanksgiving table or any dinner in Autumn. I hope that you had fun. Come back soon for more crafts.

Technorati Tags: , , , , , , ,