How to Make an Autumn Brooch or Pin to Wear to Celebrate the Fall Season or Thanksgiving

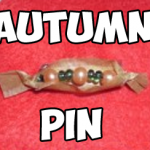
Learn how to make a cute little brooch to wear during Fall or you can even wear it on Thanksgiving day 🙂 You can even make one for all of your guests. 🙂 This step by step tutorial is offered by Laura from Dacian Moon Handmade

How to Make an Autumn Brooch or Pin to Wear to Celebrate the Fall Season


How to Make an Autumn Brooch or Pin to Wear to Celebrate the Fall Season


CRAFTS MATERIALS NEEDED:

– a piece of baking paper
– orange  / red beads
– green beads
– scissors
– a small piece of wire
– brooch base


Step 1.

Put wire through the paper at about 0.8 cm from one end…


… like this.


Step 2.

Put beads on the wire…


… making a pattern, like this.


Step 3.

Insert the other end of the wire through the paper so that the beaded part sits right.


Like this.


Cut the paper around the beads, like this.


Step 4.

Bend ends of wire to fit through the holes of the brooch base.


Tie them and cut the extra wire…


Like this.


Step 5.

Bend up the paper, besides beads…


… then twist one end…


… and the other. Your brooch is done 🙂

I hope that you enjoyed this Autumn craft and that it turned out as beautiful as you hoped it would. Come back soon for more crafts.

Technorati Tags: , , , , , , ,

How to Make Autumn Dolls or Figurines in Easy Craft Idea for Kids

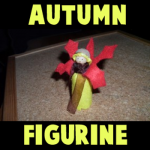
You can make this Autumn themed doll or figurine to celebrate fall, using an acorn cap for the hat and making a leaf out of felt for the “wings” of this little Autumn Fairy. This is a great Autumn-time craft that you will enjoy. Step by step tutorial offered by Laura from Dacian Moon Handmade


How to Make Autumn Dolls or Figurines in Easy Craft Idea for Kids


How to Make Autumn Dolls or Figurines in Easy Craft Idea for Kids

CRAFTS MATERIALS NEEDED:

– yellow and red felt
– pens (or permanent markers) – for eyes and mouth
– wooden bead
– scissors
– cork
– toothpick
– acorn cap
– toothpick
– brown ribbon
– craft glue


Step 1.

Glue the wooden bead on toothpick.


Step 2.

Stick toothpick in cork…


… until there are about 0.5 cm left.


Step 3.

Draw a circle and a rectangle on yellow felt. The circle must be a little bigger than the wooden bead and width of the rectangle must be from the bottom of the cork to the wooden ball.


Also draw a shape like this on red felt.


Step 4.

Cut them out.


Step 5.

Apply a layer of glue on the yellow circle…


… and place it on the wooden bead, like this.

Let it dry.


Next, put a bit of glue inside the acorn cap and on the edges…


… then fix it over the yellow circle.


You have now the head with yellow hair and acorn hat.


Step 6.

Adjust the upper part of the cork…


… like this.


Step 7.

Apply a layer of glue on the rectangle…


… like this…


And cover the cork with it.


Let it dry well.


Wrap the ribbon around the neck, over the yellow rectangle but take care to let the hair free.


Make a knot to keep it in place. You can cut the ribbon ends if they are too long.


Step 8.

Apply a stripe of glue on the lower part of red shape…


… and fix it over the ribbon, like this. Let it dry well.


Now use your pens / markers to add eyes and mouth and your cute doll is ready 😉


I hope your Autumn Fairy Doll turned out great. This would be a great decoration for the Thanksgiving table or any dinner in Autumn. I hope that you had fun. Come back soon for more crafts.

Technorati Tags: , , , , , , ,

How to make a Pen and Pencil Holder for Fall with Seeds and a Cardboard Tube

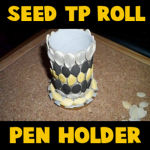
Here is a pen and pencil holder craft that is easy to make and a great craft for kids during the Autumn / Fall season. This pencil holder is made with a recycled cardboard tube from a toilet paper roll or a paper towel roll. Use seeds and paint or markers to decorate the cardboard tube. Find the crafts instructions below. Your kids will love this one. Below the Step by step tutorial is offered by Laura from Dacian Moon Handmade

How to Make an Autumn Pencil Holder with Colorful Seeds and a Recycled Toilet Paper Roll


How to make a Pen holder decorated with seeds


CRAFTS MATERIALS NEEDED:

– empty paper towel or toilet paper roll
– lid
– pumpkin seeds
– craft glue
– scissors
– paints (silver, gold, black)
– paintbrush


Step 1.

Take the roll…


… and make some cuts on one end, like this.


Bend them outward…


… like this.


Step 2.

Put glue on the folded part …


… and set it on the lid.


Step 3.

Take a seed and apply a layer of glue on one side of it…


… then place it on the roll.


Cover the roll with seeds…


… like this.


Step 4.

You can let it like this or can use metallic paints to add some style to it…or
you can use any colors that you like. If your parents don’t want you to paint,
you can use markers instead.


Like this 🙂


I hope that your pencil / pen holder looks fantastic. Keep it on your desk or give it to some one that you care about.

Technorati Tags: , , , , , , ,

How to Make a Thanksgiving Candle

Today I’m going to continue with some Thanksgiving crafts by showing you how to make a Thanksgiving candle.   This candle is very easy to make, but it turns out beautifully.  You will see how just by adding some seeds to an average candle can make it into something spectacular.  Make a bunch of these and add them to your Thanksgiving table or put them around the house as Thanksgiving decorations.  Either way it will look beautiful.  So, let’s get started.

Check out our other Thanksgiving Crafts.

Tutorial offered by Laura from Dacian Moon Handmade


Materials Needed

– candle
– seeds
– glue
– paper


Step 1

Spread the seeds on the paper.


Step 2

Apply a layer of glue on the candle…


… like this.


Step 3

Roll the candle over seeds.


Step 4

Let it dry a little.


Before it dries out, use a toothpick to create a model (removing extra seeds.)


Step 5

Let it dry well.


You can use it now as a decoration for Thanksgiving.


Isn’t this candle pretty?  It’s beautifully festive…. perfect for Thanksgiving.  Make a few and use them to decorate the house for Thanksgiving.

Technorati Tags: , , , , , , , , ,

How to Make a Cornucopia Silverware Holder

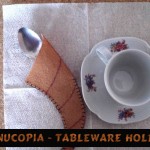
Thanksgiving is coming up quickly.  But, don’t stress you still have plenty of time to make your Thanksgiving festivities unique.  Today I will show you how to make Cornucopia Silverware Holders for your Thanksgiving table.   These Thanksgiving silverware holders are in the shape of a cornucopia…. they are the perfect shape and size to hold your silverware.  This is a great way not only to add a Thanksgiving flair to your dinner table, but it is also a great way to keep all the silverware in place.  So, let’s get started.

Check out our other Thanksgiving Crafts.

Laura from Dacian Moon Handmade  will show you, step by step, how to make these.


Materials Needed

– brown felt
– pen (or permanent marker)
– needle and thread
– scissors
– pins


Step 1

Draw the outline of the horn on felt (using your pen or marker), like this.


Fold the felt sheet on one side of the horn, like this.


Pin it in place.


Step 2

Cut it out (keeping the felt folded).


Unfold. It will look like this.


Step 3

Decorate the horn with lines (or any other decorations, if you want. I think swirls could look great too)…


… like this.


Step 4

Fold it again…


… and sew the two parts.


This is the complete tableware holder.


Imagine how festive your Thanksgiving table will look with these Cornucopia Silverware Holders.  Your Thanksgiving guests will love them.

Technorati Tags: , , , , , , , , , ,

My Favorite Mayflower Craft Ideas for Thanksgiving

Thanksgiving will be here in no time at all.  And, one of the lessons we try to teach our children about the Thanksgiving Holiday is the Pilgrims and the Mayflower.  What I found during lessons is that teaching them visually is the easiest way to get them to understand…. hence doing a craft.  So, today I thought I would show you my Favorite Mayflower Craft Ideas for Thanksgiving.  I found these Mayflower crafts while searching the internet.  They are all really incredible and a ton of fun.  Surely, you will be able to find some Mayflower craft ideas from this list….. use them to help teach your children about the Pilgrims and their travel on the Mayflower.

Check out our other Thanksgiving Crafts.


My Favorite Mayflower Craft Ideas for Thanksgiving


My Favorite Mayflower Craft Ideas for Thanksgiving

(1)  Model Mayflower


Model Mayflower


Here is a wonderful way to make a model Mayflower.  Made from disposable coffee cups and coffee stirrers this is a great way to recycle items as well as teach your children about the Mayflower.  I found this Mayflower craft over at Parenting.  Make sure to check it out.


(2)  Hand Print Mayflower


Hand Print Mayflower


I love this Mayflower craft.  It is just simply adorable.  And, any young crafter will have a lot of fun making it.  I found this Thanksgiving craft over at Almost Unschoolers.  Make sure to check out her site to get all the Mayflower craft details.


(3)  Mayflower Walnut Boat


Mayflower Walnut Boat


Even we have our own Mayflower crafts.  Here is our first one.  We will show you how to make a Mayflower out of a walnut.  And, what is really cool about this Mayflower craft is that the boat will actually float in water.  Check out How to Make a Mayflower Walnut Boat to make one for yourself.


(4)  Mayflower Paper Plate Craft


Mayflower Paper Plate Craft


Here is a fun Mayflower craft that your little ones will really enjoy.  The Crafty Classroom will show you how to take two paper plates and a popsicle stick and make it into this awesome Mayflower.  Oh boy, this sounds like fun.


(5)  The Mayflower Simplified


Mayflower Simpliefied


I love this bloggers idea.  Her idea was to come up with a Mayflower craft that she could make with young children.  I Can Teach My Child came up with this idea and it is a great one.  Made from a paper towel roll, a straw and some other materials this craft will take on a life of its own.  Share it with your child…. they will love it.


(6)  Mayflower Sandwich


Mayflower Sandwich


I just couldn’t pass this one up.  I know it’s not technically a craft, but it is a Mayflower recipe that you and your little ones can have fun putting together.  Little Nummies put this one together and it is just precious.  Made from bread, cream cheese and pretzels this yummy recipe will be a whole lot of fun to put together… almost as much fun as eating it.


(7)  Mayflower Photo Craft


Mayflower Photo Craft


This is a great Thanksgiving craft to enhance your teachings of the Pilgrims, Mayflower and the first Thanksgiving.  Here Classified Mom adds actual photos of her own children to better engage her children in the lesson.  You can do the same.


(8)  Mayflower Crayon Holder


Mayflower Crayon Holder


I love, love, love this idea.  Made from a creamer container this Mayflower actually holds crayons.  I think this Mayflower craft will be perfect for the Thanksgiving Kids Table.  Imagine every child having one of these Mayflower Crayon Holders on Thanksgiving…. the fun they will have.  Check out It’s Overflowing for all the craft details.


(9)  Mayflower Milk Carton Craft


Mayflower Milk Carton Craft


Made from a milk carton and some tissue paper this Mayflower Craft is sure to be a fun one.  Hidden underneath the tissue paper are some apples…. perfectly festive for the fall season.  Check out Creative Holiday Gift Ideas to find out how you too can make this with your children.


(10)  Mayflower Hats


Mayflower Hats


What kid doesn’t love hats?  They just all do.  And, these Mayflower hats will be no exception.  Spoonful shows you step-by-step how to make these adorable and festive hats.  Make a few and have them ready for the kids table at Thanksgiving.  All the children will love to wear them.


(11)  Mayflower Centerpiece


Mayflower Centerpiece


Why not center your entire Thanksgiving Meal around the Mayflower…. or perhaps the kids table.  Martha Stewart shows you how to with these very detailed instructions on how you too could have a Mayflower Centerpiece.


(12)  Mayflower Cut, Tape & Play


Mayflower Cut Tape Play


Homespun With Love shows you how you can print off this really cool Mayflower and let your kids cut, tape and then play with this Mayflower.  Use this as a visual tool when teaching your children about the Mayflower, the Pilgrims and the first Thanksgiving.


(13)  Mayflower Popsicle Craft


Mayflower Popsicle Craft


Here is a fun Mayflower craft that all the children will love.  Made from Construction Paper and Popsicle Sticks it is very likely you have all the craft materials needed right in your home.  Ramblings of a Crazy Woman will show you in detail how to make this craft…. she even shows you how to make waves to remind us how the Pilgrims endured a lot to find their way here.


(14)  Moving Mayflower


Moving Mayflower


Here is another of our Mayflower crafts from our very own site.  This Mayflower craft is a little bit different than the others because it can actually move.  Made with items like a paper towel roll, craft sticks and string this moveable mayflower will make the kids smile.  Gotta love something that actually moves.  Check out our site to find out how to make this Moveable Mayflower.


(15)  Mini Mayflower


Mini Mayflower


Get the kids excited about the Pilgrims and the Mayflower with this mini mayflower craft.  Made from a milk container this mayflower is the perfect size for little kids hands.  The kids will love to play with this mayflower and it also makes the perfect Thanksgiving decoration.  Check out Parents Connect for all the details.


(16)  Cardboard Tube Mayflower


Cardboard Tube Mayflower


When I found this Mayflower craft I thought it was quite original.  I found this Thanksgiving craft over at Naturally Educational.  Here she uses a cardboard tube along with some twigs to make her original Mayflower craft.  Make sure to check out her site for all the step-by-step details.  She also adds some Mayflower book choices to help you teach your children about the Mayflower.

Technorati Tags: , , , , , , , , , , ,

How to Make a Decorative Corn Filled with Treats for Thanksgiving

Today I am going to continue with the fun Thanksgiving crafts.  In this post I’m going to show you how to make a decorative corn filled with treats for Thanksgiving.  If you are having Thanksgiving dinner at your house then this is a great craft for you.  You can make these treat filled corns for the children attending your Thanksgiving feast.  Sure, they can’t eat the treats before dinner, but these festive corns will be perfect for the children to take home with them.  They will truly get a kick of out them.  So, let’s get started.

Check out our other Thanksgiving Crafts.


How to Make a Decorative Corn Filled with Treats for Thanksgiving


Materials Needed

Two 12 Inch Pieces of Manilla Paper

Pen or Pencil

Scissor

Green & Yellow Crayons, Markers or Colored Pencils

Glue or Paste

Treats or Candy

String


Step 1


Take a 12 inch piece of manilla paper and draw a pattern like this.


Take a 12 inch piece of manilla paper and draw a pattern like this.


Step 2


 Cut out the pattern like this.


Cut out the pattern like this.


Step 3


Color this green.


Color this green.


Step 4


From a piece of about 5 inches square make a roll similar to a cone.


From a piece of about 5 inches square make a roll similar to a cone.  Before rolling color paper yellow.  Make sure to not get it too pointed.  Paste.


Step 5


You can fill corn with treats or candy.  Fold green part around cone and tie with a string.


You can fill corn with treats or candy.  Fold green part around cone and tie with a string.


Step 6


Lightly draw little ovals for corn kernels.


Lightly draw little ovals for corn kernels.

And there you have it.  You have just made a decorative corn filled with treats.  These are a great idea if you are having a Thanksgiving dinner with children.  They will love these.

Technorati Tags: , , , , , , , , , , , ,

Giving Thanks Thanksgiving Crafts Roundup


Giving Thanks Thanksgiving Crafts Roundup


Thanksgiving is coming up quickly.  This month wouldn’t it be a great idea to fill it with crafts that remind us what this Holiday is all about….. being thankful.  We all have so much to be thankful for.  So, in this link roundup I have scoured the internet to find crafts that all have to do with being thankful.  Each craft is a lot of fun and all can be used as a Thanksgiving decoration…. but most of all they remind us to be thankful.  With these crafts you will be doing them as a family…. and family is one of the most important reasons to be thankful.  So, get ready to spend some time looking at some amazing Thanksgiving “Giving Thanks” Crafts….. you are sure to find one that you will love.

Check out our other Thanksgiving Crafts.

Giving Thanks Thanksgiving Crafts Roundup

(1)  Thanksgiving Countdown Calendar


Thanksgiving Countdown Calendar


This Thanksgiving craft is kind of like a Holiday Advent Calendar.  You and your family can express your thanks and gratitude simply by writing your thanks on your color piece of paper and adding it to the envelopes.  Look at them each day to remind each other what you are Thankful for.  I found this great Thanksgiving craft at Parents.com.


(2)  Give Thanks Napkin Rings


Give Thanks Napkin Rings


In this Thanksgiving thankful craft Jeanne Winters shows you how to create these amazing napkin rings that inspire your Thanksgiving guests to go around the Thanksgiving table before the feast and let everyone know what they are thankful for.


(3)  Give Thanks Yarn Turkey


Give Thanks Yarn Turkey


This Thanksgiving thankful craft was one of our crafts posted last Thanksgiving Season.  It’s a craft that your children will love putting together.  Plus, it is part finished when it is presented at the Thanksgiving table and finished by the guests adding to each feather what they are thankful for.  Check it out.


(4)  Gratitude Tree Advent Calendar


Gratitude Tree Advent Calendar


Here is another advent calendar idea using this time a tree.  Trees are great for this Thanksgiving craft because they have many branches to add your thankful ideas to…. plus trees are perfect for this fall craft.  Oopsey Daisy came up with this Thanksgiving craft and I love it.  Check it out to see how she uses a magnetic sheet and bottle caps for this craft.


(5)  Give Thanks Board


Give Thanks Board


This Thanksgiving thankful craft is similar to the first one, but instead of it being a garland it is actually all out on a board.  What is really cool about this Thanksgiving thankful craft is the use of  a variety of coordinating scrapbook paper giving it an amazing look.  Check it out for yourself at JellybeanJunkyard.


(6)  Thankful Bucket


Thanksgiving Thankful Bucket


Here one family shows you how they use a Thankful Bucket to remind each other what they are thankful for this Thanksgiving season.  Here The Idea Room shows us how to put together this festive bucket.  Have the family fill it with things they are thankful for…. after dinner share these things with the rest of the family.  Great idea.


(7)  Changeable Frames for Thankfulness


Changeable Frames for Thankfulness


Here is a clever idea by Flamingo Toes.  Here the writer of this post shows you how to make a place that your family can write down what they are thankful for.  This particular Thanksgiving thankful craft is made with glass over the embroidery so they can write different things all month long.  They can wipe it clean and start over as often as they would like.


(8)  Thankful Leaf Garland Decoration


Thankful Leaf Garland Decoration


Here is a cute Thanksgiving thankful craft.  And, one that looks awesome as a Thanksgiving decoration.  Full Circle shows you how to make this festive craft.  Simply string together construction paper leaves and have family members write on the leaves what they are thankful for.  String together as garland for all to see.


(9)  Thankful Tree


Thanksgiving Thankful Tree


Here is a great Thanksgiving thankful craft that is perfect for even the youngest of crafters with just a lit bit of help from you.  Playful Learning shows you how to make one of these Thankful Trees for your houses.  Simply have the kids make leaves, color them and cut them out.  Have the children write down what they are thankful for.  She will show you how to finish it off with a tree branch.  Check it out for yourself.


(10)  Thanksgiving Hat


Thanksgiving Hat


Here is a fun Thanksgiving thankful craft that the little kiddies will love.  Dim Sum, Bagels and Crawfish shows you how to make this craft.  The kids will love making it, but even more so love wearing it.  If you are having a Thanksgiving dinner at your house considering doing this craft with the little ones at your feast…. they will love it.


(11)  Paper Cornucopia of Thanks


Paper Cornucopia of Thanks


Flip Flops and Applesauce shows you how to take some paper and posicle sticks and make it into a beautiful and meaningful table centerpiece for Thanksgiving.  Make sure to involve the whole table…. have your guests each write down what they are thankful for and read them out loud.


(12)  Thanksgiving Clothespin Wreath


Thanksgiving Clothespin Wreath


Here is a cool Thanksgiving thankful craft that also works as an awesome Thanksgiving wreath decoration for the Holidays.  I found this Thanksgiving craft over at Chica and Jo.  This amazing Thanksgiving wreath is made from Clothespins.  Add a sharpie to your wreath and let your visitors add what they are thankful for.  Save it for years to come.

Technorati Tags: , , , , , , , , , , , , ,

How to Make Pinecone Turkeys

Oh boy, do I have a fun craft for you today perfect for the Thanksgiving season.  Today I’m going to show you how to make Pinecone Turkeys perfect for Thanksgiving.  These pinecone turkeys will look great around the house as Thanksgiving decorations.  Plus, your kids will love to make them.  They are a lot of fun and your kids will have great pride in knowing they made items you could actually put around the house as decorations.  So, grab the materials needed and let’s get started.

Check out our other Thanksgiving Crafts.


How to Make Pinecone Turkeys


Materials Needed

Pinecone

Tan Puffball

Glue

Googly Eyes

Yellow Felt or Foam

Red Felt

Orange Pipe Cleaner

Different Color Pipe Cleaner, Construction Paper or Craft Feathers


Step 1


Get a pinecone.


Get a pinecone.


Step 2


Glue a tan puffball to the top of pinecone.


Glue a tan puffball to the top of pinecone.


Step 3


Glue googly eyes on.


Glue googly eyes on.


Step 4


Cut yellow triangle out of felt or foam and glue on face.


Cut yellow triangle out of felt or foam and glue on face.


Step 5


Draw a #7 like shape on red felt like above picture.  Glue red felt on top of beak.


Draw a #7 like shape on red felt like above picture.  Glue red felt on top of beak.


Step 6


Wrap orange pipe cleaner around pinecone.


Wrap orange pipe cleaner around pinecone.  Then take smaller pieces of pipe cleaner to make claws.


Step 7


Loop pipe cleaners and stick into back of pinecone for feathers.


Loop pipe cleaners and stick into back of pinecone for feathers.  Or, use paper or craft feathers.

And, now you are all finished.  You just made your Pincone Turkey.  Now, use it to decorate your house for Thanksgiving.  Actually, make a few to put around the house….. everyone will love it!!

Technorati Tags: , , , , , , , , , , , ,

How to Make Paper Log Cabins for Thanksgiving

Whether you want to teach your children about the Pilgrims or whether you are just looking for some Thanksgiving decorations to put around the house…. I have a great Thanksgiving craft for you.  Today I’m going to show you how to make Paper Log Cabins for Thanksgiving.  This would be a great craft to help teach your children about Thanksgiving and how important the Pilgrims were to that…. plus, the craft is a lot of fun.  Use the finished Log Cabin to put around the house as a Thanksgiving decoration.  Let’s get started.

Check out our other Thanksgiving Crafts.


How to Make Paper Log Cabins for Thanksgiving


Materials Needed

Printer & Paper

Scissors

Ruler

Butter Knife

Glue


Click on template image below to open up new page and to print.


Log Cabin Template


Step 1


Print out the cabin template.


Print out the cabin template.


Step 2


Cut out both parts.


Cut out both parts.


Step 3


Score on lines by using a ruler and dull side of butter knife.  Then fold.


Score on lines by using a ruler and dull side of butter knife.  Then fold.


Step 4


Glue together with side tab.


Glue together with side tab.


Step 5


The chimney folds into a 3D rectangle.


The chimney folds into a 3D rectangle.


Step 6


Paste chimney on top tabs.


Paste chimney on top tabs.


Step 7


Let dry.


Let dry.

There you go…. you just finished making one of your Paper Log Cabins for Thanksgiving.  Make a few and use them for a Pilgrim Lesson for your kids and as Thanksgiving decorations for around your house.

Technorati Tags: , , , , , , , , , , , , ,

How to Make Wigwams and Canoes for Thanksgiving

Today I’m going to show you how to Make Wigwams and Canoes for Thanksgiving.  These items are perfect to use as decorations for Thanksgiving.   Actually, add these items to our Indian Village Craft and have an entire Indian Village to Display for Thanksgiving.  Wouldn’t that be wonderful?  You can use both of these crafts to talk about the Native Americans and what they have given our Country.  Remind the children about the story of Thanksgiving.  Do a fun craft and a wonderful lesson at the same time.

Check out our other Thanksgiving Crafts.


How to Make Wigwams and Canoes for Thanksgiving


Materials Needed

Printer & Paper

Scissors

Paste

Twigs

Crayons, Markers or Colored Pencils (optional)


Template 1

Black & White Template

Indian Canoe Template black & white


Colored Template


Indian Canoe Template Color


1.  Click on one of the images above.  Click on the black and white image if you want to color it later.  Or, print off the colored image and there is no need to color it later.   Once the new page opens up print off the template.

2.  Cut out the canoe.

3.  Slit at ‘A’.

4.  Fold in half along center line.  And, paste both halves together at ‘B’.

5.  Where you slit at ‘A’, fold towards each other and paste together.


Template 2

Black & White Template


Template 2 Black & White


Colored Template


Template 2 Colored


1.  Click on one of the images above.  Click on the black and white image if you want to color it later.  Or, print off the colored image and there is no need to color it later.   Once the new page opens up print off the template.

2.  Cut out the Wigwam.

3.  Cut on the slits that are noted.

4.  Cut out portion ‘A’.

5.  Bend back the flaps ‘D’, bring ‘C’ flaps together and paste together.

6.  Optionally, get a few twigs (or some raffia) and glue at the top of the Wigwam.


Finished Wigwams and Canoes for Thanksgiving


And, there you have it…. that’s how you make Wigwams and Canoes for Thanksgiving.  Use these as Thanksgiving Decorations…. everyone will surely love them.

Technorati Tags: , , , , , , , , , , , , , , , , , , , ,

How to Make Gourd Rattles and Maracas

I have an awesome fall craft for you today.  In this post I’m going to show you how to make Gourd Rattles and Maracas.  When you fill these gourds with pebbles they make the most playful sounds.  It is a festive way to use these gourds this fall season.  The kids will love playing with these noise makers…. Not to mention the great fun they will have making this craft.  So, grab the materials needed and let’s get started.

Check out our other Fall Crafts.


How to Make Gourd Rattles and Maracas


Materials Needed

Gourds (2 Round or 1 Oblong)

Large Bowl & Water

Awl (Parental Supervision)

Pebbles

Paper

Glue

2 Sticks (for Round Gourds)

Acrylic or Tempera Paints

Paintbrush

1/2 Glue & 1/2 Water Mixture


Step 1


Soak the dry gourd for 24 hours.


Soak the dry gourd for 24 hours.


Step 2


Using an Awl.... punch a hole in the gourd.


Using an Awl…. punch a hole in the gourd.  (Parental help needed for younger kids.)


Step 3


Shake out seeds.


Shake out seeds.


Step 4


Drop in pebbles.


Drop in pebbles.


Step 5


Glue paper over the hole.


Glue paper over the hole.


For Round Gourds

Step 6


Punch holes in both ends.  Shake out the seeds.


Punch holes in both ends.  (Parental Supervision)   Shake out the seeds.


Step 7


Put stones in the gourd.  Insert stick.


Put stones in the gourd.  Insert stick.


Step 8


Paint bright designs with acrylics or tempera paints.


Paint bright designs with acrylics or tempera paints.  Let dry.  Make a mixture of half glue and half water.  Brush it over gourd.  Let dry.  Re-apply.


And, there you have it…. you have a gourd rattle or gourd maracas.  What did you decide to make?  Let me know in the comments below.  And, don’t forget to take a picture of your finished gourd craft…. add it to the comment too.  I’d love to see it.

Technorati Tags: , , , , , , , , , , , , , , , , ,

How to make a Hay Decoration for Thanksgiving

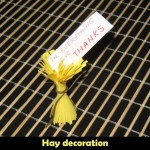
Thanksgiving is just around the corner, but it’s not too late to make a decoration for the Thanksgiving Holiday.  Today I will show you how to make a Hay Decoration for Thanksgiving.  Made out of yellow paper and thick thread this Hay decoration is sure to be a huge hit for Thanksgiving.  And, the best part…. you can say you made this decoration yourself.  So, let’s get started.

Check out our other Thanksgiving Crafts.

Laura from Dacian Moon Handmade will show you how to make it in 4 easy steps.


MATERIALS NEEDED:

– yellow paper
– thick thread
– scissors
– red pen
– a piece of white thick paper


Step 1

Cut a rectangle of the yellow paper, about 7 cm wide.


Mark the middle of it by two lines along the rectangle.


Step 2

Using the scissors, cut narrow bands from the edge to the first line…


… like this.


Repeat on the other side.


Step 3

Start rolling the paper…


… until it looks like this.


Bind it using the thread.


It doesn’t look really like a sheaf of hay…


To correct that, spread a little of the upper part and the lower part. Now it looks right.


Step 4

Write on the piece of white paper “In Everything give Thanks”…


… and fix it on top of the sheaf of hay.


Isn’t that a cute Thanksgiving decoration?  Display your Hay decoration proudly with the rest of your Thanksgiving decorations.  You are sure to get lots of compliments on this Thanksgiving craft…. and you get to say you made this decoration yourself.  Good for you!!

Technorati Tags: , , , , , , , , , , , , ,

How to make a Pumpkin Girl Decoration for Fall

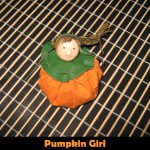
The leaves are falling,the air has gotten brisk and Halloween is just around the corner.  What does that mean?  Yep, Fall is here and it is raring to go.  I love fall…. the kids are back in school and I could finally pull out all of my favorite sweaters.  What else does it mean?  It is time to decorate for the fall season.  Today I will show you how to make a Pumpkin Girl decoration for Fall.  Let’s get started.

Tutorial offered by Laura from Dacian Moon Handmade .


CRAFT MATERIALS NEEDED:

– orange cloth
– green cloth / leather
– wooden ball (I haven’t one so I made a head in polymer clay)
– toothpick
– craft glue
– paint marker
– needle and thread
– wool / cotton – things to stuff (I used 4 cotton pads for that)
– 1 disc of cardboard
– green cord


Step 1 – The Pumpkin

Draw a circle on the orange cloth (actually I just rounded the corners).


Cut it out.


This is the orange circle.


Using the needle and thread, sew near the edges…


… like that.


Step 2 – Stuff it!

Take the cardboard disc…


… and place it inside.


Prepare your stuffing material: I made little pieces of the cotton pads…


… and place it over the cardboard, inside the orange cloth


Pull the thread to close the pumpkin…


… like this.


Sew it shut.


Step 3 – Pumpkin Top

Cut a disc of green leather and place it on top of the pumpkin, to mask the stitch.


Sew it there.


Step 4 – The Head

Take the wooden ball and put it on the toothpick (you can add a little glue on the toothpick for safety)…


… then put it on top of the green leather, forcing it through.


Now, our pumpkin girl has a head too.


Notice that the stitch on the green leather is visible and doesn’t look good. I’ll fix that by adding a new disc of green leather just under the head.


Step 5 – The Hair

Make some pieces from the green cord – about 15 cm length.


Apply a generous layer of glue on the head, where the hair will be.


Like this.


Take one piece of cord and place it on the head, taking care to have the longer part on the back, like this.


Continue to add cord pieces until the head is fully covered. Let it dry well.


Now you can arrange her hair as you want it. I split the front part of the cords in three…


… I made three braids – two on the sides and one on the back – and tied them together.  I then cut the front center part to make a fringe.


Now you must make her eyes and mouth… use the paint marker and she is ready to go.


Now you have a cute pumpkin girl to decorate your house with this Fall.  Add it to your other fall decorations to fill your house with tons of fall foliage fun.

Technorati Tags: , , , , , , , ,

How to Make a Brown Bag Scarecrow Decoration

Scarecrows are a great fall character.  You see them in fall all around corn fields to protect the corn from crows.  Well, what fall holiday do the kids love more than any other???  Halloween, of course.  Here I will show you how to make a brown bag Scarecrow decoration perfect to display this Halloween season…. and why not even the entire fall season!!

Also check out our other Halloween Crafts

How to Make a Brown Bag Scarecrow Decoration


Materials Needed:

Brown Grocery Bag

Tissues, Ripped up Newspaper or other Fillers

Stapler

Markers

Red Paint

Yellow Paper

Paste

Cardboard

Paper or Newspaper

Scissors

Tape


Step 1


Get a grocery bag and fill it with tissues, ripped up newspaper or another type of filler


Get a grocery bag and fill it with tissues, ripped up newspaper or another type of filler… then fold over and staple shut.


Step 2


Draw a line thru the center of the bag... brown markers work well.


Draw a line thru the center of the bag… brown markers work well.


Step 3


Draw two circles for the cheeks and a triangle for the nose


Draw two circles for the cheeks and a triangle for the nose.  Use red marker or paint.


Step 4


Draw a curved line for each eye


Draw a curved line for each eye.


Step 5


Draw a curved line for the mouth


Draw a curved line for the mouth.


Step 6


Draw 'X' shapes all over the mouth and center line


Draw ‘X’ shapes all over the mouth and center line.


Step 7


Cut strips of yellow paper for the hair


Cut strips of yellow paper for the hair.


Step 8


Paste hair all over the top of the bag


Paste hair all over the top of the bag.


Step 9


Form a cone with paper or newspaper


Form a cone with paper or newspaper.


Step 10


Cut a ring from cardboard and tape it to the bottom of the cone


Cut a ring from cardboard and tape it to the bottom of the cone.


Step 11


Now take large paper or newspaper and sloppily wrap it around the cardboard ring


Now take large paper or newspaper and sloppily wrap it around the cardboard ring to make it look like this.  Paint it.


Finished brown bag scarecrow decoration


Ok, that’s super cute, right?!  It is the perfect decoration for the fall Holidays… including Halloween.  Your kids will love helping you decorate for the Holidays…. they will feel so proud.

Technorati Tags: , , , , , , , , ,