How to Make Autumn Dolls or Figurines in Easy Craft Idea for Kids

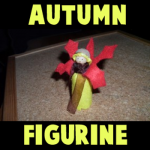
You can make this Autumn themed doll or figurine to celebrate fall, using an acorn cap for the hat and making a leaf out of felt for the “wings” of this little Autumn Fairy. This is a great Autumn-time craft that you will enjoy. Step by step tutorial offered by Laura from Dacian Moon Handmade


How to Make Autumn Dolls or Figurines in Easy Craft Idea for Kids


How to Make Autumn Dolls or Figurines in Easy Craft Idea for Kids

CRAFTS MATERIALS NEEDED:

– yellow and red felt
– pens (or permanent markers) – for eyes and mouth
– wooden bead
– scissors
– cork
– toothpick
– acorn cap
– toothpick
– brown ribbon
– craft glue


Step 1.

Glue the wooden bead on toothpick.


Step 2.

Stick toothpick in cork…


… until there are about 0.5 cm left.


Step 3.

Draw a circle and a rectangle on yellow felt. The circle must be a little bigger than the wooden bead and width of the rectangle must be from the bottom of the cork to the wooden ball.


Also draw a shape like this on red felt.


Step 4.

Cut them out.


Step 5.

Apply a layer of glue on the yellow circle…


… and place it on the wooden bead, like this.

Let it dry.


Next, put a bit of glue inside the acorn cap and on the edges…


… then fix it over the yellow circle.


You have now the head with yellow hair and acorn hat.


Step 6.

Adjust the upper part of the cork…


… like this.


Step 7.

Apply a layer of glue on the rectangle…


… like this…


And cover the cork with it.


Let it dry well.


Wrap the ribbon around the neck, over the yellow rectangle but take care to let the hair free.


Make a knot to keep it in place. You can cut the ribbon ends if they are too long.


Step 8.

Apply a stripe of glue on the lower part of red shape…


… and fix it over the ribbon, like this. Let it dry well.


Now use your pens / markers to add eyes and mouth and your cute doll is ready 😉


I hope your Autumn Fairy Doll turned out great. This would be a great decoration for the Thanksgiving table or any dinner in Autumn. I hope that you had fun. Come back soon for more crafts.

Technorati Tags: , , , , , , ,

How to Make a Painted Snail or Sea Shell Crafts Ideas for Kids

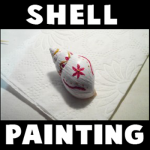
Nature is beautiful so why not take advantage of that natural beauty to create a fun craft. Find either a sea shell or a snail’s shell on the beach (or wherever). Then get the paints out and get creative! Laura from Dacian Moon Handmade  will show you, step by step, how to make this fun project for summer.

How to Make a Painted Snail or Sea Shell Crafts Ideas for Kids


How to Make a Painted Snail or Sea Shell Crafts Ideas for Kids


CRAFTS MATERIALS NEEDED:

– snail shell or sea shell
– paints
– paintbrush
– toothpick


IMG_6586


Step 1. 

We start with a base color. I choose white.


IMG_6587


Cover the shell entirely (using the paintbrush, of course)


IMG_6588


Add as many layers as necessary, until it looks as you wish. Let it dry.


IMG_6597


Step 2.

Now is time to decorate it. For decoration we will use the toothpick or a very thin paintbrush.


IMG_6598


I made a flower with red paint…


IMG_6599


.. two lines around it…


IMG_6600


and some triangles on the shell lines.


IMG_6601


Then I use golden paint to highlight the design.


IMG_6602


Like this.


IMG_6603


You now have a beautiful painted shell that you can keep on your knick knack shelf forever. Or even better, give the painted shell to someone you love or care about. I hope that you had a lot of fun!

Technorati Tags: , , , , , ,

How to Make a Steampunk USB Memory Stick Pendant

Here is a Back to School craft that you can work on in the next few weeks. 
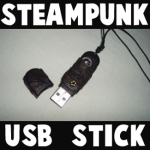
Learn how to take a normal USB memory stick and decorate it with paint and random objects…turn it into a Steampunk masterpiece.You can then wear it around your neck as a special pendant necklace.
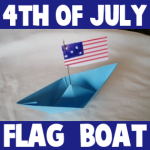
 Laura from Dacian Moon Handmade  will show you today how to make this cool and useful pendant.


How to Make a Steampunk USB Memory Stick Pendant


CRAFTS MATERIALS NEEDED:

– USB memory stick
– black paint
– silver metallic paint
– bronze powder
– instant glue
– a piece of thin fabric for texture (I use tulle)
– a little wheel
– bronze bead – I use a little stylized flower
– scissors
– paintbrush
– toothpick (useful to put little pieces in place)


IMG_5462


Step 1.

First of all, remember that you don’t have to do everything we do…just use our tutorial as a guide. You won’t have the same exact materials as us…but just be creative.

Paint the stick in black.


IMG_5465


Like this. Let it dry.


IMG_5466


Step 2.

Cut a piece of fabric…


IMG_5467


… and wrap it around the stick so as to form creases.


IMG_5468


Apply some glue to fix it in place.


IMG_5469


Like this.


IMG_5470


Add the decorations among the creases. Glue them in place.


IMG_5471


Add glue on every edge to fix the fabric.


IMG_5472


Let it dry.


IMG_5474


Do the same for the cover. It will look like this.


IMG_5478


Step 3.

Use your paintbrush to paint the fabric in black. Also paint where the glue reached and bleached the paint.


IMG_5479


Like this.


IMG_5481


Prior it dry out, add a little bronze powder …


IMG_5484


… with your paintbrush.


IMG_5486


Like this.


IMG_5487


Let it dry well.


IMG_5485


Step 4.

Use the silver paint to add a metallic patina on some elements, especially the wheel.


IMG_5488


Like this.


IMG_5490


Also, add a bit of bronze powder on it, to keep the atmosphere.


IMG_5491


Let it dry completely.


IMG_5526


Step 5.

Put the cord through the hole on upper part of the stick…


IMG_5529


And make a knot. Now you can wear it as a pendant or key chain accessory.


IMG_5532


How to Make a Patriotic American Flag Boat for 4th of July

Are you looking for a unique Fourth of July craft? Here is a fun craft to celebrate America’s birthday…this craft (by Laura from Dacian Moon Handmade)  will show you, step by step, how to make a paper boat with an American flag– a simple craft for 4th July.


How to Make a 4th of July Patriotic Flag Boat


CRAFTS MATERIALS NEEDED:

– blue paper
– white paper
– red and blue pen
– needle (or toothpick)
– scissors


IMG_5920


Step 1.

Take the blue paper …


IMG_5925


… and fold it in half by bringing the upper part over the lower one.


IMG_5926


Fold again in half by bringing the left part over the right one this time.


IMG_5927


Unfold, because we need only the crease at this point.


IMG_5928


Step 2.

Bring the right upper corner to the center.


IMG_5929


Do the same for the left corner, like this.


IMG_5930


Fold the remaining strip upward.


IMG_5931


Turn over …


IMG_5932


… and fold the strip upward.


IMG_5933


Step 3.

Open…


IMG_5934


… like this…


IMG_5935


… until it became flatten on the other direction.


IMG_5936


Fold the lower parts upward…


IMG_5937


… like this.


IMG_5938


Open again until it became flatten on the other direction.


IMG_5939


Like this.


IMG_5940


Step 4.

Take the upper corners and stretch out.


IMG_5941


Like this.


IMG_5942


Now the boat is ready.


IMG_5945


Step 5.

Let’s make the flag. Cut a rectangle of white paper…


IMG_5947


Draw the contour of the blue part…


IMG_5948


… and the stars.


IMG_5950


Start filling this part with blue color.


IMG_5951


Like this.


IMG_5952


Use red color to draw the lines on the rest of the flag.


IMG_5953


Like this.


IMG_5954


Step 6.

Now we assemble the components. Put the needle through the flag…


IMG_5956


and stick the tip in the middle of the boat, like this.


IMG_5957


The boat is ready to be used as a decoration or as a toy.


IMG_5958


Technorati Tags: , , , , , , , , , ,

How to Make a Winter Angel Christmas Ornament

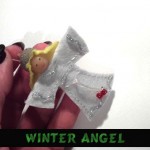
I have a fun Christmas craft for you today.  In this post I will show you how to make a Winter Angel Christmas Ornament.  This Angel Christmas Ornament turns out amazing looking.  It would look spectacular on your Christmas Tree.  You could also make this Winter Angel Christmas Ornament as a gift for your friends and family this Christmas.  They will surely love it.   This will surely be a Christmas Ornament that they will save for a long time….. proudly representing something you made yourself.  So, let’s get started.

Check out our Christmas Crafts.

Laura from Dacian Moon Handmade   will show you how to make this, step by step.


Materials Needed

– 1 disc of white felt
– 1 smaller disc of yellow felt
– 1 acorn cap
– 1 wooden bead
– toothpick
– scissors
– needle and pin
– instant glue
– red and black paint
– silver glitter glue
– 2 red beads


Step 1

Take the wooden bead…


… and stick it on a toothpick.


Like this.


Step 2

Put the toothpick through the middle of the white felt.


Fold the felt in half, like this, and start sewing a dress for your angel.


Like this.


Step 3

Cut the extra felt.


It will look like this.


It is time to shorten the hands / wings.


Like this .


Step 4

Apply a layer of glue on the head…


… and put the yellow disc over it, like this. Note: you should do this quickly because the glue is fast drying.


This is the angel with hair.


Step 5

Apply a layer of glue inside the acorn cap…


… and fix it on the angel’s head over the yellow felt.


Step 6

Put a red bead on a piece of thread…


… and make a knot, like this.


Sew this piece of thread as a belt.


… like this. Then add another bead on the other end and tie the belt.


Step 7

Put the needle (with thread) through the yellow felt, and make a hanger.


Like this.


Decorate your angel with glitter glue, make eyes and mouth with black and red paint and your ornament is ready.


Isn’t this Winter Angel Christmas Ornament simply adorable?  It will look beautiful hanging on your Christmas tree.  It would also make a wonderful gift to a friend or family member.

Technorati Tags: , , , , , , , , , , , , ,

A Collection of Awesomely Yummy Edible Christmas Crafts


A Collection of Awesomely Yummy Edible Christmas Crafts


Crafts come in all different kinds of forms.  Today I’m going to write about Edible Crafts.  And, not just any edible crafts, but Edible Christmas Crafts.  YUMMY!!  Whether you are planning a Christmas party, Christmas decorations or just want to have fun with your kids…. Edible Christmas Crafts will be enjoyed by all.  I scoured the internet looking for yummy edible crafts and I came up with 16 awesome ones that will get your stomach growling.  So, without further ado here is a collection of awesomely yummy edible Christmas crafts for your enjoyment.

Check out our other Christmas Crafts.

A Collection of Awesomely Yummy Edible Christmas Crafts

(1)  Reese’s Peanut Butter Cup Trees


Reese's Peanut Butter Cup Trees


Ok, I love Peanut Butter Cups, so I couldn’t resist this Edible Christmas Craft.  Here Sweet Simple Stuff shows you how to take my favorite candy, Reese’s Peanut Butter Cups and transform them into these adorable Christmas Trees.


(2)  Sipping Snowman


Sipping Snowman


This edible Christmas craft is so cute!!  Busy Bee Kids Crafts shows us how to take marshmallows, white icing, chocolate chips and a straw and create an adorable Sipping Snowman that is delicious!!  It would taste so good in some hot chocolate.


(3)  Gumdrop Penguins


Gumdrop Penguins


I love these crazy pair of penguins!!  And, I bet they are delicious.  I found this edible Christmas craft over at Spoonful.  Not only will your kids love making these gumdrop penguins, but they will absolutely love eating them too.


(4)  Stained Glass Cookie Ornaments


Stained Glass Cookie Ornaments


What a yummy and clever idea.  Kaboose gives us all the details how to take store bought cookie dough and some Lifesaver hard candies and transform them into these beautiful Stained Glass Cookie Ornaments.  Sure, you could just eat the cookies, but imagine how wonderful they would look on your Christmas tree.


(5)  Gingerbread Star Tree


Gingerbread Star Tree


I love how beautiful this Gingerbread Cookie Christmas Tree looks.  But, imagine how your guests at your Christmas party will enjoy this.  They can simply grab a cookie off the tree and nibble on it while they chat with the guests.  How fun!!  Check out Taste of Home for the details.


(6)  Holiday Garland


Holiday Garland


Oh this garland looks so beautiful!!  I love how the colors of the red cranberries contrast against the white popcorn.  It’s just wonderful.  Craft Elf shows you how you too can do this.  This edible Christmas craft takes you back to a simpler time.  And, it makes the Christmas tree just absolutely gorgeous.


(7)  Holiday Fiesta Spread


Holiday Fiesta Spread


I’ve actually had this at a Christmas party before and it is absolutely delicious.  And, it is so cute.  Kraft will show you in great detail how to make this edible Christmas craft for your guests.    This fiesta spread is decorated like a Christmas tree…. so colorful too.


(8)  Marshmallow Wreath


Marshmallow Wreath


Who would have thought marshmallows could look this beautiful as a wreath?  But, it truly does.  It reminds me of a Winter Wonderland.  I found this beautiful wreath at Three Pugs & a Baby.  She explains how the Marshmallow Wreath only takes about 30 minutes.  Can you imagine creating this beautiful wreath in just a half hour?  How wonderful.


(9)  Snowmen Treats


Snowmen Treats


Better Homes & Gardens shows us how to take Hostess Snowballs and transform them into these cutie-patootie Snowmen Treats.  What child wouldn’t love eating this snowmen?  They are just precious…. and I bet absolutely delicious too.


(10)  Gumdrop Wreath


Gumdrop Wreath


I love, love, love the beautiful colors of this wreath.  And, I would imagine the people at your front door will too.  A Pretty Cool Life shows you how to make this beautiful Christmas Wreath in great detail.  If you aren’t crazy about all the colors…. you can even just make a green and red wreath or any color wreath you choose.


(11)  Rudolph the Red Nosed Rein-Pear


Rudolf the Red Nosed Rein Pear


The Lead Chandelier created this adorable Rudolph the Reindeer out of a pear…. hence the name Rudolph the Red Nosed Rein-Pear.  I love the idea!!  It is super cute and the kids will love making it along with you.  Use it as a yummy Christmas decoration.


(12)  Holiday Tree Brownies


Christmas Tree Brownies


Oh these are so festive!!  And, I bet delicious too.  Betty Crocker Recipes gives you all the yummy details on this edible Christmas craft.  I love the miniature candy canes that are stuck into the brownie as a tree stand… it’s just so creative.


(13)  Donut Christmas Tree


Donut Christmas Tree


I know this Donut Tree was used at a Halloween party.  But, I was thinking…. imagine how wonderful this tree would be if it was white powered donuts!!  It would be perfect as a Donut Christmas Tree for a Christmas Party.  Check out One Charming Party for all the details.


(14)  Krispie Treat Christmas Tree


Krispie Treat Christmas Tree


Oh my kids would love this!!  After all, they love Krispie Treats.  Here Cookies & Cups takes some green food coloring and transforms ordinary looking Krispie Treats into a beautiful green Christmas tree.  Add some M&M’s and imagination and your Holiday Christmas tree is born.


(15)  Strawberry Christmas Tree Brownies


Strawberry Christmas Tree Brownies


These adorable bite-size brownies look so tasty…. and so festive too!!  I would have no doubt that they would be a huge hit at any Christmas party.  Erica’s Sweet Tooth shows you how you too can make this yummy edible Christmas craft for yourself.


(16)  Tortilla Christmas Tree


Tortilla Christmas Tree


If you are looking for something yummy and festive to serve your guests at your Christmas party that isn’t sweet…. this is the edible Christmas craft for you.  Better Homes & Gardens shows you how to take mini-wraps or tortillas and create a Christmas Tree.  Let the guests at your party pick at the tree until it’s gone.  Yummy!!

Technorati Tags: , , , , , , , , , , , ,

How to Make a Christmas Fairy Ornament

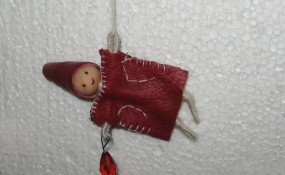
I have a special little Christmas craft for you older kids and adults.  Today I’m going to show you how to make a Christmas Fairy Ornament.  This cute fairy even has a crystal light she is holding.  The crystal will look as it is really lit when the Christmas tree’s lights shine through it.  This Christmas Fairy Ornament will be sure to get you in the Christmas spirit…. after all Christmas is less than a month away.  So, grab the materials needed and let’s get started.

Check out our other Christmas Crafts.

Tutorial offered by Laura from Dacian Moon Handmade .


Materials Needed

– red leather
– thick thread
– 1 wooden bead (big enough to be the head)
– scissors
– needle and thread
– 2 toothpicks
– craft glue
– black and red paint
– crystal (preferably drop)
– wire
-1 pin


Step 1

Take the wooden bead and put a toothpick through it (if doesn’t stay by itself, glue it).


Cut two pieces of wire, one slightly bigger than the other.


Take the smaller one and bend its ends, like this.


Coil it once around the toothpick – those will be her arms.


Step 2

Take the thick thread – you don’t need to cut it for that – and start to roll it over the toothpick.


When you arrive at the wire, cover the intersection in “x”, like this. That will make the arms stay fixed.


Continue covering one arm, and the loop at the end of it. When it is covered, press the end of the wire well and cover it with the other part…


… like this. Continue to roll over back to the toothpick and go on on the second arm.


Cover it the same way and from the middle go down covering the toothpick until you think it is the place for the legs.


Step 3

Take the other piece of wire and bend its ends.


Then bend the wire like this, with one part a little bit longer than the other.


Now bend again the longer part, so she has a leg fold at the knee.


Place the legs over the toothpick and fix them with thread as you did for the arms.


Cover them in an “x” then go down over one leg.


Secure the end and go up again.


Cut the toothpick, keeping a small part to keep the legs in place…


… and cover this part too.


Go down on the second leg, then up until you reach the head.


Here cut the thread and make a knot.


Step 4

Place the figurine on leather and measure her coat.


Mark it on the leather.


Cut double the part you measured…


… and cut that in two…


… one of them will be the front and the other the back of her coat. Make a small “v” cut in the front and back parts, where the head will be.


Start sewing the two parts together, using the cross stitch technique…


… like this.


When you reach the “v” sew only the front part, like this.


Place the fairy inside…


… and continue stitching the front and back together.


Step 5

Sew the two parts together under the arms…


… like this.


Then make a “L” stitch to mark out the arm and the body of the fairy.


It will look like this.


Step 6

Cut a triangle of leather to make her a cap.


Apply a layer of glue on the upper part of the head…


… like this…


… then put the leather on her head, making a cone.


Keep it in place until it is dry.


Step 7

Take a little black paint with a toothpick…


… and draw her eyes.


And some red paint to make her mouth.


Take the pin…


… and put the crystal on it.


Bend it and hang it on her hand. Like this. Then close the loop.


The last thing that must be done is to put a thick thread through her other hand and the fairy ornament is ready.


How adorable is this Christmas Fairy Ornament?  So cute!!  And, it will look even better hung on the Christmas tree.

Technorati Tags: , , , , , , , , , , ,

How to Make a Mayflower Walnut Boat

I have a fun craft for you…. it is a Thanksgiving craft.  Today I’m going to show you how to make a Mayflower Walnut Boat.  This boat will actually float.  So, it is a craft that will not only be a ton of fun making, but will also be loads of fun playing with.  You will need a bit of help from an adult.  Have an adult break open the walnut with a nutcracker.  It needs to be broken in half…. not crushed.  So, an adult will be able to help you with this.  Let’s get started with this fun craft…. grab the materials needed and we will get to it.

Check out our other Thanksgiving Crafts.


How to Make a Mayflower Walnut Boat


Materials Needed

Walnut

Nutcracker

Paper

Pen or Pencil

Scissors

Clay, Play Doh, Gum or Wax

Toothpick


Step 1


Get a nice walnut.


Get a nice walnut.


Step 2


Adult should split shell without cracking.


Adult should split shell without cracking.


Step 3


Draw a shape that is like a square, but wider at the bottom.


Draw a shape that is like a square, but wider at the bottom.  Now cut it out.


Step 4


Fill with clay, play doh, gum or wax


Fill with clay, play doh, gum or wax (with help).


Step 5


Now take a toothpick and stick it into the gum (or clay or wax) as well as thru the paper twice (as seen).


Now take a toothpick and stick it into the gum (or clay or wax) as well as thru the paper twice (as seen).


Step 6


The boat actually works.... set it to sail in the bathtub.


The boat actually works… set it in the bathtub and blow on its sail.

Technorati Tags: , , , , , , , , , , , ,

How to Make a Bunny Rabbit with Food for Easter

I’m sure you have all heard of the edible Easter Bunnies you get for Easter…. they are usually milk chocolate bunnies or white chocolate bunnies.  Well, today we are going to make an edible Easter Bunny, but it is going to be made with fruits and vegetables.  That’s right…. I’m going to show you how to make a Bunny Rabbit with Food for Easter.   When you are finished making the Easter Bunny you can display it proudly as an Easter decoration or eat it up… the choice is yours.  So, let’s get started.

Check out our other Easter Crafts.


How to Make a Bunny Rabbit with Food for Easter


Materials Needed

4 Toothpicks

Grapefruit

Orange

2 Lettuce Leaves

Black Marker

Marshmallow


Step 1


Stick toothpick on top of grapefruit.


Stick toothpick on top of grapefruit.


Step 2


Push orange on top of toothpick.


Push orange on top of toothpick.


Step 3


Use a lettuce leaf for each ear.


Use a lettuce leaf for each ear.  Secure with 2 toothpicks.


Step 4


Use a black marker to draw 2 eyes and a nose


Use a black marker to draw 2 eyes (ovals) and a nose (rounded triangle).


Step 5


Now draw a line and dots.


Now draw a line and dots.


Step 6


Use a marshmallow for tail.


Use a marshmallow for tail… secure with toothpick.

And, that’s it….. you just finished making your Bunny Rabbit with Food for Easter.  Now display it proudly for all to see.

Technorati Tags: , , , , , , , , , , , , , , , ,

How to Make a Cork Bunny

I have a fun and creative craft for you in this post….. today I’m going to show you how to make a Cork Bunny.  Made from a cork, toothpicks and a template this craft turns out really cute.  It is a perfect craft for Easter.  Make a few and decorate your house in time for Easter.  You will need some help from an adult as there is a part in this craft that a knife is needed.  An Adult should do this section of the craft.  So, grab the materials needed and let’s get started.

Check out our other Easter Crafts.


How to Make a Cork Bunny


Materials Needed

Cork

Knife (for adults only)

Printer & Paper

Cardboard

Scissors

Glue

Cotton Ball or Pom Pom

2 Toothpicks


Click on template image to make larger and to print.


Bunny head template


Step 1


Ask parent to cut small slit in cork for head to fit.


Ask parent to cut small slit in cork for head to fit.


Step 2


Print out bunny head or draw a small head.


Print out bunny head or draw a small head.


Step 3


Glue 1 head on to cardboard.


Glue 1 head on to cardboard.


Cut out bunny on cardboard


Cut out bunny on cardboard… turn over and paste other head on this.


Step 4


Push bunny head tab into cork slit.


Push bunny head tab into cork slit.


It should look like this.


To look like this.


Step 5


Glue on cotton ball or pom pom.


Glue on cotton ball or pom pom.


Step 6


Break 2 toothpicks in half... use each half for a leg.


Break 2 toothpicks in half… use each half for a leg.


Finished cork rabbit


Remember you can make a bunny with your own drawn head…. or use the template.

And, that’s it…. you just finished your Cork Bunny.  Doesn’t he look cute?!  Make a few and decorate your house for Easter.  Let me know how your Cork Bunny turned out… take a picture of it and leave it with your comment in the comments section below.

Technorati Tags: , , , , , , , , , , ,

How to Make Origami Boats

Today I’m going to show you how to make Origami Boats.  When made with waterproof paper like waxed paper or cellophane these Origami Boats will actually float.  Use them in the bathtub or in a puddle outside.  Not only is this craft fun to make, but it is equally fun to play with the Origami Boat once made.  You can even add toothpicks to the boat to give the illusion that the boat has oars.  So, grab the materials needed for this craft and let’s get started.

Check out our other Origami Crafts.


How to Make Origami Boats


Materials Needed

Waxed Paper, Cellophane, or Other Waterproof Paper

Toothpicks (optional)


Step 1


Fold a square in half and crease...then unfold.


Fold a square in half and crease…then unfold.


Step 2


Bring lines A and B to center fold and crease.


Bring lines A and B to center fold and crease.


Step 3


Fold on diagonal dotted lines, bringing points C, D, E and F to the center line and crease.


Fold on diagonal dotted lines, bringing points C, D, E and F to the center line and crease.


Step 4


Fold on dotted lines.


Fold on dotted lines.


Step 5


Fold again on dotted lines.


Fold again on dotted lines.


Step 6


Turn boat inside out, holding folds carefully to prevent tearing.


Turn boat inside out, holding folds carefully to prevent tearing.


Step 7


Finished boat, ready for the bathtub or after-rain puddle.


Finished boat, ready for the bathtub or after-rain puddle.  If you wish, use the toothpicks to make the boat look more authentic…. the toothpicks can be the oars.  Enjoy!!

Technorati Tags: , , , , , , , , , , , ,

How to Make a Paper Strip Dreidel – With Dreidel Game Instructions

I have a cool craft for you today.  I’m going to show you how to make a Paper Strip Dreidel.  This Dreidel craft actually produces a Dreidel that actually spins.  Not just spins…. but spins amazingly well.  So well in fact that I also am giving you the Dreidel game instructions so that you can use your Paper Strip Dreidel to play with your friends.  So grab the materials needed and let’s get started.

Check out our other Hanukkah Crafts.


How to Make a Paper Strip Dreidel


Materials Needed

Paper of All Different Colors

Scissors

Glue

Toothpick

Marker


Step 1


Cut some long strips of  paper.


Cut some long strips of  paper.  Mine were 1/4 inch wide.


Step 2


Add glue to the tip of one of the strips of paper.


Add glue to the tip of one of the strips of paper.


Step 3


Wrap paper strip tightly around the bottom of the toothpick.


Get a toothpick.  Wrap paper strip tightly around the bottom of the toothpick… but leaving some of the tip sticking out.


Step 4


glue the end of another strip to the 1st strip


When you near the end of one of your paper strips, then glue the end of another strip to the 1st strip.


Step 5


Keep rolling tightly.


Keep rolling tightly.


Step 6


Add more strips.


Add more strips.


Step 7


Add still more strips.


Add still more strips.


Step 8


It is looking like this.


It is looking like this.


Step 9


Glue the tip of the last strip down.


Glue the tip of the last strip down.  Hold tightly for a few minutes to let completely dry.


Step 10


Pull strips of paper slowly up to look like this.


After dries… Pull strips of paper slowly up to look like this.


Look how pretty.


Look how pretty.


Step 11


Each side of the dreidel has a different letter from the Hebrew alphabet.


Each side of the Dreidel bears a letter of the Hebrew alphabet:  נ (nun), ג (gimel), ה (hei) and ש (shin).


Draw these Hebrew letters on the sides of your paper strip Dreidel.


Draw these Hebrew letters on the sides of your paper strip Dreidel.


Step 12


It spins really well.


Your paper Dreidel should spin really well.


Dreidel Game Instructions

Each player begins with an equal number of game pieces (usually 10–15). The game pieces can be any object, such as chocolate gelt, pennies, or raisins.

At the beginning of each round, every participant puts one game piece into the center “pot”. In addition, every time the pot is empty and sometimes if it has one game piece left, every player puts one in the pot. Each player spins the dreidel once during their turn. Depending on which player side is facing up when it stops spinning, they give or take game pieces from the pot:

  1. If נ (nun) is facing up, the player does nothing.
  2. If ג (gimel) is facing up, the player gets everything in the pot.
  3. If ה (hei) is facing up, the player gets half of the pieces in the pot. (If there is an odd number of pieces in the pot, the player takes half the pot rounded up to the nearest whole number)
  4. If ש (shin) or פ (pei) is facing up, the player adds a game piece to the pot.

If the player is out of pieces, they are either “out” or may ask another player for a “loan”.

There you have it.  You just made your very own Paper Strip Dreidel and have the instructions for playing the Dreidel game….. now go grab your friends and play the game of Dreidel.  Let me know how you did in the comments below…. I’d love to hear about it.

Technorati Tags: , , , , , , , , , , , , , , ,

How to Make a Mini Mikado Game with Easy Crafts Activity for Kids

Mikado is a very old pick-up sticks game. It is also a very funny and captivating game that most kids will love. Today we will show you how to make a miniature Mikado Game Set with toothpicks and paint. This is easily transported so it would be great for playing in hotels while traveling. Have fun.


How to Make a Mini Mikado Game with Easy Crafts Activity for Kids


How to Make a Mini Mikado Game with Easy Crafts Activity for Kids

Mini Mikado is made of 31 toothpicks. Every stick have a number of points:

• Mikado, 1 blue stripe, 20 points, 1 stick
• Mandarin, 3 yellow stripes, 10 points, 5 sticks
• Bonzen, 2 orange stripes, 5 points, 5 sticks
• Samurai, 3 green stripes, 3 points, 10 sticks
• Kuli, 2 red stripes, 2 points, 10 sticks


CRAFTS MATERIALS NEEDED :

– 31 toothpicks
– 1 zip-lock sachet
– paints
– paintbrush


Step 1.

First, we’ll make Mikado, the most important stick, so, with blue paint …


… make 1 blue stripe on the middle of the toothpick. Let it dry.


Step 2.

Now is the Mandarins time : with yellow paint make 3 stripes on the middle of the toothpick.

We must have 5 Mandarins so make another 4 toothpicks with yellow markings.

Let them dry.


Step 3.

To make the 5 Bonzen sticks make 2 orange stripes on 5 toothpicks.

Let them dry.


Step 4.

What’s next? Oh, yes, 10 Samurai. With green paint make 3 markings on the middle of 10 toothpicks.

Let them dry.


Step 5.

We have 10 Kuli to do so, with red paint make 2 markings on the last 10 toothpicks.


Let them dry well and the game is ready.

How to Play Mini Mikado Game


The sticks are bundled and taken in one hand that touches the table/ground.


The release creates a circular jumble.


Now one stick after another should be taken up without moving/touching others. The take away could be by hand, possibly through pressing on a stick’s tip or if one has already picked up a special stick (Mikado/Mandarin), it could be used as a helper, possibly to throw up another stick.

It is allowed to stand up on but not to leave the own place. A bad throw could be rerun and the rules should be kept strict in respect to moving sticks to enjoy the game.

On a fault the turn ends (the last stick taken is not counted). The next player bundles and drops the sticks again. After several rounds, normally five, the one with the highest score is the winner.


Storing Our Mini Mikado Game

Let’s keep the sticks in the zip-lock sachet to be sure we don’t lose them.


Technorati Tags: , , , , , , , , , , ,

How to Make Pretty Earrings or Ear studs Hearts for Valentines Day Craft

Learn how to make these adorable polymer clay stud hearts (aka heart earrings). You can give these stud hearts to your Mom, Grandma, friends, etc to show them how much you care about them…especially for Valentine’s Day, Mother’s day, or a birthday. But, because we’ll use polymer clay (oven-hardening) you’ll need a little help from an adult. This is an easy to do step by step tutorial offered by Laura from Dacian Moon Handmade

Here are Even More Valentines Day Crafts Ideas


How to Make Pretty Earrings or Ear studs Hearts for Valentine's Day Craft


How to Make Pretty Earrings or Ear studs Hearts for Valentine’s Day Craft

CRAFTS MATERIALS NEEDED:

– toothpick
– red polymer clay (I placed the toothpick beside it to see how much polymer clay you need)
– cutter
– 2 flat earstuds
– 2 earnuts
– craft glue
– baking paper
– baking tray


Step 1.

Polymer clay has to be conditioned prior to use. Conditioning in this case means thorough mixing. To make conditioning easier, start with warming up your clay. The gentlest way of doing it is to carry the clay in your pocket for a while. You are ready to start conditioning your clay once it feels pliable. To condition polymer clay by hand, simply mix it and squish it with your fingers. You may want to roll it into a log between your palms, fold it in half, and then roll again.


The smaller the piece of clay you are conditioning, the faster it will soften up.


Step 2.
Make a ball with it.


Step 3.
Cut the ball in half.


Like that.


Step 4.
Squish gently between two fingers to make the lower part of the heart.


Step 5.
On the upper part, use the toothpick to shape it…


… like this.


Step 6.
Repeat the step 4 and 5 for the other half of polymer clay ball.


Step 7.
This is the moment when you need help.
Place the hearts on a baking paper in a baking tray. Bake them accordingly to the instructions on the polymer clay package (they depend on the brand you use: fimo, cernit, sculpey…, but usually is one half of hour at 230 F or 110 C)


Step 8.
Let it cool down.


Step 9.
Apply a layer of glue on the back side of the hearts and place the earstuds in the middle.


After the glue is dry, you can wear the earrings and be special on Valentine’s Day 😉


Here are Even More Valentines Day Crafts Ideas

Technorati Tags: , , , , , , , , , , , , , , , , ,

How to Make a Polymer Clay Heart Keychain Crafts Idea for Kids on Valentines Day

Today we will show you how to make this cool polymer clay heart keychain…a perfect gift to give to somebody you love or a good friend on Valentine’s day or to Mom on Mother’s Day or for a birthday. This polymer clay key chain is a cute heart adorned with flowers … perfect to decorate your phone, backpack, purse, etc.Below you will find the  step by step tutorial offered by Laura from Dacian Moon Handmade. Just to let you know…because we’ll use oven-hardening polymer clay you will need a little help from an adult.

Here are Even More Valentines Day Crafts Ideas


How to Make a Polymer Clay Heart Keychain Crafts Idea for Kids on Valentines Day


How to Make a Polymer Clay Heart Key Chain Crafts Idea for Kids on Valentines Day

CRAFTS MATERIALS NEEDED

– toothpick
– red and white polymer clay (I placed the toothpick beside it to see how much polymer clay you need)
– roll (you can use anything tubular – I use a recipient for Vitamines 😀 )
– baking paper
– baking tray
– keychain cord
– 1 jumpring


Step 1.

Condition red polymer clay by hand, simply mix it and squish it with your fingers. You may want to roll it into a log between your palms, fold it in half, and then roll again.


Step 2.

Make a ball of it and flatten it.


Step 3.

Gently squish one part, to form the lower part of the heart.


Step 4.

Use the toothpick to shape the upper part of the heart.


This is the heart 🙂


Step 5.

Place it on a piece of baking paper.


Use the toothpick again to make a hole in the upper left side.


Take care that the toothpick goes through the heart and get out on the other part.


Step 6.

Condition the white polymer clay too.


Step 7.

Make a small roll of white…


… and place it on the heart. Make a crease on it to fix it on the heart, like in the picture:


Add three more white petals.


Step 8.

Make a tiny white ball…


… and place it in the middle of the petals.


Step 9.

If you like, place two more petals on the opposite corner, for balance.


Step 10.

Now you’ll need the help of an adult.
Place the heart (with it’s piece of baking paper) on the baking tray, and bake it accordingly to the instructions on the polymer clay package (they depend on the brand you use: fimo, cernit, sculpey…, but usually is one half of hour at 230 F or 110 C)


Step 11.

Let it cool down.


Step 12.

Open the jumpring (I use a pliers for that)…


… put it through the hole that you made in the heart…


And through the keychain cord base.


Step 13.

Close the jumpring and the keychain is ready 🙂


Here are Even More Valentines Day Crafts Ideas

Technorati Tags: , , , , , , , , , , , , , , , ,