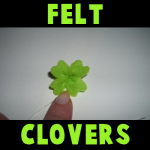
How to Make a Clover with Felt for Saint Patricks Day for Kids

Here are some cute instructions for making felt four leaf clovers Saint Patrick’s Day. Laura from  Dacian Moon Handmade will show you today, how to make a clover out of felt…perfect for Saint Patty’s Day. You can use it to make decorations, or to tie it to a headband or… actually you can make a lot of beautiful things with it.


How to Make a Clover with Felt for Saint Patricks Day for Kids


How to Make a Clover with Felt for Saint Patricks Day for Kids

CRAFTS MATERIALS NEEDED:

– a piece of green felt
– scissors
– needle and thread


IMG_4564


Step 1.

Cut the felt in 4 equal pieces.


IMG_4565


Make a “v” on the middle of top edge of one…


IMG_4566


… then round the corners beside it.


IMG_4567


Do the same for all 4 pieces.


IMG_4568


Step 2.

Start sewing them like in the picture.


IMG_4569


Add the other pieces.


IMG_4570


Bring the two ends together…


IMG_4571


… pull and make a knot. Like this. Make another knot just to be sure.


IMG_4572


Open the “flower” and the clover is ready 😀


IMG_4573


And there you have it, a realistic looking felt clover (or shamrock) to wear on St. Patrick’s Day. I hope that you had fun!

Technorati Tags: , , , , ,

How to Make Autumn Dolls or Figurines in Easy Craft Idea for Kids

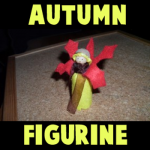
You can make this Autumn themed doll or figurine to celebrate fall, using an acorn cap for the hat and making a leaf out of felt for the “wings” of this little Autumn Fairy. This is a great Autumn-time craft that you will enjoy. Step by step tutorial offered by Laura from Dacian Moon Handmade


How to Make Autumn Dolls or Figurines in Easy Craft Idea for Kids


How to Make Autumn Dolls or Figurines in Easy Craft Idea for Kids

CRAFTS MATERIALS NEEDED:

– yellow and red felt
– pens (or permanent markers) – for eyes and mouth
– wooden bead
– scissors
– cork
– toothpick
– acorn cap
– toothpick
– brown ribbon
– craft glue


Step 1.

Glue the wooden bead on toothpick.


Step 2.

Stick toothpick in cork…


… until there are about 0.5 cm left.


Step 3.

Draw a circle and a rectangle on yellow felt. The circle must be a little bigger than the wooden bead and width of the rectangle must be from the bottom of the cork to the wooden ball.


Also draw a shape like this on red felt.


Step 4.

Cut them out.


Step 5.

Apply a layer of glue on the yellow circle…


… and place it on the wooden bead, like this.

Let it dry.


Next, put a bit of glue inside the acorn cap and on the edges…


… then fix it over the yellow circle.


You have now the head with yellow hair and acorn hat.


Step 6.

Adjust the upper part of the cork…


… like this.


Step 7.

Apply a layer of glue on the rectangle…


… like this…


And cover the cork with it.


Let it dry well.


Wrap the ribbon around the neck, over the yellow rectangle but take care to let the hair free.


Make a knot to keep it in place. You can cut the ribbon ends if they are too long.


Step 8.

Apply a stripe of glue on the lower part of red shape…


… and fix it over the ribbon, like this. Let it dry well.


Now use your pens / markers to add eyes and mouth and your cute doll is ready 😉


I hope your Autumn Fairy Doll turned out great. This would be a great decoration for the Thanksgiving table or any dinner in Autumn. I hope that you had fun. Come back soon for more crafts.

Technorati Tags: , , , , , , ,

How to Make a Sewn Notebook Cover with Cute Bunny on Top for Girls

School is about to start yet again and we thought you would love this craft to make a hand-sewn notebook cover. It is a super cute notebook cover that includes a stuffed bunny rabbit at the top. You love to write on it!  Laura from Dacian Moon Handmade  will show you, step by step, how make it.

How to Make a Sewn Notebook Cover with Cute Bunny on Top for Girls


How to Make a Sewn Notebook Cover with Cute Bunny on Top for Girls


CRAFTS MATERIALS NEEDED:

– light colored fabric
– pink felt
– pen
– notebook
– scissors
– pink ribbon
– pink bead for the nose
– instant glue
– filling material
– black paint marker


IMG_7041


Step 1

Fold the felt in half and place the notebook over it.


IMG_7043


Let about 0.5 cm on both parts (left and right) and cut the extra felt.


IMG_7044


Step 2.

Sew the two parts together until you reach about 3/4 of it.


IMG_7046


Measure with the notebook if the height is OK. You should have about 2.5 cm to the notebook spire.


IMG_7047


Step 3.

Put the ribbon here …


IMG_7048


… and sew it in place.


IMG_7049


Like this.


IMG_7051


Step 4.

Continue sewing for another 3 cm then fold the felt backward…


IMG_7052


And sew the parts together. This way, the upper part will be stronger.


IMG_7053


Do the same on the other part.


IMG_7054


The Cover will look like this.


IMG_7055


Now separate the default covers of the notebook and put them between the ribbon and felt.


IMG_7056


Like this.


IMG_7057


This is our notebook 😉 Do you think we can make it cuter?


IMG_7058


Step 5.

Of course! Let’s make a bunny! Draw a head with 2 long ears and two small paws on fabric.


IMG_7059


Cut them out.


IMG_7060


Place it again on fabric and draw the outline. Cut the second bunny out.


IMG_7061


Like this.


IMG_7062


Step 6.

Start sewing the two parts together. Let’s start with an ear.


IMG_7063


When you arrive in this point…


IMG_7064


… prepare the filling material…


IMG_7066


… and fill the ear.


IMG_7067


Then continue to sew until you finish the ear. It is important to sew only a little bit over half, then fill it because if you sew first and then fill, you can’t reach all the corners.


IMG_7068


This is the ear finished.


IMG_7069


Continue with the other ear…


IMG_7070


… the paws, and close the head. Don’t forget to fill it when you sew.


IMG_7071


The bunny head looks like this.


IMG_7072


Step 7.

Choose a point where you want the nose to be…


IMG_7073


… and sew the bead there.


IMG_7074


Like this. (If you prefer, you can glue the bead there)


IMG_7075


We will put the bunny in the corner.


IMG_7076


Sew it in place.


IMG_7077


Like this.


IMG_7078


Add the notebook and you are almost ready.


IMG_7080


Use the paint marker to draw 2 eyes and a mouth for the bunny 😉


IMG_7081


And there you have it…the finished notebook cover…the  bunny will keep you company as you write in it…whether is a journal or a school notebook. I hope that you had a lot of fun!

You Might Also Enjoy Our Other Back to School Crafts

Technorati Tags: , , , , , , ,

How to Make Apple Lunch Boxes with Recyled Plastic Soda Bottles

This project is perfect as a “back to school” project. It is very simple and fun, as well as a great way to store your packed lunch. This is also a great way to recycle / upcycle plastic soda bottles. Laura from  Dacian Moon Handmade  got inspiration for this craft from Creative Jewish Mom. Laura will show you, step by step, how to make this new lunch box.


How to Make Apple Lunch Boxes with Recyled Plastic Soda Bottles


CRAFTS MATERIALS NEEDED:

– two 2.5l plastic bottles (the sort where the bottom looks a bit like a flower with five petals)
– scissors
– instant glue
– green felt
– pen


IMG_6745


Step 1.

Clear the bottles – remove the labels.


IMG_6746


Step 2.

Use the scissors to cut off the end of one bottle.


IMG_6747


Like this.


IMG_6748


Cut also the end of the other bottle .


IMG_6749


Take care to cut one a centimeter taller than the other…


IMG_6750


… so you could overlap them and they stick together.


IMG_6751


Like this.


IMG_6752


Step 3.

Draw two leaves on the felt…


IMG_6753


… then cut them out.


IMG_6754


Step 4.

Add a bit of glue on the middle of one “flower”…


IMG_6755


… and place one leaf on it.


IMG_6756


Add the second leaf.


IMG_6757


Let it dry and you have an apple lunch box 😉


IMG_6759


Technorati Tags: , , , , , ,

How to Make an Afikoman Bag for Passover

Passover starts in about a week and I thought that some of our Jewish followers might want a Passover craft. Today I will show you how to make an Afikoman Bag, which can then be used to hide Matzah for the little kiddies to search for. Although I sewed this Afikoman Bag, you could use fabric glue to put your Afikoman bag together. Learn how to make it below.


How to Make an Afikomen Bag for Passover


Crafts Materials Needed:

Long Piece of Felt or Fabric

A Second Color of Fabric to Use for Letters and Stars

Either Needle and Thread or Fabric Glue

Scissors

Step 1


step1


step2


You May Use Felt or Fabric, either one is fine. Place a piece of Matza on the Felt and measure out enough felt to place two and a half pieces of matzah. This will be enough felt to make your bag.

Then place the matzah a little bit to the right of the center of the felt. Then fold the felt over the matzah as seen in the picture above.

Step 2


step3


Now sew on either side of the felt (or use fabric glue), as seen in the picture above.


Step 3


step4


Now the right side of the felt will be the flap. You can fold it over now.

Step 4


step4b


Like This.

Step 5


step5


Now Push fabric inwards to form a triangle (in the same fashion you would do with wrapping paper when wrapping a present). Pin the triangle in place with a safety pin or sewing pins, then sew the triangle so that the fabric stays like this…this will be the flap.


This is What the Flap Looks Like When Sewn


step5b


Above is what the flap looks like when open.


step5c


And this is what the flap looks like from the inside.

Step 6


step6


I think yellow and blue are perfect for this craft because it is the colors of Israel and Judaism. Get some yellow felt and cut out some letters. I used Find Me for the outside of the Afikoman bag and Yay for the inside. But I’ve seen ‘Find This’ for the outside and ‘Found It’ on the inside. The normal thing to do is to write Afikoman on the outside or in hebrew  –

אפיקומן

Step 7


step7


Before sewing or gluing letters on, put cardboard into the bag to keep you from sewing bag’s two sides together.

Step 8


finished-afikomen-bag-craft-for-passover


Sew the letters on the front – ‘Find Me’ or ‘Afikoman’ or אפיקומן  or what you wish.

Sew the letters on the inside – ‘Found Me’ or ‘Yay’ or what you wish.

Finish Up


step9


Now wrap some matzah in a cloth napkin and then place in your bag. Close the flap and then hide it someplace. Let kiddies go searching for it. Give the ones who find the matzah some sort of prize. Have fun and Happy Passover!

Technorati Tags: , , , , , , , , , ,


How to Sew a “Lucky Cat” for Saint Patrick’s Day

This is a cute and funny toy made especially for St. Patrick’s Day! 
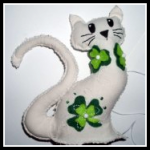
Do you want to learn how to make and sew a stuffed animal named “Lucky Cat” for Saint Patrick’s Day? This stuffed cat is covered in shamrocks and isn’t too tough to make. Learn how to make this kitty cat in the following craft tutorial.

Laura from Dacian Moon Handmade  will show you how to make it, step by step.


How to Sew a Shamrock Lucky Cat


CRAFTS MATERIALS NEEDED:

– white or cream-colored fabric
– light green and dark green felt
– filling material (I use some cotton pads broken into pieces)
– scissors
– needle and threads (white and black)
– black paint marker
– pen
– 3 small white beads
– pencil
– green beads (optional)


IMG_4668


Step 1.

Fold the fabric in half.


IMG_4669


Draw a cat outline, like this…


IMG_4673


… and the tail.


IMG_4674


Cut them out, without unfolding the fabric. This way you will have two cats and two tails.


IMG_4675


Step 2.

Place one cat over the other and start sewing them together. Start on the lower part.


IMG_4676


Go up until you reach the ear.


IMG_4678


Step 3.

Draw one big clover and some smaller on dark green felt. Also, draw them a little bit smaller on light green felt.


IMG_4679


Cut them out.


IMG_4680


Group one big dark clover with one big light clover, and the smaller ones in the same way.


IMG_4681


Step 4.

Choose one place for the big clover…


IMG_4683


… and sew it in place, using white thread.


IMG_4685


Add one white bead in the middle. Be careful not to sew both cats when you sew decorations.


IMG_4687


You can let it like this or you can make some decorative stitches with white thread and green beads


IMG_4689


Like this.


IMG_4691


Choose a place for the small clovers also.


IMG_4693


I put two of them around the cat’s neck, just like a necklace. Don’t forget to add white beads in the middle and to sew only one cat.


IMG_4696


Step 5.

Is time to decorate the head. Place a folded paper or a piece of cardboard between the two cats…


IMG_4698


… and color the eyes and nose with black paint marker.


IMG_4699


Like this.


IMG_4700


Change the thread, and using the black one…


IMG_4701


Sew the whiskers.


IMG_4702


Like this.


IMG_4703


Step 6.

Change the thread back to white and continue to sew the two cats together.


IMG_4705


When you reach the neck is time to fill the head.


IMG_4706


Tamp the filling to fill all the head and the ears. Like this.


IMG_4707


Continue to sew until you almost get down. Here will be the tail, so we must prepare it.


IMG_4709


Step 7.

Place the two tails one over the other…


IMG_4710


.. and start sewing them together from the lower part.


IMG_4711


Go until you reach the tip of the tail and start to sew the other part.


IMG_4712


Stop when you make about 10 cm. Take a piece of filling and roll it between your hands.


IMG_4713


Press it on the stitched part of the tail.


IMG_4714


Continue to fill the tail while sewing the two sides together. It will look like this.


IMG_4715


Step 8.

Place the tail between the two cats, like this.


IMG_4716


Sew it in place.


IMG_4717


Step 9.

Fill the cat’s body.


IMG_4718


sew the two parts together…


IMG_4720


And the cat is ready 😀


IMG_4721


Isn’t this cat adorable!!! I hope you enjoyed the tutorial!

Technorati Tags: , , , , , , , , , , , , ,

How to Make a Winter Angel Christmas Ornament

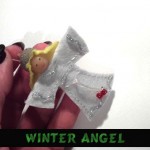
I have a fun Christmas craft for you today.  In this post I will show you how to make a Winter Angel Christmas Ornament.  This Angel Christmas Ornament turns out amazing looking.  It would look spectacular on your Christmas Tree.  You could also make this Winter Angel Christmas Ornament as a gift for your friends and family this Christmas.  They will surely love it.   This will surely be a Christmas Ornament that they will save for a long time….. proudly representing something you made yourself.  So, let’s get started.

Check out our Christmas Crafts.

Laura from Dacian Moon Handmade   will show you how to make this, step by step.


Materials Needed

– 1 disc of white felt
– 1 smaller disc of yellow felt
– 1 acorn cap
– 1 wooden bead
– toothpick
– scissors
– needle and pin
– instant glue
– red and black paint
– silver glitter glue
– 2 red beads


Step 1

Take the wooden bead…


… and stick it on a toothpick.


Like this.


Step 2

Put the toothpick through the middle of the white felt.


Fold the felt in half, like this, and start sewing a dress for your angel.


Like this.


Step 3

Cut the extra felt.


It will look like this.


It is time to shorten the hands / wings.


Like this .


Step 4

Apply a layer of glue on the head…


… and put the yellow disc over it, like this. Note: you should do this quickly because the glue is fast drying.


This is the angel with hair.


Step 5

Apply a layer of glue inside the acorn cap…


… and fix it on the angel’s head over the yellow felt.


Step 6

Put a red bead on a piece of thread…


… and make a knot, like this.


Sew this piece of thread as a belt.


… like this. Then add another bead on the other end and tie the belt.


Step 7

Put the needle (with thread) through the yellow felt, and make a hanger.


Like this.


Decorate your angel with glitter glue, make eyes and mouth with black and red paint and your ornament is ready.


Isn’t this Winter Angel Christmas Ornament simply adorable?  It will look beautiful hanging on your Christmas tree.  It would also make a wonderful gift to a friend or family member.

Technorati Tags: , , , , , , , , , , , , ,

How to Make a Cornucopia Silverware Holder

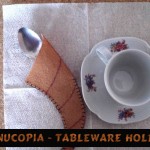
Thanksgiving is coming up quickly.  But, don’t stress you still have plenty of time to make your Thanksgiving festivities unique.  Today I will show you how to make Cornucopia Silverware Holders for your Thanksgiving table.   These Thanksgiving silverware holders are in the shape of a cornucopia…. they are the perfect shape and size to hold your silverware.  This is a great way not only to add a Thanksgiving flair to your dinner table, but it is also a great way to keep all the silverware in place.  So, let’s get started.

Check out our other Thanksgiving Crafts.

Laura from Dacian Moon Handmade  will show you, step by step, how to make these.


Materials Needed

– brown felt
– pen (or permanent marker)
– needle and thread
– scissors
– pins


Step 1

Draw the outline of the horn on felt (using your pen or marker), like this.


Fold the felt sheet on one side of the horn, like this.


Pin it in place.


Step 2

Cut it out (keeping the felt folded).


Unfold. It will look like this.


Step 3

Decorate the horn with lines (or any other decorations, if you want. I think swirls could look great too)…


… like this.


Step 4

Fold it again…


… and sew the two parts.


This is the complete tableware holder.


Imagine how festive your Thanksgiving table will look with these Cornucopia Silverware Holders.  Your Thanksgiving guests will love them.

Technorati Tags: , , , , , , , , , ,

How to Make Pinecone Turkeys

Oh boy, do I have a fun craft for you today perfect for the Thanksgiving season.  Today I’m going to show you how to make Pinecone Turkeys perfect for Thanksgiving.  These pinecone turkeys will look great around the house as Thanksgiving decorations.  Plus, your kids will love to make them.  They are a lot of fun and your kids will have great pride in knowing they made items you could actually put around the house as decorations.  So, grab the materials needed and let’s get started.

Check out our other Thanksgiving Crafts.


How to Make Pinecone Turkeys


Materials Needed

Pinecone

Tan Puffball

Glue

Googly Eyes

Yellow Felt or Foam

Red Felt

Orange Pipe Cleaner

Different Color Pipe Cleaner, Construction Paper or Craft Feathers


Step 1


Get a pinecone.


Get a pinecone.


Step 2


Glue a tan puffball to the top of pinecone.


Glue a tan puffball to the top of pinecone.


Step 3


Glue googly eyes on.


Glue googly eyes on.


Step 4


Cut yellow triangle out of felt or foam and glue on face.


Cut yellow triangle out of felt or foam and glue on face.


Step 5


Draw a #7 like shape on red felt like above picture.  Glue red felt on top of beak.


Draw a #7 like shape on red felt like above picture.  Glue red felt on top of beak.


Step 6


Wrap orange pipe cleaner around pinecone.


Wrap orange pipe cleaner around pinecone.  Then take smaller pieces of pipe cleaner to make claws.


Step 7


Loop pipe cleaners and stick into back of pinecone for feathers.


Loop pipe cleaners and stick into back of pinecone for feathers.  Or, use paper or craft feathers.

And, now you are all finished.  You just made your Pincone Turkey.  Now, use it to decorate your house for Thanksgiving.  Actually, make a few to put around the house….. everyone will love it!!

Technorati Tags: , , , , , , , , , , , ,

How to Make a Glue Stick Man out of your Recycled Glue Sticks

With all the crafts that I do  I go through a lot of glue sticks.  I always hate the idea of throwing them away…. I always try to find crafts that I can make out of recycled items.  And, glue sticks are no exception.  Here is a great craft you can make with your used glue sticks.  Today I’m going to show you how to make a Glue Stick Man out of your recycled glue sticks.  You will see what a great feeling you get from making something out of recycled materials.  Plus, you get a very cool toy man.

Check out our other Green Environmental Crafts.


How to Make a Glue Stick Man


Materials Needed

Empty Glue Stick

Glue

Paint, Paper, Foam or Felt

Black & White Paint


Step 1


Take an empty Glue Stick and peel the label off of it.


Take an empty Glue Stick and peel the label off of it.


Step 2


Glue the cap in place like this.


Glue the cap in place like this.


Step 3


Paint on clothes or glue on clothes with paper, foam or felt.


Paint on clothes or glue on clothes with paper, foam or felt.


Step 4


If painted clothes, then use black paint to outline.


If painted clothes, then use black paint to outline.


Step 5


Paint a sleeve on each side.


Paint a sleeve on each side.  Also, draw a dot for each eye.


Step 6


Draw a circle for each hand.


Draw a circle for each hand.


Step 7


Paint each hand white.


Paint each hand white.  Also, paint white buttons on the shirt.

How adorable is this little guy?  So adorable!!  Make a few of these Glue Stick people and you can have a small family.  What a great way to recycle those used glue sticks.

Technorati Tags: , , , , , , , , ,

How to Make Clothespin Witches

Halloween is later this month.  It is coming up quickly….. so now is the time to decorate your house for Halloween.  Today I’m going to show you how to make Clothespin Witches.  The craft calls for a wooden clothespin.  My suggestion to you is to use the old-fashioned clothespins…. not the “pinch-to-open” ones.  Make a few of these Clothespin Witches to decorate your whole house.   Grab the materials needed and let’s get started.

Check out our other Halloween Crafts.


How to Make Clothespin Witches


Materials Needed

Wooden Clothespin

Green and Red Paint

Black Felt, Paper or Craft Foam

Pencil

Scissors

Stapler

Glue

Red and Yellow Yarn

Stick


Step 1


Paint a wooden clothespin green.


Paint a wooden clothespin green.


Step 2


Draw a big circle on felt, paper or craft foam.


Draw a big circle on felt, paper or craft foam.


Step 3


Cut out the circle.


Cut out the circle.


Step 4


Draw a line thru the center.... both ways.


Draw a line thru the center…. both ways.


Step 5


Cut out one of the pizza slices.


Cut out one of the pizza slices.


Step 6


Staple closed like this.


Staple closed like this.


Step 7


Now push the head thru the hole.


Now push the head thru the hole.


Step 8


Now, your piece looks like this.


Now, your piece looks like this.


Step 9


Paint stripes on legs.


Paint stripes on legs.


Step 10


Cut out a small circle and a pizza slice shape


Cut out a small circle and a pizza slice shape… Use paper, felt or craft foam.


Step 11


Glue pizza slice into cone shape for top of hat.


Glue pizza slice into cone shape for top of hat.


Step 12


Cut slits at bottom of cone.


Cut slits at bottom of cone.


Step 13


Glue slits to top of circle.


Glue slits to top of circle.


Step 14


Fold yarn in half several times


Fold yarn in half several times…


Step 15


Glue yarn on top of head.


Glue yarn on top of head.


Step 16


Now cut looped ends of yarn to make hair.


Now cut looped ends of yarn to make hair.


It should look like this.


Like this.


Step 17


Glue the hat on top of head.


Glue the hat on top of head.


Glue the hat on top of head.


Like this.


Step 18


Find a stick.


Find a stick.


Step 19


 Cut a slit in front of dress.  Then put stick thru clothespin and slit in dress.


Cut a slit in front of dress.  Then put stick thru clothespin and slit in dress…


Step 20


It should look like this.


Like this.


Step 21


Fold some yellow yarn in half a few times


Fold some yellow yarn in half a few times… Like this…


Step 22


Take a 2nd piece of yarn and tie it around folded yarn.


Take a 2nd piece of yarn and tie it around folded yarn.


It should look like this.


Like this.

Step 23


Take loops on each side and cut the loops open.


Take loops on each side and cut the loops open.


It should look like this.


Like this.


Step 24


Tie this on to end of stick with another piece of yarn.


Tie this on to end of stick with another piece of yarn.


It should look like this.


Like this.


Step 25


Finished Clothespin Witch


And, that’s it.  You just finished making a Clothespin Witch.  Isn’t it awesome?!  This will make for a wonderful Halloween Decoration in your house.  Enjoy!!

Technorati Tags: , , , , , , , , , ,

15 Cool Crafts Made with Altoid Tins


15 Cool Crafts Made with Altoid Tins


If you ever had an Altoid mint you know that the mints come in this wonderful little tin.  But, who would have thought all the imaginative things you could do with this little tin.  By scouring the internet I came across a bunch of Altoid crafts you can make.  In this post I am listing 15 of the coolest crafts you can make with Altoid Tins.   The crafts range in skill level between easy and more challenging.  But, you can count on each of them being a lot of fun.   So, scroll through the different Altoid Tin crafts and you are sure to find one that you will like.  So, grab your Altoid Tin Containers and let’s get started on some fun crafts.

15 Cool Crafts Made with Altoid Tins

 (1)  Altoids Mini Flashlight


Altoids Mini Flashlight


This Altoid Tin craft is a little more complicated than we typically list in this blog, but how can I make a post about Altoid Tin Crafts without putting this one in it.  I found this craft over at Instructables and it is an awesome one.  Check out their site to find out how you too can make this Altoid Tin Mini Flashlight.


(2)  Altoids Turtle Keepsake Box


Altoids Turtle Keepsake Box


Check out this elaborate Keepsake Box…. and it is made from an Altoid Tin container and Super Sculpey.  I found this fun Altoid Tin craft over at Sculpey Club….. check out her site for all the fun crafting details.


(3)  Altoids Pincushion


Altoids pincushion


I absolutely love this Altoid Tin Pincushion idea.  What you can’t see here is that inside she added magnets so that inside you can hold pins, needles and such.  Make sure to check out My Recycled Bags so you too can make this Altoid Pincushion.


(4)  Altoid Tin Wallet


Altoid Tin Wallet


Altoid Wallet


Here is a great way to keep your cash….. keep it in an Altoid Tin Wallet.  Roxy Craft shows us how to make this wallet from an Altoid Tin Container…. she explains the craft in a very detailed step-by-step “how-to”.  Check out the site for yourself.


(5)  Magnetic Travel Board Game Set


Magnetic Travel Board Game Set


This Altoid Tin Craft is from our very own site.  I previously posted How to Make a Magnetic Travel Board Game Set from an Altoid Tin Container.  It is a fun craft and the outcome is you will have 8 games to play in the car while traveling.  Make sure to check this one out.


(6)  Altoids Tin Garden


Altoids Tin Garden


Here is another great way to use those extra Altoid Tin Containers…. use them to make a beautiful garden.  Gomi Style shows us how to do just that.  Just by adding a bit of potting soil to the tin you can have your very own small little garden.


(7)  Travel Candle


Travel Candle


I found this idea over at Design Sponge and what a great idea it is.   Here she gives you all the step-by-step details on how to make a travel candle out of an Altoid Tin Container.  She points out how great these can come into handy during an emergency… after all, you never can have enough candles.


(8)  Altoid Tin Mini Toolboxes


Altoid Tin Mini Toolboxes


I found this awesome Altoid Tin craft over at Alpha Mom.  She came up with this super creative idea to surprise Dad for Father’s Day.  She made a few so that Dad could hold the bits and bolts of his choice.  Make sure to check out the website for all the crafting details.


(9)  Altoid Tin Gift Card Holder


Altoid Tin Gift Card Holder


Here is a clever way to keep a hold of all those Gift Cards you have accumulated.  Store them in this Altoid Tin Gift Card Holder.  I found this Altoid Tin Craft over at Yahoo Voices and I dig the idea.  Check out the website for the tutorial.


(10)  Altoid Tin Jewelry Box


Altoid Tin Jewelry Box


You would never believe it by looking at it, but this beautiful jewelry box is made from an Altoid Tin and Polymer Clay.  I found this fun Altoid Tin craft over at TLC and I love it.  Get the full crafting “how-to” over at the website.


(11)  Pocket Yard Pool Table


Pocket Yard Pool Table


Ok, how cute is this pool table?  So cute!!  And it is small enough that you can take it pretty much anywhere.  How many other pool tables can you say that about?  You can find the tutorial over at Instructables.   This is just so creative.


(12)  Business Card Holder


Business Card Holder


What a clever way to hold your business cards…. and I must say quite attractive too.   This is a great way to use your left over Altoid Tin for something useful.   Check out Better Homes and Gardens for all the crafting details.


(13)  Altoid Earbud Case


Altoid Earbud Case


This is a fantastic idea.  Did you ever put your earbuds somewhere and when you wanted to use them you found they were tangled up?  Well, this Altoid Earbud Case will prevent that…  put your Earbuds inside and find that they will never tangle again.  Charlotte’s Fancy came up with this brilliant idea.  Check out her site for the details.


(14)  Doll Suitcase


Doll Suitcase


Isn’t this an adorable suitcase for your doll….. and, your doll will surely love it.  Made from an Altoid Tin and masking tape this suitcase has an aged look to it…. like a suitcase that is well traveled.  Check out Crafty Crafts for the full instructions on how to make this.


(15)  First Aid Kit


First Aid Kit


Everyone needs a first aid kit.  You don’t know when you will need some first aid treatment…. so having a kit is very important.  But, sometimes a first aid kit can be bulky and when you are “out & about” you can’t carry a bulky one…. well, how about making a first aid kit out of a Altoid Tin.  Check out Instructables for all the details.

Top image by Alpha Mom

Technorati Tags: , , , , , , , , , , ,

How to Make a Plush Bunny for Easter

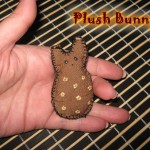
When you think of Easter what is one of the characters you think of?  A bunny, of course.  Well, today I’m going to show you how to make a Plush Bunny.  This bunny is perfect for the upcoming Easter Holiday, but honestly can be made and enjoyed any time of the year.  Made with felt and some cotton for stuffing this bunny is sure to be soft and cuddly.  Make it as big or as small as you would like.  We made our bunny pretty small.  So, grab the materials needed and let’s get started.

Check out our other Easter Crafts.


Materials Needed

– string and needles
– scissors
– felt / fabric
– paper
– pencil
– paint
– 1 toothpick
– wool / cotton – things to stuff (I used 2 cotton pads for that)


Step 1

Draw the pattern on the paper, like this.


Use the scissors to cut it out.


Step 2

Fold the felt in half, place the bunny pattern on it and trace it there.


Step 3

Cut the bunny out of felt (remember, you folded the felt before that so you’ll have 2 bunnies of felt now).


Step 4

Sew the two bunnies starting at the bottom. Use a blanket stitch along the sides.


To make a blanket stitch, push the needle through the fabric then pull the needle through the loop.


Sew as far as you are comfortable before stuffing. The size of the opening will depend on the size of your doll.


Step 5

Prepare your stuffing material: I made little pieces of the cotton pads.


Place the stuffing material in the bunny, taking care to fill all available places.


It should look like that.


Step 6

Sew it shut.


Now the bunny looks like that.


Step 7

Using the toothpick and some paint add eyes and a mouth.


Look how cute he is !
You can continue to decorate it if you feel like it.


Awesome job!!  You just finished your Plush Bunny.  Isn’t it a cutie patootie?  How did your bunny turn out?  Let me know in the comments below.  And, take a picture of it and add that to the comment too… I’d love to see it.

Technorati Tags: , , , , , , , , , , , ,

How to Make Paper from Rags

I have a fun and creative craft for you today.  I’m going to show you how to make paper from rags.  The craft is a lot of fun…. a lot of work, but tons of fun.  At different steps in this craft you will need parental help.  There are quite a few parts where you will be using adult tools and they will need to help you through this…. each of these steps are marked in red.  So, grab some white cotton or linen rags and the rest of the craft materials and let’s get started.


How to Make Paper from Rags


Materials Needed

White Cotton or Linen Rags

Scissors

Non-Aluminum Pot

Oven (Parental Help)

Baking Soda

Sink

Strainer

Blender (Parental Help)

2 Art Frames of the Same Size

Staple Gun (Parental Help)

Window Screen

Fabric or Felt

Sponge


Step 1 & 2


Cut rags into small strips.


Use clean white cotton or linen rags.

Cut rags into small strips.


Step 3


Cut strips of rags into smaller bits and pieces.


Cut strips of rags into smaller bits and pieces.  (Parental Help) Place rag pieces in Non-Aluminum Pot with a lot of water.  Add a few spoonfuls of baking soda.  Let boil for at least an hour.


Step 4


Wash all of the baking soda off of the fabric.


Place fabric in a strainer.  Wash all of the baking soda off of the fabric.


Step 5


Add soggy chunks of rags into blender


(Parental Help Needed) Add soggy chunks of rags into blender with combo of 50% water and 50% rags.  Grind these rag chunks into like a smooth paste.


Step 6


find 2 art frames that are exactly the same size


To make paper, we need a mold and deckle.  To do this…. find 2 art frames that are exactly the same size.


Staple gun a window screen down on one of the frames.


(Parental Help Needed) Staple gun a window screen down on one of the frames.


you have your mold and deckle.


Here you have your mold and deckle.


Dip up pulp unto the screen.


Dip up pulp unto the screen.  Slush screen back and forth until water runs out.


Step 7


place fabric or felt down.


Firstly, place fabric or felt down.  Then place mold face down on fabric with pulp between fabric and mold.


Use a sponge to press into the fabric to soak up the excess water.


Use a sponge to press into the fabric to soak up the excess water.  Then slowly lift up mold to leave the pulp that is left.  To make more paper just re-do step 6d thru 7b with fresh, dry fabric or felt.


Step 8


Paper is done when it is completely dry.


Paper is done when it is completely dry.

And, there you have it….. you have just made paper from rags.  Don’t you feel awesome?!  That was a lot of work, but so worth it.  Now, go enjoy your paper.

Technorati Tags: , , , , , , , , , , ,

How to Make a Fish out of a Heart Valentines Day Box

Today I have a fun craft to do with your left over Valentines Day Heart Shaped Box.  I’m going to show you how to make a Fish out of a Heart Valentines Day Box.   This craft is not only a lot of fun, but it is a great way to recycle those used Valentines Day Boxes…. so you don’t have to just throw them away.   And, the fish not only turns out totally cute, it also gives you a secret storage box to store your small secret things in.  Now, that is fun!!  So, grab the materials needed and let’s get started.

Check out How to Make a Kitty Cat out of a Heart Valentines Day Box.


How to Make a Fish out of a Heart Valentines Day Box


Materials Needed

Valentines Heart Box

Black Marker

Red Craft Foam, Felt or Paint

White & Black Craft Foam

Colorful Tissue Paper (2 different colors)

Pencil

Scissors

Glue Stick

Lid or Bowl (for tracing)

Paper Plate

Paper

Glue


Step 1


Get your chocolate hearts box.


Get your chocolate hearts box.


Step 2


Draw lips with backwards E shape.


Draw lips with backwards E shape.


Step 3


I used sticky craft foam square tiles and filled in space in the lips.


I used sticky craft foam square tiles and filled in space in the lips.  Use anything that you want to use though…. even paint or felt.


Step 4


Draw an outline around the lips


Draw an outline around the lips.  Draw curved rectangles for white highlights.


Step 5


Fill curved rectangles with white craft foam.


Fill curved rectangles with white craft foam.


Step 6


Use colorful tissue paper for next part.


Use colorful tissue paper for next part.


Draw circle on a stack of square tissue paper.


Draw circle on a stack of square tissue paper.


Cut out circles.


Cut out circles.


Step 7


Dot glue all over the rest of heart.


Dot glue all over the rest of heart.


Layer circles on top of box and on top of each other.


Layer circles on top of box and on top of each other.


Until it looks like this.


Until it looks like this.


Step 8


Use a lid or bowl to trace a big circle on white foam.


Use a lid or bowl to trace a big circle on white foam.


Trace a smaller circle on black craft foam.


Trace a smaller circle on black craft foam.


Cut out 2 small white circles and glue together like this.


Cut out 2 small white circles and glue together like this.


Step 9


Glue eye on fish face.


Glue eye on fish face.


Step 10


Draw a heart with a rectangle on lef


Draw a heart with a rectangle on left….. do this on a paper plate.


Bend and glue rectangle on to side of heart box furthest from lips.


Bend and glue rectangle on to side of heart box furthest from lips.


Now fish should look like this.


Now fish should look like this.


Step 11


Draw half of a heart on folded paper.


Draw half of a heart on folded paper.


Cut out heart.


Cut out heart.


Cover with tissue paper circles too.


Cover with tissue paper circles too.  Make two of these.


Step 12


Glue fin to fish face.


Glue fin to fish face.

And, your fish is now done. Wasn’t that fun?  Now, you have a secret storage box that is decorated as a fish.  The real question is now ….. what are you going to fill your secret box with?  Enjoy.

Technorati Tags: , , , , , , , , , ,

How to Make a Kitty Cat out of a Heart Valentines Day Box

I have a fun craft for you today….. and the coolest part is you will get to use your old Valentines Day Heart Box that you had been given as a gift on Valentines Day.  Today I’m going to show you how to make a Kitty Cat out of a Heart Valentines Day Box.  This cat is made from tissue paper and paper plates….. it is so much fun to make.   Once you are done with this craft not only will you have a cute kitty cat, but you will also have a super cool box to store whatever you would like.  So, let’s get started.


How to Make a Kitty Cat out of a Heart Valentines Day Box


Materials Needed

Valentines Day Box

Paper Plates (a few)

Tissue Paper Squares (Orange & White)

Pencil

Glue

Brown Felt

Marker

Lids (One larger than the other for tracing circles)

Paper (White, Blue & Black)

Craft Foam or String

Scissors

Tape


Step 1


Start with a Valentines Day Box.


Start with a Valentines Day Box.


Step 2


Add glue to a paper plate.


Add glue to a paper plate.


Buy or cut tissue paper squares.


Buy or cut tissue paper squares.


Grab a pencil and wrap square around eraser of pencil.


Grab a pencil and wrap square around eraser of pencil.


Dip pencil into glue.


Dip pencil into glue.


Now dab pencil onto heart


Now dab pencil onto heart… pick back up.


Now leave tissue paper behind


Now leave tissue paper behind like this.


Step 3


Keep doing this.... Orange at the top and white at the bottom.


Keep doing this…. Orange at the top and white at the bottom.


It should look like this.


Like this.


Step 4


Cut a rounded triangle from brown felt.


Cut a rounded triangle from brown felt.


cut three thin rectangles.


Also, cut three thin rectangles.


Glue them as the nose and the mouth.


Glue them as the nose and the mouth.


Step 5


Trace 2 big white circles with lids.


Trace 2 big white circles with lids.


Trace 2 slightly smaller blue circles.


Trace 2 slightly smaller blue circles.


Trace slightly smaller black circles.


Trace slightly smaller black circles.


Draw 4 small white circles.


Draw 4 small white circles.


Glue them together to look like this.


Glue them together to look like this.


Step 6


Draw an ear shape with a rectangle shape at the bottom and cut out.


Draw an ear shape with a rectangle shape at the bottom on a paper plate and cut out.


Cut out two ears... then fold rectangle inwards.


Cut out two ears… then fold rectangle inwards.


Glue and tape ears on sides.


Glue and tape ears on sides.


The ears should look like this now.


The ears should look like this now.


Step 7


Now dab / glue orange tissue paper squares around outside of ears.


Now dab / glue orange tissue paper squares around outside of ears.


Step 8


Either cut a few of these pieces from craft foam or use string.


Either cut a few of these pieces from craft foam or use string.  Tape together at one end.


Stick the ends of whiskers underneath nose.


Stick the ends of whiskers underneath nose.


Finished kitty cat craft


Look how cute this craft turns out?!  It turns out so cute!!  Plus, wasn’t it a lot of fun to make?  How did your Kitty Cat turn out?  Let me know in the comments below.  And, make sure to take a picture of your craft and post that in the comments as well…. I’d love to see it.

Technorati Tags: , , , , , , , , , , ,