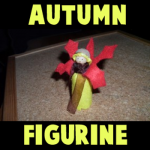
You can make this Autumn themed doll or figurine to celebrate fall, using an acorn cap for the hat and making a leaf out of felt for the “wings” of this little Autumn Fairy. This is a great Autumn-time craft that you will enjoy.
How to Make Cool Stuff
You can make this Autumn themed doll or figurine to celebrate fall, using an acorn cap for the hat and making a leaf out of felt for the “wings” of this little Autumn Fairy. This is a great Autumn-time craft that you will enjoy.
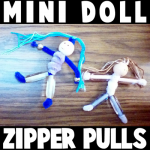
Learn how to make zipper pulls that look like miniature doll figures. Be creative and make them in all shapes, sizes, and colors. These zipper pulls are perfect for decorating your backpack as you go back to school.
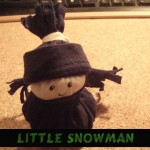
Today we will show you how to make this cute little fabric snowman. He is a lot of fun to make and even more fun to play with. On this cold Winter day, I thought this would be a great craft to share with you.
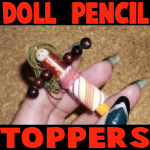
Do you want to create an adorable companion for your time back at school? Here is an easy-to-make doll that can be stored on the top of your pencil.Learn how to make it with the following step-by-step tutorial.
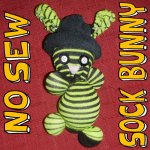
Today we will show you how to make a no-sew stuffed bunny rabbit for Easter….this craft is easy enough to make in twenty to thirty minutes. All you need are 2 socks, some rubber bands, and a few buttons. This is a great craft to make for Easter celebrations.
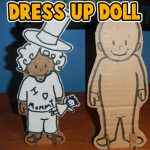
When I was a little girl I would have so much fun dressing up paper dolls. You know…. the paper dolls you buy in a book at the store where you cut out the clothes to put on them? I loved them. I used to spend hours dressing up the paper dolls and changing their clothes over and over again. Well, today I’m going to show you how to make with your children a stand-up dress-up doll. You are going to make the doll out of cardboard… it is much stiffer and will hold up to many, many clothes changes. Also, in this craft you will find 4 different template sheets of different accessories for your dress-up doll. That means hours of fun for you and your children dressing up the doll. So, grab the few materials needed and let’s get started.

I have a fun craft for you today. In this post I’m going to show you how to make a Sock Baby Doll. That’s right…. it’s a baby doll made out of a sock. This craft is a great way to put to use those socks that no longer have a match. Plus, you probably have all the materials needed for this craft in your house… so no need to buy any more materials. Give this sock baby doll to your best friend…. or better yet keep it for yourself. The choice is yours. So, let’s get started.
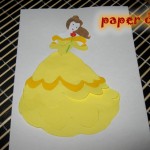
Today I’m going to show you how to make a Layered Paper Doll. This craft can be made with any character you would like. For purposes of explaining this tutorial I will show you how to make this Layered Paper Doll using a Beauty and the Beast Character…. Belle. Once you know the technique of how this is done you can do this to any character. This craft is a lot of fun, so grab the materials needed and let’s get started.
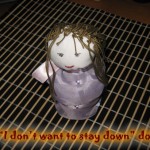
Today I’m going to show you how to make a traditional Romanian Toy. It is called a “Hopa Mitica” Doll. But, we will call it an “I Don’t Want to Stay Down” Doll because this doll will not stay down. When you try to lay it down it will pop right back up. It’s a cute, funny toy that will be a ton of fun to make…. almost as much fun as it will be playing with the Doll. So, grab the materials needed and let’s get started with the crafting fun.
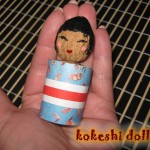
Kokeshi are Japanese dolls, originally from northern Japan. They are handmade from wood, have a simple trunk and an enlarged head with a few thin, painted lines to define the face. One characteristic of kokeshi Dolls is their lack of arms or legs. So, with that being said…. today I’m going to show you how to make a Kokeshi Doll. It will be a lot of fun…. almost as much fun as it will be showing to people the Kokeshi Doll you made yourself. So, grab the materials needed and let’s get started.
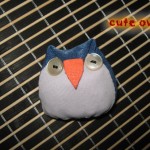
If you love stuffed animals then you are going to love today’s craft. I’m going to show you how to make a Cute Stuffed Owl. You can decide to keep in for yourself or give it to one of your best friends to love. Either way you can guarantee that people are going to love this stuffed owl… especially when they find out that you made it yourself. So, grab the materials needed and let’s get started.
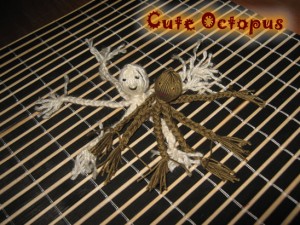
Today I’m going to show you how to make a cute Octopus toy out of yarn. The craft is an easy one, but it is sure to be a lot of fun. This Octopus toy would make a great gift to give to somebody this Holiday Season. Or, if you like…. keep the toy for yourself. Make a few and give your Octopus a friend.
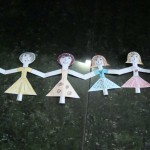
Have you ever wanted to know how to make a paper doll chain? Well, if so…. I am going to be showing you how to make that today. You can use old paper items like newspapers, paper bags or scrap paper. I used 8×11 used bond paper, with printed items on one side. But, feel free to use any kind of paper. This is a fun craft, so let’s get started.

Today we will show you how to make stuffed puppy dogs out of socks and rubber bands. This craft will probably take less than 10 minutes for you…it is that easy. These are no-sew stuffed animals…that is right…no sewing necessary at all. If you like sock monkeys, but you were too lazy to make them, then this arts and crafts project is for you. Have fun.

If you want to make your very own play dolls out of recycled twist ties, then find out how to. They come out really cool, with hug-gable & twist-able arms and legs … especially cool for Mom dolls that hug baby dolls. Find out how to make these from unused items around your house. Have fun.

Today we will show you how to make dolls out of socks. This craft will probably take less than 10 minutes for you…it is that easy. These are no-sew dolls…that is right…no sewing necessary at all. If you like sock monkeys, but you were too lazy to make them, then this arts and crafts project is for you. Have fun.