How to make a Christmas Tree with Thread : Fun and Easy Craft for Kids

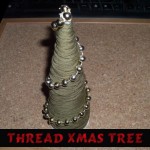
Learn how to make this adorable Christmas tree with the following simple-to-follow, step by step instructions by Laura from  Dacian Moon Handmade. She will show you how to make this cute Xmas tree, step by step. Have fun!

You Might Also Like Our Other Christmas Crafts.

How to make a Christmas Tree with Thread : Fun and Easy Craft for Kids


CRAFTS MATERIALS NEEDED:

– thick thread
– craft glue
– string of beads
– scissors
– paper


Step 1.

Make a cone of paper…


… like this.


Stick the corner to keep it in place.


Make the base flat.


Now it can stand.


Step 2.

Fix one end of thread on top of the cone…


… and start to cover it by wrapping the thread…


… like this.


The tree is ready. Now is time to decorate it.


Step 3.

Apply a bit of glue on top of it…


… and fix a bead .


Roll the string of beads around the tree…


… and glue the last one on the base.


Your Christmas tree is ready 😀


You Might Also Like Our Other Christmas Crafts.


How to Make an Autumn Brooch or Pin to Wear to Celebrate the Fall Season or Thanksgiving

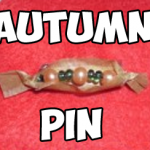
Learn how to make a cute little brooch to wear during Fall or you can even wear it on Thanksgiving day 🙂 You can even make one for all of your guests. 🙂 This step by step tutorial is offered by Laura from Dacian Moon Handmade

How to Make an Autumn Brooch or Pin to Wear to Celebrate the Fall Season


How to Make an Autumn Brooch or Pin to Wear to Celebrate the Fall Season


CRAFTS MATERIALS NEEDED:

– a piece of baking paper
– orange  / red beads
– green beads
– scissors
– a small piece of wire
– brooch base


Step 1.

Put wire through the paper at about 0.8 cm from one end…


… like this.


Step 2.

Put beads on the wire…


… making a pattern, like this.


Step 3.

Insert the other end of the wire through the paper so that the beaded part sits right.


Like this.


Cut the paper around the beads, like this.


Step 4.

Bend ends of wire to fit through the holes of the brooch base.


Tie them and cut the extra wire…


Like this.


Step 5.

Bend up the paper, besides beads…


… then twist one end…


… and the other. Your brooch is done 🙂

I hope that you enjoyed this Autumn craft and that it turned out as beautiful as you hoped it would. Come back soon for more crafts.

Technorati Tags: , , , , , , ,

How to Make Paperclip Christmas Angels : Easy Craft Idea for Kids

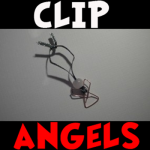
You can make a cute little paperclip angel to hang on your Christmas tree or to just decorate your bedroom or house. These are super easy to make and all of the materials are probably sitting around your house somewhere. Laura from Dacian Moon Handmade  will show you today how to make this simple decoration, step by step.

Check out our Christmas Crafts.


How to Make Paperclip Christmas Angels Easy Kids Craft Tutorial


How to Make Paperclip Christmas Angels Easy Kids Craft Tutorial

CRAFTS MATERIALS NEEDED:

– butterfly paperclip
– bead
– ribbon
– sewing pin


Step 1.

Fold the ribbon in two and put it through the bead.


You can help it with the pin.


It will look like this.


Step 2.

Put the ribbon through the paperclip, like this…


…and make a knot over the bead.


Step 3.

Bring the bead near the paperclip…


… and now it looks like an angel 😀


Tie both ends together and your decoration is ready.


And there you have it, a beautiful Christmas Angel. It is so adorable, isn’t it? You can make these as a gift or use it as a Christmas ornament. Merry Christmas!

Check out our Christmas Crafts.

Technorati Tags: , , , , , ,

How to Make Autumn Dolls or Figurines in Easy Craft Idea for Kids

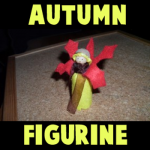
You can make this Autumn themed doll or figurine to celebrate fall, using an acorn cap for the hat and making a leaf out of felt for the “wings” of this little Autumn Fairy. This is a great Autumn-time craft that you will enjoy.
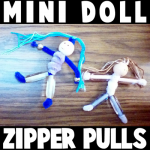
 Step by step tutorial offered by Laura from Dacian Moon Handmade


How to Make Autumn Dolls or Figurines in Easy Craft Idea for Kids


How to Make Autumn Dolls or Figurines in Easy Craft Idea for Kids

CRAFTS MATERIALS NEEDED:

– yellow and red felt
– pens (or permanent markers) – for eyes and mouth
– wooden bead
– scissors
– cork
– toothpick
– acorn cap
– toothpick
– brown ribbon
– craft glue


Step 1.

Glue the wooden bead on toothpick.


Step 2.

Stick toothpick in cork…


… until there are about 0.5 cm left.


Step 3.

Draw a circle and a rectangle on yellow felt. The circle must be a little bigger than the wooden bead and width of the rectangle must be from the bottom of the cork to the wooden ball.


Also draw a shape like this on red felt.


Step 4.

Cut them out.


Step 5.

Apply a layer of glue on the yellow circle…


… and place it on the wooden bead, like this.

Let it dry.


Next, put a bit of glue inside the acorn cap and on the edges…


… then fix it over the yellow circle.


You have now the head with yellow hair and acorn hat.


Step 6.

Adjust the upper part of the cork…


… like this.


Step 7.

Apply a layer of glue on the rectangle…


… like this…


And cover the cork with it.


Let it dry well.


Wrap the ribbon around the neck, over the yellow rectangle but take care to let the hair free.


Make a knot to keep it in place. You can cut the ribbon ends if they are too long.


Step 8.

Apply a stripe of glue on the lower part of red shape…


… and fix it over the ribbon, like this. Let it dry well.


Now use your pens / markers to add eyes and mouth and your cute doll is ready 😉


I hope your Autumn Fairy Doll turned out great. This would be a great decoration for the Thanksgiving table or any dinner in Autumn. I hope that you had fun. Come back soon for more crafts.

Technorati Tags: , , , , , , ,

How to Make Mini People or Dolls as Zipper Pulls as Back to School Craft for Kids

This makes a great back to school craft as this can be used to decorate your backpack! My daughter and I made a few of these to give to her special friends at school. We landed up having to make more than 20 of them to give out to everyone who was asking for them. She couldn’t make enough of them because they were so popular. I think you will love these too. They are very easy to make and you can use different materials each time. Any bead size or thread color will work. Just have fun and be creative with it!

How to Make Mini People or Dolls as Zipper Pulls as Back to School Craft for Kids


mini doll zipper pulls


Crafts Materials Needed:

– beads

– embroidery thread, yarn, string, or thread

– pipe cleaners

– scissors

– (Optional) metal snap spring hooks

Step 1


finished-step01-beaded-people-zipper-pulls


I started off with a round bead that already had a face drawn on it. You can use paint or a Sharpie to draw 2 eyes and a mouth on a round bead if you don’t have face beads already.

Then put a pipe cleaner thru the bead. The  beaded head should be in the center of the pipe cleaner, as seen above.

Step 2


finished-step02b-beaded-people-zipper-pulls


– Now put the pipe cleaner that is thru the top of the head back down into the top of the head again until there is a loop….as seen above. The legs (bottom 2 pieces of the pipe cleaner) should match up too.


Step 3


finished-step03-beaded-people-zipper-pulls


Take some embroidery thread (or whatever you have available) and fold it in half a few times (as you see that I did above). Then stick it in the loop hole, as seen above.


finished-step04a-beaded-people-zipper-pulls


If you want to make this a zipper pull, put a metal hook on it (optional…only for zipper pulls). Then Pull the pipe cleaner legs downwards so that the pipe cleaner on top of the head closes down on the hair and hook.

Step 4


finished-step04-beaded-people-zipper-pulls


Cut the loops that are in the embroidery thread so that it resembles hair.

 Step 5


finished-step05a-beaded-people-zipper-pulls


Cut a pipe cleaner in half. Wrap it around the top of the body, so you will have arms.

 Step 5 b


finished-step05b-beaded-people-zipper-pulls


Like in the above picture.

Step 6


finished-step06-beaded-people-zipper-pulls


Take the other half of the pipe cleaner and wrap it around the chest area as I did above.

Step 7


finished-step07-beaded-people-zipper-pulls


– Now we can place beads on the arms and legs. I have long beads, but you can also use multiple small round or oval beads. Then just push the pipe cleaner back into the bead to make it so the beads can’t fall off.

 Step 7 b


finished-step08-beaded-people-zipper-pulls


– This is what it looks like when all the beads are on there.

Finished Bead People


Finished Mini Figures


– My daughter originally only made a few of these for her to give to her closest friends. It lands up everyone in the class were BEGGING her to give them one. We landed up making enough for the entire class. Kids do Love these! Even boys! I hope that you had fun!

Technorati Tags: , , , , , ,

How to Make Abe Lincoln Finger Puppets for Presidents Day

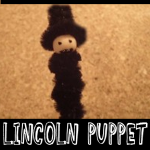
It is February which means that it is time for Presidents Day again. How about celebrating this great holiday with an Abe Lincoln Finger Puppet? Laura from Dacian Moon Handmade  will show you today how to make a Lincoln puppet out of pipe cleaners.

How to Make Abe Lincoln Finger Puppets for Presidents Day


How to Make Abe Lincoln Finger Puppets for Presidents Day


CRAFTS MATERIALS NEEDED:

– black pipe cleaner
– wooden bead (~1 cm diameter)
– instant glue
– scissors
– 2 toothpicks
– black and red paints


IMG_4060


Step 1.

Glue the wooden bead on top of one toothpick – this will be the head.

Start wrapping the pipe cleaner around the toothpick.


IMG_4061


You stop when you go over the middle. Cut the extra pipe cleaner.


IMG_4062


Like this.


IMG_4063


Step 2.

Make a spiral of pipe cleaner…


IMG_4064


Like this.


IMG_4065


Expand bottom to form the hat.


IMG_4066


Step 3. 

Apply glue on the head…


IMG_4067


… and quickly fix the hat there. (Quickly because we use instant glue)


IMG_4068


Step 4.

Use paints to add a beard…


IMG_4069


… eyes …


IMG_4070


… nose and hair.

Your puppet is ready 😀


IMG_4072


I hope that you enjoyed making this finger puppet for Presidents Day. Come back for more crafts.

Technorati Tags: , , , , , ,

How to Make Beaded Christmas Tree Ornaments

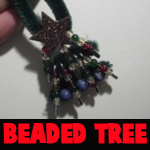
Here is a crafts tutorial to make a Christmas tree from pipe cleaners, safety pins, and some beads. With this craft, you make a beautiful Christmas tree that is also an ornament. Use this step by step tutorial offered by Laura from Dacian Moon Handmade.

How to Make Beaded Christmas Tree Ornaments


How to Make Beaded Christmas Tree Ornaments


CRAFTS MATERIALS NEEDED:

– 3 pieces of chenille stem
– green, orange, red, brown crystals / beads
– blue bigger beads
– self – adhesive star
– safety pins


Step 1.

Take one safety pin. Open it.


Put crystals on it, like this.


Close the pin.


Do the same for the other safety pins. You will need 8.


Step 2.

Take 1 piece of chenille stem…


… and put one safety pin on it.


Add two in the other direction, one, two again and one. Like in the picture.


Put another chenille through the ends of the 3 safety pins, like this.


Bring the safety pins ends together.


Raise the ends of the last chenille stem…


… and wrap them one around the other, to make a hanger


Bend the extra chenille to the back of the tree.


Put another one through the other ends of the safety pins…


… and add a blue bead between the safety pins.


It will look like this.


Fix the self-adhesive star on the ornament…


… and it is ready to adorn your Christmas tree.


Technorati Tags: , , , , , ,

How to Make Doll Pencil Toppers for Back to School

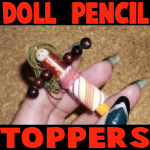
Do you want to create an adorable companion for your time back at school? Here is an easy-to-make doll that can be stored on the top of your pencil. Laura from  Dacian Moon Handmade  will show you, step by step, how to make it.


how to make doll pencil toppers for back to school


CRAFTS MATERIALS NEEDED:

– pencil
– thick tread
– wooden beads (one white and 6 brown)
– small cloth piece
– matching cord
– a piece of wire
– needle
– rubber tube


Step 1.

Take the thread …


… and spin it on your fingers, like this.


Step 2.

Tie it on the middle with the wire…


… like this.


Put the wire through the white bead – this will be the head of our doll.


Step 3.

Take the rubber tube…


… and make two holes in it with the needle.


Place it under the head, put the wire through the holes you made.


Step 4.

Is time to form her arms.


Add three brown beads like this…


… and put the wire end through the last bead one more time. That way the beads will not fall.


Repeat for the other arm.


Step 5.

Is time to place the topper on the pencil…


Like this.


Let’s dress her. Roll the piece of cloth over the rubber tube, under the arms…


… like this.


Tie it with the cord…


… and that is our doll.


You can use markers to make her eyes and mouth too. And she will make your classes easier 😉


Technorati Tags: , , , , , ,

How to Make a Pair of Party Earrings for New Years

New Years is just around the corner and before New Years  the New Years Eve Parties begin.  Why not wear an amazing pair of earrings to this years New Years Eve Parties.  Today I’m going to show you how to do just that…. I’m going to show you how to make a pair of party earrings for New Years.  These New Years earrings have a lot of flash…. perfect for New Years Eve.  And, these earrings don’t have to be just worn on New Years Eve…. they are so beautiful you will want to wear them year round.

Check out our other New Years Crafts and Jewelry Crafts.

Step by step tutorial offered by Laura from Dacian Moon Handmade


party earrings


Materials Needed

– 2 sparkle pom-poms
– 2 glass pearls
– 2 head pins
– 2 eye pins
– 2 earring findings
– 1 flat nose pliers


IMG_3062


Step 1

Take a head pin…


IMG_3063


… and put it through a pom-pom.


IMG_3064


Use the pliers to make a loop…


IMG_3065


… like this.


IMG_3066


Step 2

Take the eye pin…


IMG_3067


… and put a glass pearl on it.


IMG_3068


Cut the extra pin (with your pliers if it has a cutting side. If not, you’ll need a cutting pliers too), then make an open loop.


IMG_3069


Put the earring finding through the loop…


IMG_3070


… and close it. Like this.


IMG_3071


Step 3

Open the eye of the pin…


IMG_3072


… and put it through the loop of the pom-pom.


IMG_3073


Close the pin’s eye and you have an earring.


IMG_3074


Repeat to make the second one. Now is time to shine at the party.


IMG_3077


Aren’t these New Years Earrings beautiful?  I am sure you will get tons of compliments about these earrings…. even well after New Years Eve has passed.

Technorati Tags: , , , , , , , , , , ,

How to Make a Winter Angel Christmas Ornament

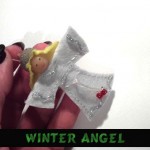
I have a fun Christmas craft for you today.  In this post I will show you how to make a Winter Angel Christmas Ornament.  This Angel Christmas Ornament turns out amazing looking.  It would look spectacular on your Christmas Tree.  You could also make this Winter Angel Christmas Ornament as a gift for your friends and family this Christmas.  They will surely love it.   This will surely be a Christmas Ornament that they will save for a long time….. proudly representing something you made yourself.  So, let’s get started.

Check out our Christmas Crafts.

Laura from Dacian Moon Handmade   will show you how to make this, step by step.


Materials Needed

– 1 disc of white felt
– 1 smaller disc of yellow felt
– 1 acorn cap
– 1 wooden bead
– toothpick
– scissors
– needle and pin
– instant glue
– red and black paint
– silver glitter glue
– 2 red beads


Step 1

Take the wooden bead…


… and stick it on a toothpick.


Like this.


Step 2

Put the toothpick through the middle of the white felt.


Fold the felt in half, like this, and start sewing a dress for your angel.


Like this.


Step 3

Cut the extra felt.


It will look like this.


It is time to shorten the hands / wings.


Like this .


Step 4

Apply a layer of glue on the head…


… and put the yellow disc over it, like this. Note: you should do this quickly because the glue is fast drying.


This is the angel with hair.


Step 5

Apply a layer of glue inside the acorn cap…


… and fix it on the angel’s head over the yellow felt.


Step 6

Put a red bead on a piece of thread…


… and make a knot, like this.


Sew this piece of thread as a belt.


… like this. Then add another bead on the other end and tie the belt.


Step 7

Put the needle (with thread) through the yellow felt, and make a hanger.


Like this.


Decorate your angel with glitter glue, make eyes and mouth with black and red paint and your ornament is ready.


Isn’t this Winter Angel Christmas Ornament simply adorable?  It will look beautiful hanging on your Christmas tree.  It would also make a wonderful gift to a friend or family member.

Technorati Tags: , , , , , , , , , , , , ,

How to Make a Lace Christmas Ornament

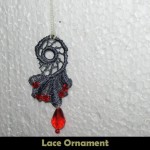
I have a wonderful Christmas craft for you today.  I’m going to show you how to make a lace Christmas Ornament for your Christmas tree.  This Lace Christmas ornament is a wonderfully delicate ornament and the crystals will look just absolutely breathtaking against the Christmas lights on the tree.  Let the kids join in on this craft…. after all it is a super fun craft for the whole family.  Plus, imagine how good the kids will feel when they see their handcrafted ornament on the tree.  So, let’s get started.

Check out our other Christmas Crafts.

This delicate ornament will add a note of elegance to your Xmas tree.


Materials Needed

– lace (for best results use one with flowers or some pattern border, like mine)
– needle and thread
– a piece of thick thread
– crystals (I use bicones and one drop)
– scissors
– 1 small bead


Step 1

Look carefully at the lace and choose the best part to use, then cut it out.


I choose a spiral with a tail so I will add the crystals to the tail. You will add them on the lower part of your piece, to dangle.


Step 2

Sew the crystals  to look good…


… I put each one on a part of the tail, letting the middle one free.


In the middle we will sew the drop.


Step 3

Place the drop on the needle, starting with the narrow end.


Then add the bead…


… and pass the needle back through the drop, like in the picture.


It will look like this. Sew it to the lace and make a small knot.


The ornament is almost ready.


The only thing that must be done is to add the thick thread on the upper part, like this.


Now you have an elegant ornament for your Christmas tree.


Isn’t this a beautiful Christmas ornament?  It’s just so delicate…. I love it.  The dangling beads will look so beautiful against your Christmas lights.

Technorati Tags: , , , , , , , , , , , ,

How to make a Pine Cone Christmas Figurine Ornament

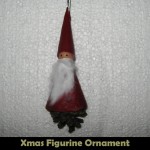
Today I’m going to continue with another Christmas Craft.  This one will be a Pine Cone Christmas Figurine Ornament.  It is super cute and will look terrific on the Christmas Tree.  Let each of the kids make one of these figurine ornaments…. they will love hanging something up on the tree that they made themselves.  Plus, it is so much fun.  So, grab the materials needed and let’s get started.

Check out our other Christmas Crafts.

Tutorial offered by Laura from Dacian Moon Handmade .


Materials Needed

– cardboard
– red leather
– a cotton pad
– 1 wooden bead (big enough to be the head)
– scissors
– 1 piece of ribbon
– 1 pine cone
– craft glue
– black paint
– toothpick


Step 1

Take the cardboard…


…and make a cone of it: bring one side over the middle.. .


… then the other. Glue the two parts together.


Place the pine cone inside, to measure how long the cardboard cone should be.


Cut the extra cardboard.


It will look like this.


Step 2

Apply a border of glue inside the cardboard cone…


… like this.


Then fix it over the pine cone.


Step 3

Take the wooden bead…


And place the toothpick inside.


Make a collar of glue where the toothpick comes out…


… and place it inside the cardboard cone, like in the picture. Keep it a little pressed, until the glue is dry.


Step 4

Take the leather and put it over the cardboard cone.


Measure the length and trace it with a pen.


Cut it out…


… like this


Apply glue on the back of the leather…


… and place it again over the cardboard cone.


Let it dry.


Step 5

Make another cardboard cone, narrower than first. This will be the cap.


Glue the cardboard cone.


Apply a layer of glue on the lower part that goes down from the cone and fold it over it.


Now cut the extra cardboard.


Measure the cone cover on the leather…


… like this.


Cut it out.


It will look like this now.


Apply glue on it…


… and place the cardboard cone on it.


Cover it with the leather.


Apply glue on the back…


… and place there the folded ribbon. Keep it in place until the glue is dry.


Now, let’s put it on the head. Put glue over the upper part of the head…


… like this…


…and fix the cap on it. Let it dry.


Step 6

Take the cotton pad…


… and break it into pieces to make one beard like this.


Apply glue on the lower part of the head and on the front part of the coat…


… and place the beard on it, fix it well on the face.


Take a little black paint with a toothpick…


… and draw its eyes.


Now you have a funny figurine to put on your Xmas tree.


The figurine is cute, huh?!  It will look wonderful on the Christmas Tree.  Enjoy!!

Technorati Tags: , , , , , , , , , , , , , ,

A Collection of Fun Nativity Scene Crafts for Kids


A Collection of Fun Nativity Scene Crafts for Kids


One thing you see at most houses at Christmas time is a Nativity Scene.  But, the problem with the store bought Nativity Scenes is that they are usually very delicate…. too delicate for the children to actually play with.  And, the thing about that is…. children love to play with the Nativity Scenes.  I mean, what’s not to want to touch…. there are small people, animals and a manger.  There is an entire scene for the kids to want to act out with the characters.  Well, why not make a Nativity Scene craft ….. put together a Nativity Scene of your very own that the children can actually play with.  So, today I have put together a bunch of Fun Nativity Scene Crafts that I have found around the internet.  All are a ton of fun…. and they are all meant to be played with.

Check out our other Christmas Crafts.

A Collection of Fun Nativity Scene Crafts for Kids

(1)  Pipe Cleaners & Yarn Nativity Scene


Pipe Cleaners and Yarn Nativity Scene


Here Spoonful shows us how to make an entire Nativity Scene using such materials as yarn and pipe cleaners.  She is very detailed, so this nativity craft is very enjoyable.  This Nativity Scene would look wonderful as a Christmas decoration and it surely will be so much fun to make.


(2)  Printable Nativity Scene


Printable Nativity Scene


I love this idea.  I found this Nativity Scene Craft at Catholic Icing and it is so cute.  Here you will be able to print off about 8 pages of templates.  Cut them out, decorate them and glue them to toilet paper tubes.  It’s so much fun.  check it out.


(3)  Flower Pot Nativity Scene


Flower Pot Nativity Scene


Ok, this is really cute, right?!  Suite 101 shows us how to transform 3 terra cotta flower pots (along with some other materials) into a ridiculously cute Nativity Scene.  The craft promises to be a lot of fun.  Plus, no doubt, you will be tempted to keep this Nativity Scene out year round.


(4)  Basket Nativity Scene


Basket Nativity Scene


This Nativity Scene craft is one of ours from last Christmas.   This Nativity surely will be one that you will keep for years to come.  We show you how to make each of the figures in great detail including the Three Wise Men, Baby Jesus & Cradle, Mary & Joseph, sheep and the donkey.  It’s so much fun.  Check it out for yourself.


(5)  Rock Nativity Scene


Rock Nativity Scene


Here is another super cute and original Nativity Scene Craft.  Here Roper 5 shows us how to make this fantastic Nativity Scene completely out of backyard rocks and markers.  So, no need to buy any craft materials…. you can have fun with the kids hunting in the backyard for the perfect rocks.


(6)  Wooden Block Nativity Scene


Wooden Block Nativity Scene


Here is an awesome Nativity Scene craft you can make with your kids with some wooden blocks, felt, glue and a few embellishments.  Imagine the fun you will have putting this craft together with your kids.  Fun part is that they are durable enough the kids can even play with this Nativity Scene.  Check out The Pioneer Woman for all the details.


(7)  Lego Nativity Scene


Lego Nativity Scene


This is such a clever idea for all you Lego fans.  Here Johan van Benthem shows us all how to make an entire Nativity Scene out of Legos.  Imagine the excitement of your kids as well as anyone who sees your Nativity Scene made completely out of Legos.  They will absolutely love it!!


(8)  Nativity Hand Puppets


Nativity Hand Puppets


What child doesn’t love hand puppets?  They all love them.  Here eHow shows us how you and your children can make these Nativity Hand Puppets for yourself.  Imagine the fun Christmas show your kids can put on with these hand puppets?  They will love using their imaginations to put on their very own program.


(9)  Nativity Blocks


Nativity Blocks


These blocks are just simply adorable.  I am a Momma – Hear Me Roar came up with this idea and I love it!!  She used homemade blocks, stickers and modge podge to make her Nativity Scene, but you can also print off Nativity Scene characters from the computer and do it that way as well.


(10)  Sun Catcher Nativity Scene


Sun Catcher Nativity Scene


Here is a clever idea by Peace Creek on the Prairie.  She uses wax paper, crayon shavings and an iron to make this beautiful Sun Catcher Nativity Scene.  Because of some of the materials used in this craft it does require some adult help.  You will have so much fun doing this Nativity Scene with your kids.


(11)  Gingerbread Nativity Scene


Gingerbread Nativity Scene


This Nativity Scene is absolutely delicious!!  Made from some of my most favorite treats this Nativity Scene craft is sure to be a big hit with the kids.  I found this craft at AOK Corral and it looks like so much fun.  You and your kids will surely enjoy putting this together.


(12)  Cardboard Tubes Nativity Scene


Cardboard Tubes Nativity Scene


Here is a simple yet fun Nativity Scene craft that all children will love putting together…. plus they can even play with this Nativity Scene once they are done.  Nurture Store shows us how to make this Nativity Scene out of toilet paper rolls.  How fun is that?!


(13)  Clothespin Nativity Scene


Clothespin Nativity Scene


This is truly a clever idea and almost all the materials used in this Nativity Scene craft can already be found in your home.  Our Dish shows us how to use a cardboard box, sharpie and a couple of clothespins (as well as a few other things) to put together this fun Nativity Scene craft.


(14)  Foam Nativity Craft


Foam Nativity Craft


Craft foam is a wonderful material that children love working with.  And, this Nativity Scene craft will be no exception.  Piggy Giggles shows us how to make a unique Nativity Scene out of craft foam.  The craft is wonderfully detailed, so believe me when I say they have covered everything.


(15)  Egg Carton Nativity Scene


Egg Carton Nativity Scene


Made from egg carton bottoms and beads this Nativity Scene is really cute.  Plus, the great thing about it is the kids will have just as much fun playing with this Nativity Scene as they had making it.  I found this craft at April Showers.  Check it out for all the craft details.

Technorati Tags: , , , , , , , , , , , , , , , ,

Fun Kwanzaa Crafts for Kids


Fun Kwanzaa Crafts for Kids


Top Image by TheBlackHour.com

Oh boy…. do I have a treat for you today.  In this post I have compiled 14 Kwanzaa crafts from around the internet.  They are all perfect for your children to make.  Whether you celebrate Kwanzaa or not these crafts are great to help teach your children about Kwanzaa and the African culture.  Many of them not only incorporate the three colors of Kwanzaa (red, green & black), but they also help teach you about the 7 Principles of Kwanzaa…. Unity, Self Determination, Collective Work & Responsibility, Collective Economics, Purpose, Creativity and Faith.   These are wonderful principles to have and to teach your children.  So, check out these Kwanzaa crafts…. you are sure to find a few to do with your children.

Fun Kwanzaa Crafts for Kids

(1)  Kwanzaa Flag Garland


Kwanzaa Flag Garland


Here is a festive Kwanzaa craft perfect to help teach your children about Kwanzaa.  Here Kaboose shows you how to make this Kwanzaa Flag Garland in great detail.  It uses the symbolic colors of the holiday… red, green and black.


(2)  Kwanzaa Greeting Card


Kwanzaa Greeting Card


Here is one of our very own Kwanzaa crafts.  In this Kwanzaa Greeting Card craft we will show you how to make a greeting card for the Holiday Kwanzaa.  It is a very easy craft, so even young children will enjoy this craft.  You simply need some paper , scissors and glue.


(3)  Kwanzaa Mobile


Kwanzaa Mobile


I found this Kwanzaa craft over at Spoonful.  Here they use the 3 colors of Kwanzaa as well as the 7 principles of Kwanzaa to make this adorable mobile.  This will make an awesome Kwanzaa decoration as well as teach your children about Kwanzaa.


(4)  Handprint Kinara


Handprint Kinara


Here is a fun craft that children of all ages will love to make.  Activity Village shows us how to take your handprint and make it into a very cute Kinara.  It’s a quick, fun and messy Kwanzaa craft for kids!  They will love it.


(5)  Doll Pin Kinara


Doll Pin Kinara


I have another fun Kinara craft for you.  This one came from Kaboose and it promises to be tons of fun.  Here they use doll pins, spools, paint and some other materials to make this festive Kinara.  Kaboose even has tons of information to teach you more about the Holiday of Kwanzaa.


(6)  Kwanzaa Placemat


Kwanzaa Placemat


Here is another entertaining Kwanzaa craft.  In this craft Making Friends shows you how to incorporate the 3 colors of Kwanzaa into this colorful placemat.  Your kids will have fun weaving strips of red, green and black craft foam into this festive Kwanzaa placemat.


(7)  Kwanzaa Bracelet


Kwanzaa Bracelet


Here is a great Kwanzaa craft that both boys and girls will love making.  I found this craft at Yahoo! Voices and it’s a good one.  Make these Kwanzaa bracelets with the colors of Kwanzaa and give them to your family and friends as gifts.  They will love it.


(8)  Bubble Wrap Corn


Bubble Wrap Corn


Kwanzaa is about the festival of the first harvest of the crops.  So, this Bubble Wrap Corn just makes sense as a craft for Kwanzaa.  Give your child all the details about Kwanzaa as you make this fun bubble wrap craft with them.  Check out No Time for Flashcards for all the details.


(9)  Kwanzaa Bead Candles


Kwanzaa Bead Candles


Here Spoonful shows us another wonderful Kwanzaa craft.  This time they make these cute Kwanzaa bead candles.  Here they use craft cubes, oval beads as well as other materials to make these festive candles.  This is a great way to introduce the seven principles of Kwanzaa.


(10)  Kwanzaa Flag Decoration


Kwanzaa Flag Decoration


Family Education shows us a great way to teach your children a little bit about Kwanzaa and the African culture.  Here they use different flags of Africa to make a great decoration for Kwanzaa.  As you are making these flags of Africa with your children it is a great time to teach them about Kwanzaa.


(11)  Corn Necklace


Corn Necklace


Remember Kwanzaa is the festival of the first harvest of the crops.  Corn was a very important crop.  So, this Corn Necklace craft is perfect for Kwanzaa.  Here Better Homes & Gardens explains how each ear of corn represents a child in the family.  Check out the craft for all the details.


(12)  Papier Mache Bowl


Papier Mache Bowl


Check out this gorgeous and super festive Papier Mache Bowl perfect for Kwanzaa.  I found this at Crafts Holidays site and thought it was beautiful.  Here they use Papier Mache to make this bowl…. so it is sure to be a lot of fun for the kids.  Use this bowl to hold the Mazao (or fresh fruits and vegetables) at your Kwanzaa table.


(13)  Kid-Friendly Kinara


Kid Friendly Kinara


Nick Jr. has the right idea with this Kinara Kwanzaa craft.  It is just adorable and the children will love making it.   Here they use craft sticks as well as clothespins to put this Kinara together.  They also don’t forget the colors of Kwanzaa with this Kinara.


(14)  Cardboard & Tissue Paper Kinara


Cardboard & Tissue Paper Kinara


Kids love to do crafts with tissue paper and cardboard rolls.  And, this Kwanzaa craft will be no exception.  I found this craft over at PBS and thought it was a great one to include.  Make sure to check this Kinara craft out.  Plus, they also go into great detail of the 7 Principles of  Kwanzaa…. great to teach your children.

Technorati Tags: , , , , , , , ,

How to Make a Bottle Brush Christmas Tree

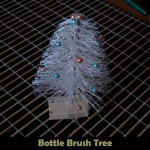
I have a fun Christmas decoration craft that you can make out of a bottle brush.  Today I’m going to show you how to make a Bottle Brush Christmas Tree.  A bottle brush is the perfect material to use for this Christmas Tree decoration because the bristles take on the look of one of those artificial Christmas Trees.  It makes for a wonderful Christmas decoration that will last for years.  And, your kids will love making them.  So, grab a bottle brush and the rest of the materials and let’s get started.

Check out our other Christmas Crafts.

Laura from  Dacian Moon Handmade will show you how to make this, in 4 easy steps.


Materials Needed

– bottle brush
– craft glue
– glitter
– glass or plastic colored pearls
– scissors
– paintbrush
– eraser
– a piece of paper


Step 1

Place the piece of paper in front of you…


… take the bottle brush and give it a haircut.


You should cut it in small steps until it looks like a tree.


Step 2

Take the eraser…


… and fix the tree in the middle of it. It should be a large eraser to support the tree. You can use polystyrene , wood or anything else strong enough to support your tree.


Step 3

Spread glitter on the paper…


…then apply glue on the tree, using the paintbrush…


… like this.


Before the glue is dry, roll your tree over the glitter.


Take care to have glitter on all sides.


It will look like this.


Step 4

The final step is to add to it some globes, so put the glass / plastic pearls in the branches without glitter. They will stick in place because of the glue. I used a toothpick to place them in place.


Your little tree will make a wonderful decoration.


Isn’t this Bottle Brush Christmas Tree adorable?  This Christmas Tree will make for a great table top decoration for Christmas.  And, your child will love that they made this Christmas decoration themselves.

Technorati Tags: , , , , , , , , ,

A Collection of Hanukkah Menorah Crafts


A Collection of Hanukkah Menorah Crafts


Hanukkah is just days away.  And, with the beginning of Hanukkah comes the lighting of the candles.  How about making a unique and creative Menorah yourself?  Don’t think you can?  Well, take a look at the following 15 Hanukkah Menorah Crafts I found on the internet.  All are amazing and you are sure to love them all.  Some are easier than others, but surely you can find one that will meet your needs…. and you will enjoy making them yourself no doubt.

Check out our other Hanukkah Crafts.

A Collection of Hanukkah Menorah Crafts

(1)  Styrofoam Hanukkah Menorah Craft


Styrofoam-Menorah-Craft


This is a super cute craft.  It’s made from Styrofoam and some birthday candles.   It’s a whole lot of fun and it’s not difficult to make at all.  I found this craft over at All Kids Network and it is definitely worth checking out.


(2)  Plastic Toy Menorah


Plastic Toy Menorah


Isn’t this Hanukkah Menorah craft adorable?!  It really is.  I found this craft over at Aunt Peaches and I just love it.  Here she shows you how to take a toy, some clay, paint and glitter and presto you can make a super cute Hanukkah Menorah.


(3)  Plaster of Paris Hanukkah Menorah 


Plaster of Paris Hanukkah Menorah


Here with this creative Hanukkah Menorah craft you will be making 9 individual candle holders.  You and your children will be able to arrange them any way you would like to celebrate the 8 nights of Hanukkah.  Check out Kveller for all the craft details.


(4)  Birthday Candle Menorah


Birthday Candle Menorah


This might look like you are celebrating a child’s birthday that is turning 9, but it’s not.  This is a Birthday Candle Hanukkah Menorah.  Made from Birthday candles, clay and paint you and your kids will have a blast making this Hanukkah Menorah.  I found this craft over at Activity Village.  Make sure to check it out for yourself.


(5)  Tot Friendly Hanukkah Menorah


Tot Friendly Hanukkah Menorah


Here is a kid-friendly Menorah that everyone in the family will enjoy making… and lighting.  Instructables shows you how to take a few recycled materials, some Mod Podge and LED tea lights and make your very own tot friendly Hanukkah Menorah for your home.  Check it out.


(6)  Handprint Menorah


Handprint Menorah


Well, I know this isn’t exactly a Hanukkah Menorah you can light…. but it is a super fun Menorah craft for the youngest of Crafters.  This is one of our very own Menorah crafts and the kids love it.  Simply made from paint and your child’s hands your little one will love making this Handprint Menorah.


(7)  Baby Food Jar Menorah


Baby Food Jar Menorah


Here is a unique spin on the traditional Hanukkah Menorah.  Aparently Speaking shows us how to take some baby food jars and make them into a beautiful Hanukkah Menorah.  I love the way this Menorah looks.  Check out her site for all the craft details.


(8)  Glass Bottle Menorah


Glass Bottle Menorah


I love this Hanukkah Menorah craft.  I just love how natural and clean the white bottle look against the blue candles.  This is an easy craft that is sure to be a lot of fun.  Ready Made shows you how to get this same Menorah look for yourself in great detail.


(9)  Alphabet Blocks Menorah Craft


Alphabet Blocks Menorah Craft


If you have little ones at home you surely have some alphabet blocks.  Your kids will get a kick out of this Hanukkah Menorah Craft.  Here Creative Jewish Mom shows you how to take ordinary alphabet blocks and transform them into this creative Hanukkah Menorah.


(10)  Wood Menorah


Wood Menorah Craft


I love this creative Menorah Craft.  It’s so colorful and just makes me happy to look at it.  I found this Menorah craft at Better Homes & Gardens.  Here they use different sized wooden beads and spools to create the individualized candlesticks used for this Menorah.  Check it out for yourself.


(11)  Cookie Menorah


Cookie Menorah


Here is a tasty Menorah you are sure to love.  Using a lollipop stick attached to the cookies you are able to attach them to a Menorah.  This Hanukkah Menorah craft looks beautiful finished and added as a centerpiece to any table.  Go to Sweet Designs to check it out.


(12)  Spool Menorah


Spool Menorah


This is a cool idea.  Here Parents explains how you can make this adorable and colorful Hanukkah Menorah for yourself.  Made from spools, colored pencils and yellow erasers (and some other materials) you can create this same look for yourself.  And, there is no flame…. so this Menorah your child can touch.


(13)  Macaroni Menorah


Macaroni Menorah Craft


I love macaroni crafts…. and so do kids.  Here is a Hanukkah Menorah Macaroni craft.  Free Kids Crafts shows you how you can take macaroni and lentils and make a festive Menorah.  Hang it up proudly during Hanukkah for all to see.  You can even talk about the Festival of Lights while doing this craft.


(14)  Sparkly Hanukkah Menorah


Sparkly Hanukkah Menorah Craft


Here is a fun Hanukkah Menorah craft that you and your kids are sure to love.  Upper West Side Mom shows us how to take a block of wood, hex nuts and some other materials and create these elegant looking Menorahs.  Check out the site for all the craft details.


(15)  Manzanita Branch Hanukkah Menorah


Manzanita Branch Hanukkah Menorah


How beautiful is this Hanukkah Menorah?  So beautiful.  And, Martha Stewart shows us how you too can have this Manzanita Branch Hanukkah Menorah.  I love how this Menorah looks as a centerpiece at the table.  It’s breathtaking.

Technorati Tags: , , , , , , , , , , , , ,