How to Make a Bow Tie for New Year Eve Party

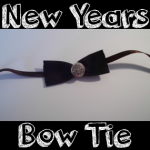
Are you allowed to stay up until midnight on New Years Eve and want to look all dressed up and spiffy? Here is a cute craft for kids to make a bow tie to wear an outfit with a classic style, perfect for any New Year party. Here is the step by step tutorial offered by Laura from Dacian Moon Handmade

You Might Also Like Our Other New Years Crafts


How to Make a Bow Tie for New Year Eve Party


How to Make a Bow Tie for New Year Eve Party

CRAFTS MATERIALS NEEDED:

– material or canvas (a rectangle of  about 8 cm x 5 cm)
– metallic button
– scissors
– ribbon
– needle and thread


IMG_3019


Step 1.

Fold the canvas in two lengthwise.


IMG_3020


Sew the two sides together…


IMG_3021


Like this.


IMG_3022


Step 2.

Bend so that the cloth will be sewn on center.


IMG_3023


Sew the new edge…


IMG_3025


… like this.


IMG_3027


Sew the other edge too.


IMG_3028


Step 3.

Turn it back in front.


IMG_3029


Make a seam in the middle, parallel to the edges.


IMG_3034


Pull the thread…


IMG_3035


… like this.


IMG_3036


Step 4.

Put the button on the needle…


IMG_3037


… and sew it over the middle seam.


IMG_3039


Step 5.

Cut the ribbon in half…


IMG_3041


… and sew it on the back of your bow…


IMG_3042


… like this.


IMG_3043


Your chic bow tie is ready.


IMG_3044


And there you have it, a cute little bow tie to wean on New Years Eve to celebrate the New Year in style! I hope that you had fun!

You Might Also Like Our Other New Years Crafts

Technorati Tags: , , , ,

How to Make Paperclip Christmas Angels : Easy Craft Idea for Kids

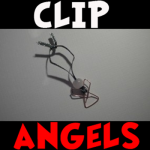
You can make a cute little paperclip angel to hang on your Christmas tree or to just decorate your bedroom or house. These are super easy to make and all of the materials are probably sitting around your house somewhere. Laura from Dacian Moon Handmade  will show you today how to make this simple decoration, step by step.

Check out our Christmas Crafts.


How to Make Paperclip Christmas Angels Easy Kids Craft Tutorial


How to Make Paperclip Christmas Angels Easy Kids Craft Tutorial

CRAFTS MATERIALS NEEDED:

– butterfly paperclip
– bead
– ribbon
– sewing pin


Step 1.

Fold the ribbon in two and put it through the bead.


You can help it with the pin.


It will look like this.


Step 2.

Put the ribbon through the paperclip, like this…


…and make a knot over the bead.


Step 3.

Bring the bead near the paperclip…


… and now it looks like an angel 😀


Tie both ends together and your decoration is ready.


And there you have it, a beautiful Christmas Angel. It is so adorable, isn’t it? You can make these as a gift or use it as a Christmas ornament. Merry Christmas!

Check out our Christmas Crafts.

Technorati Tags: , , , , , ,

How to Make Autumn Dolls or Figurines in Easy Craft Idea for Kids

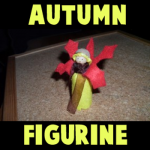
You can make this Autumn themed doll or figurine to celebrate fall, using an acorn cap for the hat and making a leaf out of felt for the “wings” of this little Autumn Fairy. This is a great Autumn-time craft that you will enjoy. Step by step tutorial offered by Laura from Dacian Moon Handmade


How to Make Autumn Dolls or Figurines in Easy Craft Idea for Kids


How to Make Autumn Dolls or Figurines in Easy Craft Idea for Kids

CRAFTS MATERIALS NEEDED:

– yellow and red felt
– pens (or permanent markers) – for eyes and mouth
– wooden bead
– scissors
– cork
– toothpick
– acorn cap
– toothpick
– brown ribbon
– craft glue


Step 1.

Glue the wooden bead on toothpick.


Step 2.

Stick toothpick in cork…


… until there are about 0.5 cm left.


Step 3.

Draw a circle and a rectangle on yellow felt. The circle must be a little bigger than the wooden bead and width of the rectangle must be from the bottom of the cork to the wooden ball.


Also draw a shape like this on red felt.


Step 4.

Cut them out.


Step 5.

Apply a layer of glue on the yellow circle…


… and place it on the wooden bead, like this.

Let it dry.


Next, put a bit of glue inside the acorn cap and on the edges…


… then fix it over the yellow circle.


You have now the head with yellow hair and acorn hat.


Step 6.

Adjust the upper part of the cork…


… like this.


Step 7.

Apply a layer of glue on the rectangle…


… like this…


And cover the cork with it.


Let it dry well.


Wrap the ribbon around the neck, over the yellow rectangle but take care to let the hair free.


Make a knot to keep it in place. You can cut the ribbon ends if they are too long.


Step 8.

Apply a stripe of glue on the lower part of red shape…


… and fix it over the ribbon, like this. Let it dry well.


Now use your pens / markers to add eyes and mouth and your cute doll is ready 😉


I hope your Autumn Fairy Doll turned out great. This would be a great decoration for the Thanksgiving table or any dinner in Autumn. I hope that you had fun. Come back soon for more crafts.

Technorati Tags: , , , , , , ,

How to Make a Sewn Notebook Cover with Cute Bunny on Top for Girls

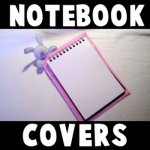
School is about to start yet again and we thought you would love this craft to make a hand-sewn notebook cover. It is a super cute notebook cover that includes a stuffed bunny rabbit at the top. You love to write on it!  Laura from Dacian Moon Handmade  will show you, step by step, how make it.

How to Make a Sewn Notebook Cover with Cute Bunny on Top for Girls


How to Make a Sewn Notebook Cover with Cute Bunny on Top for Girls


CRAFTS MATERIALS NEEDED:

– light colored fabric
– pink felt
– pen
– notebook
– scissors
– pink ribbon
– pink bead for the nose
– instant glue
– filling material
– black paint marker


IMG_7041


Step 1

Fold the felt in half and place the notebook over it.


IMG_7043


Let about 0.5 cm on both parts (left and right) and cut the extra felt.


IMG_7044


Step 2.

Sew the two parts together until you reach about 3/4 of it.


IMG_7046


Measure with the notebook if the height is OK. You should have about 2.5 cm to the notebook spire.


IMG_7047


Step 3.

Put the ribbon here …


IMG_7048


… and sew it in place.


IMG_7049


Like this.


IMG_7051


Step 4.

Continue sewing for another 3 cm then fold the felt backward…


IMG_7052


And sew the parts together. This way, the upper part will be stronger.


IMG_7053


Do the same on the other part.


IMG_7054


The Cover will look like this.


IMG_7055


Now separate the default covers of the notebook and put them between the ribbon and felt.


IMG_7056


Like this.


IMG_7057


This is our notebook 😉 Do you think we can make it cuter?


IMG_7058


Step 5.

Of course! Let’s make a bunny! Draw a head with 2 long ears and two small paws on fabric.


IMG_7059


Cut them out.


IMG_7060


Place it again on fabric and draw the outline. Cut the second bunny out.


IMG_7061


Like this.


IMG_7062


Step 6.

Start sewing the two parts together. Let’s start with an ear.


IMG_7063


When you arrive in this point…


IMG_7064


… prepare the filling material…


IMG_7066


… and fill the ear.


IMG_7067


Then continue to sew until you finish the ear. It is important to sew only a little bit over half, then fill it because if you sew first and then fill, you can’t reach all the corners.


IMG_7068


This is the ear finished.


IMG_7069


Continue with the other ear…


IMG_7070


… the paws, and close the head. Don’t forget to fill it when you sew.


IMG_7071


The bunny head looks like this.


IMG_7072


Step 7.

Choose a point where you want the nose to be…


IMG_7073


… and sew the bead there.


IMG_7074


Like this. (If you prefer, you can glue the bead there)


IMG_7075


We will put the bunny in the corner.


IMG_7076


Sew it in place.


IMG_7077


Like this.


IMG_7078


Add the notebook and you are almost ready.


IMG_7080


Use the paint marker to draw 2 eyes and a mouth for the bunny 😉


IMG_7081


And there you have it…the finished notebook cover…the  bunny will keep you company as you write in it…whether is a journal or a school notebook. I hope that you had a lot of fun!

You Might Also Enjoy Our Other Back to School Crafts

Technorati Tags: , , , , , , ,

How to Make a Cute Little Fabric Snowman

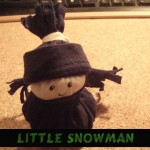
Today we will show you how to make this cute little fabric snowman. He is a lot of fun to make and even more fun to play with. On this cold Winter day, I thought this would be a great craft to share with you.

Step by step tutorial offered by Laura from Dacian Moon Handmade

How to Make a Cute Little Fabric Snowman


CRAFTS MATERIALS NEEDED:

– dark blue fabric
– white fabric
– filling material (I use some cotton pads broken into pieces)
– scissors
– ribbon
– black paint or marker
– button


Step 1.

Cut a disc of blue fabric and a smaller one of white fabric.


Step 2.

Start sewing around the edges…


… like this.


Pull the thread ends …


… and fill the inside with the filling material.


Tie the thread ends.


Do the same for the white disc.


Step 3.

Put the needle and thread through the middle of white part…


… then through the middle of the blue part…


… and through the button (we will use the button to make a solid part on the base. It will help our snowman to stay.)


Get back through the blue part and the white part to fix all parts together.


Step 4.

Cut two rectangles of blue fabric, one wider than the other.


Fold the lower part on the big one…


… and wrap it around the snowman’s head (the white part)


Use the ribbon to tie it, like this. Now the snowman have a hat.


Step 5.

Let’s make a scarf now. Take the other blue fabric rectangle…


… and wrap it around the neck of your snowman, then tie it.


Make some cuts on both ends of the scarf and on the upper part of the hat.


Thus, the hat and scarf will have fringes.


Use black paint / marker to draw eyes and mouth, and your little snowman is ready.


Technorati Tags: , , , , , ,

How to Make a Patriotic Brooch Pin for The Fourth of July

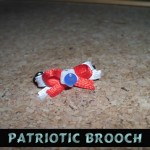
Are you proud of being a US citizen … Of your history? Show it! Wear this cute patriotic brooch pin for the 4th of July. Red…white…and blue… all of America’s beautiful colors. Laura from Dacian Moon Handmade  will show you how to make it, step by step.

How to Make a Patriotic Brooch Pin for The Fourth of July


patrioticBrooch


CRAFTS MATERIALS NEEDED:

– ribbon: white and red (~ 6 cm)
– white flower bead (or star)
– blue bead
– brooch base
– needle and thread
– instant glue if you don’t want to sew the brooch on her base.


IMG_4094


Step 1.

Take the white ribbon and make a loop. like this.


IMG_4095


Fix it by sewing.


IMG_4096


Bring over the other end, making another loop. Sew it there.


IMG_4097


Step 2.

Do the same with the red ribbon, but make this bow a little bit smaller.


IMG_4098


Sew it over the white one.


IMG_4099


Step 3.

Add in the middle the flower…


IMG_4100


… and the blue bead.


IMG_4101


Turn back through the flower bead…


IMG_4102


And fix it there.


IMG_4103


Step 4.

Now place the brooch on the base by sewing, like me, or using glue.


IMG_4104


Your brooch is ready to be wear.


IMG_4109


Isn’t this a cute American pin? Wear it and be proud on America’s birthday.

Technorati Tags: , , , , , , , ,

Number One Dad Badge Fathers Day or Mothers Day Gift Craft

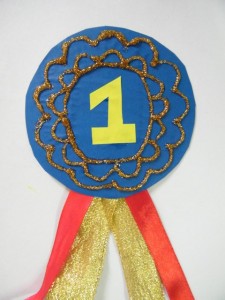
Is your dad the best in the world? Here’s a father’s day gift that will help him remember that. The simple instructions to make this Number 1 Dad badge are given below:

Number One Dad Badge Fathers Day Gift Craft


Craft materials required:

Thick card stock ( cereal box etc.)

ribbon

glue

scissors

glitter glue

colored paper


Step 1:


Cut out a circle on thick card paper as shown.

Step 2:


Glue colored paper on it as shown.


Step 3:


Cut out the number 1 and glue it in the center as shown.

Step 4:


Cut out 2 pieces of ribbon and fold them as shown below

Step 5:


Tape them to the back of the card as shown.

Step 6:


Decorate with glitter glue as shown.

Technorati Tags: , , , , , , , , , ,

Puppets for Thumb wrestling: Father’s Day Gift

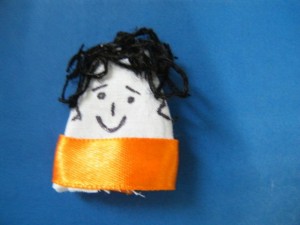
Here’s a Father’s day gift that guarantees hours of fun. Make a set of thumb puppets for your dad and yourself, and play thumb wrestling. The simple illustrated instructions to make the thumb puppets follow:


Craft materials required:

-White fabric

-black yarn

-ribbon

-scissors

-needle and thread

-fabric glue

-Permanent marker


Step 1:

Cut out a piece of cloth double the length of your thumb and about an inch wider than the width of your thumb.


Step 2:

Fold it into half and stitch along the two sides as shown.


Step 3:

Fold it inside out as shown:


Step 4:

Glue small pieces of yarn to make hair


Step 5:

Glue a strip of ribbon along the bottom as shown


Step 6:

Add facial features with a marker.


Make another one for your dad in the same way. Make sure its big enough for your dad’s thumb. Your dad is sure to enjoy this Father’s day gift.

Technorati Tags: , , , , , , , , , ,

How to Make a Snowman from Socks

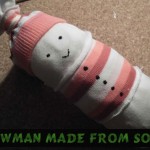
When you think of winter time what do you think of?  Snow, of course.  Well, what is the one thing that children love to make in the snow?  A snowman.   Today I’m going to show you how to make a snowman from socks.  This is an adorable snowman stuffed toy that any child will love to snuggle with.  And, if the child helped your make it…. they will enjoy it even more.  This is a great winter time craft that can be enjoyed by children young and old.

Check out our other Winter Crafts and Sock Crafts.

Step by step tutorial offered by Laura from Dacian Moon Handmade


Materials Needed

– striped sock
– white fabric
– filling material (I used some cotton pads broken into pieces)
– scissors
– ribbon
– black paint
– needle and thread


Step 1

Measure the width of the socks on the fabric folded in two…


… and cut it out.


Sew the two sides together, letting an opening on the upper part.


Like this.


Turn it to the other side.


Step 2

Shred the cotton pads into small pieces…


… and fill the sewed white fabric with it.


Like this.


Tie the open end with the ribbon.


Step 3

Use a thread to separate the 3 snowballs of the snowman.


Like this.


Step 4

Cut off the upper part of the sock …


… then cut that part in half.


Dress the snowman with one, as a shirt.


Put the other one on its head, as a cap.


Use the ribbon to tie the cap to keep it in place.


Draw eyes, mouth and buttons on your snowman using black paint.


Check out this adorable sock snowman.  You can give this to a friend or family member…. or enjoy it for yourself.

Technorati Tags: , , , , , , , , , , , ,

How to make a Pine Cone Christmas Figurine Ornament

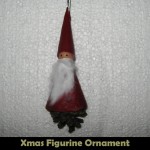
Today I’m going to continue with another Christmas Craft.  This one will be a Pine Cone Christmas Figurine Ornament.  It is super cute and will look terrific on the Christmas Tree.  Let each of the kids make one of these figurine ornaments…. they will love hanging something up on the tree that they made themselves.  Plus, it is so much fun.  So, grab the materials needed and let’s get started.

Check out our other Christmas Crafts.

Tutorial offered by Laura from Dacian Moon Handmade .


Materials Needed

– cardboard
– red leather
– a cotton pad
– 1 wooden bead (big enough to be the head)
– scissors
– 1 piece of ribbon
– 1 pine cone
– craft glue
– black paint
– toothpick


Step 1

Take the cardboard…


…and make a cone of it: bring one side over the middle.. .


… then the other. Glue the two parts together.


Place the pine cone inside, to measure how long the cardboard cone should be.


Cut the extra cardboard.


It will look like this.


Step 2

Apply a border of glue inside the cardboard cone…


… like this.


Then fix it over the pine cone.


Step 3

Take the wooden bead…


And place the toothpick inside.


Make a collar of glue where the toothpick comes out…


… and place it inside the cardboard cone, like in the picture. Keep it a little pressed, until the glue is dry.


Step 4

Take the leather and put it over the cardboard cone.


Measure the length and trace it with a pen.


Cut it out…


… like this


Apply glue on the back of the leather…


… and place it again over the cardboard cone.


Let it dry.


Step 5

Make another cardboard cone, narrower than first. This will be the cap.


Glue the cardboard cone.


Apply a layer of glue on the lower part that goes down from the cone and fold it over it.


Now cut the extra cardboard.


Measure the cone cover on the leather…


… like this.


Cut it out.


It will look like this now.


Apply glue on it…


… and place the cardboard cone on it.


Cover it with the leather.


Apply glue on the back…


… and place there the folded ribbon. Keep it in place until the glue is dry.


Now, let’s put it on the head. Put glue over the upper part of the head…


… like this…


…and fix the cap on it. Let it dry.


Step 6

Take the cotton pad…


… and break it into pieces to make one beard like this.


Apply glue on the lower part of the head and on the front part of the coat…


… and place the beard on it, fix it well on the face.


Take a little black paint with a toothpick…


… and draw its eyes.


Now you have a funny figurine to put on your Xmas tree.


The figurine is cute, huh?!  It will look wonderful on the Christmas Tree.  Enjoy!!

Technorati Tags: , , , , , , , , , , , , , ,

How to Make Paper Christmas Globe Ornaments

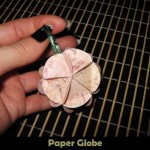
I have a super fun craft for you today…. and it is perfect for the Christmas holiday.  Today I’m going to show you how to make a Paper Christmas Globe Ornament that will look beautiful on any Christmas tree.  You could even make a few of them to spread throughout the tree.  This is a perfect way to adorn the Christmas tree using decorations you made yourself.  Imagine the joy it will give you to see these on the tree.  So, grab the materials needed and let’s get started.

Check out our other Christmas Crafts.

Laura from  Dacian Moon Handmade will show you how to make this step-by-step.


Materials Needed

– pattern cardboard
– pencil
– small piece of ribbon
– glue
– scissors
– auto-adhesive crystals (optional)


Step 1

Draw 20 circles on the cardboard.


Cut them out.


Step 2

Fold one margin upward…


… then another one…


…and the third to close the triangle.


Step 3

Repeat step 2 for all the 20 circles.


Step 4

Start to connect the pieces by applying a layer of glue on one side…


… and press on it a side from another piece, like this.


Do the same to glue all the upper sides…


Continue with the lower sides.


When you will have only one piece to add, it will look like this.


Step 5

Add a small amount of glue on one corner and place the folded ribbon on it.


Then glue the last piece like all the others.


Step 6

This step is optional.

Take one auto-adhesive crystal…


… and place it on one triangle. You can use that to add more of a shine to your globe.


Now your globe is ready to take its place on the Xmas tree.


Beautiful!!  Now your Paper Christmas Globe Ornament is all finished.  You can even make a few more to spread around the Christmas Tree.

Technorati Tags: , , , , , , , , , , , , ,

How to Make a Simple Christmas Ornament out of Paper

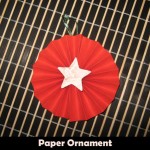
The Christmas season is upon us.  And, with the Christmas season comes the time for decorating the Christmas tree.  In this post I will show you how to make a simple Christmas ornament that is made out of paper.  But, don’t let the idea of this ornament made out of paper fool you…. the ornament turns out quite elegant.  Make a few of these paper Christmas ornaments with your kids and spread them around the Christmas tree.  It will be a lot of fun.  So, let’s get started.

Check out our other Christmas Crafts.

Tutorial offered by Laura from Dacian Moon Handmade.


Materials Needed

– red paper
– pattern cardboard
– pencil
– glue
– scissors
– a small piece of ribbon


Step 1

Cut a rectangle from the red paper…


…and fold it accordion style…


… like this.


We will make a fan from it.


Step 2

Repeat step 1 to make another fan.


Step 3

Glue the margins of the two fans…


… it will look like that. Let it dry.


Step 4

Using your pencil…


… draw a star on the cardboard.


Cut it out.


Apply a layer of glue on the back of the star…


… and place it on the middle of the fans…


… like this.


Now your decoration is ready.


Step 5

Next you must glue a piece of ribbon on the back of it…


… like this.


Wow, what an amazing Christmas ornament!!  It will look fantastic on your Christmas tree.  Make a few more to spread the paper ornaments around your tree.  How festive!!

Technorati Tags: , , , , , , , , , , , ,

How to Make a Simple 3D Christmas Tree Ornament

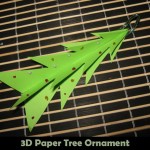
I will continue with the Christmas crafts with this fun craft.  In this post I will show you how to make a simple 3D Christmas Tree Ornament.  And, just like the title says…. this craft is a simple one.  The kids will love making it…. especially the part where they get to decorate the ornament.  They will have so much fun decorating it…. almost as much as they will have fun decorating your Christmas tree at home.  So, grab the materials needed and let’s get started.

Check out our other Christmas Crafts.

Tutorial offered by Laura from Dacian Moon Handmade.


Materials Needed

– green paper
– scissors
– glitter glue (red, gold, blue)
– glue
– metallic silver paint (or silver glitter glue)
– a small piece of ribbon
– pencil


Step 1

Cut the paper in half.


Take one part and fold it in two.


… like this.


Step 2

Using your pencil draw a half of tree, like this…


… then cut it out.


It will look like this.


Unfold, and you have a tree.


Step 3

Repeat to make a second tree from the other piece of paper.


Step 4

Cut on the crease the upper part of one tree and the lower part of the second tree…


… like this.


Combine the two trees.


Use a small amount of glue to keep in place at the top and and the base.


Step 5

Decorate the tree using glitter glue.


I decorate it with small globes.


Step 6

Take the ribbon and fold it in two…


… then glue it on top of the tree and the ornament is ready.


Isn’t this 3D Christmas Tree Ornament precious?  It simply is.  It will look terrific on your Christmas tree.  It’s so simple you will be able to make a few to spread around your tree.

Technorati Tags: , , , , , , , , , , ,

How to Make a Recycled Lid Christmas Ornament

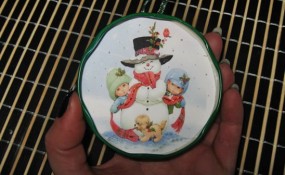
It’s the Christmas season and I’m going to get into the Christmas mood by showing you a fun Christmas craft.   Today I’m going to show you how to make a recycled lid Christmas Ornament.  I love this craft because this ornament is made from recycled materials.  Not only will we use a recycled jar lid, but we will also use a recycled greeting card.  Plus, it turns out super cute.  Your kids will really enjoy making these Christmas ornaments.  So, let’s get started.

Check out our other Christmas Crafts.

Laura from  Dacian Moon Handmade will show you how to make this recycled lid Christmas ornament.


Materials Needed

– recycled lid
– recycled greeting card
– scissors
– glitter glue (I use gold glitter glue but you can choose another color to match the greeting card you use)
– craft glue
– metallic silver paint
– a small piece of ribbon
– pencil


Step 1

Decide what part of the card you want to use and place the lid over it.


Using your pencil trace the contour of the lid…


… then cut out the desired part…


… like this.


Step 2

Apply a layer of glue inside the lid…


… and place the cut card over it.


Step 3

Use glitter glue to make some highlights on the card. I use it on the red parts.


It will look like this.


Step 4

Use metallic silver paint to add some delicate accents on the snow and to make snowflakes. (Instead of the metallic silver paint you can put small amounts of glue and place glitter or cotton wool on it )


The front of our ornament is ready.


Step 5

Turn it over to fix the back.


Draw a circle on the rest of the card and cut it out.


You can use it like this or turn it over with the white part up, as I did.


Take the ribbon and fold it in two…


… apply a small amount of glue on the upper part of the lid, like this…


… and place the folded ribbon over it.


Apply glue on the card circle too…


… and put it on top of them, like this.


Now you can write “Season Greetings” on it and decorate it with glitter glue if you want.


Let it dry well and you have a unique ornament made of recycled materials.


Isn’t that an adorable Christmas ornament?  And, it’s made from recycled materials…. how cool is that?!

Technorati Tags: , , , , , , , , , , , , , , ,

How to Make Thanksgiving Napkin Rings

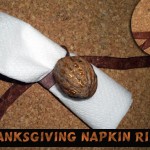
People are always wondering how they can make their Thanksgiving festive, but unique at the same time.  In today’s craft I will show you how to do just that.  In this post I will show you how to make Thanksgiving napkin rings made out of walnut shells.  And, inside these walnut shells your guests will find a nice surprise…. a thank you from you.  This is a simple yet fun craft that you and the kids will enjoy making.  Your guests will love these.  So, let’s get started.

Check out our other Thanksgiving Crafts.

Tutorial offered by Laura from Dacian Moon Handmade


Materials Needed

– walnut shells (2 halves)
– ribbon
– pen
– paper
– craft glue
– gold glitter glue
-scissors


Step 1

Cut a small rectangle of paper (about 0.8 cm x 5 cm)…


… and write “Thank you” on it.


Step 2

Apply a bit of glue on one end…


… and place the ribbon on it.


Let it dry.


Step 3

Place the walnut shells on paper and draw a pattern on them with glitter glue.


I made stripes.

Let them dry well.


Step 4

Wrap the note to look like this.


Step 5

Apply a layer of glue on the edges of a walnut shell…


… like this.


Step 6

Put the note inside…


… and close the walnut, like this.


Let it dry well.

Use ribbon to tie napkin.


And, there you have it…. you just made a Thanksgiving Napkin Ring.  Make as many as you need to complete your Thanksgiving table.

Technorati Tags: , , , , , , , , , ,

How to Make a Fairy Mask for Halloween

Little girls love to be Fairys.  They just do.  But, sometimes those store bought Fairy Masks can be a real nuisance to wear during Trick-or-Treating.  Well, I have a treat for you today.  I’m going to show you how to Make a Fairy Mask for Halloween.  This Fairy Mask is made with Tulle so it is wonderfully light.  Not like those plastic or vinyl store bought Fairy Masks…. this mask is simply beautiful.  Plus, your little girl will have a blast making her mask too…. almost as much as wearing it.  Keep an eye out as I will show you How to Make a Fairy Skirt Costume later today.

Check out our other Halloween Crafts.

Laura from  Dacian Moon Handmade  will show you, step by step, how to make this.


fairy-masks


Materials Needed

– mask template (you can download it from here)
– transparent foil
– scissors
– a piece of tulle
– silver textile paint
– silver ribbon
– tape


Step 1

Print the template and fix it on the table with tape.


Place on top of it the transparent foil and fix it with tape.


Over the foil place the tulle and fix it with tape also.


Now the setting is ready.


Step 2

Take the silver textile paint (multi-surface paint will work fine too)…


… and trace the pattern with it.


Take care to follow every swirl and every line and don’t touch the lines you already painted.


When you finish it will look like this. Let it dry overnight.


Step 3

Gently peel tulle away from the transparent foil.


It will look like this.


Cut out around the mask, including eye holes.


Like this.


Cut the ribbon in two and fix them with paint (or with craft glue) to the mask…


… like this.


Let it dry well and your mask is ready.


Didn’t this Fairy Mask come out amazing?!  Any Fairy would love to wear this Fairy Mask for Halloween.  Keep an eye out as I will be showing you How to Make a Fairy Skirt Costume next.

Technorati Tags: , , , , , , , , , ,