How to Make an Autumn Brooch or Pin to Wear to Celebrate the Fall Season or Thanksgiving

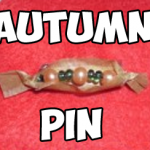
Learn how to make a cute little brooch to wear during Fall or you can even wear it on Thanksgiving day 🙂 You can even make one for all of your guests. 🙂 This step by step tutorial is offered by Laura from Dacian Moon Handmade

How to Make an Autumn Brooch or Pin to Wear to Celebrate the Fall Season


How to Make an Autumn Brooch or Pin to Wear to Celebrate the Fall Season


CRAFTS MATERIALS NEEDED:

– a piece of baking paper
– orange  / red beads
– green beads
– scissors
– a small piece of wire
– brooch base


Step 1.

Put wire through the paper at about 0.8 cm from one end…


… like this.


Step 2.

Put beads on the wire…


… making a pattern, like this.


Step 3.

Insert the other end of the wire through the paper so that the beaded part sits right.


Like this.


Cut the paper around the beads, like this.


Step 4.

Bend ends of wire to fit through the holes of the brooch base.


Tie them and cut the extra wire…


Like this.


Step 5.

Bend up the paper, besides beads…


… then twist one end…


… and the other. Your brooch is done 🙂

I hope that you enjoyed this Autumn craft and that it turned out as beautiful as you hoped it would. Come back soon for more crafts.

Technorati Tags: , , , , , , ,

How to Make an Earth Day Soda Bottle flower light

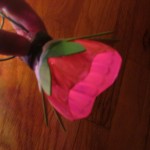
This flower light bulb craft is a great way to spend a rainy weekend, and also a terrific way to teach kids about recycling and reusing everyday objects. Explain to your child that there’s more than one way to recycle one thing into something else. You can turn used soda bottles into a string of flower lights for spring!

How to Make an Earth Day Soda Bottle Flower Light


flower-light-bulb-main


Crafts Materials Needed


flower-light-bulb-what-youll-need


String of small lights
A 16 oz soda bottle
Craft foam
Paint suitable for plastic (I used Calypso All-Purpose Acrylic Paint which dried nicely and fast)
Craft foam in green
Floral wire
Scissors
Tape (green tape or floral tape optional)


flower-light-bulb-step-one


1. Cut off the top section of the bottle.

2. Trim the cut end into petal shapes. Child-size scissors (and hands!) are good for this as they can maneuver more easily inside the bottle.


flower-light-bulb-step-three


3. Paint the outside of the bottle and allow to dry.


flower-light-bulb-step-four


4. While the paint is drying, cut two 5″ pieces of floral wire. Wrap around the base of the flower as shown, twisting the ends on each side of the base.


flower-light-bulb-step-five


5. Cut petal shapes into a 2″ x 5″ piece of green craft foam.


flower-light-bulb-step-six


6. When paint is dry, wrap petal piece around the base of the flower as shown. I used green floral tape to cover the regular clear tape I had used to make it look neater and prettier.


flower-light-bulb-step-seven


7. Insert a light into the hole in the base. Then take each set of two floral wire ends and wrap around the light string as seen above.


flower-light-bulb-finished-product


Voila, you have your own flower light! Repeat the process as many times as you’d like to string the lights around the yard for a party or in your child’s room.

Technorati Tags: , , , , , , ,

How to Make Doll Pencil Toppers for Back to School

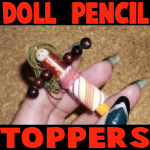
Do you want to create an adorable companion for your time back at school? Here is an easy-to-make doll that can be stored on the top of your pencil. Laura from  Dacian Moon Handmade  will show you, step by step, how to make it.


how to make doll pencil toppers for back to school


CRAFTS MATERIALS NEEDED:

– pencil
– thick tread
– wooden beads (one white and 6 brown)
– small cloth piece
– matching cord
– a piece of wire
– needle
– rubber tube


Step 1.

Take the thread …


… and spin it on your fingers, like this.


Step 2.

Tie it on the middle with the wire…


… like this.


Put the wire through the white bead – this will be the head of our doll.


Step 3.

Take the rubber tube…


… and make two holes in it with the needle.


Place it under the head, put the wire through the holes you made.


Step 4.

Is time to form her arms.


Add three brown beads like this…


… and put the wire end through the last bead one more time. That way the beads will not fall.


Repeat for the other arm.


Step 5.

Is time to place the topper on the pencil…


Like this.


Let’s dress her. Roll the piece of cloth over the rubber tube, under the arms…


… like this.


Tie it with the cord…


… and that is our doll.


You can use markers to make her eyes and mouth too. And she will make your classes easier 😉


Technorati Tags: , , , , , ,

How to Make a Christmas Fairy Ornament

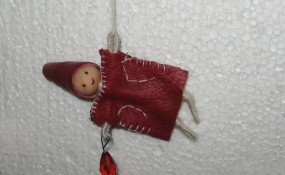
I have a special little Christmas craft for you older kids and adults.  Today I’m going to show you how to make a Christmas Fairy Ornament.  This cute fairy even has a crystal light she is holding.  The crystal will look as it is really lit when the Christmas tree’s lights shine through it.  This Christmas Fairy Ornament will be sure to get you in the Christmas spirit…. after all Christmas is less than a month away.  So, grab the materials needed and let’s get started.

Check out our other Christmas Crafts.

Tutorial offered by Laura from Dacian Moon Handmade .


Materials Needed

– red leather
– thick thread
– 1 wooden bead (big enough to be the head)
– scissors
– needle and thread
– 2 toothpicks
– craft glue
– black and red paint
– crystal (preferably drop)
– wire
-1 pin


Step 1

Take the wooden bead and put a toothpick through it (if doesn’t stay by itself, glue it).


Cut two pieces of wire, one slightly bigger than the other.


Take the smaller one and bend its ends, like this.


Coil it once around the toothpick – those will be her arms.


Step 2

Take the thick thread – you don’t need to cut it for that – and start to roll it over the toothpick.


When you arrive at the wire, cover the intersection in “x”, like this. That will make the arms stay fixed.


Continue covering one arm, and the loop at the end of it. When it is covered, press the end of the wire well and cover it with the other part…


… like this. Continue to roll over back to the toothpick and go on on the second arm.


Cover it the same way and from the middle go down covering the toothpick until you think it is the place for the legs.


Step 3

Take the other piece of wire and bend its ends.


Then bend the wire like this, with one part a little bit longer than the other.


Now bend again the longer part, so she has a leg fold at the knee.


Place the legs over the toothpick and fix them with thread as you did for the arms.


Cover them in an “x” then go down over one leg.


Secure the end and go up again.


Cut the toothpick, keeping a small part to keep the legs in place…


… and cover this part too.


Go down on the second leg, then up until you reach the head.


Here cut the thread and make a knot.


Step 4

Place the figurine on leather and measure her coat.


Mark it on the leather.


Cut double the part you measured…


… and cut that in two…


… one of them will be the front and the other the back of her coat. Make a small “v” cut in the front and back parts, where the head will be.


Start sewing the two parts together, using the cross stitch technique…


… like this.


When you reach the “v” sew only the front part, like this.


Place the fairy inside…


… and continue stitching the front and back together.


Step 5

Sew the two parts together under the arms…


… like this.


Then make a “L” stitch to mark out the arm and the body of the fairy.


It will look like this.


Step 6

Cut a triangle of leather to make her a cap.


Apply a layer of glue on the upper part of the head…


… like this…


… then put the leather on her head, making a cone.


Keep it in place until it is dry.


Step 7

Take a little black paint with a toothpick…


… and draw her eyes.


And some red paint to make her mouth.


Take the pin…


… and put the crystal on it.


Bend it and hang it on her hand. Like this. Then close the loop.


The last thing that must be done is to put a thick thread through her other hand and the fairy ornament is ready.


How adorable is this Christmas Fairy Ornament?  So cute!!  And, it will look even better hung on the Christmas tree.

Technorati Tags: , , , , , , , , , , ,

How to Make a Spider Pendant for Halloween

I have a treat for you crafters today….. I’m going to show you how to make a Spider Pendant for Halloween.  Made from jewelry wire and beads this Spider Pendant turns out beautifully.  Make it for yourself or as a gift for someone special…. they will surely love it.  What is awesome about this Spider Pendant is that you can wear it all year long…. not just for Halloween.  It turns out that amazing….. you don’t want to just save it for Halloween.  So, grab the materials needed and let’s get started.

Check out our other Halloween Crafts.

Laura from  Dacian Moon Handmade  will show you, step by step, how to make this Spider Pendant.


How to make Spider Pendants for Halloween


Materials Needed

– black crystal
– red coral (you can use any red bead, just keep in mind it should be bigger than the black one)
– 2 little beads (seed beads)
– one piece of wire (about 3 cm)
– 3 pieces of wire (about 4.5 cm)
– chain
– round nose pliers

NOTE: Wire should be neither too soft nor too hard.


Step 1

Take the small piece of wire…


…and begin making a loop on one end.


Put the 2 seed beads on it…


… and close the loop. These will be the eyes.


Step 2

Add the black crystal…


… and the red coral bead.


Using the pliers make another loop on the other end.


Take care to let about 5mm between the black bead and the red one.


Step 3

Take the 3 pieces of wire…


… and bend them in half, like this.


Continue to press on the ends until it looks like this.


Put the spider body through it, like this…


… and tighten the knot.


Press on the ends again…


… and make another knot, like this.

NOTE: It is not actually a knot. You just wrap the 3 wire around the spider body 2 times.


Step 4

Separate spider legs.


Fold down the first leg almost half (smallest side towards the body)…


… and make a little loop on the end, using the pliers.


Repeat for all the legs…


… and your spider is ready.


Add a chain to it (you can put it through the head – between the eyes) and is ready to be worn.


Ok, how awesome is this Spider Pendant?  It is perfect for the Halloween season…. or really any time of year.  It is that beautiful to wear… wear it all year long.

Technorati Tags: , , , , , , , , , , ,

How to Make a Paper Wave Sculpture – Exercise 1

Believe it or not you can actually make sculptures out of paper.  That’s right, you can actually compose items that are built up from a simple paper and molded into shapely items.  In this post I’m going to show you how to make a Paper Wave Sculpture.  With a little bit of patience and following the steps provided below you too will be able to make a Paper Wave Sculpture.  So, grab the materials needed and let’s get started.


How to Make a Paper Wave Sculpture


Materials Needed

Paper

Ruler

Hole Punch

Thread or Fine Wire


Step 1


Cut a strip of paper, hold the ruler firmly across it and pull it through and upwards.


Cut a strip of paper, hold the ruler firmly across it and pull it through and upwards.


Step 2


the paper becomes flexible and easy to handle.


Keep doing this…. the paper becomes flexible and easy to handle.


Step 3


By doing this on opposite sides of the paper you obtain a waved effect.


By doing this on opposite sides of the paper you obtain a waved effect.


Step 4


A thread or fine wire is drawn through a series of holes along the top edge of the paper.


A thread or fine wire is drawn through a series of holes along the top edge of the paper.


Step 5


The thread is drawn up and the edges of the paper fastened together.


The thread is drawn up and the edges of the paper fastened together.

That’s it…. you just made your own Paper Sculpture called the Paper Wave.  Isn’t it amazing?  I think the most amazing part is that this wave is actually just made from paper.  Very cool!!

Technorati Tags: , , , , , ,

How to Make a Leprechaun Trap for St. Patrick’s Day

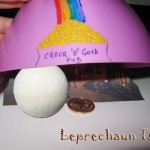
Everybody knows that leprechauns are very fond of money and parties, so let’s make a trap for him that will look like a pub, with the entrance marked by coins.  The craft is not only a lot of fun, but it will totally get you in the St. Patrick’s Day spirit.  After all, St. Patrick’s Day is in a little over a week.  The time is now to start decorating for the Holiday…. and this Leprechaun Trap makes for an adorable St. Patrick’s Day decoration.  So, let’s get started.

Check out our other St. Patrick’s Day Crafts.

Laura from Dacian Moon Handmade will show you, step by step, how to make a leprechaun trap.


Materials Needed

– any picture of a pub interior
– bowl
– scissors
– needle
– paints
– paintbrush
– coin
– a nut or a wooden ball
– a very thin wire (about 10 cm)


Step 1

Take the bowl and with the paintbrush and paints make some coins and a rainbow on one corner of the bowl (mine is rectangular… if yours is round, just paint on one side)…


… then write “Crock ‘O’ Gold Pub”, like in the picture.


Step 2

Take the wooden ball (or nut)


Stick the needle on it.


Wriggle one side of the wire around the needle…


… then the other side around the coin:


It will look like this:


Step 3

Take the picture and fold the upper corners, then place it on the bowl. It should stay like this:


Step 4

Place the bowl (with the picture inside) over the wooden ball (or nut), like this…


… and the trap is ready ! When the leprechaun will try to pass by the wooden ball (because the entrance is smaller than he) the nut will roll and the bowl will fall catching him beneath. The assurance is that even if the ball will not move (and the bowl falls) when he will try to take the coin, the ball will roll and the bowl will fall over him.


Now you have a Leprechaun Trap.  You will be able to catch a Leprechaun for sure this St. Patrick’s Day.

Technorati Tags: , , , , , , , , ,

How to Make a Cardboard Box Lantern

I have a fun and creative craft for you today.  In this post I will be showing you how to make a Cardboard Box Lantern.  That’s right…. it is a lantern that you can use outside that it made from a cardboard box.  The box is simply decorated with colored sheets of paper and the box is fitted over a light bulb.  This Cardboard Box Lantern will be a great addition to any light fixtures you use outside during a party.  It is sure to help get the festivities going.  So, let’s get started with the craft.

Check out our other Cardboard Box Crafts.


Materials Needed

A square box

scissors

glue

butter paper

some wire

colored paper


Step 1

Draw lines as shown on two opposite flaps of the box.


Step 2

Cut the edges of the cardboard box equally on two opposite sides as shown.


Step 3

Now, when you bring all 4 flaps together, it will form a shape as shown below.


Step 4

On the bottom of the box, cut out a small square as shown below.


Step 5

On every side of the box, draw and cut out a diamond shape as shown below.


Step 6

Cover the box with butter paper


Step 7

Cut out colored paper strips as shown below


Step 8

Fix some wire on the top as shown to hang the lantern.


Step 9

Cover the lantern with paper strips as shown.


Step 10

Put a bulb in the lantern and hang it up on your porch.  That’s it…. the Cardboard Box Lantern is finished.  Now, set it outside for your next party….. it is sure to be a conversation piece.

Technorati Tags: , , , , , , , , ,

How to make Fairy Wings

Earlier today I showed you how to make a Fairy Crown.  Well, what fairy could be complete without fairy wings?  Now, I’m going to help your little fairy become a true fairy this Halloween with their very own Fairy Wings.  They will match the Fairy Crown brilliantly and your little girl will be thrilled with how wonderful they look.

Check out our other Halloween Crafts.

Laura from Dacian Moon Handmade will show you how to make wings to complete your fairy costume for Halloween.


CRAFT MATERIALS NEEDED:

– organza
– 2 pieces of strong wire
– 1 piece of soft wire (about 15 cm)
– scissors
– needles and thread (I use white because my organza is light levander)
– assorted beads, crystals (or paints – the easier alternative)
– craft glue
– lace


Step 1

Take a piece of strong wire and bend it to form 2 sides of a wing, like this.


Make a loop on both ends of the wire.

Do the same with the other piece.


Using the soft wire affix the two wings together, like in the picture.


Step 2

Cut the organza in half.


Place one under one wing…


… and draw its contour using a pen.


Complete the design.


Place the other half of organza on top of that and copy the drawing (organza is transparent)


Step 3

Take the craft glue (I use Tulip glue because is glue for textiles and you can wash the wings if they get dirty).


And place a generous layer on the wire (don’t worry, it is transparent when it is dry).


Press the wire on the organza, following the contour, to glue them together. Let it dry well (until you can’t see the glue anymore).


Cut out the extra organza along the wire.


Like this.


Then cut on the contour on the free side.


Now we have the wings 🙂


Step 4

To keep them in place, you must burn the edges. Use a match or a lighter and bring it close to the organza. Don’t keep it long. Just go around it.

***This is a step for an ADULT only***


It will look like that.


You can add some personality and texture by making some small burns from place to place on the wings. I like to use organza because it melts.


Step 5

Now let’s start decorating the wings.

The easiest way is to use paints to bring your idea to life.

I will walk the longer way 🙂

Because the organza is light lavender I choose pink and grey seed beads, dark grey tube beads, 3 pearls, transparent crystals and 6 tear crystals.

Start on one edge of the design.

Using a needle for beads (one very thin in order to go through the beads) place 3 seed beads on it then sew.


Repeat that operation following the design lines.


Like this. You will sew a small amount of beads at once (3 beads) because another way it will not look well, and it can break.


Use the other beads, crystals… to complete your design.


Step 6

Take the tear crystals…


And sew them on the three corners of every wing…


… to dangle.


Like that.


This is one wing finished.


Step 7

Cut 3 little squares (the big one with the side of 10 cm, the second 7 cm and the little one 5 cm)


Burn the edges.


Sew them together…


… and place them on the center, where the wings are linked.


If you want, you can add beads here too… to match the wings.


Also, you can cut the squares on any you want, but take care when you’ll  burn their edges after that.


Step 8

Turn the wings.


Cut two pieces of lace long enough to put the wings as a backpack.


Sew them on the back of the wings, letting the upper part longer…


… like this.


Now the wings are ready. You can close them on the front with safety pins, brooches or two buttons.


The finished Fairy Wings are beautiful and will look so adorable on any little fairy.  She will love wearing her fairy costume well after Halloween has finished…. it will be great for dress-up fun any day of the year.  Check out our Fairy Crown craft too.

Technorati Tags: , , , , , , , , ,

How to make a Fairy Crown

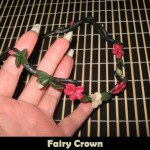
When my daughter was little all she could talk about were fairies.  She was fascinated with them and loved to dress up and imitate them.  My daughter would have loved this craft had I known about it then.  Today I will show you how to make a Fairy Crown.  It would be perfect for Halloween or dress-up any other day of the year.

Check out our other Halloween Crafts.

Tutorial offered by Laura from Dacian Moon Handmade . Children need help from an adult for this tutorial.


CRAFT MATERIALS NEEDED:

– black, green, red and white polymer clay (or any other color you want for the flowers)
– cutter
– toothpick
– soft wire
– baking tray
– baking paper


Step 1 – The Armature

Take the wire and measure how much you need for your crown (by putting it over your head). Cut the rest.


Make waves with the wire and make it circle.


On both ends make a small spiral – this will be the closing.


With the wire you cut before… make some new branches for the crown, like this.


Well, the armature is ready.


Step 2 – The Branches

Take a piece of black polymer clay and condition it.

(Condition polymer clay by hand, simply mix it and squish it with your fingers. You may want to roll it into a log between your palms, fold it in half, and then roll again)


Flatten it.


Start covering the wire with it…


… by turning it around the wire.


This is the armature completely covered. We will let the ending spirals uncovered because when it is baked the polymer clay is hard and you can’t bend it to close the crown.


Step 3- The Leaves

Condition the green clay.


Take a small piece of it and flatten it.


Squish it gently between two fingers on one end…


… then on the other end.


Using the toothpick make a crease on the middle of the leaf.


With the toothpick or with your nails make small creases like in the picture.


You will notice that the leaf had flatten again so squish the endings again to improve its form…


… and place it on the branch.


Add as many leaves you want to make it look good.


Step 4 – The Flowers

Condition the red clay.


Take a small piece of it, make a ball and flatten it.


Make a sign with your nail on it …


… then squish it between two fingers around the sign to make a petal. Like this.


Place it on the branch.


Add four more petals and you have a flower 😀


Add as many red flowers as you want.


Then take the white clay …


… and add white flowers.


Step 5 – The Baking

When you are satisfied with your crown place it on the baking tray… bake it according to the instructions on the polymer clay package (they depend on the brand you use: fimo, cernit, sculpey…, but usually it is one half hour at 230 F or 110 C) – this is the part when you could use a little help.


Let it cool down and you have a beautiful fairy crown.


I love this fairy crown…. it turned out so beautiful.  Any girl would love to play dress-up and wear the fairy crown. It would top off any fairy costume perfectly.  Also check out How to Make Fairy Wings craft that would go beautifully with this Fairy Crown.

Technorati Tags: , , , , , , , , ,

How to make a Spider Web Magnet

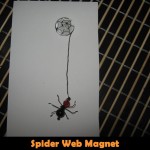
What item in your kitchen is seen most often by family members and company?  Your refrigerator, of course.  So, why not decorate your refrigerator too for Halloween.  Today I’m going to show you how to make a Spider Web magnet perfect for the Halloween season.

Check out our other Halloween Crafts.

Laura from Dacian Moon Handmade will show you how to make a funny Halloween magnet, step-by-step.


CRAFT MATERIALS NEEDED:

– cardboard
– pen
– magnet
– glass
– black soft wire (0.5 thickness)
– one red crystal and one black crystal (a little bigger)
– black thread
– craft glue
– round nose pliers


Step 1 – The Web

Place the magnet on the cardboard …


… and draw its contour.


Inside this contour start drawing the web. The drawing should be waterproof.

Fix a center of the web,…


… draw lines from it to the edge. The lines shouldn’t be perfect.


Then link the lines using horizontal ones. Like this.


Cut out the disc with the web.


Like this.


Step 2. Assembling the magnet

Apply a generous layer of glue on one side of the magnet…


… like this.


Then place the web disc on it (with the drawing up)


Apply a layer of glue on the glass too…


… like this…


… and place it over the web.


Take a piece of thread and roll it around the magnet, just under the glass. Don’t pull hard. It just need to be on the glue.


Let it dry well.


Step 3. The Spider

Cut a piece of black wire – about 4 cm.


Make a loop on one end.


Add the crystals – first the red one…


…  then the black one.


Make a closed spiral at the other end, letting 0.5 cm of wire to the crystals.


Place the crystals at the ends of this wire. This is the spider body.


Now we’ll make the legs of the spider.

Cut three pieces of wire about 4 cm each.


Take one piece and start turning it around the spider body, between the crystals. Turn it around for 3-4 times.


Take care that the remaining wire is equal on both sides.


Add the second piece of wire the same way.


Then the third.


Is time to bend its legs. At about 0.5 cm of the body, bend the wire like in the picture.


Do the same for all the legs.


To prevent scratches, make a little loop on the end of every leg.


Step 4 – Adding the spider

Put the black thread through the loop near the red crystal…


… and make a knot. Like this.


Now the magnet is ready to decorate any metallic surface 😉


Isn’t this Spider Web magnet adorable?  I’m not sure a spider and its web is adorable, but if any should be…. this should be the one.  I love how the spider dangles from the web.  It’s perfect as a magnet this Halloween…. or anytime of the year.

Technorati Tags: , , , , , , , ,