How to Make Autumn Dolls or Figurines in Easy Craft Idea for Kids

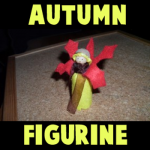
You can make this Autumn themed doll or figurine to celebrate fall, using an acorn cap for the hat and making a leaf out of felt for the “wings” of this little Autumn Fairy. This is a great Autumn-time craft that you will enjoy. Step by step tutorial offered by Laura from Dacian Moon Handmade


How to Make Autumn Dolls or Figurines in Easy Craft Idea for Kids


How to Make Autumn Dolls or Figurines in Easy Craft Idea for Kids

CRAFTS MATERIALS NEEDED:

– yellow and red felt
– pens (or permanent markers) – for eyes and mouth
– wooden bead
– scissors
– cork
– toothpick
– acorn cap
– toothpick
– brown ribbon
– craft glue


Step 1.

Glue the wooden bead on toothpick.


Step 2.

Stick toothpick in cork…


… until there are about 0.5 cm left.


Step 3.

Draw a circle and a rectangle on yellow felt. The circle must be a little bigger than the wooden bead and width of the rectangle must be from the bottom of the cork to the wooden ball.


Also draw a shape like this on red felt.


Step 4.

Cut them out.


Step 5.

Apply a layer of glue on the yellow circle…


… and place it on the wooden bead, like this.

Let it dry.


Next, put a bit of glue inside the acorn cap and on the edges…


… then fix it over the yellow circle.


You have now the head with yellow hair and acorn hat.


Step 6.

Adjust the upper part of the cork…


… like this.


Step 7.

Apply a layer of glue on the rectangle…


… like this…


And cover the cork with it.


Let it dry well.


Wrap the ribbon around the neck, over the yellow rectangle but take care to let the hair free.


Make a knot to keep it in place. You can cut the ribbon ends if they are too long.


Step 8.

Apply a stripe of glue on the lower part of red shape…


… and fix it over the ribbon, like this. Let it dry well.


Now use your pens / markers to add eyes and mouth and your cute doll is ready 😉


I hope your Autumn Fairy Doll turned out great. This would be a great decoration for the Thanksgiving table or any dinner in Autumn. I hope that you had fun. Come back soon for more crafts.

Technorati Tags: , , , , , , ,

Some Really Cool Perpetual Calendar Crafts for the New Year


Some Really Cool Perpetual Calendar Crafts for the New Year


Today I am going to show you a bunch of some really cool perpetual calendar crafts perfect for the upcoming New Year.  What is great about perpetual calendars is that they can be changed to show any combination of day, month, and year….. which means that the same calendar can be used year after year after year.  Sure, you can purchase a perpetual calendar at a store or online, but I am pretty sure you would spend way too much money and they wouldn’t be as awesome as the perpetual calendars I have listed here.  I have scoured the internet to find you some really cool perpetual calendar crafts.  You will surely find one here that will fit your needs.

Check out our other New Years Crafts and Calendar Crafts.

Some Really Cool Perpetual Calendar Crafts for the New Year

(1)  Nut Can Perpetual Calendar Craft


Nut-Can-Perpetual-Calendar


This is a super cool Perpetual Calendar.  Made from a nut can this perpetual calendar is quite unique.  If you look closely at the image above this perpetual calendar even has a choice for mood.  In this case they chose nutty.  Check this craft out at Design Sponge.


(2)  Perpetual Button Calendar


Perpetual-Button-Calendar


This perpetual calendar is super duper cute.  Make it once, and you can use it forever – just move the numbers to their correct location each month, and change the nameplate!  How fun is that?!  I found this craft over at MakeZine.  Check it out for yourself.


(3)  Paper Box Perpetual Calendar


Paper Box Perpetual Calendar


This is one of our very own perpetual calendar crafts.  Here we use some colorful templates that you glue together to make boxes.  Add some popsicle sticks and you have yourself a perpetual calendar.  Check out our Paper Box Perpetual Calendar for all the details.


(4)  Corkboard Perpetual Calendar


Corkboard Perpetual Calendar


I love the idea of this corkboard perpetual calendar.  Here they use a corkboard and foam to give this perpetual calendar a colorful look.  The corkboard is a wonderful material to use as you can easily thumbtack your notes and errands to the corkboard perpetual calendar to remind you what you need to get done.  Check out Michaels for all the craft details.


(5)  Scrapbooking Paper Perpetual Calendar 


Scrapbooking Paper Perpetual Calendar


I found this perpetual calendar craft at Our Big Earth and it is a wonderful idea.  Here they use coordinating scrapbooking paper to give this a unique look.  This is a flip chart type of calendar…. so it would be great for any desktop.  Check out the site for all the details.


(6)  Magnetic Perpetual Calendar


Magnetic Perpetual Calendar


This is actually a cookie sheet perpetual calendar.  For this craft she spray painted the cookie sheet, duct tape the edges and used playing card numbers for the days.  She also attached a dry erase board for notes and special events.  Being that everything is on magnets things can be easily moved.  Check out A Creative Princess for the info.


(7)  Colorful Perpetual Calendar


Colorful Perpetual Calendar


Look how beautiful and colorful this perpetual calendar is.   Here she uses 31 pictures to represent the days of the month…. you can cut out these pictures from scrapbooking paper or just use stickers.  I found this perpetual craft at Sandy’s Space.  Check it out for yourself.


(8)  Thrifty Box Perpetual Calendar


Thrifty Box Perpetual Calendar


Aren’t these perpetual calendars just absolutely beautiful?  No one would believe that you not only made them yourself, but also they are extremely thrifty.  I found this craft at Amazing Paper Grace.  Here she uses $1.00 boxes that she found at Michael’s.  Check out all the details on how she puts these perpetual calendars together.


(9)  Perpetual Calendar / Memo Board


Perpetual Calendar Memo Board


This is such a clever idea!!  I found this craft over at Curbly and I love it.  Here they use six steel bars painted with punchy colors, numbered magnets, plus seven days of the week and twelve months combine to make a perpetual calendar, which also serves as a memo board.  This would look amazing above anyone’s desk.


(10)  Perpetual Family Photo Calendar


Perpetual Family Photo Calendar


This is just absolutely brilliant…. and you will surely get so many compliments on this perpetual calendar.  What you might not be able to tell from the above picture is that there are 31 pictures on the twine.  You will simply flip each day/photo as the days pass.  Check out Shaken Together to see it for yourself.


(11)  Flipping Perpetual Calendar


Flipping Perpetual Calendar


I found this perpetual calendar craft at MomClick.    This is a really neat perpetual calendar because it uses the flip-chart idea.  Easily flip between day of the week, months and number days.  This perpetual calendar will look terrific on any desk.


(12)  Perpetual Chalkboard Calendar


Perpetual Chalkboard Calendar


This perpetual calendar is so awesome…. not just because it is obviously a wonderful perpetual calendar.  But, the materials to make this perpetual calendar is really thrifty.  Gotta love that!!  I found this perpetual calendar craft at I Will Craft.   Here she shows you how she made a perpetual calendar with metal flashing, game pieces and some scrabble tiles all in a framed vintage chalkboard.

Technorati Tags: , , , , , , , , , , ,

14 Fun and Festive Thanksgiving Place Card Ideas


14 Fun and Festive Thanksgiving Place Card Ideas


If you are like me you are having a lot of people over at your house for Thanksgiving.  And, with a large amount of people around a table it can sometimes mean a lot of confusion as to where everyone is sitting.  To relieve the stress from you dealing with that during your fun Thanksgiving festivities one way to do this is to have place cards around the table.  This way your guests can easily go to the table and find their seats easily.  Well, with that in mind today’s post will be about fun and festive Thanksgiving place card ideas.  Sure, you can easily just buy place cards in the store, but where is the fun in that?  Today I have put together 14 awesome Thanksgiving place card ideas I have found around the internet.  Surely, you will find the one that is perfect for you and your Thanksgiving get together.

Check out our other Thanksgiving Crafts.

14 Fun and Festive Thanksgiving Place Card Ideas

(1)  Nutshell Place Cards


Nutshell Place Cards


We are going to get right into this Place Card post with this festive Thanksgiving Place Card Idea.  Here Martha Stewart shows us how to take an average walnut and make it into a beautiful Place Card.  Make enough for your entire Thanksgiving party.  I love this idea because it is a beautiful way to give your Thanksgiving table some style without spending too much money.


(2)  Paper Pumpkin Place Cards


Paper Pumpkin Place Cards


These pumpkins are so beautiful.  Made from card stock or patterned paper these pumpkins can be as stylish or simple as your would like.  Passionately Artistic shows us how you could even fill the pumpkin with treats if you want to give the kids at the Thanksgiving Table an extra smile.


(3)  Leaf Place Card


Leaf Place Card


Here is one of our Thanksgiving Place Card Crafts.  Here we use some cardboard and gold paint to give the leaf an authentic look.  We even use a little gold paint on the edges of the cardboard to have the place cards look very elegant.  Check out How to Make Leaf Place Cards.


(4)  Pilgrim Hat Place Cards


Pilgrim Hat Place Cards


These adorable Pilgrim Hat Place Cards are actually made out of black plastic cups.  This Thanksgiving Place Card craft is super easy and the kids will love to make them.  Use a little gold paint to write the names of the people attending on the lip of the hat.  Check out all the craft details at Me and My Insanity.


(5) Terra-Cotta Pilgrim Hat Place Cards


Terra-Cotta Pilgrim Hat Place Cards


Here is a fantastically unique Place Card idea.  Here Mrs. DesignHer shows us how to take some miniature flowerpots and make them into a unique Place Card.  Plus, your guests will have a little treasure to take home to remember your wonderful Thanksgiving party.


(6)  Fun Turkey Place Cards


Fun Turkey Place Cards


Here is a simple and perfectly festive idea for Place Cards.  After all, these place cards have everything you need including a wonderful Thanksgiving Turkey to make both children and adults smile.  I found this place card idea over at Meg Bee Designs.  Here she uses Cardstock and Alphabet Stickers to make her creation.


(7)  Thankful Pilgrim Place Cards


Thankful Pilgrim Place Cards


Here is another one of our Thanksgiving Place Cards crafts.  Here we combine two wonderful things together into this place card.  Firstly, the obvious… it’s a place card.  And secondly, it’s reminds us what Thanksgiving is all about…. being thankful.  On these place cards your guests will write down what they are thankful for and share their thoughts during the festivities.  Make sure to check out how to make these Thankful Pilgrim Place Cards craft.


(8)  Book Page Turkey Place Card


Book Page Turkey Place Card


Oh boy, do I really love these!!  They are just so original and completely unique.  Your guests are sure to love them.  Fiskars shows us how to take discarded book pages or any type of pages you wish and make them into these awesome Place Cards.  Imagine how much your guests will love these.


(9)  Cork Turkey Place Card


Cork Turkey Place Cards


How cool is this Turkey?  So cool!!  And, this turkey is a place card.  Make a whole bunch and you have yourself some Cork Turkey Place Cards.  Made from actual corks…. Parents came up with this splendid idea to make these cork turkeys into place cards.  They are sure to be a big hit at any  Thanksgiving party.


(9)  Whimsical turkey place cards


Whimsical Turkey Place Cards


I know this image is small, but I think you can get the idea that this turkey is awesome.  What is even more awesome about these Turkey Place Cards is that it is made from recycled material.  Got to love that!  Canadian Living shows you how to take yogurt containers and transform them into these cute Place Cards.


(10)  Apple Turkey Place Cards


Apple Turkey Place Cards


Womans Day has the right idea with this one.  Here they take small apples, almonds, fruit lifesavers and some other items and turn it into this awesome looking turkey.  I love the idea…. and I know your guests will too.  Check out their site for the step-by-step how to.


(11)  Rustic Napkin Ring Place Cards


Rustic Napkin Ring Place Cards


Here is another festive and quite elegant Place Card idea from Womans Day.  And, if you don’t mind breaking out the electric drill for a craft… then this is the Place Card craft for you.  Here they take a birch branch and cut them into disks…. write the guest’s name on your disks and your well on your way to replicating these beautiful napkin ring place cards at your house.


(12)  Burlap Button Turkey Place Cards


Burlap Button Turkey Place Cards


I absolutely love these Thanksgiving Place Cards.  I know exactly what it is I like about them…. it is the burlap button.  I love the texture and warmth it gives these place cards.  I found this place card craft over at Factory Direct Craft and I must say you need to check it out for yourself.


(13)  Recycled Paper Place Cards


Recycled Paper Place Cards


This Thanksgiving place card craft is simply adorable.  And, I love that it is made from recycled paper…. that just makes it even better.  I found this craft over at Alpha Mom.  Here she uses junk mail for the feathers.  I love how the junk mail gives the feathers a 3D look.   Make sure your children help you with this place card craft…. they will love helping.


(14)  Finger Stamp Place Cards


Finger Stamp Place Cards


Now, these Thanksgiving Crafts are really festive and cute.  Plus, they are perfect for your children and their little fingers to make.  You can even make these place cards a fun activity for the kids to do before the Thanksgiving meal begins.  Check out Spoonful for all the fun crafty details.

Technorati Tags: , , , , , , , , , , , , , , ,

How to Make 3d Box Cover Shadow Box Framed Pictures

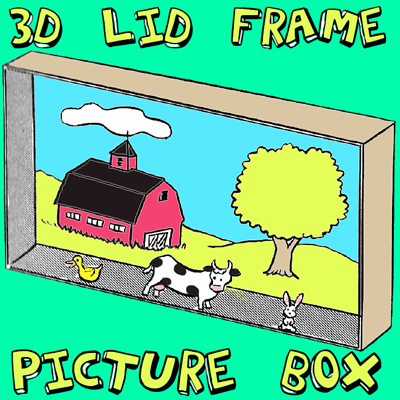
Don’t throw away those box lids because I have a fun use for them. Make these 3-dimensional pictures and use the box lids as the shadow box frame. The pictures seem to come out towards you and that is what makes them 3 dimensional. Find out how to make these with the step by step instructions found below.


How to Make 3d Box Cover Framed Pictures


Crafts Materials Needed

Box cover ( 2″ deep)

Paints

Pictures

Glue

Cardboard

Cork

Scissors

How to Make the 3D Frames

Step 1


Box Lids


Paint box cover, either oblong or square and 2″ deep, on both sides with a solid color paint, as in illustration above.

Step 2


3d-framed-box-cover-pictures-02


Inside the cover, as a background, either paint a scene, or cut a colorful scene from a magazine and glue to background, as in image above. If you want to make a barnyard scene like we did, the draw / paint a barn, some hills, and a tree.


Step 3


3d-framed-box-cover-pictures-03


Cut out or paint small pictures of people or animals. Mount on cardboard and glue to small slices of cork to make them stand (an adult should slice the cork for you), as in image above. If you want to make a barnyard scene, you might want to try some farm animals such as cows, chickens, pig, horses, sheep, and maybe some ducks. Here are some animal crafts that might help you.

Step 4


3d-framed-box-cover-pictures-04


Glue figures in place on floor of picture for 3-D effect, as in illustration above.

Technorati Tags: , , , , , , , ,

How to Make a Cork Bunny

I have a fun and creative craft for you in this post….. today I’m going to show you how to make a Cork Bunny.  Made from a cork, toothpicks and a template this craft turns out really cute.  It is a perfect craft for Easter.  Make a few and decorate your house in time for Easter.  You will need some help from an adult as there is a part in this craft that a knife is needed.  An Adult should do this section of the craft.  So, grab the materials needed and let’s get started.

Check out our other Easter Crafts.


How to Make a Cork Bunny


Materials Needed

Cork

Knife (for adults only)

Printer & Paper

Cardboard

Scissors

Glue

Cotton Ball or Pom Pom

2 Toothpicks


Click on template image to make larger and to print.


Bunny head template


Step 1


Ask parent to cut small slit in cork for head to fit.


Ask parent to cut small slit in cork for head to fit.


Step 2


Print out bunny head or draw a small head.


Print out bunny head or draw a small head.


Step 3


Glue 1 head on to cardboard.


Glue 1 head on to cardboard.


Cut out bunny on cardboard


Cut out bunny on cardboard… turn over and paste other head on this.


Step 4


Push bunny head tab into cork slit.


Push bunny head tab into cork slit.


It should look like this.


To look like this.


Step 5


Glue on cotton ball or pom pom.


Glue on cotton ball or pom pom.


Step 6


Break 2 toothpicks in half... use each half for a leg.


Break 2 toothpicks in half… use each half for a leg.


Finished cork rabbit


Remember you can make a bunny with your own drawn head…. or use the template.

And, that’s it…. you just finished your Cork Bunny.  Doesn’t he look cute?!  Make a few and decorate your house for Easter.  Let me know how your Cork Bunny turned out… take a picture of it and leave it with your comment in the comments section below.

Technorati Tags: , , , , , , , , , , ,

How to Make a Kokeshi Doll

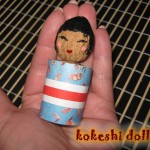
Kokeshi are Japanese dolls, originally from northern Japan. They are handmade from wood, have a simple trunk and an enlarged head with a few thin, painted lines to define the face. One characteristic of kokeshi Dolls is their lack of arms or legs.  So, with that being said…. today I’m going to show you how to make a Kokeshi Doll.  It will be a lot of fun…. almost as much fun as it will be showing to people the Kokeshi Doll you made yourself.  So, grab the materials needed and let’s get started.

Check out our other Doll Making Crafts.

Laura from Dacian Moon Handmade will show you how to make a kokeshi doll step-by-step.


Materials Needed

– 1 cylinder wooden bead – I use a cork – this will be the body
– 1 round wooden bead – I use a walnut – this will be the head (she would be prettier if you’ll use a wooden ball in place of the walnut)
– a piece of paper with flowers
– a piece of white paper
– a piece of red paper (or a ribbon)
– craft glue
– paints (red and black)
– paintbrush


Step 1

Cut the paper with flowers a little bit (with 1 or 2 mm) shorter then the cylinder.


Apply a layer of glue on the back of this paper…


… and roll it around the cylinder.


Step 2

Take the white paper and cut it the same length as the first one, but shorter. Apply a layer of glue on it…


… and place it in the middle of the paper with flowers …


… like this.


Step 3

Apply a layer of glue on the red paper / ribbon too …


… and place it on the middle…


… like this.


Step 4

Now is the time to make the head.


Take the walnut / ball and, using the black paint, make her hair and eyes. Remember that her face should be made of simple, thin lines. Let it dry.


Step 5

Apply a layer of glue on the bottom of the head…


… and place it on top of the body.


Step 6

You can add blush and a mouth… and your doll is ready!


Isn’t this Kokeshi Doll just adorable?  Imagine how cute she would look sitting on your dresser.  How did your Kokeshi Doll turn out?  Let me know in the comments below.  And, make sure to take a picture of your Kokeshi Doll and post that in the comment as well… I’d love to see it.

Technorati Tags: , , , , , , , ,

How to Make a Toy Soldiers Parachute with a Paper Napkin Crafts Idea

Today we will show you how to make a toy parachute for your toy soldiers. If you don’t want to hook this to a toy soldier, you can use a cork instead.  It’s fun to make a parachute and more fun to see it float downward as a real parachute does. It’s easy to make, too.


How to Make a Toy Soldiers Parachute with a Paper Napkin Crafts Idea


How to Make a Toy Soldiers Parachute with a Paper Napkin Crafts Idea

Crafts Materials Needed:

– Paper Napkin
– 4 Lengths of String, each 12 inches long
– Cork


Crafts Materials Needed:


Step 1


Tie a piece of string to each of the 4 corners of the napkin.


Ask your Mom or Dad for a paper napkin. Then find 4 lengths of string, each 12 inches long. Also find a small cork (ask your Mom or Dad if they have one that you can have). Tie a piece of string to each of the 4 corners of the napkin.

Step 2


Then tie the loose ends of the strings around the cork.


Then tie the loose ends of the strings around the cork. Later on you can hook it to a toy soldier or guy…but first use the cork to see if it works.


How to Play With Your Toy Soldier Guy’s Parachute


How to Play With Your Toy Soldier Guy's Parachute


Ask your Mom or Dad if it is okay that you stand on a chair. If so, find a chair, stand on it, hold the parachute by the middle of the top of the napkin, then drop it. Down, down it will float the floor. If you aren’t allowed to stand on a chair, then toss it up in the air and sometimes this works just as well.


How to Play With Your Toy Soldier Guy's Parachute


How to Play With Your Toy Soldier Guy's Parachute


Technorati Tags: , , , , , , ,

Make Newspaper or Magazine Holder Rack for Dad on Father’s Day

Father’s Day is coming up in the middle of June…which isn’t too far away from now. Do you want to start planning a great gift for your Dad? This is an arts and crafts project that uses a cork and a wire coat hanger to make a great rack to hold magazines and newspapers. If your Dad reads a lot of periodicals (newspapers and magazines), then this might be the perfect craft to make for your Dad. Instructions are below…enjoy.


Make Newspaper or Magazine Holder Rack for Dad on Father’s Day

CRAFTS MATERIALS THAT YOU WILL NEED:

– Wire hanger

– Gummed tape or felt / fabric or ribbon

– Bottle cork, optional

HOW TO MAKE THIS CRAFT TO MAKE RACK HOLDER FOR MAGAZINES AND NEWSPAPERS

Bend the wire hanger as indicated in the illustrations below.

Step 1


Straighten hook on wire hanger as pictured above.

Step 2


Now bend hook on wire hanger down as pictured above.

Step 3


Now bend arms on wire hanger down as seen above. Letter ‘C’ is where the cork will be placed.

Step 4


Now pull apart hanger about 6 inches at the top. Remember, the cork can also be seen as letter ‘c’.

Step 5

Cover the hanger entirely with gummed tape. If you don’t have gummed tape, then wrap your hanger in ribbon, fabric or felt…but you will need to use glue to secure to the hanger.

Step 6

Insert the end (C) into the center of the cork, if you have one. The cork will keep the holder from scratching table, desk, or floor when it stands with magazines held neatly in it.


This holder is the perfect size for magazines and newspapers of most sizes. Your Dad or Grandpa would love this for Father’s Day…however Moms and Grandmas would love this as well for Mother’s Day or a birthday as well.

Technorati Tags: , , , , , , , , , , , , , , , , ,

Make Pull-Along Toy Snakes with Corks and String

Learn how to make your very own pull-along toy snake with the following instructions. It really turns out to be a really cool toy when finished. This is a great toy for boys…who tend to love to scare girls with these cork snakes. Find the directions below.

How to Make Pull-Along Toy Snakes with Corks and String Crafts Idea for Kids


Crafts Materials Needed:

– Corks (From 14 to 20 of Them)
– Strong String
– Large Mending Needle
– Sewing Pins
– Paint or Markers
– Need Mom or Dad to Cut a Mouth OR Paint on Face


There are harmless snakes on many farms, and you should have one in your collection. Make one from corks —from 14 to 20 of them if you want a long snake. The corks can be of different sizes, getting smaller towards the tail, or, if yours are all the same size, your Mom and Dad can cut some.


Use a strong string and a large mending needle to put the snake together. Start at the head, and let some knotted string dangle, as in the picture. When all the corks are strung together, cut a mouth and make two eyes from pins. For the final touch, paint the snake some real snake color.

Technorati Tags: , , , , , , , , , , , , , ,