How to Make a Winter Tree Globe Ornament for your Tree

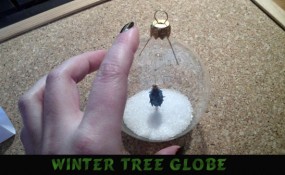
I have a real treat for you today.  I’m going to show you how to make a Winter Tree Globe Ornament perfect for any Christmas tree.  It is really easy to make and it is so much fun too.  Your kids will enjoy helping you make this Christmas tree ornament…. almost as much as they will enjoy looking at what they made on their Christmas tree.  They will certainly be so proud.  So, grab the materials needed for this craft and let’s get started.

Check out our other Christmas crafts.

A cool Christmas ornament tutorial offered by Laura from Dacian Moon Handmade


Materials Needed

– clear Christmas ornament ball
– large tip cotton swab
– square bead
– scissors
– silver glitter glue
– gold glitter
– instant glue
– green paint marker
– sugar
– tweezers


Step 1

Take the cotton swab…


… and cut the stick close to the cotton part.


Like this.


Step 2

Cut a piece of stick – as long as you want the strain to be.


Like this.


Apply a bit of glue on one end of the strain…


… and stick it to the cotton tip, on the other end. Like this. Now it looks like a tree.


Step 3

Paint the cotton part in green.


Step 4

Using your scissors make some cuts…


… like this.


Add more cuts. They are tree branches.


Step 5

Adorn it with glitter glue, then let it dry.


This is our tree.


Step 6

Now is time to fix the strain, using this square bead.


Apply a bit of glue on the strain end…


… and put it through the bead. Add a little more glue around it, just to be sure.


Step 7

Let’s decorate the top of the tree!

Apply glue on the top…


… and put it in gold glitter…


… like this.


Step 8

Use tweezers to gently grasp the top.


Add a layer of glue on the bottom of square bead…


… and put it through the opening of the globe (take the hanger off before that)…


… like this.


Step 9

Make a paper funnel (a paper cone)…


… and put it on the opening of the globe.


Pour sugar through it…


… like this.


Put the hanger back. Now you have a globe with a winter tree and snow.


Isn’t this Winter Tree Globe Ornament adorable?  It is going to look so terrific on your Christmas Tree.  Enjoy it!!

Technorati Tags: , , , , , , , , , , ,

14 Fun Snowflake Crafts for Winter


14 Fun Snowflake Crafts for Winter


Winter is well on its way….. and when you think of Winter what do you think of?  I know what I think of….. snow.  So, in honor of Winter and snow today’s craft is all about snowflakes.  I scoured the internet to find some really awesome snowflake crafts.  And, there are some really cool snowflake crafts out there.  So, today I’m going to present you with 14 Fun Snowflake Crafts for Winter.  For some of these crafts you will need to know how to make a snowflake, so check out these great snowflake patterns.

Check out some of our Snowflake Crafts.

14 Fun Snowflake Crafts for Winter

(1) Multicolor Snowflake Wreath


Snowflake Wreath


Here is a really cute Wreath perfect for the Winter Season.  It turns out quite beautiful.  BHG shows you how you too can make this Winter Wreath.  Made from left over card stock from all those Christmas Cards you got during the Christmas Season.  What a great way to recycle those greeting cards.


(2) Sparkly Snowflake


Sparkly Snowflake


Now this is a beautiful snowflake craft.  Made from long and short sparkly beads this winter craft turns out lovely…. perfect for decorating the house for this Winter Season.  CountryLiving shows you how to do this Snowflake craft step-by-step…. you have to scroll to Slide #2.


(3) Wooden Snowflake


Wooden Snowflake


Now this is a fun Snowflake Craft perfect for the youngest of crafters.  Made from Popsicle sticks, glue and fake snow…. this craft promises to be a lot of fun.  You can learn how to do this craft by going to Crafts-for-all-Seasons.


(4) Pipe Cleaner Snowflake


Pipe Cleaner Snowflake


What child doesn’t like a pipe cleaner craft.  Pipe Cleaners are just so much fun to make crafts with…. and this Snowflake craft is no exception.  Check out the MarthaStewart site to get the entire step-by-step tutorial.


(5) Snowflake Window Clings


Snowflake Window Clings


I don’t know about your kids, but I know my kids love window clings.  They love decorating the windows for all the Holidays.  Well, winter is no exception.  Imagine decorating the windows with Snowflakes that you and your child made yourself.  FamilyFun shows you how to achieve this.


(6) Recycled Plastic Ring Snowflake Craft


Recycled Plastic Ring Snowflake Craft


Here is a very cool snowflake craft because it is made out of recycled materials.  FreeKidsCrafts shows you how you can take those 6-pak ring holders from soda and make them into beautiful snowflakes that you can hang proudly this Winter Season.


(7) Q-Tip Snowflakes


Q-Tip Snowflakes


It’s hard to believe that something made from Q-Tips can turn out so beautifully…. but it does.  Made with Q-Tips, glitter and glue this Snowflake craft is not only fun…. but it also turns out perfect to hang up this Winter Season.  Check out AllFreeCrafts for the step-by-step “how-to”.


(8) Snowflake Puzzle


Snowflake Puzzle


Here is an interesting Snowflake Craft.   This easy craft is made from Popsicle sticks and black marker.  BusyBeeKidsCrafts shows you how you can simply take a Snowflake picture and make it into a puzzle just by adding it to a row of Popsicle sticks and cutting the picture with scissors…… this makes it into a puzzle.  Simply mix up the pieces and try to put it back together again.


(9) Woven Snowflake


Woven Snowflake


This woven snowflake is a great craft for kids of all ages.  Made from Popsicle sticks, yarn and glue…. you will have this snowflake craft finished in no time.  Make a few and decorate the whole house this Winter Season.  Check out the “how-to’s” of this craft over at ActivityVillage.


(10) Button Snowflakes


Button Snowflakes


HandMadeBeginnings has the right idea for a Snowflake Craft…. make the snowflakes out of Popsicle sticks and Buttons.  The idea is so easy, but yet very creative.  I love it.  And, I love how the snowflakes turn out.  She explains how taking these snowflakes and adding string will make for great window decorations.  I have to agree.


(11) String Snowflake


String Snowflake


Here is a great snowflake craft for the older children.  Basically this snowflake is made from white string and some fabric stiffener, but look how magnificent it turns out.  The snowflake craft would look awesome hanging in a window by itself or in groups.  Check out FreeCraftUnlimited for the details.


(12) Sparkly Snowflake Mobile


Sparkly Snowflake Mobile


This is a cool craft that when done looks great hung from the ceiling.  Made from paper and glitter this snowflake craft will look festive this Winter Season hung in a classroom or even a child’s bedroom.  Get all the craft details over at Kaboose.


(13) Beaded Snowflake


Beaded Snowflake


I love, love, love this snowflake craft.   I dig that they used pearls in this craft….. it just gives this beaded snowflake a really wintery look.  I found this craft over at Crafts-For-All-Seasons and they did a really beautiful job putting this snowflake craft together.  Make sure to check it out.


(14) Lace Snowflakes


Lace Snowflakes


Who would have thought that Lace can look so much like a snowflake?  But, when put together the right way…. it really does.  AllFreeCrafts did a really great job coming up with this snowflake craft.   They simply added lace to wire to create this beautiful snowflake.  Now, that’s creative.

Technorati Tags: , , , , , , ,

How to Make Q-Tip Skeletons

I have a scary little craft for you today.  I am going to show you how to make a Skeleton out of Q-Tips.  This craft will be an awesome Halloween decoration this season and the kids will love to make it.  It’s not difficult, but comes out looking super creative and it’s a lot of fun.

Check out our other Halloween Crafts.


How to Make Q-Tip Skeletons


Materials Needed

Q-tips

Printer

Black Paper

Glue

Scissors


Print the template below to make the skeleton’s head.

CLICK ON IMAGE TO OPEN IT UP BIGGER TO PRINT.


Print the template to make the skeleton's head


Step 1


Print skulls template out.  Get a piece of black paper, Q-tips and glue/paste out for next step


Print skulls template out.  Get a piece of black paper, Q-tips and glue/paste out for next step.


Step 2


Glue a whole Q-tip with 6 half Q-tips, slanted, on both side of it - for ribs


Glue a whole Q-tip with 6 half Q-tips, slanted, on both side of it – for ribs.


Step 3


Get 2 Q-tips for each arm and leg


Get 2 Q-tips for each arm and leg.  Place them however you want to… I placed them in sideways letter ‘V’ forms.


Step 4


Now, cut 5 Q-tips in half... each half will be one of the fingers


Now, cut 5 Q-tips in half… each half will be one of the fingers.  Glue them all around the top arm bone.


Step 5


Cut 6 Q-tips in half...one half will be the foot bone and the rest will be for the toes


Cut 6 Q-tips in half…one half will be the foot bone and the rest will be for the toes.


Step 6


Cut out the size skull you want from the template and glue on to the black paper


Cut out the size skull you want from the template and glue on to the black paper.


Finished Q-Tip Skeleton


That is one cool skeleton, huh?!  And, what is even more cool about it is that you could find the materials for this Halloween craft around your house.  There was no need to go out and buy anything.  If you are looking for other Skeleton types of crafts check out our Skull Flashlight Cover and our Skull Trick or Treat Basket.

Here is our video on How to Make a Q-Tip Skeleton for Halloween

Technorati Tags: , , , , ,