How to make a Christmas Tree with Thread : Fun and Easy Craft for Kids

Learn how to make this adorable Christmas tree with the following simple-to-follow, step by step instructions by Laura from  Dacian Moon Handmade. She will show you how to make this cute Xmas tree, step by step. Have fun!

You Might Also Like Our Other Christmas Crafts.

How to make a Christmas Tree with Thread : Fun and Easy Craft for Kids


CRAFTS MATERIALS NEEDED:

– thick thread
– craft glue
– string of beads
– scissors
– paper


Step 1.

Make a cone of paper…


… like this.


Stick the corner to keep it in place.


Make the base flat.


Now it can stand.


Step 2.

Fix one end of thread on top of the cone…


… and start to cover it by wrapping the thread…


… like this.


The tree is ready. Now is time to decorate it.


Step 3.

Apply a bit of glue on top of it…


… and fix a bead .


Roll the string of beads around the tree…


… and glue the last one on the base.


Your Christmas tree is ready 😀


You Might Also Like Our Other Christmas Crafts.


How to Make Paperclip Christmas Angels : Easy Craft Idea for Kids

You can make a cute little paperclip angel to hang on your Christmas tree or to just decorate your bedroom or house. These are super easy to make and all of the materials are probably sitting around your house somewhere. Laura from Dacian Moon Handmade  will show you today how to make this simple decoration, step by step.

Check out our Christmas Crafts.


How to Make Paperclip Christmas Angels Easy Kids Craft Tutorial


How to Make Paperclip Christmas Angels Easy Kids Craft Tutorial

CRAFTS MATERIALS NEEDED:

– butterfly paperclip
– bead
– ribbon
– sewing pin


Step 1.

Fold the ribbon in two and put it through the bead.


You can help it with the pin.


It will look like this.


Step 2.

Put the ribbon through the paperclip, like this…


…and make a knot over the bead.


Step 3.

Bring the bead near the paperclip…


… and now it looks like an angel 😀


Tie both ends together and your decoration is ready.


And there you have it, a beautiful Christmas Angel. It is so adorable, isn’t it? You can make these as a gift or use it as a Christmas ornament. Merry Christmas!

Check out our Christmas Crafts.

Technorati Tags: , , , , , ,

How to Make a Paper Christmas Tree Craft for Children Tutorial

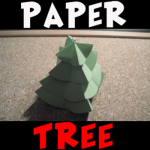
Learn how to use green construction paper and a pin to form a beautiful Christmas tree that really stands. Laura from Dacian Moon Handmade   will show you how to make a paper Xmas tree, step by step.

Check out our Christmas Crafts.


How to Make a Paper Christmas Tree Craft for Children Tutorial


How to Make a Paper Christmas Tree Craft for Children Tutorial

CRAFTS MATERIALS NEEDED:

– green paper
– scissors
– pencil
– sewing pin


Step 1.

Draw 4 circles on the green paper.


Cut them out.


Step 2.

Take one and fold it in half.


Unfold.


Fold it again in half, on the other side.


Unfold.


Step 3.

Unite two adjacent corners…


… like this.


Repeat for all sides.


Do the same for all discs.


Step 4.

Take the pin…


… and put it through the middle of the littlest one.


Put discs one on top of each other, in increasing order, and the tree is ready.


And there you have it…a stand-up, paper Christmas Tree. You can put it on a table, on a ledge, on a bookshelf, or anywhere else where people can see. Merry Christmas!

Check out our Christmas Crafts.

Technorati Tags: , , , , ,

How to Make Beaded Christmas Tree Ornaments

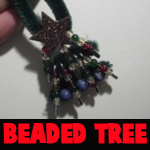
Here is a crafts tutorial to make a Christmas tree from pipe cleaners, safety pins, and some beads. With this craft, you make a beautiful Christmas tree that is also an ornament. Use this step by step tutorial offered by Laura from Dacian Moon Handmade.

How to Make Beaded Christmas Tree Ornaments


How to Make Beaded Christmas Tree Ornaments


CRAFTS MATERIALS NEEDED:

– 3 pieces of chenille stem
– green, orange, red, brown crystals / beads
– blue bigger beads
– self – adhesive star
– safety pins


Step 1.

Take one safety pin. Open it.


Put crystals on it, like this.


Close the pin.


Do the same for the other safety pins. You will need 8.


Step 2.

Take 1 piece of chenille stem…


… and put one safety pin on it.


Add two in the other direction, one, two again and one. Like in the picture.


Put another chenille through the ends of the 3 safety pins, like this.


Bring the safety pins ends together.


Raise the ends of the last chenille stem…


… and wrap them one around the other, to make a hanger


Bend the extra chenille to the back of the tree.


Put another one through the other ends of the safety pins…


… and add a blue bead between the safety pins.


It will look like this.


Fix the self-adhesive star on the ornament…


… and it is ready to adorn your Christmas tree.


Technorati Tags: , , , , , ,

How to Make a Winter Angel Christmas Ornament

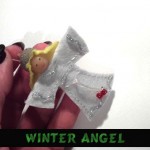
I have a fun Christmas craft for you today.  In this post I will show you how to make a Winter Angel Christmas Ornament.  This Angel Christmas Ornament turns out amazing looking.  It would look spectacular on your Christmas Tree.  You could also make this Winter Angel Christmas Ornament as a gift for your friends and family this Christmas.  They will surely love it.   This will surely be a Christmas Ornament that they will save for a long time….. proudly representing something you made yourself.  So, let’s get started.

Check out our Christmas Crafts.

Laura from Dacian Moon Handmade   will show you how to make this, step by step.


Materials Needed

– 1 disc of white felt
– 1 smaller disc of yellow felt
– 1 acorn cap
– 1 wooden bead
– toothpick
– scissors
– needle and pin
– instant glue
– red and black paint
– silver glitter glue
– 2 red beads


Step 1

Take the wooden bead…


… and stick it on a toothpick.


Like this.


Step 2

Put the toothpick through the middle of the white felt.


Fold the felt in half, like this, and start sewing a dress for your angel.


Like this.


Step 3

Cut the extra felt.


It will look like this.


It is time to shorten the hands / wings.


Like this .


Step 4

Apply a layer of glue on the head…


… and put the yellow disc over it, like this. Note: you should do this quickly because the glue is fast drying.


This is the angel with hair.


Step 5

Apply a layer of glue inside the acorn cap…


… and fix it on the angel’s head over the yellow felt.


Step 6

Put a red bead on a piece of thread…


… and make a knot, like this.


Sew this piece of thread as a belt.


… like this. Then add another bead on the other end and tie the belt.


Step 7

Put the needle (with thread) through the yellow felt, and make a hanger.


Like this.


Decorate your angel with glitter glue, make eyes and mouth with black and red paint and your ornament is ready.


Isn’t this Winter Angel Christmas Ornament simply adorable?  It will look beautiful hanging on your Christmas tree.  It would also make a wonderful gift to a friend or family member.

Technorati Tags: , , , , , , , , , , , , ,

How to Make a Winter Tree Globe Ornament for your Tree

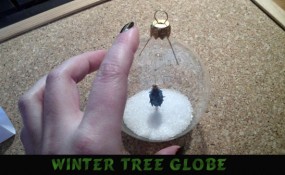
I have a real treat for you today.  I’m going to show you how to make a Winter Tree Globe Ornament perfect for any Christmas tree.  It is really easy to make and it is so much fun too.  Your kids will enjoy helping you make this Christmas tree ornament…. almost as much as they will enjoy looking at what they made on their Christmas tree.  They will certainly be so proud.  So, grab the materials needed for this craft and let’s get started.

Check out our other Christmas crafts.

A cool Christmas ornament tutorial offered by Laura from Dacian Moon Handmade


Materials Needed

– clear Christmas ornament ball
– large tip cotton swab
– square bead
– scissors
– silver glitter glue
– gold glitter
– instant glue
– green paint marker
– sugar
– tweezers


Step 1

Take the cotton swab…


… and cut the stick close to the cotton part.


Like this.


Step 2

Cut a piece of stick – as long as you want the strain to be.


Like this.


Apply a bit of glue on one end of the strain…


… and stick it to the cotton tip, on the other end. Like this. Now it looks like a tree.


Step 3

Paint the cotton part in green.


Step 4

Using your scissors make some cuts…


… like this.


Add more cuts. They are tree branches.


Step 5

Adorn it with glitter glue, then let it dry.


This is our tree.


Step 6

Now is time to fix the strain, using this square bead.


Apply a bit of glue on the strain end…


… and put it through the bead. Add a little more glue around it, just to be sure.


Step 7

Let’s decorate the top of the tree!

Apply glue on the top…


… and put it in gold glitter…


… like this.


Step 8

Use tweezers to gently grasp the top.


Add a layer of glue on the bottom of square bead…


… and put it through the opening of the globe (take the hanger off before that)…


… like this.


Step 9

Make a paper funnel (a paper cone)…


… and put it on the opening of the globe.


Pour sugar through it…


… like this.


Put the hanger back. Now you have a globe with a winter tree and snow.


Isn’t this Winter Tree Globe Ornament adorable?  It is going to look so terrific on your Christmas Tree.  Enjoy it!!

Technorati Tags: , , , , , , , , , , ,

How to Make a Snowmen Family Globe Ornament

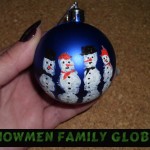
I have a Christmas craft that both you and the children will love making.  I’m going to show you how to make a super-cute, super-simple ornament for your Christmas tree.  It is a snowmen family globe ornament.  The children (or yourself) will use white paint and their hand print to make the snowmen on the globe ornament.  With just a little more paint you will create an imaginative snowmen family.  Imagine how thrilled your children will be to have made a Christmas ornament for the tree themselves.

Check out our other Christmas crafts.

Step by step tutorial offered by Laura from Dacian Moon Handmade


Materials Needed

– blue Christmas ornament ball
– white paint
– red and black paint
– paintbrush
– toothpick
– optional glitter glue to add some highlights


Step 1

Put some white paint in your hand…


… and spread it with the paintbrush.


Step 2

Put the globe in your hand…


And close your hand gently but firmly over it.


It will look like this.

Let it dry well.


Step 3

Using the toothpick and black paint…


… make eyes, mouth and buttons for the snowmen…


… like this.


With black you can also do hats and scarves for two of them.


Use red paint to make noses, hats and scarves for the other two.


Aren’t they cute?


And, that is it!!  How simple is that?  Your kids will love using their hand print to make the snowmen.

Technorati Tags: , , , , , , , , , , , ,

How to Make a Lace Christmas Ornament

I have a wonderful Christmas craft for you today.  I’m going to show you how to make a lace Christmas Ornament for your Christmas tree.  This Lace Christmas ornament is a wonderfully delicate ornament and the crystals will look just absolutely breathtaking against the Christmas lights on the tree.  Let the kids join in on this craft…. after all it is a super fun craft for the whole family.  Plus, imagine how good the kids will feel when they see their handcrafted ornament on the tree.  So, let’s get started.

Check out our other Christmas Crafts.

This delicate ornament will add a note of elegance to your Xmas tree.


Materials Needed

– lace (for best results use one with flowers or some pattern border, like mine)
– needle and thread
– a piece of thick thread
– crystals (I use bicones and one drop)
– scissors
– 1 small bead


Step 1

Look carefully at the lace and choose the best part to use, then cut it out.


I choose a spiral with a tail so I will add the crystals to the tail. You will add them on the lower part of your piece, to dangle.


Step 2

Sew the crystals  to look good…


… I put each one on a part of the tail, letting the middle one free.


In the middle we will sew the drop.


Step 3

Place the drop on the needle, starting with the narrow end.


Then add the bead…


… and pass the needle back through the drop, like in the picture.


It will look like this. Sew it to the lace and make a small knot.


The ornament is almost ready.


The only thing that must be done is to add the thick thread on the upper part, like this.


Now you have an elegant ornament for your Christmas tree.


Isn’t this a beautiful Christmas ornament?  It’s just so delicate…. I love it.  The dangling beads will look so beautiful against your Christmas lights.

Technorati Tags: , , , , , , , , , , , ,

How to Make a Pop-up Christmas Card

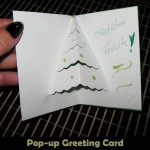
Today I’m going to show you how to make a very special greeting card for the Christmas Holiday.  In particular I’m going to show you how to make a Pop-up Christmas card.  Anyone receiving this Christmas card will love it… not only because it came from you, but also because of the 3-D effect of the card.  In this post I will show you how to make a Pop-up Christmas tree that actually sticks out of the card when opened.  Add a special note to your card and it is ready to send out for Christmas to a friend or family member.

Check out our other Christmas crafts.

Laura from  Dacian Moon Handmade will show you how to make this, step by step.


Materials Needed

– cardboard
– green paper
– green pen
– glue
– scissors
– green glitter glue


Step 1

Fold the cardboard in half.


Fold the upper corners outward at about 2/3 of their height…


… like this.


Step 2

At 2/3 of height, cut in waves until you reach the crease…


… it will look like this.


Make another 2 – 3 waved cuts…


… like this.


Step 3

Press the lower part (under the first cut) behind…


… like this. It will look like the tree stem.


Step 4

Fold the green paper in half.


Apply a layer of glue on the cardboard until you reach the creases…


… and place it over the green paper, like this.


Do the same on the other part.


Step 5

Take the green pen …


and write “Seasons Greetings” beside the tree.


Add some glitter glue globes on the tree and your greeting card is ready .


And, there you have it.  You just made a beautiful and festive Pop-up Greeting card for Christmas.  The receiver will love it!!

Technorati Tags: , , , , , , , , , , , ,

How to Make a Christmas Decorated Jug with Napkins

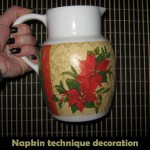
Today I’m going to show you how to transform an ordinary jug into a wonderful Christmas decoration.  You can use a jug that you can pick up at any discount store and change it into a spectacular Christmas decoration or give it out as a Christmas gift this Holiday.  Using this special napkin technique changes an ordinary jug into something so much more.  Plus, the craft itself is so much fun.  So, grab the kids and the materials needed and let’s get started.

Check out our other Christmas crafts.

Laura from  Dacian Moon Handmade will show you how to make this.


Materials Needed

– blank jug
– craft glue
– metallic gold paint
– napkin with the motif you want to use
– scissors
– paintbrush


Step 1

Take the napkin…


… and cut out the motif you want to use…


… like this.


Step 2

Remove the white layers. It is easier to start in the middle, where the napkin was folded.


Most napkins are either 2-ply or 3-ply so you must remove all the white layers.


Step 3

Using the paintbrush…


… apply a layer of glue on the item where the motif will be.


Place the napkin as flat as you can, following the contours of the item.


Wet the brush slightly with glue and spread evenly on the surface of the napkin until it is completely covered. Work slowly and be careful not to tear the napkin. Work from the center out towards the edge of the pattern.


Let it dry.


Step 4

To give it shine you can add a thin layer of metallic paint over the motif.


Let it dry well…


… and the jug is ready.


Now place the Christmas decorated Jug somewhere special this Christmas.  It is a perfect decoration for the Holiday that you can use for years to come.

Technorati Tags: , , , , , , , , , , ,

How to make a Pine Cone Christmas Figurine Ornament

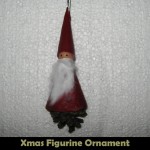
Today I’m going to continue with another Christmas Craft.  This one will be a Pine Cone Christmas Figurine Ornament.  It is super cute and will look terrific on the Christmas Tree.  Let each of the kids make one of these figurine ornaments…. they will love hanging something up on the tree that they made themselves.  Plus, it is so much fun.  So, grab the materials needed and let’s get started.

Check out our other Christmas Crafts.

Tutorial offered by Laura from Dacian Moon Handmade .


Materials Needed

– cardboard
– red leather
– a cotton pad
– 1 wooden bead (big enough to be the head)
– scissors
– 1 piece of ribbon
– 1 pine cone
– craft glue
– black paint
– toothpick


Step 1

Take the cardboard…


…and make a cone of it: bring one side over the middle.. .


… then the other. Glue the two parts together.


Place the pine cone inside, to measure how long the cardboard cone should be.


Cut the extra cardboard.


It will look like this.


Step 2

Apply a border of glue inside the cardboard cone…


… like this.


Then fix it over the pine cone.


Step 3

Take the wooden bead…


And place the toothpick inside.


Make a collar of glue where the toothpick comes out…


… and place it inside the cardboard cone, like in the picture. Keep it a little pressed, until the glue is dry.


Step 4

Take the leather and put it over the cardboard cone.


Measure the length and trace it with a pen.


Cut it out…


… like this


Apply glue on the back of the leather…


… and place it again over the cardboard cone.


Let it dry.


Step 5

Make another cardboard cone, narrower than first. This will be the cap.


Glue the cardboard cone.


Apply a layer of glue on the lower part that goes down from the cone and fold it over it.


Now cut the extra cardboard.


Measure the cone cover on the leather…


… like this.


Cut it out.


It will look like this now.


Apply glue on it…


… and place the cardboard cone on it.


Cover it with the leather.


Apply glue on the back…


… and place there the folded ribbon. Keep it in place until the glue is dry.


Now, let’s put it on the head. Put glue over the upper part of the head…


… like this…


…and fix the cap on it. Let it dry.


Step 6

Take the cotton pad…


… and break it into pieces to make one beard like this.


Apply glue on the lower part of the head and on the front part of the coat…


… and place the beard on it, fix it well on the face.


Take a little black paint with a toothpick…


… and draw its eyes.


Now you have a funny figurine to put on your Xmas tree.


The figurine is cute, huh?!  It will look wonderful on the Christmas Tree.  Enjoy!!

Technorati Tags: , , , , , , , , , , , , , ,

A Collection of Fun Nativity Scene Crafts for Kids


A Collection of Fun Nativity Scene Crafts for Kids


One thing you see at most houses at Christmas time is a Nativity Scene.  But, the problem with the store bought Nativity Scenes is that they are usually very delicate…. too delicate for the children to actually play with.  And, the thing about that is…. children love to play with the Nativity Scenes.  I mean, what’s not to want to touch…. there are small people, animals and a manger.  There is an entire scene for the kids to want to act out with the characters.  Well, why not make a Nativity Scene craft ….. put together a Nativity Scene of your very own that the children can actually play with.  So, today I have put together a bunch of Fun Nativity Scene Crafts that I have found around the internet.  All are a ton of fun…. and they are all meant to be played with.

Check out our other Christmas Crafts.

A Collection of Fun Nativity Scene Crafts for Kids

(1)  Pipe Cleaners & Yarn Nativity Scene


Pipe Cleaners and Yarn Nativity Scene


Here Spoonful shows us how to make an entire Nativity Scene using such materials as yarn and pipe cleaners.  She is very detailed, so this nativity craft is very enjoyable.  This Nativity Scene would look wonderful as a Christmas decoration and it surely will be so much fun to make.


(2)  Printable Nativity Scene


Printable Nativity Scene


I love this idea.  I found this Nativity Scene Craft at Catholic Icing and it is so cute.  Here you will be able to print off about 8 pages of templates.  Cut them out, decorate them and glue them to toilet paper tubes.  It’s so much fun.  check it out.


(3)  Flower Pot Nativity Scene


Flower Pot Nativity Scene


Ok, this is really cute, right?!  Suite 101 shows us how to transform 3 terra cotta flower pots (along with some other materials) into a ridiculously cute Nativity Scene.  The craft promises to be a lot of fun.  Plus, no doubt, you will be tempted to keep this Nativity Scene out year round.


(4)  Basket Nativity Scene


Basket Nativity Scene


This Nativity Scene craft is one of ours from last Christmas.   This Nativity surely will be one that you will keep for years to come.  We show you how to make each of the figures in great detail including the Three Wise Men, Baby Jesus & Cradle, Mary & Joseph, sheep and the donkey.  It’s so much fun.  Check it out for yourself.


(5)  Rock Nativity Scene


Rock Nativity Scene


Here is another super cute and original Nativity Scene Craft.  Here Roper 5 shows us how to make this fantastic Nativity Scene completely out of backyard rocks and markers.  So, no need to buy any craft materials…. you can have fun with the kids hunting in the backyard for the perfect rocks.


(6)  Wooden Block Nativity Scene


Wooden Block Nativity Scene


Here is an awesome Nativity Scene craft you can make with your kids with some wooden blocks, felt, glue and a few embellishments.  Imagine the fun you will have putting this craft together with your kids.  Fun part is that they are durable enough the kids can even play with this Nativity Scene.  Check out The Pioneer Woman for all the details.


(7)  Lego Nativity Scene


Lego Nativity Scene


This is such a clever idea for all you Lego fans.  Here Johan van Benthem shows us all how to make an entire Nativity Scene out of Legos.  Imagine the excitement of your kids as well as anyone who sees your Nativity Scene made completely out of Legos.  They will absolutely love it!!


(8)  Nativity Hand Puppets


Nativity Hand Puppets


What child doesn’t love hand puppets?  They all love them.  Here eHow shows us how you and your children can make these Nativity Hand Puppets for yourself.  Imagine the fun Christmas show your kids can put on with these hand puppets?  They will love using their imaginations to put on their very own program.


(9)  Nativity Blocks


Nativity Blocks


These blocks are just simply adorable.  I am a Momma – Hear Me Roar came up with this idea and I love it!!  She used homemade blocks, stickers and modge podge to make her Nativity Scene, but you can also print off Nativity Scene characters from the computer and do it that way as well.


(10)  Sun Catcher Nativity Scene


Sun Catcher Nativity Scene


Here is a clever idea by Peace Creek on the Prairie.  She uses wax paper, crayon shavings and an iron to make this beautiful Sun Catcher Nativity Scene.  Because of some of the materials used in this craft it does require some adult help.  You will have so much fun doing this Nativity Scene with your kids.


(11)  Gingerbread Nativity Scene


Gingerbread Nativity Scene


This Nativity Scene is absolutely delicious!!  Made from some of my most favorite treats this Nativity Scene craft is sure to be a big hit with the kids.  I found this craft at AOK Corral and it looks like so much fun.  You and your kids will surely enjoy putting this together.


(12)  Cardboard Tubes Nativity Scene


Cardboard Tubes Nativity Scene


Here is a simple yet fun Nativity Scene craft that all children will love putting together…. plus they can even play with this Nativity Scene once they are done.  Nurture Store shows us how to make this Nativity Scene out of toilet paper rolls.  How fun is that?!


(13)  Clothespin Nativity Scene


Clothespin Nativity Scene


This is truly a clever idea and almost all the materials used in this Nativity Scene craft can already be found in your home.  Our Dish shows us how to use a cardboard box, sharpie and a couple of clothespins (as well as a few other things) to put together this fun Nativity Scene craft.


(14)  Foam Nativity Craft


Foam Nativity Craft


Craft foam is a wonderful material that children love working with.  And, this Nativity Scene craft will be no exception.  Piggy Giggles shows us how to make a unique Nativity Scene out of craft foam.  The craft is wonderfully detailed, so believe me when I say they have covered everything.


(15)  Egg Carton Nativity Scene


Egg Carton Nativity Scene


Made from egg carton bottoms and beads this Nativity Scene is really cute.  Plus, the great thing about it is the kids will have just as much fun playing with this Nativity Scene as they had making it.  I found this craft at April Showers.  Check it out for all the craft details.

Technorati Tags: , , , , , , , , , , , , , , , ,

How to Make a Bottle Brush Christmas Tree

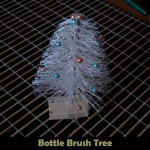
I have a fun Christmas decoration craft that you can make out of a bottle brush.  Today I’m going to show you how to make a Bottle Brush Christmas Tree.  A bottle brush is the perfect material to use for this Christmas Tree decoration because the bristles take on the look of one of those artificial Christmas Trees.  It makes for a wonderful Christmas decoration that will last for years.  And, your kids will love making them.  So, grab a bottle brush and the rest of the materials and let’s get started.

Check out our other Christmas Crafts.

Laura from  Dacian Moon Handmade will show you how to make this, in 4 easy steps.


Materials Needed

– bottle brush
– craft glue
– glitter
– glass or plastic colored pearls
– scissors
– paintbrush
– eraser
– a piece of paper


Step 1

Place the piece of paper in front of you…


… take the bottle brush and give it a haircut.


You should cut it in small steps until it looks like a tree.


Step 2

Take the eraser…


… and fix the tree in the middle of it. It should be a large eraser to support the tree. You can use polystyrene , wood or anything else strong enough to support your tree.


Step 3

Spread glitter on the paper…


…then apply glue on the tree, using the paintbrush…


… like this.


Before the glue is dry, roll your tree over the glitter.


Take care to have glitter on all sides.


It will look like this.


Step 4

The final step is to add to it some globes, so put the glass / plastic pearls in the branches without glitter. They will stick in place because of the glue. I used a toothpick to place them in place.


Your little tree will make a wonderful decoration.


Isn’t this Bottle Brush Christmas Tree adorable?  This Christmas Tree will make for a great table top decoration for Christmas.  And, your child will love that they made this Christmas decoration themselves.

Technorati Tags: , , , , , , , , ,

How to Make a Christmas Paper Toy

I have a fun Christmas craft for even the youngest of crafters.  Today I’m going to show you how to make a Christmas Paper Toy.  With just some paper, printer, scissors and a few other materials you and your child will be able to make this cute Christmas paper toy that they will enjoy playing with…. just as much fun as they will have making the craft.  If you want, feel free to color the templates before cutting them out to add even more fun to this craft.  So, let’s get started.

Check out our other Christmas Crafts.


How to Make a Christmas Paper Toy


Materials Needed

Printer

White Paper

Green Paper

Scissors

Tape

Pen

Glue

Cereal Box


Click on the template images below to open a new page and to print.

Christmas Background Template


Christmas Background Template


Christmas Presents Template


Christmas Presents Template


Christmas Table Template


Christmas Table Template


Christmas Characters Template


Christmas Characters Template


Christmas Tree Extras Template


Christmas Tree Extras Template


Step 1


Print templates


Print Templates.


Step 2


Cut out items from template.


Cut out items from template.


Step 3


This is the background.


This is the background.


Bend both dotted lines away from you.  Crease.


Bend both dotted lines away from you.  Crease.


Now fold the next line (solid) towards you.


Now fold the next line (solid) towards you.  Crease.  Do this on both sides.


Fold both of these tabs away from you so it acts as a stand.


Fold both of these tabs away from you so it acts as a stand.


Cut slits.


Cut slits.


Fold tabs up.


Fold tabs up.


Place the paper in the slits on both sides.


Place the paper in the slits on both sides.


Step 4


 Place each character in the stands.


Place each character in the stands.


Step 5


To make the Christmas tree... get some green paper and... Fold green paper in half twice.


To make the Christmas tree… get some green paper and… Fold green paper in half twice.


Use the template to... draw half of the tree along fold.


Use the template to… draw half of the tree along fold.


Cut both trees apart between both of them.


Cut both trees apart between both of them.


Cut down center... one on top of one and one at bottom of the other.


Cut down center… one on top of one and one at bottom of the other.


Now use the slits to slide the tree together to look like the tree above.


Now use the slits to slide the tree together to look like the tree above.


Tape some seams together.  Draw on tree if you want to.


Tape some seams together.  Draw on tree if you want to.


Write family member's names on ornaments or draw a design on each one.


Write family member’s names on ornaments or draw a design on each one.


Glue both stars together and put on top of tree.  Glue ornaments on tree.


Glue both stars together and put on top of tree.  Glue ornaments on tree.


Step 6


Cut out each of the legs.


Cut out each of the legs.


Glue on cereal box cardboard.


Glue on cereal box cardboard.


Cut out and fold and crease very well.


Cut out and fold and crease very well.


Cut out cardboard long and wide enough for legs.


Cut out cardboard long and wide enough for legs.


Glue on white paper like this.


Glue on white paper like this.


Have adult cut slits in the top of the table.


Have adult cut slits in the top of the table.


Put the food tabs in the slit.


Put the food tabs in the slit.


On the bottom of table push tabs in opposite directions.


On the bottom of table push tabs in opposite directions.


Step 7


 Cut out presents.


Cut out presents.


Fold on dotted lines and cut on slits.


Fold on dotted lines and cut on slits.


Put tab in slit.


Put tab in slit.


Completed present.


Completed present.


Step 8


Finished.


Finished.

Awesome job!!  You just finished making your Christmas Paper Toy.  Have fun playing with it…. Christmas will be here in no time.

Technorati Tags: , , , , , , , , , , , , , , , ,

A Collection of Awesomely Yummy Edible Christmas Crafts


A Collection of Awesomely Yummy Edible Christmas Crafts


Crafts come in all different kinds of forms.  Today I’m going to write about Edible Crafts.  And, not just any edible crafts, but Edible Christmas Crafts.  YUMMY!!  Whether you are planning a Christmas party, Christmas decorations or just want to have fun with your kids…. Edible Christmas Crafts will be enjoyed by all.  I scoured the internet looking for yummy edible crafts and I came up with 16 awesome ones that will get your stomach growling.  So, without further ado here is a collection of awesomely yummy edible Christmas crafts for your enjoyment.

Check out our other Christmas Crafts.

A Collection of Awesomely Yummy Edible Christmas Crafts

(1)  Reese’s Peanut Butter Cup Trees


Reese's Peanut Butter Cup Trees


Ok, I love Peanut Butter Cups, so I couldn’t resist this Edible Christmas Craft.  Here Sweet Simple Stuff shows you how to take my favorite candy, Reese’s Peanut Butter Cups and transform them into these adorable Christmas Trees.


(2)  Sipping Snowman


Sipping Snowman


This edible Christmas craft is so cute!!  Busy Bee Kids Crafts shows us how to take marshmallows, white icing, chocolate chips and a straw and create an adorable Sipping Snowman that is delicious!!  It would taste so good in some hot chocolate.


(3)  Gumdrop Penguins


Gumdrop Penguins


I love these crazy pair of penguins!!  And, I bet they are delicious.  I found this edible Christmas craft over at Spoonful.  Not only will your kids love making these gumdrop penguins, but they will absolutely love eating them too.


(4)  Stained Glass Cookie Ornaments


Stained Glass Cookie Ornaments


What a yummy and clever idea.  Kaboose gives us all the details how to take store bought cookie dough and some Lifesaver hard candies and transform them into these beautiful Stained Glass Cookie Ornaments.  Sure, you could just eat the cookies, but imagine how wonderful they would look on your Christmas tree.


(5)  Gingerbread Star Tree


Gingerbread Star Tree


I love how beautiful this Gingerbread Cookie Christmas Tree looks.  But, imagine how your guests at your Christmas party will enjoy this.  They can simply grab a cookie off the tree and nibble on it while they chat with the guests.  How fun!!  Check out Taste of Home for the details.


(6)  Holiday Garland


Holiday Garland


Oh this garland looks so beautiful!!  I love how the colors of the red cranberries contrast against the white popcorn.  It’s just wonderful.  Craft Elf shows you how you too can do this.  This edible Christmas craft takes you back to a simpler time.  And, it makes the Christmas tree just absolutely gorgeous.


(7)  Holiday Fiesta Spread


Holiday Fiesta Spread


I’ve actually had this at a Christmas party before and it is absolutely delicious.  And, it is so cute.  Kraft will show you in great detail how to make this edible Christmas craft for your guests.    This fiesta spread is decorated like a Christmas tree…. so colorful too.


(8)  Marshmallow Wreath


Marshmallow Wreath


Who would have thought marshmallows could look this beautiful as a wreath?  But, it truly does.  It reminds me of a Winter Wonderland.  I found this beautiful wreath at Three Pugs & a Baby.  She explains how the Marshmallow Wreath only takes about 30 minutes.  Can you imagine creating this beautiful wreath in just a half hour?  How wonderful.


(9)  Snowmen Treats


Snowmen Treats


Better Homes & Gardens shows us how to take Hostess Snowballs and transform them into these cutie-patootie Snowmen Treats.  What child wouldn’t love eating this snowmen?  They are just precious…. and I bet absolutely delicious too.


(10)  Gumdrop Wreath


Gumdrop Wreath


I love, love, love the beautiful colors of this wreath.  And, I would imagine the people at your front door will too.  A Pretty Cool Life shows you how to make this beautiful Christmas Wreath in great detail.  If you aren’t crazy about all the colors…. you can even just make a green and red wreath or any color wreath you choose.


(11)  Rudolph the Red Nosed Rein-Pear


Rudolf the Red Nosed Rein Pear


The Lead Chandelier created this adorable Rudolph the Reindeer out of a pear…. hence the name Rudolph the Red Nosed Rein-Pear.  I love the idea!!  It is super cute and the kids will love making it along with you.  Use it as a yummy Christmas decoration.


(12)  Holiday Tree Brownies


Christmas Tree Brownies


Oh these are so festive!!  And, I bet delicious too.  Betty Crocker Recipes gives you all the yummy details on this edible Christmas craft.  I love the miniature candy canes that are stuck into the brownie as a tree stand… it’s just so creative.


(13)  Donut Christmas Tree


Donut Christmas Tree


I know this Donut Tree was used at a Halloween party.  But, I was thinking…. imagine how wonderful this tree would be if it was white powered donuts!!  It would be perfect as a Donut Christmas Tree for a Christmas Party.  Check out One Charming Party for all the details.


(14)  Krispie Treat Christmas Tree


Krispie Treat Christmas Tree


Oh my kids would love this!!  After all, they love Krispie Treats.  Here Cookies & Cups takes some green food coloring and transforms ordinary looking Krispie Treats into a beautiful green Christmas tree.  Add some M&M’s and imagination and your Holiday Christmas tree is born.


(15)  Strawberry Christmas Tree Brownies


Strawberry Christmas Tree Brownies


These adorable bite-size brownies look so tasty…. and so festive too!!  I would have no doubt that they would be a huge hit at any Christmas party.  Erica’s Sweet Tooth shows you how you too can make this yummy edible Christmas craft for yourself.


(16)  Tortilla Christmas Tree


Tortilla Christmas Tree


If you are looking for something yummy and festive to serve your guests at your Christmas party that isn’t sweet…. this is the edible Christmas craft for you.  Better Homes & Gardens shows you how to take mini-wraps or tortillas and create a Christmas Tree.  Let the guests at your party pick at the tree until it’s gone.  Yummy!!

Technorati Tags: , , , , , , , , , , , ,

How to Make Paper Christmas Globe Ornaments

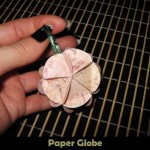
I have a super fun craft for you today…. and it is perfect for the Christmas holiday.  Today I’m going to show you how to make a Paper Christmas Globe Ornament that will look beautiful on any Christmas tree.  You could even make a few of them to spread throughout the tree.  This is a perfect way to adorn the Christmas tree using decorations you made yourself.  Imagine the joy it will give you to see these on the tree.  So, grab the materials needed and let’s get started.

Check out our other Christmas Crafts.

Laura from  Dacian Moon Handmade will show you how to make this step-by-step.


Materials Needed

– pattern cardboard
– pencil
– small piece of ribbon
– glue
– scissors
– auto-adhesive crystals (optional)


Step 1

Draw 20 circles on the cardboard.


Cut them out.


Step 2

Fold one margin upward…


… then another one…


…and the third to close the triangle.


Step 3

Repeat step 2 for all the 20 circles.


Step 4

Start to connect the pieces by applying a layer of glue on one side…


… and press on it a side from another piece, like this.


Do the same to glue all the upper sides…


Continue with the lower sides.


When you will have only one piece to add, it will look like this.


Step 5

Add a small amount of glue on one corner and place the folded ribbon on it.


Then glue the last piece like all the others.


Step 6

This step is optional.

Take one auto-adhesive crystal…


… and place it on one triangle. You can use that to add more of a shine to your globe.


Now your globe is ready to take its place on the Xmas tree.


Beautiful!!  Now your Paper Christmas Globe Ornament is all finished.  You can even make a few more to spread around the Christmas Tree.

Technorati Tags: , , , , , , , , , , , , ,