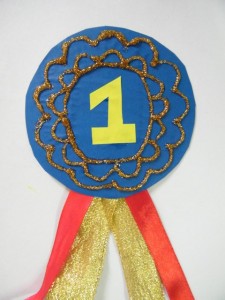
Is your dad the best in the world? Here’s a father’s day gift that will help him remember that. The simple instructions to make this Number 1 Dad badge are given on the following tutorial.
How to Make Cool Stuff
Is your dad the best in the world? Here’s a father’s day gift that will help him remember that. The simple instructions to make this Number 1 Dad badge are given on the following tutorial.
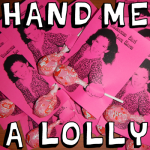
Today we will show you how to make a very unique Valentines Day Lollipop Card. This card looks like your child is handing his or her friend a lollipop and it is very cute and personalized to your own child. Find out how to make it.

Valentine’s Day will be here before we know it. Kids love handing out Valentine’s Day Cards…. they just love it. Plus, they love receiving them as well. I don’t know about you, but every year I try to help my kids come up with different Valentine Card ideas than the year before. It gets difficult after a while to keep coming up with unique ideas. Well, I thought I would help you with that by showing you some really cool Candy Valentine’s Day Card Ideas for Kids. I found them all while scrounging the internet for you. Each are unique and a ton of fun to make. I’m sure you and your kids will find something here that they will enjoy making and giving to their friends and family. So, let’s get started.
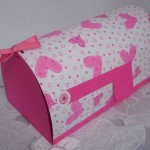
Valentine’s Day is next month. Now is the time to start getting your Valentine’s Day Mailboxes ready for February. Valentine’s Day mailboxes are a great way to collect your Valentine’s Day cards from all your friends and family members. I have searched the internet and found some really wonderful and awesomely cool Valentine’s Day Mailboxes. Surely, out of all the Valentine’s Day mailbox crafts I have listed in this post you will find one that fits your needs…. plus, it promises to be tons of fun for you and the kids.

Today I will show you how to draw a fantasy style Valentine’s Day Card…. specifically a Valentine Dragoness Valentine’s Day card. You can use regular paper for this craft or if you would like something more durable feel free to use Card Stock. Whatever you have in your house is fine. I will show you how to make every detail of this Valentine Dragoness perfect for your someone special. So grab a paper and pencil and let’s get started.
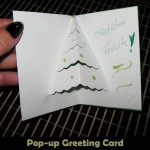
Today I’m going to show you how to make a very special greeting card for the Christmas Holiday. In particular I’m going to show you how to make a Pop-up Christmas card. Anyone receiving this Christmas card will love it… not only because it came from you, but also because of the 3-D effect of the card. In this post I will show you how to make a Pop-up Christmas tree that actually sticks out of the card when opened. Add a special note to your card and it is ready to send out for Christmas to a friend or family member.

If you are like me you are having a lot of people over at your house for Thanksgiving. And, with a large amount of people around a table it can sometimes mean a lot of confusion as to where everyone is sitting. To relieve the stress from you dealing with that during your fun Thanksgiving festivities one way to do this is to have place cards around the table. This way your guests can easily go to the table and find their seats easily. Well, with that in mind today’s post will be about fun and festive Thanksgiving place card ideas. Sure, you can easily just buy place cards in the store, but where is the fun in that? Today I have put together 14 awesome Thanksgiving place card ideas I have found around the internet. Surely, you will find the one that is perfect for you and your Thanksgiving get together.

Today I’m going to show you how to make a changing story board. You can bring your stories to life by using your creativity and a little bit of imagination. As the story evolves you can change your story board to depict the story you are trying to tell to your family and friends. You will actually have moveable figures and changeable backgrounds for your story…. what better way to actually tell your story than to have visuals. So, grab the materials needed and let’s get started.

Mother’s Day is coming up next month. That will be here before you know it. So, in honor of the upcoming Mother’s Day Holiday today I will show you how to make a 3D Carnation Mother’s Day Card. Any mom would love receiving a homemade card from their child. And, this card is no exception. Not only is this card made by you, but it is also 3D which makes it really cool. You will use crepe paper to give this card a 3D effect. So, grab the materials needed and let’s get started.
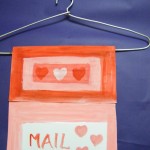
Today I’m going to show you a great craft that you can make from an old wire hanger. That’s right…. I’m going to show you how to make a Mail Holder from an Old Wire Hanger. This mail holder can be given to your parents so that they have a place to hold onto their bills, or save it for yourself to hang on your door so that you can receive notes from your siblings or parents. Either way this Mail Holder is sure to be enjoyed. So, let’s get started.
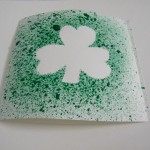
In this post I’m going to show you how to make a Shamrock Greeting Card Craft for St. Patrick’s Day. You can make it to wish your friend, teacher or mother (or whoever you would like) a wonderful St. Patrick’s Day. All you need is some paint, paper and an old toothbrush. The craft is an easy one, but it is sooooo…. much fun. So, grab those materials needed and your St. Patrick’s spirit and let’s get started. Have fun!!
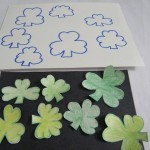
St. Patrick’s Day will be here before you know it…. so in the spirit of that this craft is all about St. Patrick’s Day. In this post I will be showing you how to make a St. Patrick’s Day Matching Game. This craft is perfect for the Preschool crafter as this game is all about matching the size of each shape of the shamrocks. Get a couple Preschoolers together and listen to them giggle as they try to match the shape of the shamrocks. So, with that being said…. let’s get started.
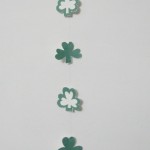
St. Patrick’s Day is coming up in just a few weeks…. March 17th to be exact. Have you started decorating yet? If you haven’t, but you’d like to start…. then I have the craft for you today. I’m going to show you how to make a St. Patrick’s Day Shamrock Streamer Decoration. It is a super easy craft, so this is a great craft for the youngest of crafters. But, it is also fun enough to keep the attention of all age crafters. So, no matter what your age is…. grab the materials needed and let’s get started.
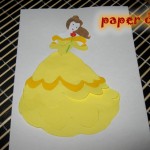
Today I’m going to show you how to make a Layered Paper Doll. This craft can be made with any character you would like. For purposes of explaining this tutorial I will show you how to make this Layered Paper Doll using a Beauty and the Beast Character…. Belle. Once you know the technique of how this is done you can do this to any character. This craft is a lot of fun, so grab the materials needed and let’s get started.
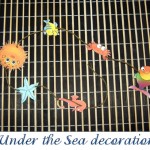
Do you like Under the Sea creatures? If you do then I have a craft for you today that you will truly enjoy. I’m going to show you how to make an Under the Sea Decoration that will look so wonderful hung up in your bedroom. Imagine how lovely it will look hung up on your ceiling as your stare at it below from your bed. Well, you don’t have to imagine anymore… let’s help it become a reality. Today I’m going to show you how to make this Under the Sea Decoration step-by-step. So, let’s get started.
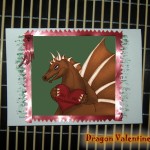
Do you have someone special that you would love to give a Valentine’s Day Card too, but they aren’t crazy about the traditional Valentine’s Day Cards. Well, if so…. I have the perfect Valentine’s Day Card Craft for you. Today I’m going to show you how to make a Fantasy Style Valentine’s Day Card…. A Dragon Valentine to be specific. The craft is an easy one, but don’t worry… it’s fun too. So, grab the materials needed and let’s get started.