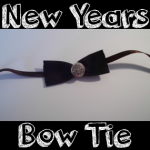
Are you allowed to stay up until midnight on New Years Eve and want to look all dressed up and spiffy? Here is a cute craft for kids to make a bow tie to wear an outfit with a classic style, perfect for any New Year party.
How to Make Cool Stuff
Are you allowed to stay up until midnight on New Years Eve and want to look all dressed up and spiffy? Here is a cute craft for kids to make a bow tie to wear an outfit with a classic style, perfect for any New Year party.
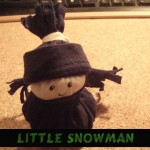
Today we will show you how to make this cute little fabric snowman. He is a lot of fun to make and even more fun to play with. On this cold Winter day, I thought this would be a great craft to share with you.
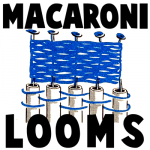
This is a very unique weaving loom craft…and you probably haven’t seen it anywhere else. Here is a craft idea for making weaving looms out of 3 inch long macaroni noodles, string, buttons, and a few other items. Find out how to put this unique loom together…the sooner you start, the sooner you can begin your weaving projects.
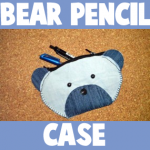
If you want to start getting prepared for back-to-school time, here is a simple sewing project to make a pencil case that looks like a cute teddy bear. Find out how to make it with the following step-by-step craft instructions.
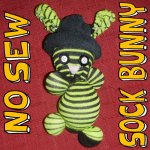
Today we will show you how to make a no-sew stuffed bunny rabbit for Easter….this craft is easy enough to make in twenty to thirty minutes. All you need are 2 socks, some rubber bands, and a few buttons. This is a great craft to make for Easter celebrations.

Today I am going to show you a bunch of some really cool perpetual calendar crafts perfect for the upcoming New Year. What is great about perpetual calendars is that they can be changed to show any combination of day, month, and year….. which means that the same calendar can be used year after year after year. Sure, you can purchase a perpetual calendar at a store or online, but I am pretty sure you would spend way too much money and they wouldn’t be as awesome as the perpetual calendars I have listed here. I have scoured the internet to find you some really cool perpetual calendar crafts. You will surely find one here that will fit your needs.

Yesterday I showed you how to make a Glue Stick Man out of your recycled glue sticks. Today I’m going to continue showing you how to make toy figures out of recycled materials. In this post I’m going to show you how to make Cardboard Little People Figures. Just simply use pieces of used cardboard boxes. This craft is a great way to recycle those cardboard boxes that you would normally throw away. These Cardboard Little People Figures are fun to make…. almost as much fun as they will be to play with. So, let’s get started.

St. Patrick’s Day is coming up in less than 2 weeks. So, with that being said…. I thought that we could work on a fun craft in honor of St. Patrick’s Day. In this post I will show you how to make a Button Leprechaun. A Leprechaun is supposed to be a fairy type of being that takes the shape of an old man…. he usually wears a green jacket. a Leprechaun is popular in Irish folklore. So, in preparation of the upcoming St. Patrick’s Day Holiday let’s get this craft started.
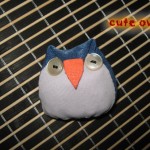
If you love stuffed animals then you are going to love today’s craft. I’m going to show you how to make a Cute Stuffed Owl. You can decide to keep in for yourself or give it to one of your best friends to love. Either way you can guarantee that people are going to love this stuffed owl… especially when they find out that you made it yourself. So, grab the materials needed and let’s get started.
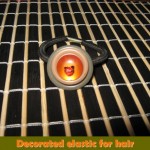
Here is a fun craft for the girls today. I’m going to show you how to make a Decorated Elastic for your Hair. The craft is super easy, but it is so much fun. Made from a basic elastic and some extra buttons you have laying around….. the elastic turns out so beautiful. People will actually be surprised you made it yourself. So, grab the few materials you need for this craft and let’s get started.

Winter is well on its way….. and when you think of Winter what do you think of? I know what I think of….. snow. So, in honor of Winter and snow today’s craft is all about snowflakes. I scoured the internet to find some really awesome snowflake crafts. And, there are some really cool snowflake crafts out there. So, today I’m going to present you with 14 Fun Snowflake Crafts for Winter.

Today I’m going to show you how to make a Button Santa Claus Ornament. This Santa ornament is like no other….this Santa ornament is made up of buttons of different sizes and colors. Use your creativity to make your ornament look like Santa. This craft is a lot of fun…. so grab your buttons and a pipe cleaner and let’s get started.
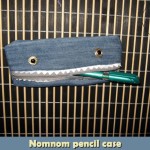
School is back in session once again. And, with school brings tons and tons of school supplies. Instead of using the same old pencil box that everyone else is using why not make a funny case that is like no other. Check out this funny nom nom pencil case craft. Why nom nom? Because it looks like it is eating your pencils….. “Nom nom nom.”

Today we will show you how to make dolls out of socks. This craft will probably take less than 10 minutes for you…it is that easy. These are no-sew dolls…that is right…no sewing necessary at all. If you like sock monkeys, but you were too lazy to make them, then this arts and crafts project is for you. Have fun.

Do you want to make a desk for your dollhouse so that the dolls can actually open up the drawers and put things int he desk? This is a great craft that actually turns out fantastic. I hope you enjoy this diy dollhouse furniture miniatures tutorial for kids.