How to Make a Recycled Lid Christmas Ornament

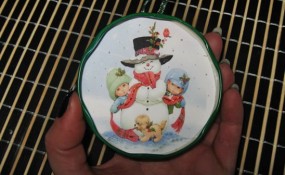
It’s the Christmas season and I’m going to get into the Christmas mood by showing you a fun Christmas craft.   Today I’m going to show you how to make a recycled lid Christmas Ornament.  I love this craft because this ornament is made from recycled materials.  Not only will we use a recycled jar lid, but we will also use a recycled greeting card.  Plus, it turns out super cute.  Your kids will really enjoy making these Christmas ornaments.  So, let’s get started.

Check out our other Christmas Crafts.

Laura from  Dacian Moon Handmade will show you how to make this recycled lid Christmas ornament.


Materials Needed

– recycled lid
– recycled greeting card
– scissors
– glitter glue (I use gold glitter glue but you can choose another color to match the greeting card you use)
– craft glue
– metallic silver paint
– a small piece of ribbon
– pencil


Step 1

Decide what part of the card you want to use and place the lid over it.


Using your pencil trace the contour of the lid…


… then cut out the desired part…


… like this.


Step 2

Apply a layer of glue inside the lid…


… and place the cut card over it.


Step 3

Use glitter glue to make some highlights on the card. I use it on the red parts.


It will look like this.


Step 4

Use metallic silver paint to add some delicate accents on the snow and to make snowflakes. (Instead of the metallic silver paint you can put small amounts of glue and place glitter or cotton wool on it )


The front of our ornament is ready.


Step 5

Turn it over to fix the back.


Draw a circle on the rest of the card and cut it out.


You can use it like this or turn it over with the white part up, as I did.


Take the ribbon and fold it in two…


… apply a small amount of glue on the upper part of the lid, like this…


… and place the folded ribbon over it.


Apply glue on the card circle too…


… and put it on top of them, like this.


Now you can write “Season Greetings” on it and decorate it with glitter glue if you want.


Let it dry well and you have a unique ornament made of recycled materials.


Isn’t that an adorable Christmas ornament?  And, it’s made from recycled materials…. how cool is that?!

Technorati Tags: , , , , , , , , , , , , , , ,

How to Make a Kissing Dangle Decoration for Valentines Day

Are you still looking for decorations for Valentines Day?  If so, then I have the craft for you today.  In this post I’m going to show you how to make a Kissing Dangle Decoration for Valentine’s Day.  It’s an easy craft, but turns out really beautiful to hang up for Valentines Day.  Plus, making this craft is a lot of fun…. almost as much fun as it will be seeing people’s reactions when they find out you made this decoration yourself.  So, grab the materials needed and let’s get started.

Check out our other Valentines Day Crafts.

Laura from Dacian Moon Handmade  will show you how to make this, step by step.


Materials Needed

– 4 recycled valentines cards
– white paper
– scissors
– thick thread
– pencil
– paper glue
– assorted color beads (I used blue, red and white)


Step 1

Take the card with the smaller width and draw its width on the white paper.


Do the same with the card with the smaller height.


Complete the rectangle…


… then cut it out. This is the maximum size that can be used on all the cards.


Draw a heart inside this rectangle. Make it as large as you can.


Cut it out.  This is our heart template.


Step 2

Place the template on a card …


… and draw the outline.


Cut it out, then fold it in half.


Do the same for all 4 cards.


Step 3

Apply a layer of glue on one half of one heart (on the back)…


… then place another heart over it. Press well.


Do the same to add another heart. Now we have only one left.


Step 4

Take the thread and make a knot on its end.


Add the blue bead…


… and make another knot over it.


Add the red bead …


… and make another knot.


Step 5

Apply a layer of glue on the center of hearts.


Put the thread there…


… add glue and the last heart over it, like this.


Make another knot.


Add the last bead and make the last knot.


Now your kissing dangle is ready! Hang it where people can see and enjoy it.


How did your Kissing Dangle Decoration turn out?  Let me know in the comments below.  And, take a picture of the decoration too and share that in the comment as well.  I’d love to see it.  Now, go hang up your Kissing Dangle.

Technorati Tags: , , , , , , , , ,

14 Fun Snowflake Crafts for Winter


14 Fun Snowflake Crafts for Winter


Winter is well on its way….. and when you think of Winter what do you think of?  I know what I think of….. snow.  So, in honor of Winter and snow today’s craft is all about snowflakes.  I scoured the internet to find some really awesome snowflake crafts.  And, there are some really cool snowflake crafts out there.  So, today I’m going to present you with 14 Fun Snowflake Crafts for Winter.  For some of these crafts you will need to know how to make a snowflake, so check out these great snowflake patterns.

Check out some of our Snowflake Crafts.

14 Fun Snowflake Crafts for Winter

(1) Multicolor Snowflake Wreath


Snowflake Wreath


Here is a really cute Wreath perfect for the Winter Season.  It turns out quite beautiful.  BHG shows you how you too can make this Winter Wreath.  Made from left over card stock from all those Christmas Cards you got during the Christmas Season.  What a great way to recycle those greeting cards.


(2) Sparkly Snowflake


Sparkly Snowflake


Now this is a beautiful snowflake craft.  Made from long and short sparkly beads this winter craft turns out lovely…. perfect for decorating the house for this Winter Season.  CountryLiving shows you how to do this Snowflake craft step-by-step…. you have to scroll to Slide #2.


(3) Wooden Snowflake


Wooden Snowflake


Now this is a fun Snowflake Craft perfect for the youngest of crafters.  Made from Popsicle sticks, glue and fake snow…. this craft promises to be a lot of fun.  You can learn how to do this craft by going to Crafts-for-all-Seasons.


(4) Pipe Cleaner Snowflake


Pipe Cleaner Snowflake


What child doesn’t like a pipe cleaner craft.  Pipe Cleaners are just so much fun to make crafts with…. and this Snowflake craft is no exception.  Check out the MarthaStewart site to get the entire step-by-step tutorial.


(5) Snowflake Window Clings


Snowflake Window Clings


I don’t know about your kids, but I know my kids love window clings.  They love decorating the windows for all the Holidays.  Well, winter is no exception.  Imagine decorating the windows with Snowflakes that you and your child made yourself.  FamilyFun shows you how to achieve this.


(6) Recycled Plastic Ring Snowflake Craft


Recycled Plastic Ring Snowflake Craft


Here is a very cool snowflake craft because it is made out of recycled materials.  FreeKidsCrafts shows you how you can take those 6-pak ring holders from soda and make them into beautiful snowflakes that you can hang proudly this Winter Season.


(7) Q-Tip Snowflakes


Q-Tip Snowflakes


It’s hard to believe that something made from Q-Tips can turn out so beautifully…. but it does.  Made with Q-Tips, glitter and glue this Snowflake craft is not only fun…. but it also turns out perfect to hang up this Winter Season.  Check out AllFreeCrafts for the step-by-step “how-to”.


(8) Snowflake Puzzle


Snowflake Puzzle


Here is an interesting Snowflake Craft.   This easy craft is made from Popsicle sticks and black marker.  BusyBeeKidsCrafts shows you how you can simply take a Snowflake picture and make it into a puzzle just by adding it to a row of Popsicle sticks and cutting the picture with scissors…… this makes it into a puzzle.  Simply mix up the pieces and try to put it back together again.


(9) Woven Snowflake


Woven Snowflake


This woven snowflake is a great craft for kids of all ages.  Made from Popsicle sticks, yarn and glue…. you will have this snowflake craft finished in no time.  Make a few and decorate the whole house this Winter Season.  Check out the “how-to’s” of this craft over at ActivityVillage.


(10) Button Snowflakes


Button Snowflakes


HandMadeBeginnings has the right idea for a Snowflake Craft…. make the snowflakes out of Popsicle sticks and Buttons.  The idea is so easy, but yet very creative.  I love it.  And, I love how the snowflakes turn out.  She explains how taking these snowflakes and adding string will make for great window decorations.  I have to agree.


(11) String Snowflake


String Snowflake


Here is a great snowflake craft for the older children.  Basically this snowflake is made from white string and some fabric stiffener, but look how magnificent it turns out.  The snowflake craft would look awesome hanging in a window by itself or in groups.  Check out FreeCraftUnlimited for the details.


(12) Sparkly Snowflake Mobile


Sparkly Snowflake Mobile


This is a cool craft that when done looks great hung from the ceiling.  Made from paper and glitter this snowflake craft will look festive this Winter Season hung in a classroom or even a child’s bedroom.  Get all the craft details over at Kaboose.


(13) Beaded Snowflake


Beaded Snowflake


I love, love, love this snowflake craft.   I dig that they used pearls in this craft….. it just gives this beaded snowflake a really wintery look.  I found this craft over at Crafts-For-All-Seasons and they did a really beautiful job putting this snowflake craft together.  Make sure to check it out.


(14) Lace Snowflakes


Lace Snowflakes


Who would have thought that Lace can look so much like a snowflake?  But, when put together the right way…. it really does.  AllFreeCrafts did a really great job coming up with this snowflake craft.   They simply added lace to wire to create this beautiful snowflake.  Now, that’s creative.

Technorati Tags: , , , , , , ,

Crafty Ways to Reuse Wrapping Paper & Greeting Cards


Crafty Ways to Reuse Wrapping Paper & Greeting Cards


Christmas has come and gone.  And, with Christmas comes the mountains of used wrapping paper from all those gifts you received.  Most of the time we land up throwing it away…. we don’t even think twice about throwing it away.  Or, how about all those Holiday Greeting Cards you received this year….. what do you land up doing with them once the Holiday is over?  Throw them away, right?  Well today I’m going to show you crafty ways to reuse these items.    From Christmas decorations for next year to decorative gift boxes there are plenty ideas for reusing your wrapping paper & greeting cards.  You are sure to find an idea for yours.  So, without further ado….

Crafty Ways to Reuse Wrapping Paper & Greeting Cards

(1) Wrapping Paper Wreath


Wrapping Paper Wreath


Here is a great way to reuse your wrapping paper.  Take your wrapping paper and make it into a festive Holiday wreath.  Check out Instructables for the How-to.


(2)  Iron the Wrapping Paper


Iron the Wrapping Paper


If the receiver of the gift was careful and the wrapping paper isn’t torn too bad you could actually reuse it.  But, you may be wondering what to do about all those wrinkles…. no worries.  Martha Stewart tells you to iron it on low heat and reuse it.


(3) Gift Card Ornaments


Gift Card Ornaments


Here is a fantastic idea to transform all those Holiday Greeting Cards into some beautiful Christmas Ornaments for next year.  Look how beautiful they turn out.  Junk Mail Gems shows you step-by-step how to make these beautiful Christmas Ornaments for yourself.


(4) Decorative Bowls


Decorative Bowls


Here’s a great craft for the kids.  Take the old wrapping paper…. shred it up…. and make it into decorative bowls.  Instructables shows you step-by-step how to do this.  The kids will love showing off the bowl they made themselves.


(5) Holiday Tins


Holiday Tins


Here is another great way to reuse that Holiday Wrapping Paper…..decorate tins with the wrapping paper and make them into beautiful Holiday Tins.  CraftStylish shows you step-by-step how to achieve this.


(6) Gift Boxes


Gift Boxes


You know what I never have enough of???…   Gift Boxes.  I’m always buying gift boxes for my gifts every Holiday Season.  Well, no more.  There is no longer a need because CraftyPod shows us how to make our very own gift boxes from Greeting Cards.  They come out looking perfectly festive.


(7) Wrapping Paper Collage


Wrapping Paper Collage


Here is a great craft for the kids…. and it uses Wrapping Paper scraps.  It is a perfect way to use up those little pieces of wrapping paper that you would normally throw away.  KinderArt shows you how to do this with your kids…. they will have so much fun.


(8) Serving Tray Liner


Serving Tray Liner


Here is a beautiful way to reuse your Holiday wrapping paper.  Simply iron it on low heat and then place it in one of your serving trays.  You will have a wonderfully festive Holiday serving tray for your New Years Party.  Martha Stewart shows you how to achieve this.


(9) Christmas Card Basket


Christmas Card Basket


Here is a creative way to use up all those Holiday greeting cards you have from this year.  Instead of throwing them away why not make this adorable Christmas Card Basket that you can use next Holiday Season.  Made from Christmas Cards and yarn you and your children will have so much fun making it.  Check out AllFreeCrafts for the tutorial.

And, there you have it…. 9 crafty ways to reuse your Holiday wrapping paper & greeting cards this Holiday Season.  Do you have some other ways to reuse wrapping paper and greeting cards?  Let me know in the comments below.  I would love to hear them.

Top image by tillwe

Technorati Tags: , , , , , , , , , , ,

Making a Greeting Card Display Wall Hanger Crafts Idea for Kids

Since Valentine’s Day is coming up soon, how about learning how to make this Greeting Cards Display Craft. You can hang it on a picture hook, or hang it from other high places. Then you can look at the love that people sent to you in Valentine’s Day cards, Christmas cards, Birthday cards, or whatever.


Making a Greeting Card Display Wall Hanger Crafts Idea for Kids


Making a Greeting Card Display Wall Hanger Crafts Idea for Kids

Crafts Materials Needed

– wire coat hanger
– scraps of ribbons, any color
– decorative paper or wrapping paper (optional)
– glue
– scissors
– tape measure or ruler


Step 1 (Optional Step)

Glue and wrap strips of decorative paper, wrapper paper, ribbon, or yarn all over the hanger so that the wire does not show anywhere.

Step 2

Have 15 to 20 ribbons of varying lengths—from 15 to 36 inches. Glue them on the hanger, both on the upper and lower parts, about 1 to 2 inches apart.

Step 3

These ribbons should be used to pin on, or glue on, Christmas cards, Valentine’s Day cards, or birthday cards, or whatever.

The hanger can be displayed on a picture hook anywhere in the house.


Greeting Cards and Valentines Cards Display Hanger Crafts Idea for Kids


Technorati Tags: , , , , , , , , ,

Make Letter Holders Box as Gift for Mom on Mother’s Day


Make Letter Holders Box as Gift for Mom on Mother’s Day

Make this cool letter holder as a gift for Mom  on Mother’s Day or Dad on Father’s Day or for someone else you love. You can  make this attractive and useful letter holder box gift in which to hold correspondence letters.

To make it you will need the following crafts materials:

-glue
-colorful greeting cards
-magazine cut-outs
-paints
-brush
-nail
-firm rectangular cereal box
-scissors
-needle
-wool
-colored paper

Step 1


Cut the cereal box down to the height you want, with a pair of scissors.

Step 2

Cut a piece of colored paper to fit around the box, and glue it in place. Allow it to dry.

Step 3

With a nail, punch evenly-spaced holes at 1/2 inch intervals about 1/4 inch down from the top, all around the box.

Step 4

With a needle and wool, run an overcast stitch through the holes to make a decorative finish.

How to Make an Overcasting Stitch


Make a knot at the end of your piece of thread. Point the needle away from the hand with which you are working and toward the shoulder of the other hand. The stitches should be about 1/4 inch apart. End a row of overcasting stitches with a few little backstitches one over the other.

Step 5

Cut a colorful picture from a greeting card, and glue it to the front of the box.

Technorati Tags: , , , , , , , , , ,