How to Make Paperclip Christmas Angels : Easy Craft Idea for Kids

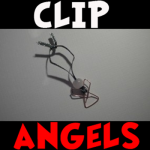
You can make a cute little paperclip angel to hang on your Christmas tree or to just decorate your bedroom or house. These are super easy to make and all of the materials are probably sitting around your house somewhere. Laura from Dacian Moon Handmade  will show you today how to make this simple decoration, step by step.

Check out our Christmas Crafts.


How to Make Paperclip Christmas Angels Easy Kids Craft Tutorial


How to Make Paperclip Christmas Angels Easy Kids Craft Tutorial

CRAFTS MATERIALS NEEDED:

– butterfly paperclip
– bead
– ribbon
– sewing pin


Step 1.

Fold the ribbon in two and put it through the bead.


You can help it with the pin.


It will look like this.


Step 2.

Put the ribbon through the paperclip, like this…


…and make a knot over the bead.


Step 3.

Bring the bead near the paperclip…


… and now it looks like an angel 😀


Tie both ends together and your decoration is ready.


And there you have it, a beautiful Christmas Angel. It is so adorable, isn’t it? You can make these as a gift or use it as a Christmas ornament. Merry Christmas!

Check out our Christmas Crafts.

Technorati Tags: , , , , , ,

How to Make a Clip Bookmark

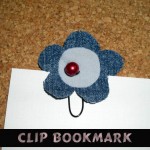
One thing I never can find when I need one is a bookmark.  And, you can always use a bookmark in school to mark your homework spot in your textbooks.  So because of that…. today I’m going to show you how to make a Clip Bookmark.  Not only is it super cute, but it is also super effective  in keeping your spot…. after all it is a clip that is sure to hold tight.  So, grab the materials needed for this craft and let’s get started.

Check out our other Bookmark Crafts.

Laura from  Dacian Moon Handmade  will show you, step by step, how to do this craft.


Materials Needed

– paper clip
– one piece dark denim
– one piece light denim
– glass pearl
– pen
– needle and thread


Step 1

Draw a flower on the dark denim…


… and a circle on light denim.


Cut them out.


Step 2

Take the flower…


… and sew the circle on it.


On the back we will place the clip and sew it there.


Turn the bookmark over. The stitches are visible, but we will mask that by sewing the glass pearl over them.


Like this. The bookmark is ready to use.


Wasn’t that easy?  And, so much fun!!  Now, you have an awesome Clip Bookmark perfect for bookmarking your homework spot in your textbooks.  Enjoy!!

Technorati Tags: , , , , , , , , , ,

How to Make a Paper Clip Necklace

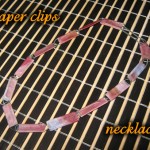
Today I’m going to show you a fun craft you can make with some of the supplies you probably have at home.  I’m going to show you how to make a very cute Paper Clip Necklace.  This craft is made from paper clips and colored paper…. it’s really quite an easy craft, but so much fun.  It’s great for children of all ages.  So grab the materials needed and let’s get started.

Check out our other Jewelry Crafts.

Laura from Dacian Moon Handmade will show you this tutorial step-by-step.


Materials Needed

– colored paper (I used a white/pink transparent paper)
– paper clips
– glue
– scissors
– ruler


Step 1

Connect the paper clips together into a necklace.


Try it and see if it is the length you need it to be. Mine will have 14 paper clips.


Step 2.

Cut a piece of paper with a 2 cm width. You will see that is almost as big as the paper clip.


Make 13 rectangles of it, with 4 cm length. The 14th paper clip will be used to close the necklace, so it will stay as it is.


Step 3

Apply a layer of glue on one little rectangle…


… place it on one paper clip and wrap it around it.


It will look like this.


Step 4

Repeat step 3 for all the other little rectangles and the necklace is ready.


And, there you have it…. a Paper Clip Necklace.   Doesn’t it turn out quite pretty?  How did your Paper Clip Necklace turn out?  Let me know in the comments below.  Make sure to take a picture of it too…. you  can post the picture with your comment for all to see.

Technorati Tags: , , , , , ,

How to Make New Years Resolution Reminders

Today I’m going to show you how to make New Years Resolution Reminders.  A New Years Resolution is something you want to change or do better in the new year.  Such as conserve more water or save electricity, for example.  You probably have different ones.  Well, with today’s craft you will have an easier time remembering your New Years Resolutions throughout the new year, so you can keep working on your New Years Resolutions.  Do you know what your New Years Resolutions will be?  Come up with a few and then let’s get started on the craft.

Check out our other New Years Crafts.

Laura from Dacian Moon Handmade  will show you how to make these resolution reminders, step by step.


MATERIALS NEEDED:

– two pieces of cloth of different colors (I chose blue and white)
– black and white textile paint
– needle and thread
– scissors
– cotton pads
– 6 beads (4 white and 2 blue)
– 9 paper clips


Step 1

Cut one rectangle from the blue cloth ( ~12 cm x 5 cm)


Fold it in half, like this…


… and start sewing the fold.


Near the edge, place a paper clip over the cloth…


… and sew it in place.


Continue to sew the lower part and add the second paper clip near the other edge.


Sew the sides too.


When you finish it will look like this.


Step 2

Take one cotton pad …


… and part it in small pieces.


Put all those pieces inside the blue cloth…


… and sew the upper part too. We made a pillow.


Step 3

On the right upper part, sew 2 white beads…


… like this. Those will be the eyes.


On the middle sew a paper clip – this will be needed to hang the reminders somewhere.


Now we have a blank reminder.


Step 4

Using white paint, write the first resolution. My example, “keep my room clean”.


With black paint, complete the eyes.


Like this.


Step 5

Take a piece of white cloth and follow all the steps above…


… to make a white cute pillow with blue eyes and a new message, “study harder”. Take care that you must have two paper clips on the upper part, to link to the first reminder, and two paper clips on the lower part to link to the next.


Step 6

Make the third cute pillow, blue. You can add as many reminders as you like. Just take care that the last of them should have paper clips only on the upper part.


Link them together and place it somewhere you will easily see. It will help you remember your New Years Resolutions.


And, there you have it…. you just finished your New Years Resolution Reminders.  Isn’t it cute?  What were your New Years Resolutions?  Let me know in the comments below.  Also, take a picture of your craft and share it with your comments…. we’d love to see it.

Technorati Tags: , , , , , , , , ,

Mask Making Fun – How to Make 3 Different Style Masks

Everyone knows that Masks are a perfect craft for Halloween.  But, if your kids are anything like my two littlest ones…. Masks are fun ANY time of year.  My children LOVE masks… love them!!  So, today I’m going to show you how to make three different style masks….. make your favorite or make all three.  Plenty of mask making fun.

Check out our other Halloween Crafts.


How to Make 3 Different Style Masks


Mask 1


Mask 1 Directions


Materials Needed

Paper Bag

Chalk

Crayons

Scissors

Paint, Construction paper, yarn…. and anything you would like to decorate the mask with.

Directions:

  1. Put a paper bag over your head. Mark with chalk or crayon the places for eyes and mouth.
  2. Remove the bag and carefully cut these openings.
  3. Funny ears, a nose, and hair may be added by painting and pasting. Color with crayons or water colors.


Mask 2


Mask 2


Materials Needed

Firm Paper (butcher paper would work)

Paint, Construction paper, yarn…. and anything you would like to decorate the mask with.

Pencil

Scissors

Hole Punch

Notebook Reinforcements (makes holes stronger)

String

Rubber Bands

Paper Clips

Directions:

  1. Cut a piece of firm paper large enough to cover your face and reach your ears. Hold the paper to your face and mark places for your eyes and mouth.
  2. Remove the paper and cut the openings.
  3. Punch holes in the sides just above the ears. Put notebook reinforcements or paper rings over the holes.
  4. Decorate the mask however way you would like.
  5. Use string, rubber bands, and paper clips to fasten the mask around your head.


Mask 3


Directions for Mask 3


Materials Needed

Clay

Cardboard, Slate or Wood

Paper Towels

Bright Colored Paint

Directions:

  1. Model a face of clay on a firm base of heavy cardboard, slate, or wood.
  2. Let the model dry. Cover it with a layer of damp strips of paper toweling.
  3. Paste four more layers over the first layer. Each layer should be at right angles to the one under it. When the paper is dry and rigid, remove the mask from the clay model.
  4. Paint the mask with bright colors.

There you have it…. 3 different style masks.  Your child is sure to find a Mask craft that fits their needs.  Have fun!!

Technorati Tags: , , , , , , , ,

How to Make a Paper Airplane Glider in Easy Illustrated Steps Craft for Kids

Learn how to fold this amazing paper airplane glider that flies really, really far. All you need is a piece of paper and 2 paper clips.


How to Make a Paper Airplane Glider in Easy Illustrated Steps Craft for Kids


How to Make a Paper Airplane Glider in Easy Illustrated Steps Craft for Kids

Crafts Materials Needed

– Piece of Paper
– 2 Paper Clips

Here is a very easy way to make an airplane glider.

Step 1


Fold a rectangular sheet of paper in half the long way. Figure 1


Fold a rectangular sheet of paper in half the long way as in Figure 1.

Step 2


Fold back the corner of one end of the paper. Then fold back the facing corner in just the same way.


Fold back the corner of one end of the paper. Then fold back the facing corner in just the same way. Notice how these corner folds match in Figure 2

Step 3


Now fold down the entire length of both sides of the glider to make its wings


Now fold down the entire length of both sides of the glider to make its wings as seen in  Figure 3.

Step 4

Spread the wings of the glider. Use 2 paper clips to fasten the plane together as seen in Figure 3. The weight of the paper clips will make your plane glide smoothly through the air.

Flying Your Glider


Now fly that airplane glider and have a LOT of fun.


Now fly that airplane glider and have a LOT of fun.

Technorati Tags: , , , , , , , , , ,

How to Make a Mini Zip Line Moving Toy Crafts Idea for Kids

This is a really cool toy idea…one that can be changed for a lot of different variations of moving toys. This is an air ship / space ship zip line moving toy. Find out how to make this zip line toy that zips and moves, by reading the step by step, illustrated instructions below in our crafts project tutorial. Have fun.


How to Make a Mini Zip Line Moving Toy Crafts Idea for Kids


How to Make a Mini Zip Line Moving Toy Crafts Idea for Kids

Crafts Materials Needed

-Poster Board
– Paper Clips
– Sewing Bobbin
– Paste
– Staples (optional)
– Balloons (optional)
– Tape (Optional)


How to Make a Mini Zip Line Moving Toy Crafts Idea for Kids


This is a labeled image of the craft that we are going to be making today. Find the more detailed instructions below.

Step 1


fold poster board into a tube


The dimensions of the poster board are just a suggestion…use any size that you have. Roll poster board into a tube shape and glue and staple. If you don’t have staples…just use glue.


Step 2


For the cone shapes at the end of our air ship, use a paper plate (or any type of disposable plate). All you have to do is cut a triangle in the plate and the fold like you see in the image below. You can also cut out triangles on the ends of the plate … but not necessary if you are in a hurry.

Step 3


how to make toy zipline space ship


Fold the paper plates into cones and paste them to the poster board. At the top of the poster board I start showing you how to make the wheels for the zip line. Detailed instructions are below.

Step 4


bobbin and paper clip zip line craft


Take a paper clip, thread it through one side of the bobbin and then bend it OVER the bobbin and around it to form a letter ‘J’ like you see in the illustration above.

Step 5


bobbin and paper clip zip line craft


Now take the ‘J’ part of the paper clip and thread it through the poster board and bend it over to make sure that they stay fastened to the air space ship.

Step 6


How to Make a Mini Zip Line Moving Toy Crafts Idea for Kids


If you have balloons, tape them to the top of the airship. Now just take string / cord and attach it to two different places….one of the attachments should be higher than the other attachment. Make sure that the string is taught (tight). Now just put the bobbins on top of the string and let it go for a lot of fun!

Technorati Tags: , , , , , , , , , , ,

How to Make Colorful Milk Carton Candles from Old Candles

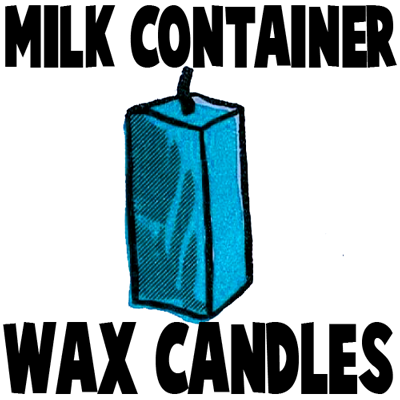
Today we will show you how to make a beautiful, colorful candle. This candle is made by using bits and pieces of old candles and placing them in the milk container, which would be used as the mold. You will be able to use this candle for a very, very long time, as it will be a very large candle. Find out how to make this recycled candle below.

How to Make Colorful Milk Carton Candles from Old Candles


How to Make Colorful Milk Carton Candles from Old Candles


CRAFTS MATERIALS NEEDED

Bits of left over candles

Quart milk container

Scotch tape

Paper clip

String

How to Make the Colorful Candle

Step 1


Cut off top of quart milk container


Cut off top of quart milk container (dotted line).  Make hole in center of bottom, as in Figure 1.

Step 2


milk-container-candles-02


Pull a length of string from top through bottom hole. Stick in a pin to hold string in place. Fasten piece of Scotch tape over hole at bottom to prevent wax from escaping, as in Figure 2.

Step 3


When hard, remove mold


From top, pull string taut, and fasten to top of container with a paper clip.

This part an adult must do. The adult should fill container with melted wax and allow to harden.

When hard, remove mold, as in Figure 3.

Now you can enjoy your beautiful, colorful candle that was made from bits and pieces of old candles. It feels good to recycle / upcycle unused items.

Technorati Tags: , , , , , , ,