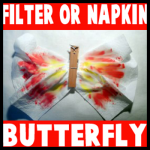
This is a cute project for little ones – a cheerful butterfly made of napkin or a coffee filter 😀 This is perfect for Kindergarteners or Preschoolers. They can do everything on their own with a little bit of guidance.
How to Make Cool Stuff
This is a cute project for little ones – a cheerful butterfly made of napkin or a coffee filter 😀 This is perfect for Kindergarteners or Preschoolers. They can do everything on their own with a little bit of guidance.
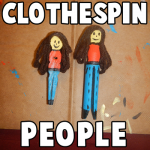
I have a fun craft for you today that you can make out of any kind of wooden clothespin. In this post I’m going to show you how to make a Clothespin People Figure. Grab a few clothespins and you can even make an entire clothespin family. Simply use your imagination to make each figure a little bit different. The kids will love this craft because it is so much fun and you will love how your children use their imagination to create their clothespin figures.

One thing you see at most houses at Christmas time is a Nativity Scene. But, the problem with the store bought Nativity Scenes is that they are usually very delicate…. too delicate for the children to actually play with. And, the thing about that is…. children love to play with the Nativity Scenes. I mean, what’s not to want to touch…. there are small people, animals and a manger. There is an entire scene for the kids to want to act out with the characters. Well, why not make a Nativity Scene craft ….. put together a Nativity Scene of your very own that the children can actually play with. So, today I have put together a bunch of Fun Nativity Scene Crafts that I have found around the internet. All are a ton of fun…. and they are all meant to be played with.

Oh boy…. do I have a treat for you today. In this post I have compiled 14 Kwanzaa crafts from around the internet. They are all perfect for your children to make. Whether you celebrate Kwanzaa or not these crafts are great to help teach your children about Kwanzaa and the African culture. Many of them not only incorporate the three colors of Kwanzaa (red, green & black), but they also help teach you about the 7 Principles of Kwanzaa…. Unity, Self Determination, Collective Work & Responsibility, Collective Economics, Purpose, Creativity and Faith. These are wonderful principles to have and to teach your children. So, check out these Kwanzaa crafts…. you are sure to find a few to do with your children.

Halloween is later this month. It is coming up quickly….. so now is the time to decorate your house for Halloween. Today I’m going to show you how to make Clothespin Witches. The craft calls for a wooden clothespin. My suggestion to you is to use the old-fashioned clothespins…. not the “pinch-to-open” ones. Make a few of these Clothespin Witches to decorate your whole house. Grab the materials needed and let’s get started.

Get ready for a fun and creative craft because I have just that for you today. In this post I am going to show you how to make a Glove Bunny for Easter. That’s right…. it’s an Easter bunny made out of a Glove. This is a great craft to do to actually use that glove that you no longer have the pair for. After stuffing the glove you have a nice, cuddly Easter Bunny that would be perfect as an Easter decoration or a nice cuddly friend. The choice is yours. So, let’s get started.

Spring is right around the corner…. it is literally days away. In honor of Spring today I’m going to show you how to make a Clothespin Butterfly. This craft is super simple, but it is equally that much fun too. Make a few of these Clothespin Butterflies and decorate your house or your entire bedroom. These Clothespin Butterflies when hung up are sure to get you in the Spring mood. So, grab the materials needed and let’s get started.

Today we are going to continue with the fun Christmas crafts by making an ornament. I’m going to show you how to make a Santa Claus Clothespin Ornament. The craft makes a cute Santa Claus that is perfect to hang on your Christmas Tree. As a matter of fact, this ornament turns out so good I think you should make a few to put around your entire Christmas Tree this Holiday Season. So, let’s get started.

I have a fun craft for you today. I’m going to show you how to make a Clothespin Penguin Ornament. It turns out so cute and perfectly festive for the Christmas Season. What would be even cuter is to make a few of the Penguin Ornaments and spread them around the Christmas Tree. So, go grab a clothespin, old glove and the rest of the materials needed and let’s get started.

All week long I have been showing you how to make the characters for a Nativity Scene. Well, today you are going to set up your Nativity Scene complete with basket. You have been working hard and today you are going to get to see the results of all your hard work. If you need to still complete the Nativity character crafts…. not a problem. I have all the crafts for the Nativity characters below. So, let’s complete the Nativity Scene for Christmas, shall we….

Today we are continuing our Nativity Scene crafts… in this post I’m going to show you how to make Yarn Clothespin Donkeys for your Nativity Scene. This craft is very similar to the Yarn Clothespin Sheep we made yesterday…. and, this craft turn out just as cute too. With some cardboard and a few clothespins you can make this Yarn Clothespin Donkey…. so let me show you how.

All week long I have been showing you how to make a Nativity Scene that is practically completely Woven. Today I’m going to complete the Nativity Scene Tutorials with showing you How to Make Yarn Clothespin Sheep for your Nativity Scene. The craft is super easy, but will turn out perfectly for your Nativity Scene. And, don’t forget to do the rest of the Nativity Scene crafts: 3 Wise Men, Baby Jesus and Mary & Joseph. Everything to make your Nativity Scene a beautiful one.

Oh boy….. do I have a fun craft for you today. I’m going to show you how to make a Clothespin Airplane Toy. This airplane toy actually works. After the craft is done the child will simply hold on to the airplane’s string and start running…. the airplane should start flying. Doesn’t that sound like fun? Almost as much fun as it will be putting the craft together. So, let’s get started.

I have a craft that kids will love to make. It’s a Standing Ghosts craft and it is perfect for Halloween. The craft is easy enough that in no time you could have several of these ghosts made….. ideal for decorating the House for Halloween.

Do you want to learn how to make this adorable alligator / crocodile clip? When it is done, you can stick it on the refrigerator and post your memos in the alligator’s mouth. It is super easy to make, learn how to on the following page.
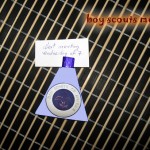
Today we will show you today how to make something simple and fun: a memo for Boy Scouts. Now the boys can have a special place where they can write important Scout related topics down .