How to Make Doll Pencil Toppers for Back to School

Do you want to create an adorable companion for your time back at school? Here is an easy-to-make doll that can be stored on the top of your pencil. Laura from  Dacian Moon Handmade  will show you, step by step, how to make it.


how to make doll pencil toppers for back to school


CRAFTS MATERIALS NEEDED:

– pencil
– thick tread
– wooden beads (one white and 6 brown)
– small cloth piece
– matching cord
– a piece of wire
– needle
– rubber tube


Step 1.

Take the thread …


… and spin it on your fingers, like this.


Step 2.

Tie it on the middle with the wire…


… like this.


Put the wire through the white bead – this will be the head of our doll.


Step 3.

Take the rubber tube…


… and make two holes in it with the needle.


Place it under the head, put the wire through the holes you made.


Step 4.

Is time to form her arms.


Add three brown beads like this…


… and put the wire end through the last bead one more time. That way the beads will not fall.


Repeat for the other arm.


Step 5.

Is time to place the topper on the pencil…


Like this.


Let’s dress her. Roll the piece of cloth over the rubber tube, under the arms…


… like this.


Tie it with the cord…


… and that is our doll.


You can use markers to make her eyes and mouth too. And she will make your classes easier 😉


Technorati Tags: , , , , , ,

How to Make a Toy Figure Pencil Topper

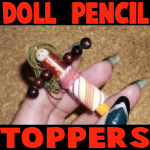
Since pencils are the one back to school item you will use most often…. why not make it unique.  Today I will show you how to make a Toy Figure Pencil Topper.  I can almost guarantee that no one else in your class will have a pencil like yours.  What is cool is that you probably already have the craft materials around your house.  Simply grab one of your favorite toy figurines you have around your house, get a pipe cleaner and pencil and you are good to go.  Let’s get started.

Check out our other Back to School Crafts.


How to Make a Toy Figure Pencil Topper


Materials Needed

Pencil

Pipe Cleaner

Toy Figurine


Step 1


Get a pencil out.


Get a pencil out.


Step 2


Wrap a pipe cleaner around end of pencil.


Wrap a pipe cleaner around end of pencil.


Step 3


Wrap around figurine


Wrap around figurine.


Finished toy figure pencil topper


And, there you go.  Your finished Toy Figure Pencil Topper.  Isn’t cute?  Don’t be surprised when your friends at school ask you to make one for them too.

Technorati Tags: , , , , , , , , , , , , , , ,

How to Make Color Tape Decorated Pencils

School is about ready to begin again.  And, what is the item you use most often at school?  A pencil, of course.  So, for today’s craft I’m going to show you how to take an everyday pencil and turn it into a Color Tape Decorated Pencil perfect for using at school.  Just grab a standard cheapo yellow pencil and some different color tape and you are good to go.  The more different colored tape you have the better.  So, grab the materials needed and let’s get this back to school craft started.

Check out our other Back to School Crafts.


How to Make Color Tape Decorated Pencils


Materials Needed

Pencil

Colored Tape (at least 2 different colors)

Glue Stick

Pipe Cleaner & Figure (optional)


Step 1


Wrap colored tape around pencil.


Wrap colored tape around pencil.


Step 2


Wrap another color around next area.


Wrap another color around next area.


Step 3


Alternate colors.


You only need 2 colors…. but the more the better.  Alternate colors.


Step 4


Keep going until end of pencil.


Keep going until end of pencil.


Step 5


Apply glue to entire pencil


Apply glue to entire pencil.  Let dry.


Step 6


Now there is a nice shiny coat.


Now there is a nice shiny coat.


Step 7


you can add a figure to your pencil by wrapping pipe cleaner around pencil and then your figure.


If you want…. you can add a figure to your pencil by wrapping pipe cleaner around pencil and then your figure.


Finished color tape decorated pencil


Awesome job!!!  You just finished your Color Tape Decorated Pencil.  How did your pencil turn out?  Let me know in the comments below.  And, don’t forget to take a picture too and share that in the comment as well.  I’d love to see it.

Here is our video on How to Make Color Tape Decorated Pencils

Technorati Tags: , , , , , , , , , , , , ,

How to make Decorated Pencils

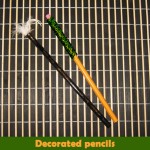
In the last post I was talking about how 100 days of school will be arriving soon, and that got me thinking…. if you are almost at 100 days of school your pencils must be getting old and it is time for some new ones.  Well, instead of just using the same old standard pencils for school… why not take it up a notch.  Let’s make our pencils fancy and fun with some decorations.  Today I’m going to show you how to make decorated pencils.  The craft will be so much fun…. almost as much fun as these pencils will be to use.  So, let’s get started.

Check out some Pencil Topper Crafts.

Laura from Dacian Moon Handmade  will show this tutorial step-by-step.


Materials Needed

– pencils
– fluffy feathers
– craft glue
– paint
– metallic powder
– beads


Step 1

Let’s place some beads on a piece of paper.


Apply a layer of glue on the upper part of a pencil…


… like this. Spread it well.


Step 2

To begin, press the pencil over the beads…


… then pour more beads over the pencil.  Do that until it is well covered all around.

Let it dry well.


Meanwhile let’s make the second pencil.


Step 1

Take the eraser out.


Fill its place with glue…


… like this.


Step 2

Place the feather where the glue is.  While it dries you can paint the pencil.


We will paint it all black.


Step 3

Take metallic powder on the paintbrush and spread it over the paint… do this before it is dried.


Like this:


Let it dry completely.


Now, both your pencils are finished.  Don’t they look fun?!  They are so much better than using just plain, ordinary pencils.  It almost makes you excited to do some homework, doesn’t it?   hmmmmmm…..

Here is our video on How to Make Decorated Pencils

Technorati Tags: , , , , ,

Making a Groundhog Pencil Topper Craft for Groundhogs Day

On February 2nd, the groundhog is going to peek his little head out. He is going out to have a little look around. If he sees his shadow, he know that 6 more weeks of Winter will come, and run back to his home. If he doesn’t see it, than Spring is here! Let’s make a cute pencil topper groundhog to celebrate Groundhogs Day!

Here are More Groundhogs Day Crafts


Making a Groundhog Pencil Topper Craft for Groundhogs Day


Making a Groundhog Pencil Topper Craft for Groundhogs Day

CRAFTS MATERIALS NEEDED:


– paper
– scissors
– pencil
– 3 wooden beads (or anything else round, small and light)
– craft glue
– yarn (Whatever color you want your groundhog to be)

Step 1.

First of all we draw 2 circles on the paper. The circles mustn’t be too big (let’s say 4 cm diameter)


Then, we draw other two (approx. 1.5 cm diameter) , in the center of the big ones.


Step 2.

We cut out the big circles.


We take one of them and fold it in two half…


then we cut out the little circle in the middle.


Now we have a half of our circle


but if we unfold the paper, we have this.


Repeat for the second big circle.


Step 3.

Take the 2 circles and put them one over the other.


Fold the yarn in half…


… and put it through the circles.


Coil the yarn over the paper, covering it.


More, and more, until it looks like that. The more yarn you coil over the paper, more fluffy your groundhog will be 😀


Now make 2 or 3 knots with the remaining yarn.


Step 4.

With the scissor cut the yarn on the edge of our disc, then cut the long knotted ones, at the same size like the others.


When you finish it should look like this.


Cut the paper so it can’t be seen through the fluffy ball.


Like this:


Step 5.

Apply a layer of glue on one bead


And put it on the fluffy ball, where the eyes should be.


Do the same and put the other eye


And then the nose.


Step 6.

Every groundhog have ears so let’s make a pair for our cute little one :). With the pencil, draw them on the paper.


Cut them out and then apply a layer of glue on one


And fix it to the paper inside the fluffy ball, where the ear should be.


Do the same with the other ear. So… this is it, our cute little grounhog !


Step 7.

Take the pencil and apply a not so thin layer of glue on it’s plain end.


Fix the fluffy ball on top of it.


Let it dry and … look what cute and unique pencil you have!


My groundhog is snowy-white. What colour is yours? (offered by Laura from Dacian Moon Handmade)

Here are More Groundhogs Day Crafts

Technorati Tags: , , , , , , , , ,