How to Make a Painted Snail or Sea Shell Crafts Ideas for Kids

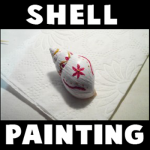
Nature is beautiful so why not take advantage of that natural beauty to create a fun craft. Find either a sea shell or a snail’s shell on the beach (or wherever). Then get the paints out and get creative! Laura from Dacian Moon Handmade  will show you, step by step, how to make this fun project for summer.

How to Make a Painted Snail or Sea Shell Crafts Ideas for Kids


How to Make a Painted Snail or Sea Shell Crafts Ideas for Kids


CRAFTS MATERIALS NEEDED:

– snail shell or sea shell
– paints
– paintbrush
– toothpick


IMG_6586


Step 1. 

We start with a base color. I choose white.


IMG_6587


Cover the shell entirely (using the paintbrush, of course)


IMG_6588


Add as many layers as necessary, until it looks as you wish. Let it dry.


IMG_6597


Step 2.

Now is time to decorate it. For decoration we will use the toothpick or a very thin paintbrush.


IMG_6598


I made a flower with red paint…


IMG_6599


.. two lines around it…


IMG_6600


and some triangles on the shell lines.


IMG_6601


Then I use golden paint to highlight the design.


IMG_6602


Like this.


IMG_6603


You now have a beautiful painted shell that you can keep on your knick knack shelf forever. Or even better, give the painted shell to someone you love or care about. I hope that you had a lot of fun!

Technorati Tags: , , , , , ,

How to Make Handprint Elephants and Lions for Preschoolers

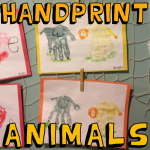
This is an adorable craft for toddlers, Preschoolers, Kindergarteners, and even slightly older children. My friend Erin has a son who goes to Little Monster’s Home Daycare and they made this cute craft today. The bodies of the elephant and lion are created with the child’s hand prints, and they couldn’t come out any cuter. Below you will find the step by step tutorial for making these adorable handprint pictures.

How to Make Handprint Elephants and Lions for Preschoolers


handprint-lions-and-elephants


Crafts Materials Needed:

Paint

Markers

How to Make the Handprint Lion

Lion: Step 1


lion-step1


Paint the child’s hand yellow and then push the child’s hand down onto the paper. Let the handprint dry thoroughly.

Lion: Step 2


lion-step2


After the handprint is completely dry, you can start drawing the features of the lion.  Take out an orange marker and draw curly Qs all around the thumb print for the lion’s hair. Draw 2 black dots for eyes. And with a yellow marker, draw a rectangle tail.

Lion: Step 3


lion-step3


With the orange marker, draw a circle on the tail. Draw black rectangles on the feet. And draw a black dot for a nose and a letter ‘w’ mouth.

Lion: Step 4


lion-step4


Take a green marker and scribble grass below each of the feet. There you have it…an adorable handprint lion.

How to Make the Handprint Elephant

Elephant: Step 1


elephant-step1


Paint the child’s hand gray and then push the child’s hand down onto the paper. Let the handprint dry thoroughly.

Elephant: Step 2


elephant-step2


When you are sure that the handprint is dry, you can then start drawing the elephant’s features. With a grey marker, draw a gray rectangle for the tail. With a black marker, draw 3 lines on the thumb. Draw a letter ‘W’ on the center of the handprint.

Elephant: Step 3


elephant-step3


Draw rectangles on the bottom of the 4 bottom fingers.  Draw a dot for an eye.

Elephant: Step 4


elephant-step4


With a green marker, scribble grass at the bottom of all the feet. And there you have it, an adorable handprint elephant.

The Final Handprint Animal Picture


handprint-lions-and-elephants


Here is what the pictures turn out like (above). Aren’t they adorable!!!! Have fun making these gems.

Technorati Tags: , , , , , , , , , ,

How to Make Coffee Filter or Napkin Butterfly

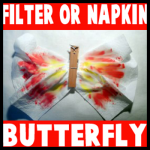
This is a cute project for little ones – a cheerful butterfly made of napkin or a coffee filter 😀 This is perfect for Kindergarteners or Preschoolers. They can do everything on their own with a little bit of guidance. Laura from Dacian Moon Handmade  will show you, step by step, how to make it.


How to Make Coffee Filter or Napkin Butterfly


CRAFTS MATERIALS NEEDED:

– napkin
– laundry tongs
– paints
– black marker
– paintbrush
– coffee filter or small piece of napkin
– glue


IMG_6571


Step 1.

Unfold the napkin.


IMG_6572


Bring the middle part together…


IMG_6573


… like this.


IMG_6574


Step 2.

Put there the laundry tongs…


IMG_6575


… like this. This is the butterfly body.


IMG_6577


Step 3.

Rub the little piece of napkin between your fingers, until it look like this.


IMG_6578


Fold it in two…


IMG_6579


… and stick it on the upper part of the body.


IMG_6580


Step 4.

Use black marker to draw eyes and mouth …


IMG_6581


and to darken the antennas.


IMG_6582


Step 5.

Use the paintbrush to add color to the wings


IMG_6583


like this.


IMG_6584


When you have added all the color you want, gently smudge it.

Let it dry. The butterfly is ready.


IMG_6585


Technorati Tags: , , , , , , ,

How to Make a Steampunk USB Memory Stick Pendant

Here is a Back to School craft that you can work on in the next few weeks. 
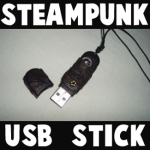
Learn how to take a normal USB memory stick and decorate it with paint and random objects…turn it into a Steampunk masterpiece.You can then wear it around your neck as a special pendant necklace. Laura from Dacian Moon Handmade  will show you today how to make this cool and useful pendant.


How to Make a Steampunk USB Memory Stick Pendant


CRAFTS MATERIALS NEEDED:

– USB memory stick
– black paint
– silver metallic paint
– bronze powder
– instant glue
– a piece of thin fabric for texture (I use tulle)
– a little wheel
– bronze bead – I use a little stylized flower
– scissors
– paintbrush
– toothpick (useful to put little pieces in place)


IMG_5462


Step 1.

First of all, remember that you don’t have to do everything we do…just use our tutorial as a guide. You won’t have the same exact materials as us…but just be creative.

Paint the stick in black.


IMG_5465


Like this. Let it dry.


IMG_5466


Step 2.

Cut a piece of fabric…


IMG_5467


… and wrap it around the stick so as to form creases.


IMG_5468


Apply some glue to fix it in place.


IMG_5469


Like this.


IMG_5470


Add the decorations among the creases. Glue them in place.


IMG_5471


Add glue on every edge to fix the fabric.


IMG_5472


Let it dry.


IMG_5474


Do the same for the cover. It will look like this.


IMG_5478


Step 3.

Use your paintbrush to paint the fabric in black. Also paint where the glue reached and bleached the paint.


IMG_5479


Like this.


IMG_5481


Prior it dry out, add a little bronze powder …


IMG_5484


… with your paintbrush.


IMG_5486


Like this.


IMG_5487


Let it dry well.


IMG_5485


Step 4.

Use the silver paint to add a metallic patina on some elements, especially the wheel.


IMG_5488


Like this.


IMG_5490


Also, add a bit of bronze powder on it, to keep the atmosphere.


IMG_5491


Let it dry completely.


IMG_5526


Step 5.

Put the cord through the hole on upper part of the stick…


IMG_5529


And make a knot. Now you can wear it as a pendant or key chain accessory.


IMG_5532


How to Make Fairy Lights with Bubbles and Paint

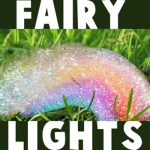
This is a cool and fun project for summer. What can be more pleasant than playing with water on a hot Summer day? How about painting with colorful bubbles, just the way a fairy would. Laura from  Dacian Moon Handmade will show you, step by step, how to make this.

How to Make Fairy Lights by Blowing Bubbles


How to Make Fairy Lights with Bubbles and Paint


CRAFTS MATERIALS NEEDED:

– plastic bottle
– 1 sock
– paints
– tape
– scissors
– liquid soap / shower gel… mixed with water


IMG_6670


Step 1.

Cut off the lower part of the bottle.


IMG_6672


Like this.


IMG_6673


Step 2.

Put the sock on the cut.


IMG_6674


Like this. You can use tape to fix it in place.


IMG_6676


Step 3.

Add some paint on the sock.


IMG_6677


Dip the sock in the soap / water mixture …


IMG_6678


Then gently blow through the mouth of the bottle. Take care not to suck in air through the bottle, because of the soap and paint.


IMG_6681


It is a fun project and you can make very beautiful fairy lights 😉


IMG_6679


Technorati Tags: , , , , , , , , , , , , ,

How to make a Painted Stone or Rock 4th July Paper Weight or Decoration

Here is a fun way to celebrate America’s Independence Day – Find a nice flat Rock and paint it in red, white, and blue. Laura from Dacian Moon Handmade  will show you, step by step, how to make this lovely stone decoration.

How to make a Painted Stone or Rock 4th July Paper Weight or Decoration


How to make a Painted Stone or Rock 4th July Paper Weight or Decoration


CRAFTS MATERIALS NEEDED:

– rounded stone
– red, white and blue paint
– pencil
– toothpick
– paintbrush


IMG_5961


Step 1.

We begin by drawing the desired shape on the stone with a pencil.


IMG_5962


We draw a star, like this.


IMG_5963


Step 2.

Fill the star with blue paint…


IMG_5964


… like this.


IMG_5965


Color the rest of the stone with white.


IMG_5966


Like this.


IMG_5967


Next, draw the red lines around the star.


IMG_5968


It will look like this.


IMG_5969


Step 3.

Using the toothpick and white paint, write “4 July” on the star.


IMG_5970


Let it dry well.


IMG_5971


Now you have a beautiful 4th of July decoration…you can even use it as a paper weight. Or you can put it in front of your garden as a patriotic gesture.

Technorati Tags: , , , , , , , , , ,

How to Make a Snowmen Family Globe Ornament

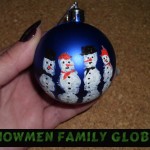
I have a Christmas craft that both you and the children will love making.  I’m going to show you how to make a super-cute, super-simple ornament for your Christmas tree.  It is a snowmen family globe ornament.  The children (or yourself) will use white paint and their hand print to make the snowmen on the globe ornament.  With just a little more paint you will create an imaginative snowmen family.  Imagine how thrilled your children will be to have made a Christmas ornament for the tree themselves.

Check out our other Christmas crafts.

Step by step tutorial offered by Laura from Dacian Moon Handmade


Materials Needed

– blue Christmas ornament ball
– white paint
– red and black paint
– paintbrush
– toothpick
– optional glitter glue to add some highlights


Step 1

Put some white paint in your hand…


… and spread it with the paintbrush.


Step 2

Put the globe in your hand…


And close your hand gently but firmly over it.


It will look like this.

Let it dry well.


Step 3

Using the toothpick and black paint…


… make eyes, mouth and buttons for the snowmen…


… like this.


With black you can also do hats and scarves for two of them.


Use red paint to make noses, hats and scarves for the other two.


Aren’t they cute?


And, that is it!!  How simple is that?  Your kids will love using their hand print to make the snowmen.

Technorati Tags: , , , , , , , , , , , ,

How to Make a Butterfly Headband

I have a fun craft for the girls today.  I’m going to show you how to make a butterfly headband.  This headband is perfect for any girl to wear who loves butterflies.  This headband can actually be worn in the hair and the butterflies stand up from the headband, so you will be able to see the butterflies no matter how thick your hair is.  This craft is not only useful, but it is also fun.  So, grab the materials needed and let’s get started.

Check out our other Crafts for Girls.

Laura from Dacian Moon Handmade  will show you, step by step, how to make this.


Butterfly Headbands


Materials Needed

– transparent foil (mine is backed with paper)
– craft glue
– pen
– headband
– scissors
– paint markers (or permanent markers): black, green, gold


Step 1

Use the pen to draw a butterfly on the transparency.


Like this.


… and another one, smaller…


… like this.


Step 2

Using the black marker…


…trace the contour of the first butterfly, and color the body.


If you want to make some black decorations on it, do that now. I made a line on both wings.


Trace the contour of the second butterfly too. Let them dry.


Use green marker to color them.


I added some green lines to the big one…


… and I made the second one completely green.


Use the gold marker to add highlights.


I added golden dots to the small one…


… and I colored the remaining places on the big one’s wings.

Let them dry well.


Step 3

Cut them out.


Like this.


Fold up the wings like this.


Step 4

Turn the big butterfly over …


… and add glue on its body…


… then place it on the headband.


Do the same with the small one…


… and the headband is ready.

Let it dry well before wearing.


And there you go…. you now have a beautiful headband decorated with butterflies.  What girl wouldn’t love wearing that?

Technorati Tags: , , , , , ,

How to Make a Pumpkin Milk Jug Candy Holder

Last week I showed you how to make a Milk Jug Vampire Candy Holder.  Well, you seemed to have loved that idea, so I thought I would show you another cool Milk Jug Halloween Craft.  Today I’m going to show you how to make a Pumpkin Milk Jug Candy Holder perfect for handing out candy this Halloween.  Kids will love reaching inside this Pumpkin for the treats…. almost as much as your kids will love making it.  Keep in mind you will need some Adult Help for this craft as a knife and/or a scissor will be needed to cut open the milk jug.  So, let’s get started.

Check out our other Halloween Crafts.


How to Make a Pumpkin Milk Jug Candy Holder


Materials Needed

Milk Jug

Scissors

Knife (for adult only)

Orange, White, Green, Black & Red Paint

Brass Fasteners

Black Marker

Green Foam, Felt or Paper

Paper Plate

Glue

Candy


Step 1


Peel labels off milk jug.


Peel labels off milk jug.


Step 2


Cut milk jug in half.


Cut milk jug in half.


Step 3


Paint both sides orange.


Paint both sides orange.


Step 4


Use brass fasteners to attach both sides... to look like mouth is open.


Use brass fasteners to attach both sides… to look like mouth is open.


It should look like this.


Like this.


It looks like this from the back.


It looks like this from the back.


Step 5


 Draw eyes and nose.


Draw eyes and nose.


Step 6


Paint eyes white.


Paint eyes white.  I painted nose a lighter color.


Step 7


Paint red for lips.


Paint red for lips.


Step 8


Draw a leaf on foam, felt or paper.


Draw a leaf on foam, felt or paper.


Cut it out.


Cut it out.


Step 9


Roll some foam on a triangle like angle.


Roll some foam on a triangle like angle… like this.


It should look like this.


Like this.


Push top in and it stays in place on its own.


Push top in and it stays in place on its own.


Step 10


Push into open spout.


Push into open spout.


Step 11


Paint spout green.


Paint spout green.


Step 12


Outline features with black paint.


Outline features with black paint.


Step 13


Draw a letter C for each eye's pupil.


Draw a letter C for each eye’s pupil.


Step 14


 Draw rectangles on paper plate.


Draw rectangles on paper plate.


Glue in mouth.


Glue in mouth.


Step 15


Shove leaf in the spout.


Shove leaf in the spout.


Step 16


Fill with candy.


Fill with candy.

Wonderful!!  Wasn’t that fun?!  But, the fun doesn’t end there.  Use it to hand out candy to the Trick-or-Treaters….. they will love it!!

You might also like the How to make a Milk Jug Vampire Candy Holder ….. both crafts are perfect for Halloween.

Technorati Tags: , , , , , , , , , , , , ,

How to Make a Milk Jug Vampire Candy Holder

I have a wonderfully fun Halloween craft for you today.  In this post I’m going to show you how to make a Milk Jug Vampire Candy Holder for Halloween.  What is really cool about this craft is that you probably have all the craft materials needed in your house.  This vampire candy holder is made from a Milk Jug…. just simply wash it out and you are good to go.  You will need a bit of help from an adult cutting the milk jug as it can be difficult to cut.  So, grab the materials needed and let’s get started.

Check out our other Halloween Crafts.


How to Make a Milk Jug Vampire Candy Holder


Material Needed

Milk Jug

Black Marker

Scissors

Paint (color of your choice)

White, Black & Red Paint

Glue

Yarn

Paper Plate

Candy


Step 1


Clean out a milk jug.


Clean out a milk jug.  Take the labels off too.


Step 2


There are indentions in the plastic... I drew lines there for the mouth.


There are indentions in the plastic… I drew lines there for the mouth.


Step 3


Cut out this line.


Cut out this line.  Ask parents for help.


Step 4


 Draw eyes behind the handle.  Draw a nose too.


Draw eyes behind the handle.  Draw a nose too.


Step 5


Paint everything other than the eyes.


Paint everything other than the eyes.  I chose purple… choose any color.


Step 6


Paint eyes white.


Paint eyes white.  I decided to paint the nose a lighter purple… it’s optional.


Step 7


Remember the piece you cut out for the mouth?  Paint it black now.


Remember the piece you cut out for the mouth?  Paint it black now.


Step 8


Draw two triangles.


Draw two triangles on a paper plate.


Step 9


Cut them out.


Cut them out.


Step 10


Glue them in mouth.


Glue them in mouth.


Step 11


Glue black cloak to back of jug.  Outline parts in black.


Glue black cloak to back of jug.  Outline parts in black.


Step 12


Fold lots of yarn in half several times


Fold lots of yarn in half several times…. like this.


Step 13


Tie a string around the middle


Tie a string around the middle…


It should look like this.


Like this.


Step 14


There will be loops on both sides... cut them in half


There will be loops on both sides… cut them in half…


It should look like this.


Like this.


Step 15


Cut off top of jug.  Glue yarn to top of jug for hair.


Cut off top of jug.  Glue yarn to top of jug for hair.


Step 16


Add red paint for blood.... also add candy.


Add red paint for blood…. also add candy.

Isn’t this Milk Jug Vampire Candy Holder so cool?  It is perfect for holding candy this Halloween Season.  You are sure to get lots of comments on this candy holder.

Also, Check out How to Make a Pumpkin Milk Jug Candy Holder.… it’s another great Candy Holder for Halloween.

Technorati Tags: , , , , , , , , , , , , ,

How to Make a Simple Desk Organizer

There is not much worse than doing your homework on a cluttered unorganized desk.  Who wants to hunt for the homework supplies you need on a messy desk?  Well, you don’t have to worry about that anymore.  Today I’m going to show you how to make a Simple Desk Organizer.  It will be perfect to hold on to some paper, pencils, erasers, and pretty much anything else you want to keep organized on your desk.  So, grab the materials needed and let’s get started.

Check out our other Back to School Crafts.


How to Make a Simple Desk Organizer


Tutorial offered by Laura from  Dacian Moon Handmade  .

Materials Needed

– recycled box
– white paint
– scissors
– pencils (one with eraser head)
– paper glue
– red paper


Step 1

Take the box…


… and draw the contour of our organizer on it, like in the picture.


Cut on the line.


It will look like this.


Step 2

Place the box on its side on the paper and draw the contour.


Turn it on the other side and continue the contour. It will look like this.


Apply a layer of glue on half of the paper…


… and place the box on it.


Then glue the other half.


Like this.


Continue covering  the sides of the box.


You can cover the inside of the sides too.


It will look like this.


Step 3

Put a little bit of paint on a piece of paper…


… and use the pencil with eraser head…


… to make white dots.


Decorate the box with white dots.


Finally, let’s add a thin band of paint on the edges.


Let it dry well.


Now you can use the organizer.


Isn’t this a great Desk Organizer?  And, it was so simple to make.  Now, you have a great way to organize your desk perfect for doing your homework.  Enjoy!!

Technorati Tags: , , , , , , , , , , , ,

How to Make Gourd Rattles and Maracas

I have an awesome fall craft for you today.  In this post I’m going to show you how to make Gourd Rattles and Maracas.  When you fill these gourds with pebbles they make the most playful sounds.  It is a festive way to use these gourds this fall season.  The kids will love playing with these noise makers…. Not to mention the great fun they will have making this craft.  So, grab the materials needed and let’s get started.

Check out our other Fall Crafts.


How to Make Gourd Rattles and Maracas


Materials Needed

Gourds (2 Round or 1 Oblong)

Large Bowl & Water

Awl (Parental Supervision)

Pebbles

Paper

Glue

2 Sticks (for Round Gourds)

Acrylic or Tempera Paints

Paintbrush

1/2 Glue & 1/2 Water Mixture


Step 1


Soak the dry gourd for 24 hours.


Soak the dry gourd for 24 hours.


Step 2


Using an Awl.... punch a hole in the gourd.


Using an Awl…. punch a hole in the gourd.  (Parental help needed for younger kids.)


Step 3


Shake out seeds.


Shake out seeds.


Step 4


Drop in pebbles.


Drop in pebbles.


Step 5


Glue paper over the hole.


Glue paper over the hole.


For Round Gourds

Step 6


Punch holes in both ends.  Shake out the seeds.


Punch holes in both ends.  (Parental Supervision)   Shake out the seeds.


Step 7


Put stones in the gourd.  Insert stick.


Put stones in the gourd.  Insert stick.


Step 8


Paint bright designs with acrylics or tempera paints.


Paint bright designs with acrylics or tempera paints.  Let dry.  Make a mixture of half glue and half water.  Brush it over gourd.  Let dry.  Re-apply.


And, there you have it…. you have a gourd rattle or gourd maracas.  What did you decide to make?  Let me know in the comments below.  And, don’t forget to take a picture of your finished gourd craft…. add it to the comment too.  I’d love to see it.

Technorati Tags: , , , , , , , , , , , , , , , , ,

How to Make a Changing Story Board

Today I’m going to show you how to make a changing story board.  You can bring your stories to life by using your creativity and a little bit of imagination.  As the story evolves you can change your story board to depict the story you are trying to tell to your family and friends.   You will actually have moveable figures and changeable backgrounds for your story…. what better way to actually tell your story than to have visuals.  So, grab the materials needed and let’s get started.


How to Make a Changing Story Board


Materials Needed

2 poster boards

markers and / or poster paints

scissors

stapler and staples (optional)

glue or paste

tape

card stock to make figures


Step 1


Fold one of the poster boards as seen in above


Fold one of the poster boards as seen in above. Basically folding forward and then fold backwards…then forwards…backwards…etc.


Step 2


Tape folds on back of poster board.


Tape folds on back of poster board.


Step 3


Glue folds onto bottom of the second poster board


Glue folds onto bottom of the second poster board, as seen in the picture. You can cut off folds that you don’t want before you glue it down. along sides of board.


Step 4


Draw a background that depicts your story.


Draw a background that depicts your story. This should be drawn on on upper section (2nd poster board).


Step 5


Bind edges with tape.


Bind edges with tape.


Step 6


Place figures in various folds as story is told.


Make cut out figures or objects.  Place figures in various folds as story is told.


Step 7


Scenes may be changed easily.


Scenes may be changed easily. Night or stormy sky may be added by drawing and coloring on another poster board and folding along top about 2 in from edge.  Hang over top of board, as seen above. Cut the bottom of sky to show hills in background. Shrubs, houses, wells, etc. may be placed in folds.

And, that’s it.  Use your imagination to make any story line you can come up with for your story board.  Share your story with your family and friends…. they are sure to love it.

Technorati Tags: , , , , , , , , , ,

How to Make Egg Carton Tulips for Spring

I have a fun and creative Spring craft for you today.  I’m going to show you how to make Egg Carton Tulips for Spring.  This craft is a great way to use up all those egg cartons you have laying around after Easter.  Nothing like recycling items and using them to create something beautiful.  And these tulips are no exception….. they come out looking so colorful.  Just the perfect craft to make and give to you Mom or Grandma to help them celebrate Spring.  They will surely love this item….. so let’s get started.

Check out our other Spring Crafts.


How to Make Egg Carton Tulips for Spring


Materials Needed

Egg Carton

Scissors

Different Color Paints

Pipe Cleaners

Tissue Paper same Color as Paint

Green Construction Paper

Pot full of Dirt


Step 1


Cut out egg carton cups so they look a bit like this.


Cut out egg carton cups so they look a bit like this.  Cut the 4 corners like above.


Step 2


Paint egg cups beautiful colors.


Paint egg cups beautiful colors.


Step 3


Poke hole in bottom of egg cups.


Poke hole in bottom of egg cups.  Stick pipe cleaner up this hole.


Step 4


Put a small square of tissue paper into the egg cup and let pipe cleaner push thru tissue paper.


Put a small square of tissue paper into the egg cup and let pipe cleaner push thru tissue paper.  Bend pipe cleaner to keep it on.


Step 5


Cut out a green leaf and stick it on bottom of pipe cleaner.


Cut out a green leaf … poke a hole in it… stick it on bottom of pipe cleaner.


Step 6


Stick pipe cleaners in vase full of dirt


Stick pipe cleaners in vase full of dirt … and leaves will stay on and flowers will stand up tall.  Give to Mom or Grandma.

Technorati Tags: , , , , , , , , , ,

How to Make a Clay Pinch Pot

I have a fun and creative craft for you today.  In this post I’m going to show you how to make a Clay Pinch Pot.  Actually, in this post I don’t show you how to make this pot step-by-step…. instead I just direct you.   This way you are using your own creative juices to make this clay pinch pot yourself.   Use the image and instructions below to give direction on how to make your own Clay Pinch Pot.  So, grab some clay and let’s get started.

Check out our other Clay & Sculpting Craft Ideas


How to Make a Clay Pinch Pot


Materials Needed

Clay

Sponge & a bit of Water

Paint (optional)


How To:

The simplest clay dish to make is fashioned from a ball of clay into which the thumb is pressed as the clay is turned in the palm of one hand and guided with the other. From this thumb hole, the sides are slowly pressed out uniformly. This is called a pinch pot. Make sure that there is at least 1/4 inch thickness on the bottom of the pot.  **Note** Turning the pinch pot continuously as you work will improve the contour and shape the pot quickly before the clay becomes too dry.

Pinch pots should be dried on a hard and clean surface. When the surface is hard, the children can sponge their pieces gently to remove irregularities. Caution them to use water, sparingly. Under glaze colors can be applied with a clean paintbrush. Dry the pinch pot until completely dry and then you can paint it.

Alternatively:

If you are with a teacher or an artist who has access to a kiln…then this adult can fire your pinch pot in a kiln. When the pieces are cold, they may be dipped or sprayed with transparent glaze and fired a second time in the kiln. This makes them glossy. Such pottery will hold water and can be used as vases.

Technorati Tags: , , , , , , , , , , , , ,

How to Make a Leprechaun Trap for St. Patrick’s Day

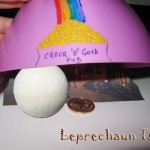
Everybody knows that leprechauns are very fond of money and parties, so let’s make a trap for him that will look like a pub, with the entrance marked by coins.  The craft is not only a lot of fun, but it will totally get you in the St. Patrick’s Day spirit.  After all, St. Patrick’s Day is in a little over a week.  The time is now to start decorating for the Holiday…. and this Leprechaun Trap makes for an adorable St. Patrick’s Day decoration.  So, let’s get started.

Check out our other St. Patrick’s Day Crafts.

Laura from Dacian Moon Handmade will show you, step by step, how to make a leprechaun trap.


Materials Needed

– any picture of a pub interior
– bowl
– scissors
– needle
– paints
– paintbrush
– coin
– a nut or a wooden ball
– a very thin wire (about 10 cm)


Step 1

Take the bowl and with the paintbrush and paints make some coins and a rainbow on one corner of the bowl (mine is rectangular… if yours is round, just paint on one side)…


… then write “Crock ‘O’ Gold Pub”, like in the picture.


Step 2

Take the wooden ball (or nut)


Stick the needle on it.


Wriggle one side of the wire around the needle…


… then the other side around the coin:


It will look like this:


Step 3

Take the picture and fold the upper corners, then place it on the bowl. It should stay like this:


Step 4

Place the bowl (with the picture inside) over the wooden ball (or nut), like this…


… and the trap is ready ! When the leprechaun will try to pass by the wooden ball (because the entrance is smaller than he) the nut will roll and the bowl will fall catching him beneath. The assurance is that even if the ball will not move (and the bowl falls) when he will try to take the coin, the ball will roll and the bowl will fall over him.


Now you have a Leprechaun Trap.  You will be able to catch a Leprechaun for sure this St. Patrick’s Day.

Technorati Tags: , , , , , , , , ,