This tutorial will show you, step by step, how to make a paper boat with an American flag– a simple craft for 4th July.
How to Make Cool Stuff
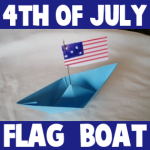
This tutorial will show you, step by step, how to make a paper boat with an American flag– a simple craft for 4th July.

I have a fun craft for you…. it is a Thanksgiving craft. Today I’m going to show you how to make a Mayflower Walnut Boat. This boat will actually float. So, it is a craft that will not only be a ton of fun making, but will also be loads of fun playing with. You will need a bit of help from an adult. Have an adult break open the walnut with a nutcracker. It needs to be broken in half…. not crushed. So, an adult will be able to help you with this. Let’s get started with this fun craft…. grab the materials needed and we will get to it.

Today we will show you how to make a rubber band motored dump truck, cars, or other vehicles. It is much easier than you think it would be and it is a lot of fun figuring out ways to make it roll faster or just smoother. If you like a challenge, then go on and find out how to make this rubber band powered vehicle.