How Mommy and You Make Spaghetti Octopus Dogs

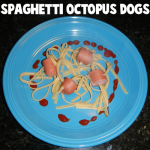
Do you want a fun cooking craft to make with your kids? Here is a super easy and tasty edible craft to make. You can call these Octopus or Squid Dogs – Either way, they are super cool to look at and super yummy to eat. Find out how to make these below. This is a craft that the parent / adult does most of the work.


Spaghetti Octopus Dogs


Crafts Materials Needed:

Hot Dogs, Spaghetti or Linguini, Large Pot, Water, Stove

Step 1


Step 1 Hot Dog Squids Octopus Dogs


Cut up each hot dog into quarters.


Step 2


Step 2a Hot Dog Squids


Now you can stick spaghetti or linguini into the hot dogs. To make a squid, just push the spaghetti thru the center. To make an octopus (like we did), push the spaghetti in both directions (2 one way and 2 the other).


A View of All of Them Done


Step 2b Hot Dog Squids


Step 3


Step 3 Hot Dog Squids


Have Mom or Dad put them into large pot of boiling water. Take them out when spaghetti is finished.


Step 4


Hot Dog Squids Octopus Dogs


Place them on a plate and eat them … yummy.

OR Eat Them on a Hot Dog Bun


step5 Hot Dog Squid Sandwiches


Or eat them in a hot dog bun and call it an Octopus Sandwich or a Squid Sandwich. Yummy.

Technorati Tags: , , , , , , , , , , , , , ,


Cool Candy Valentine’s Day Card Ideas for Kids


Cool Candy Valentine’s Day Card Ideas for Kids


Valentine’s Day will be here before we know it.  Kids love handing out Valentine’s Day Cards…. they just love it.  Plus, they love receiving them as well.  I don’t know about you, but every year I try to help my kids come up with different Valentine Card ideas than the year before.   It gets difficult after a while to keep coming up with unique ideas.  Well, I thought I would help you with that by showing you some really cool Candy Valentine’s Day Card Ideas for Kids.  I found them all while scrounging the internet for you.  Each are unique and a ton of fun to make.  I’m sure you and your kids will find something here that they will enjoy making and giving to their friends and family.  So, let’s get started.

Check out our other Valentine’s Day Crafts.


Cool Candy Valentine’s Day Card Ideas for Kids

 (1) Now or Later Valentines Cards


Now or Later Valentines Cards


Better Homes and Gardens shows you how to combine these tasty treats with a clever written label to make a wonderful Valentine’s Day Card.  “Will You Be Mine Now or Later?”  How clever is that?!  The receivers will love it.


(2)  Dynamic Duo Valentine Cards


Dynamic Duo Valentine Cards


We’re two of a kind.   That is the saying you can use when you are putting together this tasty Valentine Card.  I found this cool candy Valentine’s Day card over at Spoonful.  They also offer some other clever sayings to use on other Valentine Cards so you don’t say the same thing to everybody.


(3)  Candy Doggy Card


Candy Doggy Card


Made with Tootsie Rolls this Candy Dog Valentine Card is sure to be a big hit in the classroom this year.  This is one of our fun crafts.  It is an easy craft and is inexpensive too…. gotta love that.  Check it out to find out how to make this Candy Doggy Card.


(4)  Candy Rings


Candy Rings


Here is a fun Candy Valentines craft that the children will love…. both the receiver and the giver.  These are Candy Rings…. perfect for Valentine’s Day.  I found this over at Kaboose.  Here they use a chenille stem per ring plus a wrapped candy.  These are so cute!!


(5)  Cupcake Goodies


Cupcake Goodies


These are simply brilliant…. and I’m sure absolutely delicious.  Made with cupcake liners and your favorite candy these are sure to be a big hit with your family and friends.  Add a special Valentine’s note to add a loving touch.  Check out this craft at Martha Stewart.


(6)  You Rock Valentines


You Rock Valentines


Show somebody how much you love them with this unique Valentines idea.  Made with Pop Rocks candy this Valentines sends out an awesome message…. that the receiver “Rocks”.  I found this Candy Valentines Card at Fiskars.  Check it out for yourself.


(7)  You Make Me Snicker


You Make Me Snicker


This Candy Valentine’s Day card is just simply adorable.  I found this craft over at Craft-O-Maniac.  Here she uses pictures of her daughter with the words, “I Like You, You Make Me Snicker!” on it.  Add a snicker candy and you have yourself a Valentine’s Card.


(8)  Valentines Critter


Valentines Critter


Here is another one of our very own Candy Valentine’s Day Cards.  It is an adorable little critter holding a yummy lollipop and a heart that reads, “Happy Valentine’s Day”.   That pretty much says it all, right?  Check out our How to Make a Valentines Critter for yourself.


(9)  Butterfly Valentines


Butterfly Valentines


This butterfly is so super cute!!  And, it is really a fun and easy Candy Valentine’s Day Card to make.  You can find the craft details at Skip To My Lou.  At that site they offer a printable template that you can print off on card stock.  Do a bit of cutting and add a lollipop.  You will be good to go.


(10)  I’ve Got a Crush on You


I've Got a Crush on You


I just love this Valentine’s Day Card idea…. I just couldn’t pass up adding it to this post.  It is not quite a Valentine Card, but it is definitely an adorable Valentine message to give to a special someone.  Use Crush soda along with a special message…. “I’ve Got a Crush on You”  They will surely love it.  Check out all the details at Design Aglow.


(11)  M&M Tic Tac Toe


M&M Tic Tac Toe


This Candy Valentine’s Day Card is really awesome.  And, it is sure to be so much fun for anyone who receives it.  I found this great Valentine idea at Shim & Sons.  Here they used 2 different color M&M’s and placed plenty in resealable bags.  They also used card stock to create the Tic Tac Toe Valentine Cards.  These are sure to be a ton of fun.


(12)  Lip & Mustache Lollipops


Lip & Mustache Lollipops


This is an awesomely clever idea.  Here Blonde Designs shows you how to use craft foam to trace some mustaches and lips.  Add them to a lollipop with a Valentine note and you have a fun Candy Valentine’s Day Card.  Watch how silly everybody looks sucking on the lollipop… they will look like they have mustaches and funny looking lips.  It is sure to get a lot of laughs.


(13)  Valentine Mice


Valentine Mice


I know what you are thinking…. when you think of Valentine’s Day you don’t think of mice.  I understand that.  But, take a look at these delicious mice made from Hershey Kisses and think again.  The receiver of this special Valentines gift will surely love it.  So much so that they probably will not want to eat it.  Check out Floral Showers for all the details.


(14)  Valentine’s Fuzzy Cake Balls


Valentine's Fuzzy Cake Balls


I found this yummy Valentine’s Day treat at Hungry Happenings and just had to share it with you.  Here they use shaved coconut to make these adorable creatures.  But, as they share with you if you do not like coconut feel free to use shaved chocolate instead.  Add a cute and loving message to your fuzzy cake ball and you have yourself the perfect Valentines.

Top photo by StuartWebster

Technorati Tags: , , , , , , , , , ,

A Collection of Awesomely Yummy Edible Christmas Crafts


A Collection of Awesomely Yummy Edible Christmas Crafts


Crafts come in all different kinds of forms.  Today I’m going to write about Edible Crafts.  And, not just any edible crafts, but Edible Christmas Crafts.  YUMMY!!  Whether you are planning a Christmas party, Christmas decorations or just want to have fun with your kids…. Edible Christmas Crafts will be enjoyed by all.  I scoured the internet looking for yummy edible crafts and I came up with 16 awesome ones that will get your stomach growling.  So, without further ado here is a collection of awesomely yummy edible Christmas crafts for your enjoyment.

Check out our other Christmas Crafts.

A Collection of Awesomely Yummy Edible Christmas Crafts

(1)  Reese’s Peanut Butter Cup Trees


Reese's Peanut Butter Cup Trees


Ok, I love Peanut Butter Cups, so I couldn’t resist this Edible Christmas Craft.  Here Sweet Simple Stuff shows you how to take my favorite candy, Reese’s Peanut Butter Cups and transform them into these adorable Christmas Trees.


(2)  Sipping Snowman


Sipping Snowman


This edible Christmas craft is so cute!!  Busy Bee Kids Crafts shows us how to take marshmallows, white icing, chocolate chips and a straw and create an adorable Sipping Snowman that is delicious!!  It would taste so good in some hot chocolate.


(3)  Gumdrop Penguins


Gumdrop Penguins


I love these crazy pair of penguins!!  And, I bet they are delicious.  I found this edible Christmas craft over at Spoonful.  Not only will your kids love making these gumdrop penguins, but they will absolutely love eating them too.


(4)  Stained Glass Cookie Ornaments


Stained Glass Cookie Ornaments


What a yummy and clever idea.  Kaboose gives us all the details how to take store bought cookie dough and some Lifesaver hard candies and transform them into these beautiful Stained Glass Cookie Ornaments.  Sure, you could just eat the cookies, but imagine how wonderful they would look on your Christmas tree.


(5)  Gingerbread Star Tree


Gingerbread Star Tree


I love how beautiful this Gingerbread Cookie Christmas Tree looks.  But, imagine how your guests at your Christmas party will enjoy this.  They can simply grab a cookie off the tree and nibble on it while they chat with the guests.  How fun!!  Check out Taste of Home for the details.


(6)  Holiday Garland


Holiday Garland


Oh this garland looks so beautiful!!  I love how the colors of the red cranberries contrast against the white popcorn.  It’s just wonderful.  Craft Elf shows you how you too can do this.  This edible Christmas craft takes you back to a simpler time.  And, it makes the Christmas tree just absolutely gorgeous.


(7)  Holiday Fiesta Spread


Holiday Fiesta Spread


I’ve actually had this at a Christmas party before and it is absolutely delicious.  And, it is so cute.  Kraft will show you in great detail how to make this edible Christmas craft for your guests.    This fiesta spread is decorated like a Christmas tree…. so colorful too.


(8)  Marshmallow Wreath


Marshmallow Wreath


Who would have thought marshmallows could look this beautiful as a wreath?  But, it truly does.  It reminds me of a Winter Wonderland.  I found this beautiful wreath at Three Pugs & a Baby.  She explains how the Marshmallow Wreath only takes about 30 minutes.  Can you imagine creating this beautiful wreath in just a half hour?  How wonderful.


(9)  Snowmen Treats


Snowmen Treats


Better Homes & Gardens shows us how to take Hostess Snowballs and transform them into these cutie-patootie Snowmen Treats.  What child wouldn’t love eating this snowmen?  They are just precious…. and I bet absolutely delicious too.


(10)  Gumdrop Wreath


Gumdrop Wreath


I love, love, love the beautiful colors of this wreath.  And, I would imagine the people at your front door will too.  A Pretty Cool Life shows you how to make this beautiful Christmas Wreath in great detail.  If you aren’t crazy about all the colors…. you can even just make a green and red wreath or any color wreath you choose.


(11)  Rudolph the Red Nosed Rein-Pear


Rudolf the Red Nosed Rein Pear


The Lead Chandelier created this adorable Rudolph the Reindeer out of a pear…. hence the name Rudolph the Red Nosed Rein-Pear.  I love the idea!!  It is super cute and the kids will love making it along with you.  Use it as a yummy Christmas decoration.


(12)  Holiday Tree Brownies


Christmas Tree Brownies


Oh these are so festive!!  And, I bet delicious too.  Betty Crocker Recipes gives you all the yummy details on this edible Christmas craft.  I love the miniature candy canes that are stuck into the brownie as a tree stand… it’s just so creative.


(13)  Donut Christmas Tree


Donut Christmas Tree


I know this Donut Tree was used at a Halloween party.  But, I was thinking…. imagine how wonderful this tree would be if it was white powered donuts!!  It would be perfect as a Donut Christmas Tree for a Christmas Party.  Check out One Charming Party for all the details.


(14)  Krispie Treat Christmas Tree


Krispie Treat Christmas Tree


Oh my kids would love this!!  After all, they love Krispie Treats.  Here Cookies & Cups takes some green food coloring and transforms ordinary looking Krispie Treats into a beautiful green Christmas tree.  Add some M&M’s and imagination and your Holiday Christmas tree is born.


(15)  Strawberry Christmas Tree Brownies


Strawberry Christmas Tree Brownies


These adorable bite-size brownies look so tasty…. and so festive too!!  I would have no doubt that they would be a huge hit at any Christmas party.  Erica’s Sweet Tooth shows you how you too can make this yummy edible Christmas craft for yourself.


(16)  Tortilla Christmas Tree


Tortilla Christmas Tree


If you are looking for something yummy and festive to serve your guests at your Christmas party that isn’t sweet…. this is the edible Christmas craft for you.  Better Homes & Gardens shows you how to take mini-wraps or tortillas and create a Christmas Tree.  Let the guests at your party pick at the tree until it’s gone.  Yummy!!

Technorati Tags: , , , , , , , , , , , ,

How to Make Thanksgiving Napkin Rings

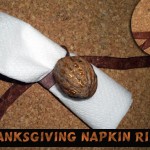
People are always wondering how they can make their Thanksgiving festive, but unique at the same time.  In today’s craft I will show you how to do just that.  In this post I will show you how to make Thanksgiving napkin rings made out of walnut shells.  And, inside these walnut shells your guests will find a nice surprise…. a thank you from you.  This is a simple yet fun craft that you and the kids will enjoy making.  Your guests will love these.  So, let’s get started.

Check out our other Thanksgiving Crafts.

Tutorial offered by Laura from Dacian Moon Handmade


Materials Needed

– walnut shells (2 halves)
– ribbon
– pen
– paper
– craft glue
– gold glitter glue
-scissors


Step 1

Cut a small rectangle of paper (about 0.8 cm x 5 cm)…


… and write “Thank you” on it.


Step 2

Apply a bit of glue on one end…


… and place the ribbon on it.


Let it dry.


Step 3

Place the walnut shells on paper and draw a pattern on them with glitter glue.


I made stripes.

Let them dry well.


Step 4

Wrap the note to look like this.


Step 5

Apply a layer of glue on the edges of a walnut shell…


… like this.


Step 6

Put the note inside…


… and close the walnut, like this.


Let it dry well.

Use ribbon to tie napkin.


And, there you have it…. you just made a Thanksgiving Napkin Ring.  Make as many as you need to complete your Thanksgiving table.

Technorati Tags: , , , , , , , , , ,

How to Make a Mayflower Walnut Boat

I have a fun craft for you…. it is a Thanksgiving craft.  Today I’m going to show you how to make a Mayflower Walnut Boat.  This boat will actually float.  So, it is a craft that will not only be a ton of fun making, but will also be loads of fun playing with.  You will need a bit of help from an adult.  Have an adult break open the walnut with a nutcracker.  It needs to be broken in half…. not crushed.  So, an adult will be able to help you with this.  Let’s get started with this fun craft…. grab the materials needed and we will get to it.

Check out our other Thanksgiving Crafts.


How to Make a Mayflower Walnut Boat


Materials Needed

Walnut

Nutcracker

Paper

Pen or Pencil

Scissors

Clay, Play Doh, Gum or Wax

Toothpick


Step 1


Get a nice walnut.


Get a nice walnut.


Step 2


Adult should split shell without cracking.


Adult should split shell without cracking.


Step 3


Draw a shape that is like a square, but wider at the bottom.


Draw a shape that is like a square, but wider at the bottom.  Now cut it out.


Step 4


Fill with clay, play doh, gum or wax


Fill with clay, play doh, gum or wax (with help).


Step 5


Now take a toothpick and stick it into the gum (or clay or wax) as well as thru the paper twice (as seen).


Now take a toothpick and stick it into the gum (or clay or wax) as well as thru the paper twice (as seen).


Step 6


The boat actually works.... set it to sail in the bathtub.


The boat actually works… set it in the bathtub and blow on its sail.

Technorati Tags: , , , , , , , , , , , ,

How to Make Gourd Rattles and Maracas

I have an awesome fall craft for you today.  In this post I’m going to show you how to make Gourd Rattles and Maracas.  When you fill these gourds with pebbles they make the most playful sounds.  It is a festive way to use these gourds this fall season.  The kids will love playing with these noise makers…. Not to mention the great fun they will have making this craft.  So, grab the materials needed and let’s get started.

Check out our other Fall Crafts.


How to Make Gourd Rattles and Maracas


Materials Needed

Gourds (2 Round or 1 Oblong)

Large Bowl & Water

Awl (Parental Supervision)

Pebbles

Paper

Glue

2 Sticks (for Round Gourds)

Acrylic or Tempera Paints

Paintbrush

1/2 Glue & 1/2 Water Mixture


Step 1


Soak the dry gourd for 24 hours.


Soak the dry gourd for 24 hours.


Step 2


Using an Awl.... punch a hole in the gourd.


Using an Awl…. punch a hole in the gourd.  (Parental help needed for younger kids.)


Step 3


Shake out seeds.


Shake out seeds.


Step 4


Drop in pebbles.


Drop in pebbles.


Step 5


Glue paper over the hole.


Glue paper over the hole.


For Round Gourds

Step 6


Punch holes in both ends.  Shake out the seeds.


Punch holes in both ends.  (Parental Supervision)   Shake out the seeds.


Step 7


Put stones in the gourd.  Insert stick.


Put stones in the gourd.  Insert stick.


Step 8


Paint bright designs with acrylics or tempera paints.


Paint bright designs with acrylics or tempera paints.  Let dry.  Make a mixture of half glue and half water.  Brush it over gourd.  Let dry.  Re-apply.


And, there you have it…. you have a gourd rattle or gourd maracas.  What did you decide to make?  Let me know in the comments below.  And, don’t forget to take a picture of your finished gourd craft…. add it to the comment too.  I’d love to see it.

Technorati Tags: , , , , , , , , , , , , , , , , ,

How to Make Sugar Cookie Leprechauns for St. Patrick’s Day

Today I’m going to show you how to make Sugar Cookie Leprechauns for St. Patrick’s Day.  We will be decorating Sugar Cookies with Icing.  In order to do this Sugar Cookie Craft correctly please check out the following post, “How to Decorate Cookies with Royal Icing”.  In that post, Sweetopia shows you how to decorate cookies with the Flood Icing technique…. that is the technique we will be using for these Leprechaun Cookies.  So, let’s get started.

Check out our other St. Patrick’s Day Crafts.


How to Make Sugar Cookie Leprechauns


Materials Needed

Sugar Cookies

Green Icing

Black Icing

Yellow Icing

Orange Icing (optional)


Step 1


Buy sugar cookies.


Buy sugar cookies.


Step 2


color half of a circle shape green at top of the cookie.


Firstly, color half of a circle shape green at top of the cookie.


Step 3


Draw a thick curved black line.


Draw a thick curved black line.


Step 4


Draw 2 ovals for eyes and a letter U shaped nose.


Draw 2 ovals for eyes and a letter U shaped nose.


Step 5


Draw yellow square over black belt.


Draw yellow square over black belt.


Step 6


Outline some items in black if you want to


Outline some items in black if you want to.  You could also add eyebrows and a beard if you wish.

And, there you have it… you just made your super yummy Sugar Cookie Leprechauns for St. Patrick’s Day.  Didn’t they come out cute?  They are almost too cute to eat….. almost.

Technorati Tags: , , , , , , , , , , , , , , , ,

11 Cool Outer Space Crafts for Kids


11 Cool Outer Space Crafts for Kids


Today I have some awesome craft ideas for you.  Not just any craft ideas…… today I have cool outer space crafts for you.  I was making my way through the internet looking for some really creative outer space crafts and I think I found them.  I found some that are made from food and others that are made from recycled materials.  I found crafts that are perfect for the youngest of crafters and others that are meant for older children.  But, bottom line…. there is an outer space craft here for you.  So, enough with the chit-chat….. let’s get started.

11 Cool Outer Space Crafts for Kids

(1)  Orbiting Planets


Orbiting Planets


Here is a great craft to help teach your kids about space and all the orbiting planets.  Plus, the craft is a lot of fun.  I found this craft over at BusyBeeKidsCrafts and they have the right idea….. use a fun craft to help teach your children about space.


(2) Recycled Robot Craft

Recycled Robot Craft

Look how cute this robot is….. so cute!!  And, it is made from many recycled materials which makes this robot even cooler.  FreeKidsCrafts shows you how you can take tin foil, an empty container and soda bottle lids and make it into a robot like above.  How fun!!


(3) Alien Pipe Cleaner Craft


Alien Pipe Cleaner Craft


I love this craft…. I just love how these little aliens turn out.  I found this Outer Space craft over at Craft Jr. She shows you step-by-step how to make the aliens as pictured above.  But, she also explains how if you have mismatched colors or pipe cleaners of different sizes it doesn’t matter…. they are aliens after all.


(4) Spiral Galaxy


Spiral Galaxy


What a pretty craft….. I love all the colors in this Spiral Galaxy Craft.  And, believe it or not this Outer Space craft is made with a paper plate and some glow in the dark paint.  TheCraftyClassroom shows you in detail how you too can make this craft.


(5) Out of this World Centerpiece


Out of this World Centerpiece


Here is a cool craft that will be a lot of fun to put together.  Plus, this Out of this World Centerpiece is perfect if you are having an Outer Space birthday party.  Imagine this being the centerpiece at the Birthday table.  Find out how to make this over at MakingFriends.


(6) Grass Head Monster


Grass Head Monster


This is an awesome Outer Space craft because your child is going to have to care for it everyday.  It is actually made with real grass seed so your child will have to care for it everyday for the grass to grow.  Check out FreeKidsCrafts for all the details.


(7) Googly Eyed Green Blobs


Googly Eyed Green Blobs


These are pretty creepy looking…. aren’t they?  I found this craft over at MakeAndTakes and she had it posted as a Halloween craft, but I thought this craft would also fit for an Alien…. so I am including it in this Outer Space crafts list.  Check out her site for all the “how-to” details.


(8)  Rocket Craft


Rocket Craft


Isn’t this Rocket craft just adorable?  I love it!!  And, it is made out of a cardboard box.  What a creative idea.  You will need help from an adult for this craft as they do use a craft knife.  But, it would be so much fun making this with your parents.  Check out Se7en for the step-by-step details.


(9) Space Cake


Space Cake


I just had to add this cake to this post.  I know it really isn’t a craft Per Se, but I think cooking can be quite crafty…. and it is also a ton of fun to do with an adult.  So, check out this Outer Space cake over at FamilyFun and get the recipe to cook with your parents.  This would be great for an Outer Space birthday party.


(10) Puffy Paint Moon Craft


Puffy Paint Moon Craft


AllKidsNetwork shows us how if you mix shaving cream and glue together it makes a lumpy and bumpy surface….. just like the moon.  Actually, what they explain is that while the glue dries it makes a smooth-textured material that puffs while it’s drying and then flattens out.  Isn’t that cool?  Go to AllKidsNetwork to check out the full details.


(11) Space Shuttle Craft


Space Shuttle Craft


Wow, isn’t this space shuttle amazing?!  It’s just so creative.  And, the best part…. It’s made out of mostly all recycled materials.  How cool is that?!  Kids of all ages will love making this space shuttle…. the younger kids will need help from an adult.  Check out LooLeDo for the entire craft tutorial.

Technorati Tags: , , , , , , , , , , ,

How to Make Egg Head Christmas People

I have a fun craft for you today.  I’m going to show you how to make Egg Head Christmas People out of eggshells.  You can even make an entire series of egg people…Use your creativity to make angels, shepherds, Mary and Joseph. These make great tabletop Christmas decorations…. so make a few.  Let’s get started.

Check out our other Christmas Crafts.


Image005


Craft materials required:

Thick purple paper

Thick brown colored paper (or any skin color shade)

Egg Shell

Glitter Glue

Gold Paper

Permanent Marker

Glue

Scissors


Image006


Step 1

Take a square piece of purple paper.


Image105


Step 2

Roll it to make a cone and glue the end to hold it in place. Cut the edge to form a perfect cone that will stand as shown.


Image106


Step 3

Wash and dry an egg which has been broken from one end and emptied as shown.


Image100


Step 4

Cut a strip of gold paper and snip the edges to make a zigzag design as shown.


Image104


Step 5

Roll the strip and glue. Glue the crown to the top of the head as shown.


Image107


Step 6

Take a small strip of brown card paper and fold in the center as shown.


Image001


Step 7

Glue the ends of the paper strip to the cone as shown to form folded hands.


Image002


Step 8

Draw a face using a permanent marker.


Image003


Step 9

Decorate the clothes with glitter glue as shown


Image005


Isn’t it beautiful?  Who would have thought that this could have been started from an eggshell.  But, of course it was.  Please let me know in the comments below how your Egg Head Christmas People turned out.  And, don’t forget to share a picture in your comment…. I’d love to see them.

Technorati Tags: , , , , , , , , , ,

How to Make Mini Pumpkins from Oranges

I have a cute little craft for you today.  I’m going to show you how to make Mini Pumpkins out of oranges.  They come out looking adorable and they will be a great Halloween decoration. These Mini Pumpkins are a great craft for all ages…. even the youngest of kids.  No knife needed…. just a simple sharpie.  So, make a few and have fun decorating for Halloween.

Check out our other Halloween Crafts.


How to Make Mini Pumpkins from Oranges


Materials Needed

A Few Oranges

Black Sharpie


Step 1


Clean and dry off a few oranges


Clean and dry off a few oranges.


Step 2


Draw Lines Down the Orange as in the Picture


Get a black sharpie marker and start drawing.  All the lines start at the top center of the pumpkin…. notice where the center dot is in the picture above.  Now, curve the lines down to hit the dots like above.


Step 3


Draw 2 big triangles for the eyes and a smaller triangle for the nose


Draw 2 big triangles for the eyes and a smaller triangle for the nose.


Step 4


Draw a Mouth


Draw a Mouth.  Above I have many mouths to choose from.


Finished mini pumpkins


There you go…. you just finished your first Mini Pumpkin.  Doesn’t it look great?!  Now, make a few more and put them around the house this Halloween.  Imagine how proud your child will be when they see their work put around the house.  So proud!!

Technorati Tags: , , , , , , ,

How to Make a Squash Ghost Decoration for Halloween

If you are looking for a Halloween craft that is easy to do, doesn’t need much materials and is a great decoration…. then I have the perfect Halloween craft for you.  In this post I will show you how to make a Squash Ghost Decoration for Halloween.  And, as promised it doesn’t need many materials to make…. just a nice squash and some white and black paint.  That’s it!!

Check out our other Halloween Crafts.


How to Make a Squash Ghost Decoration for Halloween


Materials Needed

Tall Squash

White & Black Paint


Step 1


Paint a tall squash white


Paint a tall squash white.


Step 2


Now paint the face with black paint.  First, the eyes... Eyes are sideways letter D shapes


Now paint the face with black paint.  First, the eyes… Eyes are sideways letter D shapes.


Step 3


The smile can be drawn by drawing a letter U... closed at the top with a 2nd letter U


The smile can be drawn by drawing a letter U… closed at the top with a 2nd letter U.


Step 4


Now sit this on your front step as a decoration


Now sit this on your front step as a decoration.

See, that wasn’t difficult to make, was it?!  But yet, look at the finished product… you have an awesome Ghost decoration perfect to put out on Halloween.

Technorati Tags: , , , , , , , ,