How to Make Removable Nail Art for 4th of July : Fun Craft Idea for Independence Day

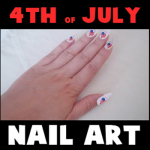
This is an adorable craft idea for little girls and teenage girls on the Fourth of July. By using mailing labels, you can make very patriotic nail art that can be taken off easily after the celebrations have finished. Laura from Dacian Moon Handmade  will show you, step by step, how to have a beautiful 4th July themed manicure.

How to Make Removable Nail Art for 4th of July  : Fun Craft Idea for Independence Day


How to Make Removable Nail Art for 4th of July  : Fun Craft Idea for Independence Day


CRAFTS MATERIALS NEEDED:

– white labels
– pencil
– red marker
– blue marker
– scissors


IMG_5989


Step 1.

Place a finger over one label…


IMG_5990


And draws approximately the contour of the nail.


IMG_5991


Do the same for all the fingers.


1


 Step 2.

Now is time to decorate them. Draw a little heart on each of them.


IMG_5993


Like this.


2


Delineates the left corner of the heart , like this.


IMG_5995


Step 3.

Let’s add some colors. Make the upper left corner of the heart blue (using the blue marker).


IMG_5996


Like this.


IMG_5997


Then, using the red marker, draw the lines on the rest of the heart.


IMG_5998


Like this.


IMG_5999


Repeat for all fingers.


IMG_6000


Step 4.

If you have space, you can write on top of the heart “4 July”.


IMG_6001


Like this.


IMG_6002


Step 5.

Cut them out.


IMG_6003


Now our nail art looks like this.


IMG_6004


Remove the protection foil of the label…


IMG_6005


And place it on your nail.


IMG_6006


This is your cute 4th July themed manicure. It can be easily removed by detaching it from your nails.


IMG_6009


Now you will look amazing at the Fourth of July Parade and cookouts and parties. I hope that you have an amazing Independence Day!

Technorati Tags: , , , , , , ,

How to make a Painted Stone or Rock 4th July Paper Weight or Decoration

Here is a fun way to celebrate America’s Independence Day – Find a nice flat Rock and paint it in red, white, and blue.
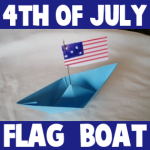
 Laura from Dacian Moon Handmade  will show you, step by step, how to make this lovely stone decoration.

How to make a Painted Stone or Rock 4th July Paper Weight or Decoration


How to make a Painted Stone or Rock 4th July Paper Weight or Decoration


CRAFTS MATERIALS NEEDED:

– rounded stone
– red, white and blue paint
– pencil
– toothpick
– paintbrush


IMG_5961


Step 1.

We begin by drawing the desired shape on the stone with a pencil.


IMG_5962


We draw a star, like this.


IMG_5963


Step 2.

Fill the star with blue paint…


IMG_5964


… like this.


IMG_5965


Color the rest of the stone with white.


IMG_5966


Like this.


IMG_5967


Next, draw the red lines around the star.


IMG_5968


It will look like this.


IMG_5969


Step 3.

Using the toothpick and white paint, write “4 July” on the star.


IMG_5970


Let it dry well.


IMG_5971


Now you have a beautiful 4th of July decoration…you can even use it as a paper weight. Or you can put it in front of your garden as a patriotic gesture.

Technorati Tags: , , , , , , , , , ,

How to Make a Patriotic American Flag Boat for 4th of July

Are you looking for a unique Fourth of July craft? Here is a fun craft to celebrate America’s birthday…this craft (by Laura from Dacian Moon Handmade)  will show you, step by step, how to make a paper boat with an American flag– a simple craft for 4th July.


How to Make a 4th of July Patriotic Flag Boat


CRAFTS MATERIALS NEEDED:

– blue paper
– white paper
– red and blue pen
– needle (or toothpick)
– scissors


IMG_5920


Step 1.

Take the blue paper …


IMG_5925


… and fold it in half by bringing the upper part over the lower one.


IMG_5926


Fold again in half by bringing the left part over the right one this time.


IMG_5927


Unfold, because we need only the crease at this point.


IMG_5928


Step 2.

Bring the right upper corner to the center.


IMG_5929


Do the same for the left corner, like this.


IMG_5930


Fold the remaining strip upward.


IMG_5931


Turn over …


IMG_5932


… and fold the strip upward.


IMG_5933


Step 3.

Open…


IMG_5934


… like this…


IMG_5935


… until it became flatten on the other direction.


IMG_5936


Fold the lower parts upward…


IMG_5937


… like this.


IMG_5938


Open again until it became flatten on the other direction.


IMG_5939


Like this.


IMG_5940


Step 4.

Take the upper corners and stretch out.


IMG_5941


Like this.


IMG_5942


Now the boat is ready.


IMG_5945


Step 5.

Let’s make the flag. Cut a rectangle of white paper…


IMG_5947


Draw the contour of the blue part…


IMG_5948


… and the stars.


IMG_5950


Start filling this part with blue color.


IMG_5951


Like this.


IMG_5952


Use red color to draw the lines on the rest of the flag.


IMG_5953


Like this.


IMG_5954


Step 6.

Now we assemble the components. Put the needle through the flag…


IMG_5956


and stick the tip in the middle of the boat, like this.


IMG_5957


The boat is ready to be used as a decoration or as a toy.


IMG_5958


Technorati Tags: , , , , , , , , , ,

How to Make a Patriotic Brooch Pin for The Fourth of July

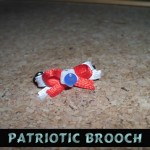
Are you proud of being a US citizen … Of your history? Show it! Wear this cute patriotic brooch pin for the 4th of July. Red…white…and blue… all of America’s beautiful colors. Laura from Dacian Moon Handmade  will show you how to make it, step by step.

How to Make a Patriotic Brooch Pin for The Fourth of July


patrioticBrooch


CRAFTS MATERIALS NEEDED:

– ribbon: white and red (~ 6 cm)
– white flower bead (or star)
– blue bead
– brooch base
– needle and thread
– instant glue if you don’t want to sew the brooch on her base.


IMG_4094


Step 1.

Take the white ribbon and make a loop. like this.


IMG_4095


Fix it by sewing.


IMG_4096


Bring over the other end, making another loop. Sew it there.


IMG_4097


Step 2.

Do the same with the red ribbon, but make this bow a little bit smaller.


IMG_4098


Sew it over the white one.


IMG_4099


Step 3.

Add in the middle the flower…


IMG_4100


… and the blue bead.


IMG_4101


Turn back through the flower bead…


IMG_4102


And fix it there.


IMG_4103


Step 4.

Now place the brooch on the base by sewing, like me, or using glue.


IMG_4104


Your brooch is ready to be wear.


IMG_4109


Isn’t this a cute American pin? Wear it and be proud on America’s birthday.

Technorati Tags: , , , , , , , ,

How to Make a Patriotic Fan

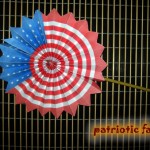
Today I’m going to show you how to make a Patriotic Fan.  Made from a printed-off template, some glue and a flexible straw…. it makes for an excellent decoration to be used on any Patriotic day.  Rather make a fan that is not patriotic?  Not a problem.  Simply print of a template of your choosing and follow the rest of the directions to complete the fan.  Sound good?  Awesome!!  So, grab the materials you need to make the craft and let’s get started.

Check out our other Drinking Straw Crafts.


Materials Needed

– template (found here)
– scissors
– glue
– 1 flexible straw (it is not important that it’s flexible)
– pencil
– stapler


Step 1

Print the template from here.   Cut off the white margins.


Step 2

With your pencil, make markings on the long sides at 1 cm of one another.


Step 3

Accordion fold on the markings…


… like this.


Fold the whole paper.


Step 4

Cut off one corner…


… like this.


Do the same with the other corner.


Step 5

Bring together the two corners of one side…


… and staple them.


Do the same on the other side.


Step 6

Apply a layer of glue on the straw…


… and place it on one crease (on the back side, of course)


And, that’s it. A cute patriotic fan that can be used as a decoration for any Patriotic Day.


Isn’t that an awesome Patriotic Fan?  It’s make for an excellent decoration for any day that you are feeling especially Patriotic.

Technorati Tags: , , , , , , , , ,

How to make a Tricorn Hat Badge

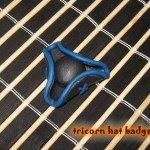
Today I’m going to be showing you how to make a Tricorn Hat Badge.   The Tricorn Hat was a very popular hat in the 18th Century.  The turned-up portions of the brim formed gutters that directed rainwater away from the wearer’s face, depositing most of it over his shoulders.  Well, in this post I’m going to show you had to make this style Hat into a brooch that you can wear.  Because we’ll use oven-hardening polymer clay you’ll need a little help from an adult.

Check out our other Jewelry Pin Crafts.

Laura from Dacian Moon Handmade will show you, step by step how to make this tricorn hat badge.


Materials Needed

– toothpick
– black and blue polymer clay
– roll (you can use anything tubular – I used a vitamins container)
– baking paper
– baking tray
– cutter
– brooch base
– craft glue


Step 1

Cut a piece of black clay.


Condition it by hand, simply mix it and squish it with your fingers. You may want to roll it into a log between your palms, fold it in half, and then roll again.
Finally, make a ball with it.


Step 2

Cut another piece (about the same size as the first).


Condition it too and make another ball.


Place it on a piece of baking paper and flatten it.


Use the roll to flatten it well, until is thin enough.


Like this.


Step 3

Place the ball on the flatten one, in the center.


Step 4

Lift the margins around the ball to form three corners.


Step 5

Take the blue polymer clay…


… and condition it.


Make a roll from it, moving your fingers forward and backward, as in the picture.


Do that until your roll is as thin as the toothpick.


Step 6

Gently, place the blue roll on the edge of the hat, pressing a little bit.


It will look like that.


Cut the extra blue clay…


… and with it make another roll, thinner than the first.


Step 7

Cut the new roll in 6 pieces.


Step 8

Place them two by two into “x’s” on the hat’s sides.


It will look like that.


Step 9

Now you’ll need the help of an adult.
Place the hat (with it’s piece of baking paper) on the baking tray, and bake it according to the instructions on the polymer clay package (they depend on the brand you use: fimo, cernit, sculpey…, but usually it is one half of hour at 230 F or 110 C)


Step 10

Let it cool down.


Step 11

Apply a layer of craft glue on the brooch base…


… place it on the back side of the hat. Let it dry well, and…


… the badge is ready !


And, there you have it…. you just finished making your Tricorn Hat Badge.  How did your badge turn out?  Let me know in the comments below.  And, make sure to take a picture of it too and add it to the comment…. I’d love to see it.  Now, go wear your Tricorn Hat Badge proudly.

Technorati Tags: , , , , , , , , , ,

How to Make a Confetti Blowing Pipe to Celebrate Festivities and Parties for New Years Eve

Tomorrow is New Years Eve so it is time to party (partaaaaaaaaaaaay). So how about making a toy confetti pipe to make cool little fireworks to celebrate the upcoming New Year. We will show you how to do this with the easy illustrated steps below. Have fun.


How to Make a Confetti Blowing Pipe to Celebrate Festivities and Parties for New Years Eve


How to Make a Confetti Blowing Pipe to Celebrate Festivities and Parties for New Years Eve

Crafts Materials Needed

..Pins

..Stiff Paper or Card Stock Paper

..Colorful Paper

..Scissors

..Glue or Paste

Step 1


Step 1 : Making Sparkling Confetti Blowing Pipe to Celebrate New Years Day


Take a strip of stiff paper 3 and 1/2 inches wide and 11 inches long. Cut a hole in one end. Fig 1.

Step 2A


Step 2 : Making Sparkling Confetti Blowing Pipe to Celebrate New Years Day


Paste the 2 lengthwise edges together to form a hollow tube as seen above in fig. 2A

Step 2B


Step 3 : Making Sparkling Confetti Blowing Pipe to Celebrate New Years Day


Pin up the open end nearest to the hole. Figure 2B.

Step 3


Step 4 : Making Sparkling Confetti Blowing Pipe to Celebrate New Years Day


Cut the bowl of pipe in the form of Figure 3, making it about 4 inches across the widest part. Slash the lower edge.

Step 4


Step 5 : Making Sparkling Confetti Blowing Pipe to Celebrate New Years Day


Now paste the pipe-bowl into a funnel shape by bringing the 2 sides together in figure 4.

Step 5


Step 6 : Making Sparkling Confetti Blowing Pipe to Celebrate New Years Day


Fasten the bowl over the hole in the tube. Glue in place as seen in figure 5.

Step 6

cut a bunch of gold, silver, red, blue, yellow, green, and all different types of colorful paper into VERY small pieces. The brighter the colors, the more sparkling and intense the colorful celebratory fireworks will be.

To Play With This Toy Confetti Maker:

To play with this toy, place the open end of the pipe stem to your lips and blow. Grab more paper confetti or take it off the floor and place it back into the pipe bowl. Re-blow the toy confetti pipe.

Technorati Tags: , , , , , , , , , , , ,

Easy Pinwheel Pencil Craft for Kids for Independence Day on July 4th


rimg19691


Easy Pinwheel Pencil Craft for Kids for Independence Day on July 4th


This article was written in the Spring, and as Fourth of July is tomorrow, I thought of pinwheels and how with red, white, and blue paper, they could be very festive on a hot fourth of July night. Although this article was intended for Spring, when the days are windier, I think it is a good thing that this article was pushed to Fourth of July, as I think your children will have a lot of fun using these pinwheels tomorrow night.

Pinwheels are such an easy craft.  I remember making them as a young child all the way back to kindergarten and I remember being really proud of my accomplishment as the wind spun it around and around on the walk home.

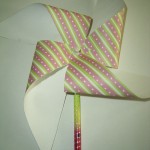
Today, I love making pinwheels with my kids because they get as much enjoyment out of it as I did.  They are very easy to use and they only require a few supplies that most people have in their homes or home offices.

To Celebrate fourth of July, just use paper that is red, white, and blue and make sure to keep these pinwheels away from any sparks created by sparklers or any other types of miniature fireworks items that kids use for fun. Have fun and Happy Fourth of July.

Pinwheel Pencil Craft for Kids: How to Make a Pinwheel Pencil


rimg1957


Gather all the Craft Supplies That You Will Need:

  • Scissors
  • Pencil with an eraser
  • Paper (I like to use a printed paper that has a print on one side but you can use any type of paper)
  • Pushpin


rimg1958


1 – Cut out a square of paper.  I use about 8 inch by 8 inch paper for this craft.


rimg1959


2 – Fold the paper in half on the diagonal line so you make a triangle.  Unfold so that the paper is creased.


rimg1960


3 – Repeat the process with the other diagonal.  Unfold again.


rimg1962


4 – With the printed paper facing down, mark a line on the crease with your pencil. The line should be a third of the way up from the center of the paper.  Do this on all four diagonal lines.


rimg1963


5 – Carefully cut the diagonal crease until your scissors reach the guideline.  Repeat on all four diagonals.


rimg1964


6 – Take on corner and fold it into the center of the paper.  It should form a loop and you shouldn’t flatten it at all.  Leave it loose.


rimg1965


7 – Take the next corner, it should be every other corner, and bring that in the exact same way.

8 – Repeat the process until you have one loop, then one straight, then one loop, then one straight paper; forming a pinwheel.


rimg1966


9 – Connect together in the center with a pushpin.


rimg1967


10 – Push the pin into the eraser on the tip of your pencil.

And that is all it takes to make a pinwheel.  Easy but with hours of fun and a few cute decoration for your pencil.

More Online Crafts for Kids That You Might Enjoy

Homemade Pinwheel Kids Craft – Kids love to make things move and work. Homemade Pinwheels are a fun children’s activity to make and kids love to play with them.

Flower Pinwheels Craft for Kids – These simple pinwheels can be made for decorations, party favors, or just for fun. We made ours with colored card stock, but you might try cereal boxes, or you could use plain paper and let the kids draw or paint a design.

How to Make a Pinwheel – Easy and fun directions to Make a Pinwheel. Great summer fun for the kids and the printable paper included is great for Fourth of July, too!

Summer Crafts Pinwheel Craft – Pinwheels are a great activity for kids to make during the summers. The bright colors and spinning of the spiked disc is representative of the sun.

Easy-to-make Patriotic Pinwheels: Great craft to celebrate July 4th – What is it about a pinwheel that makes every child smile? Make these with your kids this weekend and use them in your Fourth of July celebration.

3 Kids Craft Ideas for Independence DayThere are many fun ways that you can craft the way to July 4. There are many things you can do to make this day truly extraordinary. If you are ready to celebrate, here are some ideas to consider craft. You can find full details about how to create them in the web or use your own creativity.

10 of the best fourth of July crafts – For US residents celebrating fourth of July – here are my picks for the best fourth of July crafts to get you in the patriotic mood.

Technorati Tags: , , , , , , , , , , , , ,