How to Make a Paper Owl Decorations for Halloween

Although owls are known as being wise, they are also known as a spooky part of Halloween. They don’t seem very creepy, but walking thru a dark forest with owls hooting can be a pretty creepy experience. However, this owl is more a cute tribute to Halloween. and can also be used as a cover for glasses or whatever else you choose to use it for. Happy Halloween.

Laura from  Dacian Moon Handmade  will show you, step by step, how to make it.


How to make a Paper Owl decoration for Halloween


CRAFTS MATERIALS NEEDED:

– recycled paper roll
– red paper
– white paper
– paper glue
– permanent markers : black, gold
– pencil
– scissors


Step 1.

Take the paper roll…


…and flatten it.


Fold one part inside, like in the picture…


… then the other. Now the owl have ears 😀


Step 2.

Color it with black…


… like this.


Step 3.

Draw drops on red paper.


Cut them out.


Step 4.

Apply a layer of glue on the top of a drop…


… and place it on the black roll, like this. Must start at the bottom for feathers to sit well.


Continue to glue red feathers on the owl till close up.


Step 5.

Draw 2 bigger wings on red paper.


Cut them out and applying a layer of glue on the top of them…


… stick them on their places.


Step 6.

Draw another drop and 2 circles on white paper.


Cut them out.


The new drop will be the beak, so you’ll paint it with gold.


The circles will be the eyes and you should paint them black, like this.


Glue the beak on the middle of the „face”…


… and eyes on one side and the other.

The paper owl is ready.


Technorati Tags: , , , , , , , ,

How to Make a “Be My Valentine” Owl

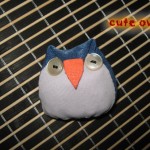
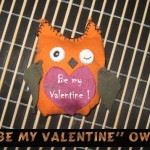
Today I’m going to show you how to make a stuffed Owl toy.  And, not just any stuffed Owl toy, but a “Be My Valentine” Owl that you can give to someone special this Valentines Day.  Imagine their surprise when they receive something that you made yourself.  Or, if you would prefer to keep it…. don’t even give it to someone.  Instead of writing “Be My Valentine” on the heart you can leave it blank or write whatever message you would like.  So, whether it is for you or someone special…. either way it is sure to be loved.  Let’s get started.

Check out our other Valentines Day Crafts.

Tutorial offered by Laura from Dacian Moon Handmade.


Materials Needed

– three pieces of fabric (a large piece – about 16 cm x16 cm – the color that the owl will have, a smaller piece in a contrasting color and a red piece of about 5 cm x 5 cm)
– small pieces of white and black (or brown) leather
– scissors
– pen
– stuffing material (I used some cotton pads)
– needle and thread


Step 1

Fold the large fabric piece in half.


Draw the outline of the owl using your pen. Like this.


Cut it out. You will find it useful to use some pins to keep the two parts together.


It will look like this.


Step 2

Start sewing the two parts together…


… like this.


Stop when you reach the ears.


Sew the other side too.


Step 3

Turn it inside out.


Prepare the stuffing material .


I tore the cotton pads into small fluffy pieces.


Stuff your little bird so that it has a wonderfully squishy and cuddly softness.


When you are satisfied, sew the top.


Like this.


Step 4

Draw two circles on the piece of white leather.


Cut them out.


Apply a layer of glue on the back of one…


… and place it where the eye should be. Do the same with the other one.


Take the black / brown leather…


… and cut out a diamond from it.


This is the beak and we will stick it between the two eyes.


Use the pen to give it some personality by finishing the eyes.


Step 5

Cut 2 wings from the fabric in contrasting color. Like this.


Then sew them on the two sides of the owl…


… like this.


Step 6

Draw a heart on red fabric.


Cut it out, then apply a layer of glue on its back.


Place it under the beak, like this.


Now you can let it like this, decorate it or write “Be my Valentine !” on it, like I did.


And, there you have it…. you just finished the “Be My Valentine” Owl.  Did you make your owl like mine or did you do something different?  Let me know in the comments below.  If you want, take a picture of the owl and share that too in the comments…. I’d love to see it.

Technorati Tags: , , , , , , , , , , ,

How to Make a Cute Stuffed Owl

If you love stuffed animals then you are going to love today’s craft.  I’m going to show you how to make a Cute Stuffed Owl.  You can decide to keep in for yourself or give it to one of your best friends to love.  Either way you can guarantee that people are going to love this stuffed owl… especially when they find out that you made it yourself.  So, grab the materials needed and let’s get started.

Laura from Dacian Moon Handmade will show you how to make this, step-by-step.


Materials Needed

– two different pieces of fabric (one smaller than the other) – in my case I used blue and grey.
– one small piece of red leather or felt
– scissors
– craft glue (optional)
– 2 white buttons
– stuffing material (I use some cotton pads)
– string and needles


Step 1

Draw a big triangle (with curved edges) on the blue fabric.


Draw a smaller triangle on the grey fabric.


Step 2

Cut the triangles out.


They should look like this.


Step 3

Place the right sides together…


… and stitch them.


Step 4

Force the left sides together and stitch them too.


This will cause the top of the body piece to come together …


… so sew that shut too.


Step 5

Turn the owl right-side-out …


… and fold down the top of the triangle. If you fold it lower, you’ll have a fatter and shorter owl. It will be taller and thinner if you fold it higher.  Secure this with a quick whip stitch.


Step 6

Cut a small triangle (with curved edges) out of the red leather.


Sew it or glue it on top of the fold.


Step 7

Sew the buttons on the sides of the beak…


… like this.


Step 8

Do a nice running gather stitch along the bottom of the owl, but don’t tie it yet.


Step 9

Prepare the stuffing material – I tore the cotton pads in small fluffy pieces.


Stuff your little bird so that it has a wonderfully squishy and cuddly softness to it.


Tie off the gather threads….


…and now you have a new cute friend to play with.


Isn’t this Stuffed Owl just simply cute?!  And, the cool part is that you made it yourself.  How did your stuffed owl turn out?  Let me know in the comments below.  And, don’t forget to add a picture of your owl to the comment too…. I would love to see it.

Technorati Tags: , , , , , , , , , , ,