How to make a Pine Cone Christmas Figurine Ornament

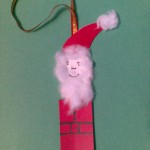
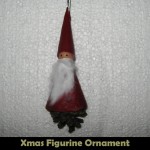
Today I’m going to continue with another Christmas Craft.  This one will be a Pine Cone Christmas Figurine Ornament.  It is super cute and will look terrific on the Christmas Tree.  Let each of the kids make one of these figurine ornaments…. they will love hanging something up on the tree that they made themselves.  Plus, it is so much fun.  So, grab the materials needed and let’s get started.

Check out our other Christmas Crafts.

Tutorial offered by Laura from Dacian Moon Handmade .


Materials Needed

– cardboard
– red leather
– a cotton pad
– 1 wooden bead (big enough to be the head)
– scissors
– 1 piece of ribbon
– 1 pine cone
– craft glue
– black paint
– toothpick


Step 1

Take the cardboard…


…and make a cone of it: bring one side over the middle.. .


… then the other. Glue the two parts together.


Place the pine cone inside, to measure how long the cardboard cone should be.


Cut the extra cardboard.


It will look like this.


Step 2

Apply a border of glue inside the cardboard cone…


… like this.


Then fix it over the pine cone.


Step 3

Take the wooden bead…


And place the toothpick inside.


Make a collar of glue where the toothpick comes out…


… and place it inside the cardboard cone, like in the picture. Keep it a little pressed, until the glue is dry.


Step 4

Take the leather and put it over the cardboard cone.


Measure the length and trace it with a pen.


Cut it out…


… like this


Apply glue on the back of the leather…


… and place it again over the cardboard cone.


Let it dry.


Step 5

Make another cardboard cone, narrower than first. This will be the cap.


Glue the cardboard cone.


Apply a layer of glue on the lower part that goes down from the cone and fold it over it.


Now cut the extra cardboard.


Measure the cone cover on the leather…


… like this.


Cut it out.


It will look like this now.


Apply glue on it…


… and place the cardboard cone on it.


Cover it with the leather.


Apply glue on the back…


… and place there the folded ribbon. Keep it in place until the glue is dry.


Now, let’s put it on the head. Put glue over the upper part of the head…


… like this…


…and fix the cap on it. Let it dry.


Step 6

Take the cotton pad…


… and break it into pieces to make one beard like this.


Apply glue on the lower part of the head and on the front part of the coat…


… and place the beard on it, fix it well on the face.


Take a little black paint with a toothpick…


… and draw its eyes.


Now you have a funny figurine to put on your Xmas tree.


The figurine is cute, huh?!  It will look wonderful on the Christmas Tree.  Enjoy!!

Technorati Tags: , , , , , , , , , , , , , ,

How to Make a Cheerful Lunch Box

In this post I’m going to show you how to make a fun and cheerful lunch box.  School has just started and one of the kids favorite times of day is lunch time.  You know what would make it more memorable for them is to make this lunch box craft with your child.  Your child will be so proud to take their homemade lunch box to school with them.  Plus, there will surely be no other person with a matching lunch box.  So, grab the materials needed and let’s get started.

Check out our other Back to School Crafts.

Laura from Dacian Moon Handmade   will show you, step by step, how to make this cheerful and girlish lunch box.


Materials Needed

– recycled box
– cotton cloth
– pen
– craft glue
– scissors
– tulle pieces
– bead
– needle and thread
– auto-adhesive crystal bead


Step 1

Cut 3 squares of tulle…


… place one on top of the other…


… and sew the bead on the middle…


… like this.


Step 2

Place the cloth over the box lid and mark the contour.


Cut it out…


… like this.


Sew the tulle flower on the middle of it…


… like this.


Step 3

Remove (as much as you can) the label on the lid, then add glue on it…


… like this…


… and place the decorated cloth on it.


Step 4

Now, that the lid is ready, is time to decorate the box.


Place the cloth over it and measure the height.


Cut a strip that measures that height.


Apply a layer of glue on it…


… and cover the box. I made some folds on the front to make it less plain.


Take the auto-adhesive crystal…


… and use it to highlight the folds.


Now the decorated lunch box is ready.


Now you have no ordinary lunch box.  You have a very girly and fun lunch box that no other person will have.  Enjoy it!!

Technorati Tags: , , , , , , , ,

How to Make a Hand Print Lamb

I have a fun and adorable craft for you today.  I’m going to show you how to make a Hand Print Lamb.  This craft is great for all ages….. even the youngest of crafters can enjoy this craft.  Made from cotton, a bow, a googly and of course your hand print…. this craft turns out super cute.  Any child will be so proud they made this.  So, grab the materials needed and let’s get started.

Check out our other Cotton Crafts.


How to Make a Hand Print Lamb


Materials Needed

Black Paint

Paper

Cotton

Googly Eye

Bow

Glue


Step 1


Put black paint on hand.


Put black paint on hand.


Step 2


Press hand on paper.


Press hand on paper.


Step 3


Leave print on paper.


Leave print on paper.


Step 4


Glue on cotton


Glue on cotton…. leave fingers showing.


Step 5


Add a googly eye and a bow.


Add a googly eye and a bow.

That’s all there is to it!!  You just finished making a Hand Print Lamb.  How did your lamb turn out?  Let me know in the comments below.  And, add a picture of it too to the comments…. I’d love to see it.

Here is a video on How to Make a Hand Print Lamb.  Watch our step-by-step tutorial.

Technorati Tags: , , , , , , , , , , , , , ,

How to Make a Cork Bunny

I have a fun and creative craft for you in this post….. today I’m going to show you how to make a Cork Bunny.  Made from a cork, toothpicks and a template this craft turns out really cute.  It is a perfect craft for Easter.  Make a few and decorate your house in time for Easter.  You will need some help from an adult as there is a part in this craft that a knife is needed.  An Adult should do this section of the craft.  So, grab the materials needed and let’s get started.

Check out our other Easter Crafts.


How to Make a Cork Bunny


Materials Needed

Cork

Knife (for adults only)

Printer & Paper

Cardboard

Scissors

Glue

Cotton Ball or Pom Pom

2 Toothpicks


Click on template image to make larger and to print.


Bunny head template


Step 1


Ask parent to cut small slit in cork for head to fit.


Ask parent to cut small slit in cork for head to fit.


Step 2


Print out bunny head or draw a small head.


Print out bunny head or draw a small head.


Step 3


Glue 1 head on to cardboard.


Glue 1 head on to cardboard.


Cut out bunny on cardboard


Cut out bunny on cardboard… turn over and paste other head on this.


Step 4


Push bunny head tab into cork slit.


Push bunny head tab into cork slit.


It should look like this.


To look like this.


Step 5


Glue on cotton ball or pom pom.


Glue on cotton ball or pom pom.


Step 6


Break 2 toothpicks in half... use each half for a leg.


Break 2 toothpicks in half… use each half for a leg.


Finished cork rabbit


Remember you can make a bunny with your own drawn head…. or use the template.

And, that’s it…. you just finished your Cork Bunny.  Doesn’t he look cute?!  Make a few and decorate your house for Easter.  Let me know how your Cork Bunny turned out… take a picture of it and leave it with your comment in the comments section below.

Technorati Tags: , , , , , , , , , , ,

How to Make a “Be My Valentine” Owl

Today I’m going to show you how to make a stuffed Owl toy.  And, not just any stuffed Owl toy, but a “Be My Valentine” Owl that you can give to someone special this Valentines Day.  Imagine their surprise when they receive something that you made yourself.  Or, if you would prefer to keep it…. don’t even give it to someone.  Instead of writing “Be My Valentine” on the heart you can leave it blank or write whatever message you would like.  So, whether it is for you or someone special…. either way it is sure to be loved.  Let’s get started.

Check out our other Valentines Day Crafts.

Tutorial offered by Laura from Dacian Moon Handmade.


Materials Needed

– three pieces of fabric (a large piece – about 16 cm x16 cm – the color that the owl will have, a smaller piece in a contrasting color and a red piece of about 5 cm x 5 cm)
– small pieces of white and black (or brown) leather
– scissors
– pen
– stuffing material (I used some cotton pads)
– needle and thread


Step 1

Fold the large fabric piece in half.


Draw the outline of the owl using your pen. Like this.


Cut it out. You will find it useful to use some pins to keep the two parts together.


It will look like this.


Step 2

Start sewing the two parts together…


… like this.


Stop when you reach the ears.


Sew the other side too.


Step 3

Turn it inside out.


Prepare the stuffing material .


I tore the cotton pads into small fluffy pieces.


Stuff your little bird so that it has a wonderfully squishy and cuddly softness.


When you are satisfied, sew the top.


Like this.


Step 4

Draw two circles on the piece of white leather.


Cut them out.


Apply a layer of glue on the back of one…


… and place it where the eye should be. Do the same with the other one.


Take the black / brown leather…


… and cut out a diamond from it.


This is the beak and we will stick it between the two eyes.


Use the pen to give it some personality by finishing the eyes.


Step 5

Cut 2 wings from the fabric in contrasting color. Like this.


Then sew them on the two sides of the owl…


… like this.


Step 6

Draw a heart on red fabric.


Cut it out, then apply a layer of glue on its back.


Place it under the beak, like this.


Now you can let it like this, decorate it or write “Be my Valentine !” on it, like I did.


And, there you have it…. you just finished the “Be My Valentine” Owl.  Did you make your owl like mine or did you do something different?  Let me know in the comments below.  If you want, take a picture of the owl and share that too in the comments…. I’d love to see it.

Technorati Tags: , , , , , , , , , , ,

How to Make a George Washington Wig for President’s Day

Lately I have been showing you some crafts to do for President’s Day.  Well, I’m going to continue with the President’s Day crafting fun by showing you how to make a George Washington Wig.  Made from cotton balls and a large paper shopping bag…. this craft turns out awesome.  Plus, the craft is a lot of fun…. almost as much fun as the child will have running around wearing the George Washington Wig he/she just made.  So, grab the materials needed and let’s get started with this crafting fun.

Check out our other President’s Day Crafts.


How to Make a George Washington Wig


Materials Needed

Large Paper Bag

Pen or Marker

Scissors

Cotton Balls

Glue

Blue Ribbon


Step 1


Draw a number 5 like shape on large bag.


Draw a number 5 like shape on large bag.


Step 2


Now, cut out the shape you drew in last step


Close the bag so it is not open.  Now, cut out the shape you drew in last step so you cut thru both sides.


Step 3


This is the part that will go over your head.


This is the part that will go over your head.


Step 4


Glue cotton balls over the outside of bag.


Glue cotton balls over the outside of bag.


Step 5


Tie ribbon around back for ponytail.


Tie ribbon around back for ponytail.


Finished George Washington Wig


Awesome job… you just finished making your George Washington Wig for President’s Day.  Wasn’t it fun to make?!  Now, put on your wig and act like George Washington.  Fun stuff!!

Technorati Tags: , , , , , , , , ,

How to Make New Years Resolution Reminders

Today I’m going to show you how to make New Years Resolution Reminders.  A New Years Resolution is something you want to change or do better in the new year.  Such as conserve more water or save electricity, for example.  You probably have different ones.  Well, with today’s craft you will have an easier time remembering your New Years Resolutions throughout the new year, so you can keep working on your New Years Resolutions.  Do you know what your New Years Resolutions will be?  Come up with a few and then let’s get started on the craft.

Check out our other New Years Crafts.

Laura from Dacian Moon Handmade  will show you how to make these resolution reminders, step by step.


MATERIALS NEEDED:

– two pieces of cloth of different colors (I chose blue and white)
– black and white textile paint
– needle and thread
– scissors
– cotton pads
– 6 beads (4 white and 2 blue)
– 9 paper clips


Step 1

Cut one rectangle from the blue cloth ( ~12 cm x 5 cm)


Fold it in half, like this…


… and start sewing the fold.


Near the edge, place a paper clip over the cloth…


… and sew it in place.


Continue to sew the lower part and add the second paper clip near the other edge.


Sew the sides too.


When you finish it will look like this.


Step 2

Take one cotton pad …


… and part it in small pieces.


Put all those pieces inside the blue cloth…


… and sew the upper part too. We made a pillow.


Step 3

On the right upper part, sew 2 white beads…


… like this. Those will be the eyes.


On the middle sew a paper clip – this will be needed to hang the reminders somewhere.


Now we have a blank reminder.


Step 4

Using white paint, write the first resolution. My example, “keep my room clean”.


With black paint, complete the eyes.


Like this.


Step 5

Take a piece of white cloth and follow all the steps above…


… to make a white cute pillow with blue eyes and a new message, “study harder”. Take care that you must have two paper clips on the upper part, to link to the first reminder, and two paper clips on the lower part to link to the next.


Step 6

Make the third cute pillow, blue. You can add as many reminders as you like. Just take care that the last of them should have paper clips only on the upper part.


Link them together and place it somewhere you will easily see. It will help you remember your New Years Resolutions.


And, there you have it…. you just finished your New Years Resolution Reminders.  Isn’t it cute?  What were your New Years Resolutions?  Let me know in the comments below.  Also, take a picture of your craft and share it with your comments…. we’d love to see it.

Technorati Tags: , , , , , , , , ,

How to Weave Mary and Joseph for a Nativity Scene

For the past few days I have been showing you how to weave different characters for a Nativity Scene.  First, I showed you how to Weave the 3 Wise Men.  Next, I showed you how to Weave a Baby Jesus.  Today I’m going to continue showing you how to weave a Nativity Scene by showing you how to Weave Mary and Joseph.  So, let’s get started.

Check out our other Christmas Crafts.


How to Weave Mary and Joseph for a Nativity Scene


Materials Needed

2 inch x 4 inch Piece of Cardboard

Ruler

Pencil

Scissors

Tape

String or Yarn (different color yarn, make sure to have some skin color yarn like Peach, Tan, Brown, etc.)

Needle

Fork

Stones, Coins, or Something Else Heavy

Cotton or other Filling

Black Thread

Old Piece of Fabric

4 Hand Shaped Beads


Step 1


Cut out 2" x 4" piece of cardboard.


Cut out 2″ x 4″ piece of cardboard.


Step 2


Mark sides with lines about 1/8 inch apart


Mark sides with lines about 1/8 inch apart… so every two lines on the inches side of the ruler.


Step 3


start cutting slits on lines that we drew in the previous step.


If you think your cardboard will fall apart by cutting slits… firstly, cover with clear tape.  Otherwise, just start cutting slits on lines that we drew in the previous step.


Step 4


Put string in the notch that is alone on one side.


Put string in the notch that is alone on one side.  Tape it down.  Then pull the string all the way up the back of the cardboard.


Step 5


pull the yarn through the first notch


In the last step you brought the yarn up to the top left side notch from behind the cardboard.  Now, pull the yarn through the first notch… now the yarn is in the front again.


Step 6


bring yarn over the next notch and pull down back again


Now, bring yarn over the next notch and pull down back again.


Step 7


Bring the string all the way down to the bottom.


Bring the string all the way down to the bottom.


Step 8


Bring string over from back and up thru the first notch again


Bring string over from back and up thru the first notch again.


Step 9


pull the yarn behind and thru the 2nd tab


Now, pull the yarn behind and thru the 2nd tab so that there is now a loop in front and behind the first tab.


Step 10


bring the yarn down behind cardboard and up thru the next slit.


Now, bring the yarn down behind cardboard and up thru the next slit.  Make loop in front of tab and bring down back of cardboard again.


Step 11


bring yarn down back and up bottom and thru the slit and make a loop in back and down next slit and down front again


Now, bring yarn down back and up bottom and thru the slit and make a loop in back and down next slit and down front again… continue this pattern.


Step 12


When done... tape string down


When done… tape string down.


Step 13


Thread a needle with yarn or string.


Thread a needle with yarn or string.


Step 14


Pull the yarn over and under each piece of yarn and leave a short tail


Make your yarn as long as you want it to be.  Pull the yarn over and under each piece of yarn and leave a short tail.


Step 15


turn the cardboard over and you will weave on this side too


Now, turn the cardboard over and you will weave on this side too.  On the other side you went UNDER the last thread… so here go OVER the first thread.  ***Don’t go under the taped string.


Step 16


Every few times or so, take a fork and push the threads down


Keep weaving on both sides of the cardboard.  Every few times or so, take a fork and push the threads down.


Step 17


When the thread is nearing an end, then push the needle down thru loops in past rows


When the thread is nearing an end, push the needle down thru loops in past rows.


How to start a new string


To start a new piece of yarn… just put the string in where you left off… like you see in the above image.


Step 18


Weave back and forth with skin color only in center strings


Weave back and forth with skin color (tan, brown, peach, etc.) only in the center strings.  So, you will NOT be turning cardboard over and weave along back.


start by pushing the yarn through the same loop that the bottom left side of the face used


Choose the color that will be around face.  You will be using this yarn to weave around the face for a hood.  We start by pushing the yarn through the same loop that the bottom left side of the face used.


weave around back.


Now, weave around back.


come over on the right side of the face.


Now, come over on the right side of the face.  Loop thru the string on the right side of the face and then go over it and weave around back again.


Keep going.


Keep going.  At the top of the figure you can weave all around it again.


This is what your figure should look like now


This is what your figure should look like now.


Step 19


Use your needle to pull loops off of cardboard.


Use your needle to pull loops off of cardboard.


Step 20


pull the woven fabric off of the cardboard


Now, loops are off… You can now pull the woven fabric off of the cardboard.


Step 21


Tie any loose threads into a knot.


Tie any loose threads into a knot.


Step 22


You should now stuff with stones, coins or something else heavy.


You should now stuff with stones, coins or something else heavy.  Only fill enough to look like she is kneeling.  Then fill the rest of the figure with cotton.


Step 23


Use black thread to sew on hair and eyes


Use black thread to sew on hair and eyes.


Step 24


For Joseph.... sew on a beard.


For Joseph…. sew on a beard.


Step 25


Bend figures into an L shape


Bend figures into an L shape like above.  Sew them in this position with same color yarn as shirt.


Step 26


Somehow I lost the pictures of the last few steps....


Somehow I lost the pictures of the last few steps…. Basically, just cut a bit of fabric and wrap around (like in image) and sew to head (just a few stitches will do).  Then just glue two hand shaped beads to the bottom of their face to look like praying hands.


Step 27


Sit Joseph and Mary around Baby Jesus


Sit Joseph and Mary around Baby Jesus from our Baby Jesus craft tutorial.

Awesome job…. you just finished weaving Mary and Joseph for a Nativity Scene.  How did they turn out for you?  Let me know in the comments below.  And, if you haven’t already done so…. make sure to complete the entire Nativity Scene by weaving the 3 Wise Men, Baby Jesus, Clothespin Donkey and the Clothespin Sheep.

Technorati Tags: , , , , , , , , , , , , , ,

How to Weave a Baby Jesus and Cradle for a Nativity Scene

Yesterday I showed you how to Weave the 3 Wise Men for a Nativity Scene…. well, today I’m going to continue the weaving fun by showing you how to Weave a Baby Jesus and Cradle.  Imagine how proud you will be to have made an entire Nativity Scene yourself… so proud!!  So, let’s get started.

Check out our other Christmas Crafts.


How to Weave a Baby Jesus and Cradle for a Nativity Scene


Materials Needed

2 Pieces of Cardboard Measuring 3 inch x 1 1/2 inch

Ruler

Scissors

Tape

String or Yarn (Brown, Yellow & Skin Color Yarn like Pink, Tan, Brown, etc.)

Needle

Black String or Thread

Cotton or other Filler

Burp Cloth or Similar Fabric

Fork


Step 1


Cut a piece of cardboard about 3 inches x 1.5 inches.


We will start by making a cardboard loom to weave the basket with. Cut a piece of cardboard about 3 inches x 1.5 inches.


Step 2


Cut slits about 1/4 inch apart on one of the long sides.


Cut slits about 1/4 inch apart on one of the long sides.  Cut one slit on the other side.


Step 3


Put string in slit that is alone.


Put string in slit that is alone.  Tape down.


Step 4


Pull string around back and down thru top slit.


Pull string around back and down thru top slit.


Step 5


Wrap string around front of tab to the next slit.


Wrap string around front of tab to the next slit.  The string will now be hanging down back of cardboard.


Step 6


Bring string down back of cardboard and up around to the front


Bring string down back of cardboard and up around to the front and slide thru the first slit.


Step 7


Bring string around back and thru second slit.


Bring string around back and thru second slit.


Step 8


Bring string around back and then thru next slit


Bring string around back and then thru next slit… now it’s hanging down front again.


Step 9


Put string into next slit so string hanging down back to make loop in front.


Put string into next slit so string hanging down back to make loop in front.


Step 10


Bring down back of cardboard and then up around the front.


Bring down back of cardboard and then up around the front.  Place in the slit and make a loop in back by putting in 2nd slit.


Step 11


When done winding... tape last string down.


When done winding… tape last string down.


Step 12


Thread some yarn or string.


Thread some yarn or string.


Step 13


Basics of Weaving


We will now start weaving. Above in the illustration, O is over and U is under. Basically, put the needle under and over the strings. For the first string, you can pull the yarn all the way through, leaving just a bit of yarn left under the first string. When you get to the edge of cardboard, turn over the cardboard. Then start weaving again. if you ending going under the last string on the other side, then this time go over.


Stick needle with yarn under and over strings.


Stick needle with yarn under and over strings.


You can leave a bit of a tail on the yarn you are weaving with.


You can leave a bit of a tail on the yarn you are weaving with.


Step 14


go under the first string on the other side.


Turn over the cardboard… we ended by going over the last string, so go under the first string on the other side.  Make sure to skip taped down string.  ***Always weave on the side with OUT the loops… as seen above.


Step 15


take a fork and push the threads down.


Keep weaving on both sides of the cardboard.  Every few times or so take a fork and push the threads down.


Step 16


When the thread is nearing the end, then push the needle down thru loops in past row.


When the thread is nearing the end, then push the needle down thru loops in past row.


Step 17


To start a new piece of yarn... just put the string in where you left off


To start a new piece of yarn… just put the string in where you left off… like you see in the image above.


Step 18


Fill up the entire piece of cardboard with brown yarn.


Fill up the entire piece of cardboard with brown yarn.


Step 19


Use your needle to pull loops off of cardboard.


Use your needle to pull loops off of cardboard…


pull the weaved fabric off of cardboard


… Now the loops are off like this and you can pull the weaved fabric off of cardboard.


Step 20


You now have a little basket.


Take the woven fabric off the cardboard.  Tie any loose threads.  You now have a little basket.


Step 21


Cut a piece of cardboard that is about 1.5 inches by 3 inches


Cut a piece of cardboard that is about 1.5 inches by 3 inches.


Step 22


Wind string around it like you did with the other cardboard loom.


Cut slits on one of the short ends.  Then cut one slit on the other side.  Wind string around it like you did with the other cardboard loom.  Make skin color such as pink, tan, brown, etc.


Step 23


Then weave with the skin color you chose when winding string.


Then weave with the skin color you chose when winding string.  Weave all the way to the top.  Use needle to take the loops off of top.  Take woven fabric off of cardboard.


Step 24


Tie loose threads into knots.


Tie loose threads into knots.


Step 25


Get some black string or thread and tie a knot.


Get some black string or thread and tie a knot.


step 26


Start sewing the eyes.


Bring the needle up thru unclosed end and pull it out where you want one of the eyes to be.


Step 27


Sew second eye.


Then just push the needle back down where you want the eyes shape to end.  From underneath push up where you want 2nd eye to be.


Step 28


Fill with cotton or other filler.


Fill with cotton or other filler. Then sew the bottom of the figure shut with skin colored yarn that you used previously.


Step 29


Cut a piece of burp cloth or other similar fabric.


Cut a piece of burp cloth (ask Mom or Dad if they saved any from when you were a baby) or other similar fabric.  Make it a rectangle.  Fold down a triangle on the left top corner.


Step 30


Place woven baby on it with head all the way to top of triangle.


Place woven baby on it with head all the way to top of triangle.


Step 31


Push bottom of fabric up to below eyes.


Push bottom of fabric up to below eyes.


Step 32


Push the left side of fabric over the baby.


Push the left side of fabric over the baby.  The push it under right side of baby.


Step 33


Bring right side of fabric over the baby


Bring right side of fabric over the baby and push it down under the left side of baby.


Step 34


Baby should look like this now.


Baby should look like this now.


Step 35


Place baby in cradle.


Place baby in cradle.  Cut up some yellow yarn and stick in basket if you want to.


Finished Baby Jesus in Cradle Craft.


And, there you have it…. you finished weaving a Baby Jesus and Cradle for a Nativity Scene.  Awesome job!!  This woven Baby Jesus goes perfectly with the woven 3 Wise Men we made yesterday. Make sure to also do the Mary & Joseph craft, Yarn Clothespin Sheep craft  and the Yarn Clothespin Donkey craft to complete your Nativity Scene.

Technorati Tags: , , , , , , , , , , , , , ,

How to Weave the 3 Wise Men for a Nativity Scene

Today I have a great craft perfect for the Christmas Holiday Season.  I am going to show you how to Weave the 3 Wise Men for a Nativity Scene.  There are a lot of steps to this craft, but I don’t want you to be intimidated by that.  The craft isn’t too complicated…. there are just a lot of steps because I wanted to be detailed in my instructions for you.  And, keep an eye out… I will be showing you how to Weave a Baby Jesus for this Nativity Scene in the next day or so too.

Check out our other Christmas Crafts.


How to Weave the 3 Wise Men for a Nativity Scene


Materials Needed

2″ x 4″ Piece of Cardboard

Pencil

Ruler

Scissors

Yarn or String  (Different colors for skin, beard, hair, clothes and crowns)

Needle

Fork

Black and Gold String or Thread

Rock, Stones, or Coins (something heavy)

Cotton for Filling

Safety Pin

Fabric from Old Clothes or Baby Clothes

Tape

Twist Tie

Sturdy Cardboard Box

Small Beads


Step 1


Cut out 2" x 4" piece of cardboard


Cut out 2″ x 4″ piece of cardboard.


Step 2


Mark sides with lines about 1/8 inch apart


Mark sides with lines about 1/8 inch apart… so every two lines on the inches side of the ruler.


Step 3


start cutting slits on lines that we drew in the previous step.


If you think that your cardboard will fall apart by cutting slits… firstly cover with clear tape.  Otherwise, just start cutting slits on lines that we drew in the previous step.


Step 4


Put string in the notch that is alone on one side


Put string in the notch that is alone on one side.  Tape it down.  Then pull the string all the way up the back of the cardboard.


Step 5


pull the yarn thru the first notch


In the last step you brought the yarn up to the top left side notch from behind the cardboard.  Now, pull the yarn thru the first notch… now yarn is in front again.


Step 6


bring the yarn over the next notch and pull down back again


Now, bring the yarn over the next notch and pull down back again.


Step 7


Bring the string all the way down to the bottom.


Bring the string all the way down to the bottom.


Step 8


Bring string over from back and up thru the first notch again


Bring string over from back and up thru the first notch again.


Step 9


pull the yarn behind and thru the 2nd tab


Now, pull the yarn behind and thru the 2nd tab so that there is now a loop in front and behind the first tab.


Step 10


bring yarn down behind cardboard and up thru next slit.


Now, bring yarn down behind cardboard and up thru next slit.  Make loop in front of tab and bring down back of cardboard again.


Step 11


bring yarn down back and up bottom and thru the slit and make a loop in back and down next slit and down front again


Now, bring yarn down back and up bottom and thru the slit and make a loop in back and down next slit and down front again… continue this pattern.


Step 12


When done... tape string down.


When done… tape string down.


Step 13


Thread a needle


Thread a needle with yarn or string.


Step 14


Pull the yarn over and under each piece of yarn and leave a short tail.


Make your yarn as long as you want it to be.  Pull the yarn over and under each piece of yarn and leave a short tail.  ***Notice that you start weaving on the side that does not have loops.


Step 15


go OVER the first thread


Now, turn the cardboard over and you will weave on this side too.  On the other side, you went UNDER the last thread…. so here go OVER the first thread.


Step 16


Keep weaving on both sides of the cardboard


Keep weaving on both sides of the cardboard.  Every few times or so, take the fork and push the threads down.


Step 17


push the needle down thru loops in past rows


When the thread is nearing the end, then push the needle down thru loops in past rows….


To start a new piece of yarn... just put the string in where you left off


… To start a new piece of yarn… just put the string in where you left off… like you see above.


Step 18


When you get to about the half way point... change the yarn to skin color - which could be brown, tan, pink, cream, etc.


When you get to about the half way point… change the yarn to skin color – which could be brown, tan, pink, cream, etc.  Go as far to the top as you can.


Alternative Way to Make the Face

Step A


Weave back and forth on center strings if you want to make skin only in the center.


An alternative way to make these figures are to make the face only in the center (like small image above).  Weave back and forth on center strings if you want to make skin only in the center.  So, don’t go around the back for making the face.


Step B


We start by pushing the yarn through the same loop that the bottom left side of the face used.


Choose the color that will be around the face.  You will be using this yarn to weave around the face for a hood.  We start by pushing the yarn through the same loop that the bottom left side of the face used.


Step C


weave around back.


Now, weave around back.


Step D


Loop thru the string on the right side of the face


Now, come over on the right side of the face.  Loop thru the string on the right side of the face and then go over it and weave around back again.


Step E


Keep going


Keep going.  At the top of the figure you can weave all around it again.


Step 19


Use your needle to pull the loops off of cardboard.


Use your needle to pull the loops off of cardboard.


Step 20


you can now pull the weaved fabric off of cardboard


The loops are now off like this… you can now pull the weaved fabric off of cardboard.


Step 21


Take fabric off of cardboard


Take fabric off of cardboard…. it now looks like above image.


Step 22


Fold inside out and then tie loose threads into knots.


Fold inside out and then tie loose threads (the ones that were taped down in the beginning) into knots.  Turn back to right side.


Step 23


Get some black string or thread.


Get some black string or thread.  Tie a knot at one end.


Step 24


Make the eye.


Put needle inside of hole on top of the head… and then put the needle where the eye should be and pull it out the front of the face.  This way the knot is inside the figure and can’t be seen.


Step 25


just sew in eyes by pulling string in and out of the fabric until they look like eyes.


Then just sew in eyes by pulling string in and out of the fabric until they look like eyes.  To sew in the 2nd eye… pull needle under fabric and up in the spot where the 2nd eye should be.


Step 26


Tie a knot inside of figure.


Tie a knot inside of figure.


Step 27


Place a rock, coins or something else heavy in the bottom and make sure figure stands.


Place a rock, coins or something else heavy in the bottom and make sure figure stands.  Then fill the rest of the figure with cotton or something soft.


Step 28


Sew top of head closed


Sew top of head closed… with knot on the inside.


Step 29


To make belt... tie 3 pieces of string together and braid them.


To make belt… tie 3 pieces of string together and braid them.  Pin it to your pants to keep it down while you braid.  Tie knot when done with belt.


Step 30


Cut a piece of fabric from old shirt or baby clothes


Cut a piece of fabric from old shirt or baby clothes (ask Mom or Dad first).  Then wrap around figure and tie shut with belt.


Step 31


Use cardboard loom to make the beard.


Use cardboard loom to make the beard.  Wrap string around the short side of the loom.


Step 32


push a 2nd string under all the wrapped strings


When done wrapping string around side of loom… push a 2nd string under all the wrapped strings… like so.


Step 33


Take it off of cardboard.


Take it off of cardboard.


Step 34


Fold it in half and then sew it on below the eyes.


Fold it in half and then sew it on below the eyes.


Step 35


To make hair, push needle thru top of head


To make hair, push needle thru top of head, until just a bit of string is sticking out.


Step 36


with tail of string still out, push the needle back into the head somewhere else.


Then, with tail of string still out, push the needle back into the head somewhere else.


Step 37


When you have a loop of string... don't pull any further.  You just made a curl.


When you have a loop of string… don’t pull any further.  You just made a curl.  Now, stick the needle thru again… and the curl will stay now.


Step 38


When your figure has enough curls... then tie a knot and you are finished with the hair.


When your figure has enough curls… then tie a knot and you are finished with the hair.


Step 39


Tie a twist tie and wrap colored thread around it.


Tie a twist tie and wrap colored thread around it.  I used gold thread… you can use any color you wish.


Step 40


Fold ends of twist tie over to keep threads on and then push it onto your figure's head.


Fold ends of twist tie over to keep threads on and then push it onto your figure’s head.


Step 41


The 2nd crown is beaded on a cardboard loom.


The 2nd crown is beaded on a cardboard loom.  Just make slits 1/2 inch apart on both sides of a sturdy box.  The loom is threaded by putting string in first notch… taping it down.  Then just pull over to other side and put thru that notch.  Then put thru 2nd notch and pull to other side and continue.  When done… wrap around extra notches to keep in place.


Step 42


Tie thread to first string.


Tie thread to first string. ***Make sure to leave extra room on strings so you can tie knots at end.


Step 43


Put some small beads onto the needle and thread.


Put some small beads onto the needle and thread.  If you have 6 strings, you need 5 beads…. If you have 5 strings, you need 4 beads.


Step 44


Pull threads and beads under all 6 strings


Pull threads and beads under all 6 strings, so they are on the opposite side now.


Step 45


Push all the beads so that each bead is in between 2 strings.


The first row is the trickiest… and then each row gets easier.  Push all the beads so that each bead is in between 2 strings.


Step 46


push the needle thru all of them so that the needle is now on the opposite side again.


Then, while beads are up above the strings (because you are pushing below them)… push the needle thru all of them so that the needle is now on the opposite side again.


Step 47


Now, do this for all the rows.


Now, do this for all the rows.  Make as many as you feel fit.


Step 48


I took some gold thread and wove it over and under all of the strings a few times


Optionally, as an added touch… I took some gold thread and wove it over and under all of the strings a few times to make the crown surrounded in gold.


Step 49


Cut off string on both sides.


Cut off string on both sides.


Step 50


Tie it shut to make a crown.


Tie it shut to make a crown.


Step 51


Place crown on figure.


Place crown on figure.


Step 52


For the 3rd crown, you can use the same loom that you used for beading.  Thread it the same way.


For the 3rd crown, you can use the same loom that you used for beading.  Thread it the same way.  Weave over and under.


Step 53


When you have woven a long strip, then take loops off.


When you have woven a long strip, then take loops off.


Step 54


Cut loops in half.


Cut loops in half.


Step 55


Tie these strings into knots.


Tie these strings into knots.


Step 56


Roll this woven fabric lengthwise


Roll this woven fabric lengthwise…. like above image.  Sew it so it stays like that.


Step 57


Then sew into donut shape and place on figure's head.


Then sew into donut shape and place on figure’s head.


Finished 3 wise men craft


You have just finished weaving the 3 Wise Men for a Nativity Scene…. How did they turn out?  Please let me know in the comments below.  Also, take a picture of your Wise Men and share them in the comment as well.  I’d love to see them.  Come back to check out how to Weave a Baby Jesus for a Nativity Scene as well the Mary & Joseph craft, Yarn Clothespin Sheep craft and the Yarn Clothespin Donkey craft to complete your Nativity Scene.

Technorati Tags: , , , , , , , , , , , , , ,

How to Make a Spooky Spider Glove Puppet

Today I have a fun craft for you.  I am going to show you how to make a spooky Spider Glove Puppet.  It’s going to be so much fun.  Plus, this spooky spider is so cute.  I know a spooky spider shouldn’t be cute.  But, it just is.  Something about seeing a spider as a puppet that makes it so cute.  So, find an old pair of gloves and grab your kids because they are going to love this craft…. and for sure playing with the finished puppet.

Check out our other Halloween Crafts.


How to Make a Spooky Spider Glove Puppet


Materials Needed

Pair of Black Gloves (old or new)

Needle

Black Thread

Cotton

Styrofoam Ball (1 1/4″ in diameter)

Scissors


Step 1


Buy a pair of black gloves....or even better, find an old pair of black gloves


Buy a pair of black gloves….or even better, find an old pair of black gloves. Decide if you want to wear this puppet on your right hand or left hand. Set one of the gloves in the pair aside…the one that you will not be wearing on your hand. For the purposes of this tutorial, we will assume that you are right handed. You are now going to cut up the glove that is NOT your good hand. If you are right handed, cut up the left glove…and vice versa if you are left handed. Now, cut off the bottom of the left handed glove(the cuff) if you are right handed. And then cut the thumb and first two fingers from the left glove as well… as shown in the picture above.


Step 2


Now you will have a piece of the left glove that included 3 fingers without the cuff


Now, you will have a piece of the left glove that included 3 fingers without the cuff. You will slip the middle finger of this left glove over the little finger of the right glove.


Step 3


You will now sew the 2 pieces together


You will now sew the 2 pieces together.  Sew the seams together carefully so that a finger still will fit into opening (see sketch above).


Step 4


Now, stuff other finger and thumb of left glove with cotton and sew to right glove


Now, stuff other finger and thumb of left glove with cotton and sew to right glove. Cut another finger from left glove and stuff it with cotton. Sew it fast between the thumb and forefinger on the right handed glove (see sketch above).


Step 5


Cover a styrofoam ball


Cover a Styrofoam ball ( about 1 1/4″ in diameter) with some of the left-over left glove cuff and sew on to the right hand glove (see x on sketch above).


Step 6


Put it on and wear it as a scary black spider


Put it on and wear it as a scary black spider. Creep people out with your scary Halloween spider.  Hey, you can even make a few and put on a Halloween spider puppet show.  How fun would that be?!

Technorati Tags: , , , , ,

How to make a Pumpkin Girl Decoration for Fall

The leaves are falling,the air has gotten brisk and Halloween is just around the corner.  What does that mean?  Yep, Fall is here and it is raring to go.  I love fall…. the kids are back in school and I could finally pull out all of my favorite sweaters.  What else does it mean?  It is time to decorate for the fall season.  Today I will show you how to make a Pumpkin Girl decoration for Fall.  Let’s get started.

Tutorial offered by Laura from Dacian Moon Handmade .


CRAFT MATERIALS NEEDED:

– orange cloth
– green cloth / leather
– wooden ball (I haven’t one so I made a head in polymer clay)
– toothpick
– craft glue
– paint marker
– needle and thread
– wool / cotton – things to stuff (I used 4 cotton pads for that)
– 1 disc of cardboard
– green cord


Step 1 – The Pumpkin

Draw a circle on the orange cloth (actually I just rounded the corners).


Cut it out.


This is the orange circle.


Using the needle and thread, sew near the edges…


… like that.


Step 2 – Stuff it!

Take the cardboard disc…


… and place it inside.


Prepare your stuffing material: I made little pieces of the cotton pads…


… and place it over the cardboard, inside the orange cloth


Pull the thread to close the pumpkin…


… like this.


Sew it shut.


Step 3 – Pumpkin Top

Cut a disc of green leather and place it on top of the pumpkin, to mask the stitch.


Sew it there.


Step 4 – The Head

Take the wooden ball and put it on the toothpick (you can add a little glue on the toothpick for safety)…


… then put it on top of the green leather, forcing it through.


Now, our pumpkin girl has a head too.


Notice that the stitch on the green leather is visible and doesn’t look good. I’ll fix that by adding a new disc of green leather just under the head.


Step 5 – The Hair

Make some pieces from the green cord – about 15 cm length.


Apply a generous layer of glue on the head, where the hair will be.


Like this.


Take one piece of cord and place it on the head, taking care to have the longer part on the back, like this.


Continue to add cord pieces until the head is fully covered. Let it dry well.


Now you can arrange her hair as you want it. I split the front part of the cords in three…


… I made three braids – two on the sides and one on the back – and tied them together.  I then cut the front center part to make a fringe.


Now you must make her eyes and mouth… use the paint marker and she is ready to go.


Now you have a cute pumpkin girl to decorate your house with this Fall.  Add it to your other fall decorations to fill your house with tons of fall foliage fun.

Technorati Tags: , , , , , , , ,

Making Popsicle Stick Santa Clause Christmas Tree Ornaments Craft for Kids

Make your own Santa Clause Ornaments decoration for your Christmas trees. This is just a sample Christmas Tree Ornament, you can use your creativity to make kings, angels and other Christmas characters using the same technique. Have fun.


Image028


Making Popsicle Stick Santa Clause Christmas Tree Ornaments Craft for Kids

Craft materials required:

thick Red colored paper, thick white paper

ribbon

Popsicle stick

marker

cotton

scissors

glue

tape


Image020


Step 1

Draw and cut out a shape as shown below.


Image010


Step 2

Cut out a santa hat of the same size and glue it on to the shape cut out in card.


Image011


Image012


Step 3

Cut out a small rectangle to make Santa’s dress.


Image013


Step 4

Draw the Santa’s dress as shown.


Image014


Step 5

Draw Santa’s face. Glue cotton on the sides of Santa’s face and beard.


Image016


Step 6

Glue Santa’s dress on the Popsicle stick as shown.


Image017


Step 7

Glue Santa’s head on top of the popsicle stick.


Image018


Step 8

Tape a piece of ribbon to the back of the Popsicle stick as shown.


Image023


Step 9

Hang the Santa ornament on your tree


Image028


CHRISTMAS CRAFTS ACTIVITIES & IDEAS FOR KIDS

It is almost Christmas time so check out our Christmas Coloring Pages & Christmas Crafts for Kids Page to find some great Christmas crafts project ideas for kids to celebrate Xmas such as .. Advent Calendar Crafts ..Candy Cane Crafts ..Christmas Angel Crafts ..Christmas Cards Crafts ..Christmas Bells Crafts ..Christmas Coloring Pages .. Santa Coloring Pages .. Christmas Elf Crafts .. Christmas Gift Bags Crafts ..Christmas Gift Tags Crafts .. Christmas Games & Activities .. Christmas Nativity Scenes .. Christmas Soda Can Crafts .. Christmas Placemat Crafts ..Christmas Poinsettias Crafts .. Christmas Sewing Patterns .. Christmas Tree Crafts ..Christmas Tree Ornament Crafts ..Christmas Wreath Crafts ..Gingerbread House Crafts ..Gingerbread Man Crafts .. Mittens and Gloves Crafts ..Recycle Christmas Cards to Make Other Crafts ..Reindeer Crafts .. Winter Penguin Crafts .. Winter Snow Crafts .. Winter Solstice / Yule Crafts ..Santa Clause Crafts .. Santa Hats Crafts .. Santa’s Sleigh Crafts ..Snowflake Crafts ..Snowman Crafts .. Stocking Crafts .. Wrapping Paper Craft

Technorati Tags: , , , , , , , , , , , , , , , , , , , , ,