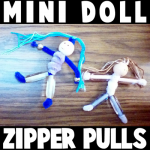
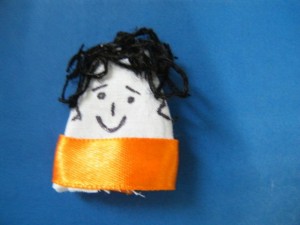
How to Make Mini People or Dolls as Zipper Pulls as Back to School Craft for Kids

This makes a great back to school craft as this can be used to decorate your backpack! My daughter and I made a few of these to give to her special friends at school. We landed up having to make more than 20 of them to give out to everyone who was asking for them. She couldn’t make enough of them because they were so popular. I think you will love these too. They are very easy to make and you can use different materials each time. Any bead size or thread color will work. Just have fun and be creative with it!

How to Make Mini People or Dolls as Zipper Pulls as Back to School Craft for Kids


mini doll zipper pulls


Crafts Materials Needed:

– beads

– embroidery thread, yarn, string, or thread

– pipe cleaners

– scissors

– (Optional) metal snap spring hooks

Step 1


finished-step01-beaded-people-zipper-pulls


I started off with a round bead that already had a face drawn on it. You can use paint or a Sharpie to draw 2 eyes and a mouth on a round bead if you don’t have face beads already.

Then put a pipe cleaner thru the bead. The  beaded head should be in the center of the pipe cleaner, as seen above.

Step 2


finished-step02b-beaded-people-zipper-pulls


– Now put the pipe cleaner that is thru the top of the head back down into the top of the head again until there is a loop….as seen above. The legs (bottom 2 pieces of the pipe cleaner) should match up too.


Step 3


finished-step03-beaded-people-zipper-pulls


Take some embroidery thread (or whatever you have available) and fold it in half a few times (as you see that I did above). Then stick it in the loop hole, as seen above.


finished-step04a-beaded-people-zipper-pulls


If you want to make this a zipper pull, put a metal hook on it (optional…only for zipper pulls). Then Pull the pipe cleaner legs downwards so that the pipe cleaner on top of the head closes down on the hair and hook.

Step 4


finished-step04-beaded-people-zipper-pulls


Cut the loops that are in the embroidery thread so that it resembles hair.

 Step 5


finished-step05a-beaded-people-zipper-pulls


Cut a pipe cleaner in half. Wrap it around the top of the body, so you will have arms.

 Step 5 b


finished-step05b-beaded-people-zipper-pulls


Like in the above picture.

Step 6


finished-step06-beaded-people-zipper-pulls


Take the other half of the pipe cleaner and wrap it around the chest area as I did above.

Step 7


finished-step07-beaded-people-zipper-pulls


– Now we can place beads on the arms and legs. I have long beads, but you can also use multiple small round or oval beads. Then just push the pipe cleaner back into the bead to make it so the beads can’t fall off.

 Step 7 b


finished-step08-beaded-people-zipper-pulls


– This is what it looks like when all the beads are on there.

Finished Bead People


Finished Mini Figures


– My daughter originally only made a few of these for her to give to her closest friends. It lands up everyone in the class were BEGGING her to give them one. We landed up making enough for the entire class. Kids do Love these! Even boys! I hope that you had fun!

Technorati Tags: , , , , , ,

How to make a Chalk Pastel Jars for Valentines Day or for Summer Fun

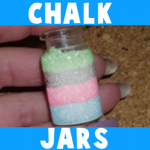
Today we will show you how to make a really cool item that you have never made before. This project is to make a jar filled with beautiful pastel chalk…it looks like sand art, but instead with chalk. Look below to find out how to make these awesome jars…great for a Valentines Day gift or for a Cool Summer Project. Laura from Dacian Moon Handmade   will show you today how to make a cute gift for your Valentine.

How to make a Chalk Pastel Jars for Valentines Day or for Summer Fun


Chalk Pastel Jars


CRAFTS MATERIALS NEEDED:

– chalk: blue, pink, green
– sugar
– small jar
– paper


IMG_3796


Step 1.

Put some sugar on a piece of paper.


IMG_3798


Spread it.


IMG_3799


Rub the blue chalk over the sugar…


IMG_3800


… and the sugar will become blue.


IMG_3801


Use the paper as a funnel to put the blue sugar into the jar.


IMG_3802


like this.


IMG_3803


Step 2.

Repeat step 1 using pink chalk. Put pink sugar over the blue one.


IMG_3805


 Step 3.

Add a layer of white sugar on the jar, then make some green sugar (repeating step 1, with green chalk).


IMG_3809


Add the green layer over the white one, like this.


IMG_3810


Seal the jar and the gift is ready.


IMG_3811


Technorati Tags: , , , , , , , , , ,

How to Make Fabric Oatmeal Container Drawstring Bags

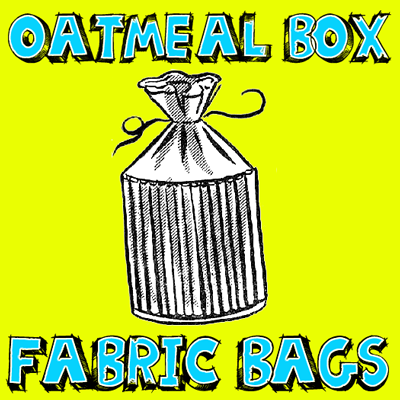
Here is a craft for making a great drawstring bag out of a cylinder oatmeal container, fabric, some cardboard, and a few other items. This bag turns out looking beautiful and would make a great bag for yourself or as a gift to mom, grandma, or someone else you love.


How to Make Fabric Oatmeal Container Drawstring Bags


CRAFTS MATERIAL NEEDED:

Fabric

Oatmeal Container

6″ x 6″ cardboard square

Glue

Magazine pictures

Knitting needle (size 3 or 4)

White shellac

Scissors

Pencil

Ruler

How to Make These Drawstring Bags:

Step 1


fabric-oatmeal-container-drawstring-bags-01


Cut cereal box to 4″ height, as shown by broken line in Figure 1.


Step 2


fabric-oatmeal-container-drawstring-bags-02


Make cardboard pattern, 4″ wide at base and 5″ high to center point, as in Figure 2.

Step 3


fabric-oatmeal-container-drawstring-bags-04


Using cardboard pattern trace triangles on colorful smooth magazine pictures. Cut triangles out, and lay, face down, on work table. Apply glue lightly down middle of triangle, making sure the top point is well covered to prevent unrolling. Place the knitting needle along the 4″ base, and roll triangle tightly around the needle to make a tube, as in Figure 3. Slip the tube off the needle and set aside to dry. It will take about 90 tubes to cover a box, 5 1/2″ in diameter.

Step 4


fabric-oatmeal-container-drawstring-bags-05


fabric-oatmeal-container-drawstring-bags-03


Apply a liberal amount of glue to the outside of the cereal box. Stand tubes, side by side, around the box. Hold in place with rubber bands. When dry, apply several coats of shellac over tubes. Make a drawstring top from a piece of material and sew around top of tube-covered box. Cut a circle of the same material, 1″ larger than bottom of the box. Center and paste circle to bottom of the box with fabric glue. Bend the extra inch of material over and sew to base to cover ends of tubes, as in Figure 4.


Technorati Tags: , , , , , ,

Number One Dad Badge Fathers Day or Mothers Day Gift Craft

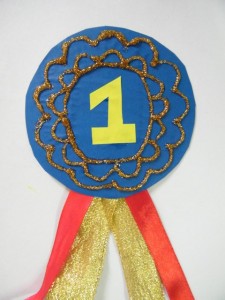
Is your dad the best in the world? Here’s a father’s day gift that will help him remember that. The simple instructions to make this Number 1 Dad badge are given below:

Number One Dad Badge Fathers Day Gift Craft


Craft materials required:

Thick card stock ( cereal box etc.)

ribbon

glue

scissors

glitter glue

colored paper


Step 1:


Cut out a circle on thick card paper as shown.

Step 2:


Glue colored paper on it as shown.


Step 3:


Cut out the number 1 and glue it in the center as shown.

Step 4:


Cut out 2 pieces of ribbon and fold them as shown below

Step 5:


Tape them to the back of the card as shown.

Step 6:


Decorate with glitter glue as shown.

Technorati Tags: , , , , , , , , , ,

Puppets for Thumb wrestling: Father’s Day Gift

Here’s a Father’s day gift that guarantees hours of fun. Make a set of thumb puppets for your dad and yourself, and play thumb wrestling. The simple illustrated instructions to make the thumb puppets follow:


Craft materials required:

-White fabric

-black yarn

-ribbon

-scissors

-needle and thread

-fabric glue

-Permanent marker


Step 1:

Cut out a piece of cloth double the length of your thumb and about an inch wider than the width of your thumb.


Step 2:

Fold it into half and stitch along the two sides as shown.


Step 3:

Fold it inside out as shown:


Step 4:

Glue small pieces of yarn to make hair


Step 5:

Glue a strip of ribbon along the bottom as shown


Step 6:

Add facial features with a marker.


Make another one for your dad in the same way. Make sure its big enough for your dad’s thumb. Your dad is sure to enjoy this Father’s day gift.

Technorati Tags: , , , , , , , , , ,

Turn a Deck of Cards into a 52 Reasons I Love You Book for a Valentines Day Gift

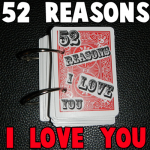
I am sure that you can think of way more than 52 reasons that you love someone. However, it will only take those 52 reasons to make your loved-one break down into tears of happiness. Take the time to tell your Mom / Dad / Sister / Brother / Grandparents etc how much you love them with this special project. Versions of this craft are all over the Internet…each a little different from the other, and I am not sure who was the first craftster to come up with this idea…but it is super cool. So know that I didn’t come up with this idea, however, it isn’t exactly the same as others.


Turn a Deck of Cards into a 52 Reasons I Love You Book for a Valentines Day Gift


Crafts Materials Needed:

A Deck of Cards

Glue or Paste

Jump Rings

Paper / Printer (or you can write out by hand)

Hole Puncher

Templates


template 3 - 52 ways i love you template 1


Click on Pic and Save Pic That Opens Up


template 1 - 52 ways i love you template 1


Click on Pic and Save Pic That Opens Up


template 2 - 52 ways i love you template 1


Click on Pic and Save Pic That Opens Up


template 4 - 52 ways i love you template 1


Click on Pic and Save Pic That Opens Up

Step 1


step1


Download and then print out the 4 pages of templates. Then write something for each number. Each thing should be something you love about the person you are writing the book for.

Step 2


step2 : 52 reasons why I love you


Cut each number rectangle out.


Step 3


step 3 : 52 reasons why I love you


Paste each number rectangle on a playing card.

Step 4


step4a


Now take a hole puncher and punch 2 holes in each card. Line cards up so holes are in about the same place on each card.


step4b


Here is what the holes look like on the other side of the cards.

Step 5


step 5 : 52 reasons why I love you


Open jump rings and thread it through all the cards…2 this for both holes.

Now Your Loved One Can Flip Thru Pages


step6d


step6c


step6b


step6a


This might be the most special gift you ever give any one. Your loved one will cherish this book forever.

Technorati Tags: , , , , , , , , , ,

How to Make a Winter Angel Christmas Ornament

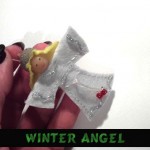
I have a fun Christmas craft for you today.  In this post I will show you how to make a Winter Angel Christmas Ornament.  This Angel Christmas Ornament turns out amazing looking.  It would look spectacular on your Christmas Tree.  You could also make this Winter Angel Christmas Ornament as a gift for your friends and family this Christmas.  They will surely love it.   This will surely be a Christmas Ornament that they will save for a long time….. proudly representing something you made yourself.  So, let’s get started.

Check out our Christmas Crafts.

Laura from Dacian Moon Handmade   will show you how to make this, step by step.


Materials Needed

– 1 disc of white felt
– 1 smaller disc of yellow felt
– 1 acorn cap
– 1 wooden bead
– toothpick
– scissors
– needle and pin
– instant glue
– red and black paint
– silver glitter glue
– 2 red beads


Step 1

Take the wooden bead…


… and stick it on a toothpick.


Like this.


Step 2

Put the toothpick through the middle of the white felt.


Fold the felt in half, like this, and start sewing a dress for your angel.


Like this.


Step 3

Cut the extra felt.


It will look like this.


It is time to shorten the hands / wings.


Like this .


Step 4

Apply a layer of glue on the head…


… and put the yellow disc over it, like this. Note: you should do this quickly because the glue is fast drying.


This is the angel with hair.


Step 5

Apply a layer of glue inside the acorn cap…


… and fix it on the angel’s head over the yellow felt.


Step 6

Put a red bead on a piece of thread…


… and make a knot, like this.


Sew this piece of thread as a belt.


… like this. Then add another bead on the other end and tie the belt.


Step 7

Put the needle (with thread) through the yellow felt, and make a hanger.


Like this.


Decorate your angel with glitter glue, make eyes and mouth with black and red paint and your ornament is ready.


Isn’t this Winter Angel Christmas Ornament simply adorable?  It will look beautiful hanging on your Christmas tree.  It would also make a wonderful gift to a friend or family member.

Technorati Tags: , , , , , , , , , , , , ,

How to Make a Christmas Decorated Jug with Napkins

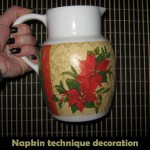
Today I’m going to show you how to transform an ordinary jug into a wonderful Christmas decoration.  You can use a jug that you can pick up at any discount store and change it into a spectacular Christmas decoration or give it out as a Christmas gift this Holiday.  Using this special napkin technique changes an ordinary jug into something so much more.  Plus, the craft itself is so much fun.  So, grab the kids and the materials needed and let’s get started.

Check out our other Christmas crafts.

Laura from  Dacian Moon Handmade will show you how to make this.


Materials Needed

– blank jug
– craft glue
– metallic gold paint
– napkin with the motif you want to use
– scissors
– paintbrush


Step 1

Take the napkin…


… and cut out the motif you want to use…


… like this.


Step 2

Remove the white layers. It is easier to start in the middle, where the napkin was folded.


Most napkins are either 2-ply or 3-ply so you must remove all the white layers.


Step 3

Using the paintbrush…


… apply a layer of glue on the item where the motif will be.


Place the napkin as flat as you can, following the contours of the item.


Wet the brush slightly with glue and spread evenly on the surface of the napkin until it is completely covered. Work slowly and be careful not to tear the napkin. Work from the center out towards the edge of the pattern.


Let it dry.


Step 4

To give it shine you can add a thin layer of metallic paint over the motif.


Let it dry well…


… and the jug is ready.


Now place the Christmas decorated Jug somewhere special this Christmas.  It is a perfect decoration for the Holiday that you can use for years to come.

Technorati Tags: , , , , , , , , , , ,

How to Make Simple Gift Tags

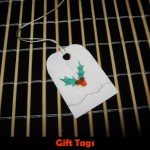
How you present your gifts this holiday season is so important.  The right gift wrap, the right bows and of course the right gift tags.  But, instead of buying store bought gift tags why not do something more original.  In this post I will show you how to make a simple gift tag for your gifts.  Whether you celebrate Christmas or Hanukkah you can make this gift tag craft work for you.  Simply alter the design on your gift tags to fit your needs.  So, let’s get started.

Check out our other Christmas Crafts.

Today, Laura from  Dacian Moon Handmade will show you how to make a simple but beautiful gift tag.


Materials Needed

– transparent paper
– cardboard
– green pen
– glue
– scissors
– glitter glue
– card punch
– thick thread


Step 1

Cut a rectangle from the cardboard (3 cm x 4.5 cm)


Cut another rectangle of the same dimensions from the transparent paper. You can measure or you can use the cardboard as a template.


… like this.


Try to cut a pattern out of the transparent paper – at about 1 cm of the lower side…


… like this.


Step 2

Apply a layer of glue on the cardboard…


… and place the transparent paper over it, like this. Let it dry.


Step 3

Using your green pen…


… draw two holly leaves on the transparent paper..


Add three red berries with glitter glue.


Let it dry.


 Step 4

Using the card punch make a hole on the upper part.


… like this.

Take the thread and fold it in half…


Put it through the hole, like in the picture…


…then bring the back through the loop, like this.


You can round the corners and your gift tag is ready.


And, there you have it….. simple gift tags that won’t look simple at all on any gift.  How did your gift tags turn out?  Let me know in the comments below.

Technorati Tags: , , , , , , , , , , , ,

How to Make a Pop-Up Hanukkah Dreidel Greeting Card

Now is the time to start to get your Holiday greeting cards ready to be given out.  Well, today I’m going to show you how to make a Pop-Up Hanukkah Dreidel Greeting Card.  Anyone who receives this Hanukkah greeting card will love the 3D look of this card.  With some simple paper, scissors and some markers for decorating you too can make this Hanukkah Dreidel Greeting Card.  Your kids will love making this pop-up card.  Plus, they will be preparing a special card for someone they love…. they will truly get a kick out of that.

Check out our other Hanukkah Crafts.


How to Make a Pop-Up Hanukkah Dreidel Greeting Card


Materials Needed

Piece of Paper

Colorful Piece of Paper

Scissors

Markers, Crayons or Colored Pencils to Decorate Card


Step 1


Get a piece of paper.


Get a piece of paper.


Step 2


Fold in half.


Fold in half.


Step 3


Cut slits on fold.


Cut slits on fold.


Step 4


Open up page.


Open up page.


Step 5


Fold this part in.... the other direction.


Fold this part in…. the other direction.


Step 6


Now turn card in this direction.


Now turn card in this direction.


Cut down in a V shape, but don't cut all the way!


Cut down in a V shape, but don’t cut all the way!!!


Step 7


Fold right here upwards to make a crease.


Fold right here upwards to make a crease.


Step 8


Bring top part of card down on this square


Bring top part of card down on this square (not bottom of card).


Cut 2 slits.  As you can see... You are NOT cutting bottom of card as seen here.


Cut 2 slits.  As you can see… You are NOT cutting bottom of card as seen here.


 Step 9


Fold this part in opposite direction.


Fold this part in opposite direction.


Step 10


Make a crease here.


Make a crease here.


Step 11


Glue down the outer edges of white paper onto colorful paper


Glue down the outer edges of white paper onto colorful paper (the side that doesn’t pop out).


It should look like this.


Like this.


Step 12


Decorate the card.


Decorate the card.

Anyone who receives this Hanukkah card will love it!!  I love the 3D look of this greeting card…. as will the receiver.

Technorati Tags: , , , , , , , , , , , , ,

How to Make a Spider Pendant for Halloween

I have a treat for you crafters today….. I’m going to show you how to make a Spider Pendant for Halloween.  Made from jewelry wire and beads this Spider Pendant turns out beautifully.  Make it for yourself or as a gift for someone special…. they will surely love it.  What is awesome about this Spider Pendant is that you can wear it all year long…. not just for Halloween.  It turns out that amazing….. you don’t want to just save it for Halloween.  So, grab the materials needed and let’s get started.

Check out our other Halloween Crafts.

Laura from  Dacian Moon Handmade  will show you, step by step, how to make this Spider Pendant.


How to make Spider Pendants for Halloween


Materials Needed

– black crystal
– red coral (you can use any red bead, just keep in mind it should be bigger than the black one)
– 2 little beads (seed beads)
– one piece of wire (about 3 cm)
– 3 pieces of wire (about 4.5 cm)
– chain
– round nose pliers

NOTE: Wire should be neither too soft nor too hard.


Step 1

Take the small piece of wire…


…and begin making a loop on one end.


Put the 2 seed beads on it…


… and close the loop. These will be the eyes.


Step 2

Add the black crystal…


… and the red coral bead.


Using the pliers make another loop on the other end.


Take care to let about 5mm between the black bead and the red one.


Step 3

Take the 3 pieces of wire…


… and bend them in half, like this.


Continue to press on the ends until it looks like this.


Put the spider body through it, like this…


… and tighten the knot.


Press on the ends again…


… and make another knot, like this.

NOTE: It is not actually a knot. You just wrap the 3 wire around the spider body 2 times.


Step 4

Separate spider legs.


Fold down the first leg almost half (smallest side towards the body)…


… and make a little loop on the end, using the pliers.


Repeat for all the legs…


… and your spider is ready.


Add a chain to it (you can put it through the head – between the eyes) and is ready to be worn.


Ok, how awesome is this Spider Pendant?  It is perfect for the Halloween season…. or really any time of year.  It is that beautiful to wear… wear it all year long.

Technorati Tags: , , , , , , , , , , ,

How to Make a Butterfly Headband

I have a fun craft for the girls today.  I’m going to show you how to make a butterfly headband.  This headband is perfect for any girl to wear who loves butterflies.  This headband can actually be worn in the hair and the butterflies stand up from the headband, so you will be able to see the butterflies no matter how thick your hair is.  This craft is not only useful, but it is also fun.  So, grab the materials needed and let’s get started.

Check out our other Crafts for Girls.

Laura from Dacian Moon Handmade  will show you, step by step, how to make this.


Butterfly Headbands


Materials Needed

– transparent foil (mine is backed with paper)
– craft glue
– pen
– headband
– scissors
– paint markers (or permanent markers): black, green, gold


Step 1

Use the pen to draw a butterfly on the transparency.


Like this.


… and another one, smaller…


… like this.


Step 2

Using the black marker…


…trace the contour of the first butterfly, and color the body.


If you want to make some black decorations on it, do that now. I made a line on both wings.


Trace the contour of the second butterfly too. Let them dry.


Use green marker to color them.


I added some green lines to the big one…


… and I made the second one completely green.


Use the gold marker to add highlights.


I added golden dots to the small one…


… and I colored the remaining places on the big one’s wings.

Let them dry well.


Step 3

Cut them out.


Like this.


Fold up the wings like this.


Step 4

Turn the big butterfly over …


… and add glue on its body…


… then place it on the headband.


Do the same with the small one…


… and the headband is ready.

Let it dry well before wearing.


And there you go…. you now have a beautiful headband decorated with butterflies.  What girl wouldn’t love wearing that?

Technorati Tags: , , , , , ,

How to Make a Duct Tape Playing Cards Shoulder Bag

Oh boy…. do I have a fun craft for you today!!  I’m going to show you how to make a Duct Tape Playing Cards Shoulder Bag.  The front and back side of this durable bag is covered with playing cards to give it a playful style.  I used Uno Cards for this craft, but feel free to use any style playing cards you wish.  Whatever style you choose will look great.  So, grab a deck of cards, duct tape and scissors and you are good to go.  Let’s get started.

Check out our other Duct Tape Crafts.


How to Make a Duct Tape Playing Cards Shoulder Bag


Materials Needed

Deck of Cards

Purple & Yellow Duct Tape (or other colors you prefer)

Scissors


Step 1


Overlap 6 cards slightly.


Overlap 6 cards slightly.


Step 2


Duct tape these cards together.


Duct tape these cards together.


Step 3


Do this 4 times and then duct tape all together


Do this 4 times and then duct tape all together… Like this.  Duct tape only one side.


Step 4


Do step 1 thru 3 again so you have two of these.


Do step 1 thru 3 again so you have two of these.


Step 5


Make duct tape fabric.


Make duct tape fabric that is about this much bigger than the 2 card pieces you made.  ***Look below this step to see a detailed description on how to make Duct Tape Fabric***


How to Make Duct Tape Fabric


How to make duct tape fabric


  • Unroll a long piece of duct tape so that it is sticky side up.
  • Now place a piece of  duct tape, sticky side down, on top of the first piece of duct tape so that it is sealed closed.
  • Take a new piece of duct tape and place it sticky side up.  Now overlap the sealed piece of duct tape (from last step) slightly on top of this new piece, just enough so it will stick.
  • Take a new piece of duct tape and place it sticky side down on top of the piece of tape that is sticky side up.  Keep going until your duct tape fabric is as large as you need it to be.


Step 6


Place the purple pieces, card side down.


Place the purple pieces, card side down.  Place yellow piece on top of both… and then overlap a long strip of yellow duct tape over both yellow and purple fabric so they stick together.


Step 7


 Turn over and cover and add a piece of yellow duct tape, sticky side down, over both cards and yellow duct tape.


Turn over and cover and add a piece of yellow duct tape, sticky side down, over both cards and yellow duct tape.


Step 8


Pull yellow part up and duct tape to purple part like this.


The yellow part will be the sides of the bag.  Pull yellow part up and duct tape to purple part like this.  A friend should help.


Step 9


Now duct tape other yellow side up to purple fabric.


Now duct tape other yellow side up to purple fabric.


This is what you have done so far.


This is what you have done so far.


Step 10


Now tape the yellow part to the other purple side.


Now tape the yellow part to the other purple side.  Here is a pic looking down into the bag.


Step 11


This is what fronts of bag look like.


This is what fronts of bag look like.  We have to now tape edges of cards.


It should look like this now.


Like this.


Step 12


You might have these sticking up


You might have these sticking up….


Just fold them into the bag.


Just fold them into the bag.


Step 13


Make some more duct tape fabric.... make it long.


Make some more duct tape fabric…. make it long.  This will be the handle.


even longer than this


Nope…. even longer than this.


Step 14


Make a small slit, about 3 inches down on both sides of bag.


Make a small slit, about 3 inches down on both sides of bag.


Step 15


Duct tape all around hole so it won't rip later.


Duct tape all around hole so it won’t rip later.


Step 16


Place yellow strap in hole and tie large knot at end to secure in place.... do on both sides of bag.


Place yellow strap in hole and tie large knot at end to secure in place…. do on both sides of bag.


Step 17


It's done and ready to wear.


It’s done and ready to wear.

Isn’t this bag awesome?  It is so big that you can pretty much hold in it whatever you wish.  Enjoy carrying around this fun loving bag.

Technorati Tags: , , , , , , , , , , , , , , ,

How to Make Papier Mache Bowls

Today I’m going to show you how to make Papier Mache Bowls.  Using a wooden, glass or ceramic bowl for your armature for this project as well as newspaper strips and the papier mache paste we will make together you will be able to make a beautiful bowl that you can actually hold stuff in.  Once dry you will paint the bowl in the beautiful colors of your choice…. it is an all around fun project.  So, grab the materials needed and let’s get started.

Check out our other Sculpting Crafts.


How to Make Papier Mache Bowls


Materials Needed

Wooden, Glass, or Ceramic Bowls

Grease, Lard or Salad Oil

Newspaper Strips

1 Cup Water

4 tsp Salt

1 Cup Flour

Elmer’s Glue (optional)

Tempera or Acrylic Paint

Shellac or Lacquer (optional)


Step 1


Select simple wooden, glass, or ceramic bowls to serve as the armature for this project.


Select simple wooden, glass, or ceramic bowls to serve as the armature for this project. Make sure that the bowl you have selected is free from undercuts so that no problems arise in the removal of the following papier mache forms. Go over the surface of the bowl lightly with grease, lard, or salad oil to facilitate removal of the finished papier mache form.


Step 2


In beginning this project, tear newspaper strips.


In beginning this project, tear newspaper strips.


Step 3


Make Papier Mache Paste.


Make Papier Mache Paste…it should be the consistency of light cream. Soak newspaper strips in prepared paste.  To make Papier Mache paste mixture…. mix 1 cup water… 4 tsp salt… and 1 cup flour.  Mix together.  Or, mix together 1/2 Elmer’s Glue and 1/2 water.  Mix together.


Step 4


Dip / soak each newspaper strip in the papier mache mixture


Dip / soak each newspaper strip in the papier mache mixture and then you will place them on the bowl. Build up a shell of about six layers of newspaper strips around the outside of the bowl.


Step 5


When the papier mache is dry, lift the shell from the original bowl


When the papier mache is dry, lift the shell from the original bowl and build up the lip on the papier mache bowl as illustrated above. This will provide extra strength and will give a more finished appearance to the bowl.


Step 6


When the papier mache is dry, paint with tempera or acrylic paint.


When the papier mache is dry, paint with tempera or acrylic paint. You can finish with an application of shellac or lacquer for final, durable surface conditioning.

And, there you have it….. that’s how you make Papier Mache Bowls.  How did your bowl turn out?  Let me know in the comments below?  Also, take a picture of your finished Papier Mache Bowl and share it with your comment as well.  I’d love to see it.

Technorati Tags: , , , , , , , , ,

How to Make a Coupon Organizer Case

Mother’s Day is right around the corner.  Have you thought about a gift for your mother yet?  Well, if not I got a great Mother’s Day craft for you.  I’m going to show you how to make a Coupon Organizer Case.  There is not many things more frustrating that going shopping with a pile of coupons and no way of organizing them…. well, your mom won’t have that problem anymore.  With the number of envelopes you are going to be adding to this craft she will have more than enough places to organize her coupons.  So, let’s get started.

Check out our other Mother’s Day Crafts.


How to Make a Coupon Organizer Case


Materials Needed

Cardboard

Paper

Glue or Paste

Hole Punch

10-20 Envelopes

5 Binder Rings, Ribbon or Yarn

Markers, Crayons, Glitter Glue (items to decorate case)


Step 1


Cut 2 pieces of cardboard down to a size that is a tiny bit larger than a business envelope.


Cut 2 pieces of cardboard down to a size that is a tiny bit larger than a business envelope.


Step 2


Cover with paper.  Paste in place.


Cover with paper.  Paste in place.


Step 3


Use a hole punch to poke holes on left side.


Use a hole punch to poke holes on left side.


Step 4


Punch holes in 10-20 envelopes so they will match up with covers.


Punch holes in 10-20 envelopes so they will match up with covers.


Step 5


Bind 2 covers and all the envelopes together.


Bind 2 covers and all the envelopes together.  You can use binder rings, ribbon or yarn to bind them together.


Step 6


Decorate cover.


Decorate cover.


Finished Coupon Case


And there you have it…. you just finished making your Coupon Organizer Case.  Isn’t it a wonderful way to organize coupons?  Your mom is going to surely love this!!

Here is our video on How to Make a Coupon Organizer Case

Technorati Tags: , , , , , , , , , , , ,

How to Make Cone May Baskets

I have a fun craft for you that will totally get you in the Spring mood.  I’m going to show you how to make a Cone May Basket.  May is all about the Spring flowers.  Well, imagine how beautiful a basket will be filled with some of those magnificent flowers.  Or, perhaps you want to give this Cone May Basket to someone special…. well, why not fill it with candy.  The receiver will surely love it!!  Either way this Cone May Basket will surely be enjoyed.  So, grab the materials needed and let’s get started.

Check out our other Spring Crafts.


How to Make Cone May Baskets


Materials Needed

Printer

Paper

Scissors

Crayons or Markers

Paste

Items to Fill the Basket With


Click on template images below to make larger and to print.

8×11 Template


May Basket Template 8x11


Larger Template


May Basket Larger Template


Step 1


Print out template.


Print out template.


Step 2


Cut out pattern.


Cut out pattern.


Step 3


Decorate paper.


Decorate paper.


Step 4


Fold to look like image above.  Paste the tab to the other edge.


Fold to look like image above.  Paste the tab to the other edge.


Step 5


Cut a long strip of paper and use for the handle.


Cut a long strip of paper and use for the handle.  Paste the handle.


Step 6


Fill with flowers or treats.


Fill with flowers or treats.  Now your basket is finished.  What did you fill your basket with?  Are you keeping it for yourself or are you giving it away as a gift this May?  Let me know in the comments below.

Technorati Tags: , , , , , , , , , , , ,