How to Make a Cute Little Fabric Snowman

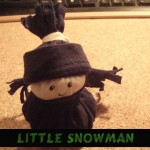
Today we will show you how to make this cute little fabric snowman. He is a lot of fun to make and even more fun to play with. On this cold Winter day, I thought this would be a great craft to share with you.
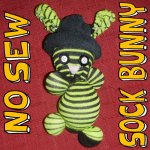
Step by step tutorial offered by Laura from Dacian Moon Handmade

How to Make a Cute Little Fabric Snowman


CRAFTS MATERIALS NEEDED:

– dark blue fabric
– white fabric
– filling material (I use some cotton pads broken into pieces)
– scissors
– ribbon
– black paint or marker
– button


Step 1.

Cut a disc of blue fabric and a smaller one of white fabric.


Step 2.

Start sewing around the edges…


… like this.


Pull the thread ends …


… and fill the inside with the filling material.


Tie the thread ends.


Do the same for the white disc.


Step 3.

Put the needle and thread through the middle of white part…


… then through the middle of the blue part…


… and through the button (we will use the button to make a solid part on the base. It will help our snowman to stay.)


Get back through the blue part and the white part to fix all parts together.


Step 4.

Cut two rectangles of blue fabric, one wider than the other.


Fold the lower part on the big one…


… and wrap it around the snowman’s head (the white part)


Use the ribbon to tie it, like this. Now the snowman have a hat.


Step 5.

Let’s make a scarf now. Take the other blue fabric rectangle…


… and wrap it around the neck of your snowman, then tie it.


Make some cuts on both ends of the scarf and on the upper part of the hat.


Thus, the hat and scarf will have fringes.


Use black paint / marker to draw eyes and mouth, and your little snowman is ready.


Technorati Tags: , , , , , ,

How to Make a Simple No-Sew Sock Bunny Rabbit for Easter or for Fun

Today, we will show you how to make a sock doll bunny rabbit…the best part is that there is NO sewing involved in this craft. Anybody can make these sock bunnies and they can make it pretty quickly. I think you can probably make one of these is 20 or 30 minutes. And these sock bunnies turn out so adorable that you are going to make a few of them so your bunnies can keep each other company. This shouldn’t be played with by young kids who might eat the rubber bands if they come off!


How to Make a Simple No-Sew Sock Bunny Rabbit for Easter or for Fun


Crafts Materials Needed

– 1 Stretchy Sock  – I used Knee High Girls Socks
– 1 Normal Sock for the Hat
– Small Rubber Bands or Yarn
– Buttons or Sharpie Marker or Fabric Markers or Needle and Thread
– Stuffing
-Scissors

Step 1 Thru 9


Step 1 Thru 9 How to Make a Simple No-Sew Sock Bunny Rabbit for Easter or for Fun


We have a crafts tutorial for making a no-sew sock doll. Steps 1-9 are the same for this tutorial…so first go to the sock doll tutorial, and do steps 1-9 and then come back to this tutorial for step 10. Your doll should look like the above picture when you are done with step 9.

Step 10


Step 10


Now cut the top part in half…as seen in picture above.


Step 11


Step 11


Now, in this picture above, we have already done one of the 2 sides. The left side has been braided already…we did this by cutting the left side into three strips and then braiding that side and rubber banding the end as if it was hair. Now the right side needs to be done…we cut the right side into 3 strips…now we just need to braid it. If you don’t know how to braid, please see this tutorial.


real-pic-06


Now both sides should be braided and look like this.

Step 12


Step 12


Now both the right side and left side is looped into a letter ‘U’ shape. Then hold both loops together in the center and rubber band both sides together. I used more than one rubber band to make sure both sides stayed together.

Step 13


Step 13


Cut a second sock in half.

Step 14


Step 14


Now put the bottom of the sock (toe part) on top of the bunny.

Step 15


Step 15


Now fold up the bottom of the sock…so it is rolled up like a normal winter hat is.

Step 16


Step 17


Now cut a small slit on both sides of the hat.

Step 17


Step 18


Now pull an ear thru


real-pic14


And another ear thru.

Step 18


Step 19


Cut a nose out of fabric or felt (a triangle shape). Use a button(s) for eyes.

Step 19


Step 19


Ask mom or dad to help you hot glue the eyes and nose on. That is it…you have a stuffed bunny rabbit to play with. Wasn’t that easy?!

This shouldn’t be played with by young kids who might eat the rubber bands if they come off!

How to Sew a “Lucky Cat” for Saint Patrick’s Day

This is a cute and funny toy made especially for St. Patrick’s Day! 
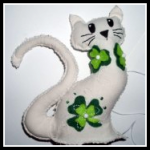
Do you want to learn how to make and sew a stuffed animal named “Lucky Cat” for Saint Patrick’s Day? This stuffed cat is covered in shamrocks and isn’t too tough to make. Learn how to make this kitty cat in the following craft tutorial.

Laura from Dacian Moon Handmade  will show you how to make it, step by step.


How to Sew a Shamrock Lucky Cat


CRAFTS MATERIALS NEEDED:

– white or cream-colored fabric
– light green and dark green felt
– filling material (I use some cotton pads broken into pieces)
– scissors
– needle and threads (white and black)
– black paint marker
– pen
– 3 small white beads
– pencil
– green beads (optional)


IMG_4668


Step 1.

Fold the fabric in half.


IMG_4669


Draw a cat outline, like this…


IMG_4673


… and the tail.


IMG_4674


Cut them out, without unfolding the fabric. This way you will have two cats and two tails.


IMG_4675


Step 2.

Place one cat over the other and start sewing them together. Start on the lower part.


IMG_4676


Go up until you reach the ear.


IMG_4678


Step 3.

Draw one big clover and some smaller on dark green felt. Also, draw them a little bit smaller on light green felt.


IMG_4679


Cut them out.


IMG_4680


Group one big dark clover with one big light clover, and the smaller ones in the same way.


IMG_4681


Step 4.

Choose one place for the big clover…


IMG_4683


… and sew it in place, using white thread.


IMG_4685


Add one white bead in the middle. Be careful not to sew both cats when you sew decorations.


IMG_4687


You can let it like this or you can make some decorative stitches with white thread and green beads


IMG_4689


Like this.


IMG_4691


Choose a place for the small clovers also.


IMG_4693


I put two of them around the cat’s neck, just like a necklace. Don’t forget to add white beads in the middle and to sew only one cat.


IMG_4696


Step 5.

Is time to decorate the head. Place a folded paper or a piece of cardboard between the two cats…


IMG_4698


… and color the eyes and nose with black paint marker.


IMG_4699


Like this.


IMG_4700


Change the thread, and using the black one…


IMG_4701


Sew the whiskers.


IMG_4702


Like this.


IMG_4703


Step 6.

Change the thread back to white and continue to sew the two cats together.


IMG_4705


When you reach the neck is time to fill the head.


IMG_4706


Tamp the filling to fill all the head and the ears. Like this.


IMG_4707


Continue to sew until you almost get down. Here will be the tail, so we must prepare it.


IMG_4709


Step 7.

Place the two tails one over the other…


IMG_4710


.. and start sewing them together from the lower part.


IMG_4711


Go until you reach the tip of the tail and start to sew the other part.


IMG_4712


Stop when you make about 10 cm. Take a piece of filling and roll it between your hands.


IMG_4713


Press it on the stitched part of the tail.


IMG_4714


Continue to fill the tail while sewing the two sides together. It will look like this.


IMG_4715


Step 8.

Place the tail between the two cats, like this.


IMG_4716


Sew it in place.


IMG_4717


Step 9.

Fill the cat’s body.


IMG_4718


sew the two parts together…


IMG_4720


And the cat is ready 😀


IMG_4721


Isn’t this cat adorable!!! I hope you enjoyed the tutorial!

Technorati Tags: , , , , , , , , , , , , ,

How to Make a Snowman from Socks

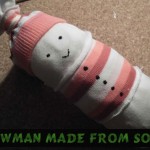
When you think of winter time what do you think of?  Snow, of course.  Well, what is the one thing that children love to make in the snow?  A snowman.   Today I’m going to show you how to make a snowman from socks.  This is an adorable snowman stuffed toy that any child will love to snuggle with.  And, if the child helped your make it…. they will enjoy it even more.  This is a great winter time craft that can be enjoyed by children young and old.

Check out our other Winter Crafts and Sock Crafts.

Step by step tutorial offered by Laura from Dacian Moon Handmade


Materials Needed

– striped sock
– white fabric
– filling material (I used some cotton pads broken into pieces)
– scissors
– ribbon
– black paint
– needle and thread


Step 1

Measure the width of the socks on the fabric folded in two…


… and cut it out.


Sew the two sides together, letting an opening on the upper part.


Like this.


Turn it to the other side.


Step 2

Shred the cotton pads into small pieces…


… and fill the sewed white fabric with it.


Like this.


Tie the open end with the ribbon.


Step 3

Use a thread to separate the 3 snowballs of the snowman.


Like this.


Step 4

Cut off the upper part of the sock …


… then cut that part in half.


Dress the snowman with one, as a shirt.


Put the other one on its head, as a cap.


Use the ribbon to tie the cap to keep it in place.


Draw eyes, mouth and buttons on your snowman using black paint.


Check out this adorable sock snowman.  You can give this to a friend or family member…. or enjoy it for yourself.

Technorati Tags: , , , , , , , , , , , ,

How to Make a Glove Bunny for Easter

Get ready for a fun and creative craft because I have just that for you today.  In this post I am going to show you how to make a Glove Bunny for Easter.  That’s right…. it’s an Easter bunny made out of a Glove.  This is a great craft to do to actually use that glove that you no longer have the pair for.  After stuffing the glove you have a nice, cuddly Easter Bunny that would be perfect as an Easter decoration or a nice cuddly friend.  The choice is yours.  So, let’s get started.

Check out our other Easter Crafts.


How to Make a Glove Bunny for Easter


Materials Needed

Glove

2 Safety Pins

Stuffing

Glue

Clothespins or Clips

Cap

yarn

Construction Paper

Ribbon or Twist Tie

Cotton Ball


Step 1


Get a glove.


Get a glove.  Then fold middle finger down and the two outside fingers can be pushed to the back.


This is what the other side looks like.


This is what the other side looks like.


Step 2


Pin middle finger down from inside of glove.


Pin middle finger down from inside of glove.


Step 3


Fill with stuffing.


Fill with stuffing.


Step 4


Fold bottom part inside glove.


Fold bottom part inside glove.


Step 5


Glue and clip shut.


Glue and clip shut.


Step 6


Get a cap.


Get a cap.


Fill cap with glue.


Fill cap with glue.  Fill with tiny, cut pieces of yarn… as well as tiny little paper eggs that you cut out.


For a tiny handle use a ribbon or twist tie.


For a tiny handle use a ribbon or twist tie.


Step 7


Put tiny basket handle over one arm and then pin both arms together.


Put tiny basket handle over one arm and then pin both arms together.  Pin from behind arms.


Step 8


Glue cotton ball to back.


Glue cotton ball to back.

And, that’s it…. you just finished making your Glove Bunny for Easter.  Isn’t he a cutie patootie?!  Let me know how your Glove Bunny turned out in the comments below.  And, take a picture of it too and post that with the comment as well…. I’d love to see it.

Technorati Tags: , , , , , , , , , ,

How to Make a Sock Baby Doll

I have a fun craft for you today.  In this post I’m going to show you how to make a Sock Baby Doll.  That’s right…. it’s a baby doll made out of a sock.  This craft is a great way to put to use those socks that no longer have a match.  Plus, you probably have all the materials needed for this craft in your house… so no need to buy any more materials.  Give this sock baby doll to your best friend…. or better yet keep it for yourself.  The choice is yours.  So, let’s get started.

Check out our other Sock Crafts or Doll Making Crafts.


How to Make a Sock Baby Doll


Materials Needed

Sock

Scissors

Needle & Strong Thread

Stuffing

Black Marker (optional)


Step 1


Cut a sock where you see dashed lines


Cut a sock where you see dashed lines… to look like this…


After cutting, the above pieces are what you should see.


After cutting, the above pieces are what you should see.


Step 2


Turn sock so top hole is in the front as in image B.


Turn sock so top hole is in the front as in image B.


Sew front and back of each leg together as shown.


Sew front and back of each leg together as shown.


Step 3


Stuff the legs and sew hole closed.


Stuff the legs and sew hole closed.


Step 4


Turn doll around so that sewn up hole is in the back.


Turn doll around so that sewn up hole is in the back.  Gather and draw in with strong thread the section shown in the image above.


Step 5


Draw or sew a face on.


Draw or sew a face on.


Step 6


Fold each square in half.


Fold each square in half.


Sew sides with dashed lines.


Sew sides with dashed lines.


Fill with stuffing.


Fill with stuffing.


Sew shut.


Sew shut.


Step 7


Sew on arms.


Sew on arms.

Awesome job…. you just finished making your Sock Baby Doll.   How did your baby doll turn out?  Let me know in the comments below.  Also, take a picture of your sock baby doll and add that to your comment as well… I’d love to see it.

Technorati Tags: , , , , , , , , ,

How to Make a Plush Bunny for Easter

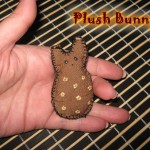
When you think of Easter what is one of the characters you think of?  A bunny, of course.  Well, today I’m going to show you how to make a Plush Bunny.  This bunny is perfect for the upcoming Easter Holiday, but honestly can be made and enjoyed any time of the year.  Made with felt and some cotton for stuffing this bunny is sure to be soft and cuddly.  Make it as big or as small as you would like.  We made our bunny pretty small.  So, grab the materials needed and let’s get started.

Check out our other Easter Crafts.


Materials Needed

– string and needles
– scissors
– felt / fabric
– paper
– pencil
– paint
– 1 toothpick
– wool / cotton – things to stuff (I used 2 cotton pads for that)


Step 1

Draw the pattern on the paper, like this.


Use the scissors to cut it out.


Step 2

Fold the felt in half, place the bunny pattern on it and trace it there.


Step 3

Cut the bunny out of felt (remember, you folded the felt before that so you’ll have 2 bunnies of felt now).


Step 4

Sew the two bunnies starting at the bottom. Use a blanket stitch along the sides.


To make a blanket stitch, push the needle through the fabric then pull the needle through the loop.


Sew as far as you are comfortable before stuffing. The size of the opening will depend on the size of your doll.


Step 5

Prepare your stuffing material: I made little pieces of the cotton pads.


Place the stuffing material in the bunny, taking care to fill all available places.


It should look like that.


Step 6

Sew it shut.


Now the bunny looks like that.


Step 7

Using the toothpick and some paint add eyes and a mouth.


Look how cute he is !
You can continue to decorate it if you feel like it.


Awesome job!!  You just finished your Plush Bunny.  Isn’t it a cutie patootie?  How did your bunny turn out?  Let me know in the comments below.  And, take a picture of it and add that to the comment too… I’d love to see it.

Technorati Tags: , , , , , , , , , , , ,

How to Make a “Be My Valentine” Owl

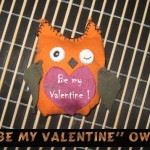
Today I’m going to show you how to make a stuffed Owl toy.  And, not just any stuffed Owl toy, but a “Be My Valentine” Owl that you can give to someone special this Valentines Day.  Imagine their surprise when they receive something that you made yourself.  Or, if you would prefer to keep it…. don’t even give it to someone.  Instead of writing “Be My Valentine” on the heart you can leave it blank or write whatever message you would like.  So, whether it is for you or someone special…. either way it is sure to be loved.  Let’s get started.

Check out our other Valentines Day Crafts.

Tutorial offered by Laura from Dacian Moon Handmade.


Materials Needed

– three pieces of fabric (a large piece – about 16 cm x16 cm – the color that the owl will have, a smaller piece in a contrasting color and a red piece of about 5 cm x 5 cm)
– small pieces of white and black (or brown) leather
– scissors
– pen
– stuffing material (I used some cotton pads)
– needle and thread


Step 1

Fold the large fabric piece in half.


Draw the outline of the owl using your pen. Like this.


Cut it out. You will find it useful to use some pins to keep the two parts together.


It will look like this.


Step 2

Start sewing the two parts together…


… like this.


Stop when you reach the ears.


Sew the other side too.


Step 3

Turn it inside out.


Prepare the stuffing material .


I tore the cotton pads into small fluffy pieces.


Stuff your little bird so that it has a wonderfully squishy and cuddly softness.


When you are satisfied, sew the top.


Like this.


Step 4

Draw two circles on the piece of white leather.


Cut them out.


Apply a layer of glue on the back of one…


… and place it where the eye should be. Do the same with the other one.


Take the black / brown leather…


… and cut out a diamond from it.


This is the beak and we will stick it between the two eyes.


Use the pen to give it some personality by finishing the eyes.


Step 5

Cut 2 wings from the fabric in contrasting color. Like this.


Then sew them on the two sides of the owl…


… like this.


Step 6

Draw a heart on red fabric.


Cut it out, then apply a layer of glue on its back.


Place it under the beak, like this.


Now you can let it like this, decorate it or write “Be my Valentine !” on it, like I did.


And, there you have it…. you just finished the “Be My Valentine” Owl.  Did you make your owl like mine or did you do something different?  Let me know in the comments below.  If you want, take a picture of the owl and share that too in the comments…. I’d love to see it.

Technorati Tags: , , , , , , , , , , ,