How to Make a Paper Owl Decorations for Halloween

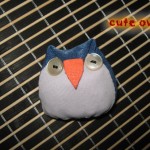
Although owls are known as being wise, they are also known as a spooky part of Halloween. They don’t seem very creepy, but walking thru a dark forest with owls hooting can be a pretty creepy experience. However, this owl is more a cute tribute to Halloween. and can also be used as a cover for glasses or whatever else you choose to use it for. Happy Halloween.

Laura from  Dacian Moon Handmade  will show you, step by step, how to make it.


How to make a Paper Owl decoration for Halloween


CRAFTS MATERIALS NEEDED:

– recycled paper roll
– red paper
– white paper
– paper glue
– permanent markers : black, gold
– pencil
– scissors


Step 1.

Take the paper roll…


…and flatten it.


Fold one part inside, like in the picture…


… then the other. Now the owl have ears 😀


Step 2.

Color it with black…


… like this.


Step 3.

Draw drops on red paper.


Cut them out.


Step 4.

Apply a layer of glue on the top of a drop…


… and place it on the black roll, like this. Must start at the bottom for feathers to sit well.


Continue to glue red feathers on the owl till close up.


Step 5.

Draw 2 bigger wings on red paper.


Cut them out and applying a layer of glue on the top of them…


… stick them on their places.


Step 6.

Draw another drop and 2 circles on white paper.


Cut them out.


The new drop will be the beak, so you’ll paint it with gold.


The circles will be the eyes and you should paint them black, like this.


Glue the beak on the middle of the „face”…


… and eyes on one side and the other.

The paper owl is ready.


Technorati Tags: , , , , , , , ,

How to Make Crepe Paper Mache Rock Sculptures

HAVE you ever wished you could suggest a use for the interesting stones that children bring home? Here is an idea. By adding crepe-paper mache to these rocks, the children can produce interesting creatures of the imagination. These can be used for paperweight gifts, but the experience of making them has its own reward. With crepe-paper mache children can make rocks into birds, animals, vehicles, fruit, vegetables, holiday novelties.  Sounds fun, right?  Sure does.  So, let’s get started.

Check out our other crafts made from stones and rocks.


How to Make Crepe Paper Mache Rock Sculptures


Materials Needed

Crepe Paper of Different Color

1 Cup Measuring Cup

Bowl

Water

Mixing Spoon

Flour

Salt

Rock


Step 1


Cut up crepe paper into tiny pieces.


Cut up crepe paper into tiny pieces.


Step 2


Make about one cupful of crepe paper.


Make about one cupful of crepe paper.


Step 3


Add enough water to cover paper... soak overnight.


Add enough water to cover paper… soak overnight.


Step 4


Mix and rub wet paper into into fine pulp.


Mix and rub wet paper into into fine pulp.


Step 5


Mix in 4 or 5 tablespoons of flour and 2 tablespoons of salt.


Mix in 4 or 5 tablespoons of flour and 2 tablespoons of salt.  Work until texture of clay.  Add more flour or salt as needed.  Make a different batch for each color.


Step 6


Use the mixture as if it were clay.


Use the mixture as if it were clay.  Use rock as base, and crepe clay as head, wings, feet, tails, or whatever else your sculpture needs.  It will dry as hard as the rock.


Here are more ideas


Here are some more ideas.


And, there you have it.  A great way to mold many different items simply by making Crepe Paper Mache Rock Sculptures.  What did you land up sculpting?  Let me know in the comments below.  And, don’t forget to take a picture of your item as well…. you can add the picture to the comment.  I’d love to see it.

Technorati Tags: , , , , , , , ,

How to Make a Flying Bird Decoration

Today I’m going to show you how to make a flying bird decoration.  When made correctly this bird will flap his wings with just a bit of movement of the string.  Crafters of all ages will enjoy making this craft…. even the youngest.  We provide many templates that you can choose from to make this flying bird.  You can choose one of the colored templates or you can print off the black & white template and color the bird yourself.  The choice is yours.  So, grab the materials needed and let’s get started.

Check our our other Toy Crafts.


How to Make a Flying Bird Decoration


Materials Needed

Printer & Paper

Scissors

Glue or Tape

String

Crayons, Markers or Colored Pencils (optional)


Click on template images below to make larger and to print.

Black & White Template


flying bird black & white template


Aqua template


flying bird aqua template


Blue Template


flying bird blue template


Red template


flying bird red template


Yellow template


flying bird yellow template


Step 1


Print template.


Print template.


Step 2


color in your bird and wings


If you printed the black & white template…. color in your bird and wings.


Step 3


Cut out wings and bird.


Cut out wings and bird.


Step 4


Fold wings in middle.


Fold wings in middle.


Step 5


Glue or tape wings on bird's body cut-out.


Glue or tape wings on bird’s body cut-out.


Step 6


Fasten string to bird.


Fasten string to bird.  Raise string up and down and bird will flap wings.

And, that’s it… you just finished making your flying bird decoration.  Isn’t it cool with just raising your string up and down you can make the bird appear as if he is flying.  Enjoy playing with your flying bird.

Technorati Tags: , , , , , , , , ,

How to Make Clay Birds

I have a fun clay activity for you.  Today I’m going to show you how to make Clay Birds…. or really any Clay Animal you would like to make.  The only material you will need for this craft is clay…. that’s it.  The first sight of clay as it is taken from a crock or plastic bag is enough to get kids interested. Show them to roll, flatten, remove air bubbles, and what to do so the clay will not dry too fast and crack.  This first clay project serves to give kids experience with the clay, and incidentally endears it to them.  So, grab some clay and let’s get started.

Check out our other Clay & Sculpting Craft Ideas


How to Make Clay Birds


Materials Needed

Clay


Step 1


Start with a ball or an egg-shaped lump of clay


Start with a ball or an egg-shaped lump of clay, modeling it with the palms of the hands – but not working over long on it.


Step 2


Model in a solid mass with no detail.


Model in a solid mass with no detail.


Step 3


Begin shaping the clay into an animal.


Begin shaping the clay into an animal.


Step 4


Give the animal some detail


Give the animal some detail…. Shape head, wings, and tail if you are making a bird. If an animal, keep legs and ears close to the body.


How to Work with Clay

STORE natural and water-base clays in galvanized garbage buckets, earthenware crocks, jars with screw-top lids, or plastic bags. Avoid high temperatures, but do not let the clay freeze.

WHEN WORKING with clay, keep the excess covered with a damp cloth, or return it to the covered crock or can in which it is kept. Pieces will soften if soaked in water.

CLAY SHRINKS during the drying process, preventing the use of any type of permanent framework. Children can note shrinkage in drying and make things large enough to allow for this.

LIMIT the child to making compact, bulky figures without delicate appendages—unless there is plenty of time for him to experiment and find out these appendages fall off. Show him how to pull out head, arms, and legs for figures of people and animals.

COVER tables or desks with paper or cardboard when clay work is being done. For the surface of a permanent clay area, a piece of hall-runner linoleum looks well and is practical. Wooden boards are sometimes used for working surfaces.

Technorati Tags: , , , , , , , , , ,

How to Make Paper Sculpture Birds

Today I have a fun craft for you.  I’m going to show you how to make a Paper Sculpture Bird.  When made correctly the birds are 3 dimensional and look so cool hanging from a ceiling.  These Paper Sculpture Birds can be used to decorate a classroom or  child’s bedroom.  A great number of birds and animals can be made by using this technique…. so feel free to use your imagination,  Grab the materials needed and let’s get started.

Check out some other Paper Folding Activities.


How to Make Paper Sculpture Birds


Materials Needed

8 1/2″ x 11″ typewriting or mimeograph paper

Scissors

Ruler

Pencil Paper punch

Thread


Step 1


8 1/2 x 11" typewriting paper is folded in half and a freehand cut is made to suggest the bird form.


8 1/2 x 11″ typewriting paper is folded in half and a freehand cut is made to suggest the bird form.


A paper punch is used to make the eyes.


A paper punch is used to make the eyes.


Step 2


Unfolding the paper reveals a symmetrical design.


Unfolding the paper reveals a symmetrical design.


Step 3


Using a ruler as a straight edge, fold upward the wings of the bird at points "A''.


Using a ruler as a straight edge, fold upward the wings of the bird at points “A”.


Step 4


draw two triangular peaks lightly with pencil as shown in Figure 4


In making the pleat, draw two triangular peaks lightly with pencil as shown in Figure 4. Carefully fold the pleats down; this will bring the tail of the bird up.


Step 5


The wing tips are curled by rolling them tightly around a pencil.


The wing tips are curled by rolling them tightly around a pencil.


Step 6


In Figure 6 another pleat is made at the neck; and the bird is suspended from the ceiling with thread.


In Figure 6 another pleat is made at the neck; and the bird is suspended from the ceiling with thread.

And, there you have it…..you just finished making a Paper Sculpture Bird.  This Paper Sculpture Bird would look so cool hanging from your bedroom ceiling.  Where are you going to hang your bird?

Technorati Tags: , , , , , , , , , , , ,

How to Make an Owl Mailbox for Valentines Day

Valentines Day is coming up in less than a week.  If you don’t have a Mailbox to collect your Valentines Day Cards in then you are missing out.  No worries…. in this post I’m going to show you how to make an Owl Mailbox for Valentines Day.  This mailbox is perfect for collecting all your Valentines Day Cards.  Don’t be stuck holding a brown paper bag to collect your Valentines in…. that’s just boring.  So, grab the materials needed and let’s get started.

Check out our other Valentines Day Crafts.

Laura from Dacian Moon Handmade will show you, step by step, how to make this.


Materials Needed

– recycled box
– beautifully patterned wrapping paper
– white and red paper
– scissors
– pen
– glue
– glitter glue
– cutter


Step 1

Take the recycled box and draw a “window” on it (a rectangle in the middle) … like this.


Draw another “window” on top. Be careful to not draw too close to the edge.


Cut the “windows” out. Take care not to cut yourself.


It will look like this.


And the “window” on top.


Step 2

Put wrapping paper under the the lid with the “window” and draw its outline.


Cut it out, like this.


Apply a layer of glue on the back of it…


… and stick it in place.


Step 3

Glue wrapping paper on the other sides of the box too.

For the top do the same as in step 2.


Apply a layer of glue inside the box and cover it with white paper (you can cover only the back, because only this part is visible through windows).


Like this.


Step 4

Now, let’s decorate it.  Draw a simple owl outline and 2 wings on white paper.


Draw another one on red paper.


Cut them out.


Now let’s prepare a tree branch to stand on.


You can use your pen to give it some color, like this.


Cut  it out and glue it on a lower corner of the front window.


Step 5

Now you have to assemble owls. We’ll start with the white one. First, color its eyes.


Then, put glue on the upper side of one red wing…


… and stick it in place. Do the same with the other one.


Make sparkling points on its body with glitter glue…


… like this.


What’s missing? Cut a small triangle from the red paper to make its beak.


Do the same with the other owl. Aren’t they cute?!


Step 7

Apply glue where you want to place the owl.


I put them on the left side of the window. To keep them on sturdy, cover a little of the lid with one of them, like this.


The other one will stay near the first, holding hands (or wings). They look so cute together.


Step 8

Draw one circle on white paper and one on red paper (slightly bigger).


Cut them out.


On the white one write “Happy Valentines Day”.


Apply glue on the opposite corner of the window…


… and stick the red circle there.


Over it place the white one.


Your mailbox is now ready to be used.


There you go…. your Owl Mailbox for Valentines Day is ready.  Now, you are all set to collect all your Valentines Day Cards.  Enjoy!!

Technorati Tags: , , , , , , , , , , , , , ,

How to Make a Whistling Birdie Toy

I have a fun craft for you today.  I’m going to show you how to make a Whistling Birdie Toy.  This Whistling Birdie toy is a traditional toy from Romania.  It is common to see the children of Romania playing with a Whistling Birdie toy like the one I’m going to show you how to make today.  And, believe it or not…. it will actually whistle.  And, if you add a little water to the whistling birdie it will sound like it is a real bird.  Because you will be using polymer clay you will need a little help from an adult.  So, grab the materials needed and let’s get started.

Check out our other Toy Crafts.

Laura from Dacian Moon Handmade will show you, step by step, how to make this toy.


Materials Needed

– toothpick
– a piece of polymer clay (the color you want your bird to be)
– two little tubes (I use two little pieces from a flexible straw)
– baking paper
– baking tray


Step 1

Take a small part of clay…


… and condition it by hand, simply mix it and squish it with your fingers.


Roll it into a log using your fingers, like that:


The log will look like that.


Make a circle with the roll, by pressing the ends together.


Step 2

Take a little less than half of the remaining clay, condition it by hand.


Make it a ball and flatten it.


Using your big finger press the center of the clay piece.


Place the piece on the circle, like in the picture.


Step 3

Take a half of the remaining clay, condition it …


… and make it the same.


Later we will place it on top of the other one, reverted, so it should fit there.


Step 4

Place the tubes near the edges of the top piece, taking care to get off the clay that will get on the tubes.


Step 5

Use a half of the remaining clay to cover one tube, taking care to be higher than the tube, like in the picture.


Completely cover the tube.


Use the toothpick to make a hole like in the picture (that’s the reason we need the covering to be higher than the tube)


Step 6

Use all remaining clay to cover the second straw.


Completely cover it (not on top, of course.)


Try to make it look, as much as possible, like a bird’s head with an open beak.


Step 7

Place the top on the bottom of the figure, like in the picture.


Step 8

***Now you’ll need the help of an adult.
Place the bird (with it’s piece of baking paper) on the baking tray, and bake it according to the instructions on the polymer clay package (they depend on the brand you use: fimo, cernit, sculpey…, but usually is one half of hour at 230 F or 110 C)


Step 9

Let it cool down.


Step 10

You can use paints to make the bird beautiful.  I used a toothpick and silver paint.


And… This is our bird.


You can fill it half with water…


… and whistle. Without water it will simply whistle, with water it will make sounds like real birds.


Have fun whistling with your Whistling Birdie Toy.  How did your Whistling Birdie Toy turn out?  Did you paint it differently than me?  Let me know in the comments below.  And, take a picture of your birdie too…. you can leave it in the comments as well.  I’d love to see it.

Technorati Tags: , , , , , , , , , ,

How to Make a Cute Stuffed Owl

If you love stuffed animals then you are going to love today’s craft.  I’m going to show you how to make a Cute Stuffed Owl.  You can decide to keep in for yourself or give it to one of your best friends to love.  Either way you can guarantee that people are going to love this stuffed owl… especially when they find out that you made it yourself.  So, grab the materials needed and let’s get started.

Laura from Dacian Moon Handmade will show you how to make this, step-by-step.


Materials Needed

– two different pieces of fabric (one smaller than the other) – in my case I used blue and grey.
– one small piece of red leather or felt
– scissors
– craft glue (optional)
– 2 white buttons
– stuffing material (I use some cotton pads)
– string and needles


Step 1

Draw a big triangle (with curved edges) on the blue fabric.


Draw a smaller triangle on the grey fabric.


Step 2

Cut the triangles out.


They should look like this.


Step 3

Place the right sides together…


… and stitch them.


Step 4

Force the left sides together and stitch them too.


This will cause the top of the body piece to come together …


… so sew that shut too.


Step 5

Turn the owl right-side-out …


… and fold down the top of the triangle. If you fold it lower, you’ll have a fatter and shorter owl. It will be taller and thinner if you fold it higher.  Secure this with a quick whip stitch.


Step 6

Cut a small triangle (with curved edges) out of the red leather.


Sew it or glue it on top of the fold.


Step 7

Sew the buttons on the sides of the beak…


… like this.


Step 8

Do a nice running gather stitch along the bottom of the owl, but don’t tie it yet.


Step 9

Prepare the stuffing material – I tore the cotton pads in small fluffy pieces.


Stuff your little bird so that it has a wonderfully squishy and cuddly softness to it.


Tie off the gather threads….


…and now you have a new cute friend to play with.


Isn’t this Stuffed Owl just simply cute?!  And, the cool part is that you made it yourself.  How did your stuffed owl turn out?  Let me know in the comments below.  And, don’t forget to add a picture of your owl to the comment too…. I would love to see it.

Technorati Tags: , , , , , , , , , , ,

How to Make your own Angry Birds Magnet Set

Angry Birds is the most successful mobile application yet.  Everyone just loves playing Angry Birds.  I mean, what’s not to love?!  You got flying birds, hungry green pigs and slingshots.  The combination guarantees a ton of fun.  Well, today I’m going to show you how to make your own Angry Birds Magnet Set.  And, there are plenty of Angry Birds scenarios on these magnets…. your fridge can look different everyday.

Check out our other Magnet Crafts.


How to Make your own Angry Birds Magnet Set


Materials Needed

Printable Magnet Sheets

Printer

Scissors


Below are the printable templates.  Click on the image to make larger and to print.

Template 1


Angry Birds template 1


Template 2


Angry Birds template 2


Template 3


Angry Birds template 3


Step 1


Print out Angry Bird templates on printable magnet sheets.


Print out Angry Bird templates on printable magnet sheets.


Step 2


Cut out all of the characters and items from the 3 template sheets.


Cut out all of the characters and items from the 3 template sheets.


Step 3


Put the Angry Birds Magnets on your fridge.


Put the Angry Birds Magnets on your fridge.  What Angry Birds scenario did you use?  Take a picture and leave it in the comments for me to see.

Here is a video on How to Make your own Angry Birds Magnet Set.  With this video you can easily follow along with the craft step-by-step.

Technorati Tags: , , , , , ,