How to Make Paper Stand-Up Turkey Centerpieces for Thanksgiving

Here is a fun paper craft that isn’t too hard to make. All you have to do is print out our paper template and then paste it together. Then you can just put it in the center of your Thanksgiving dinner table.


Standup Paper Centerpiece Foldable Craft


How to Make Paper Stand-Up Turkey Centerpieces for Thanksgiving

Crafts Materials Needed

Printer

Paper

Scssors

Paste

Print Out a Color or Black and White Template


Color Paper Turkey Template


Click on this image to open up a the template in a new page


Black and White Paper Turkey Template


Click on this image to open up the template in a new page

Instructions for Making These Turkeys


Instructions for Making These Turkeys


All you have to do is cut on the solid lines and fold on the dotted lines. Then just paste it together as you see in the above picture. This turkey is a great decoration for your Thanksgiving table.

Technorati Tags: , , , , , , ,

How to Make a Thankful Turkey for Thanksgiving

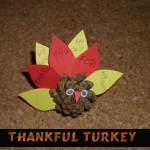
Thanksgiving is all about giving thanks.  Sometimes we tend to forget the true meaning of Thanksgiving…. being thankful for what you have.  This craft is a great way to teach your kids about the true meaning of thanksgiving.  And, your kids will have so much fun doing this.  This turkey’s feathers will tell everyone what you are thankful for.  Plus, it makes for a great Thanksgiving decoration.  Made from a pine cone and some construction paper this craft is sure to be a lot of fun.  So, let’s get started.

Check out our other Thanksgiving Crafts.

Tutorial offered by Laura from Dacian Moon Handmade


Materials Needed

– pine cone
– white, yellow and red paper
– pencil
– pen
– scissors
– craft glue


Step 1

Draw 4 feathers (only outline) on yellow paper and 3 on red paper.


Cut them out.


Step 2

On the three red ones write “thank”, “you” and “for”…


… and on the yellow ones write the things you are thankful for.


Step 3

Take the pine cone…


… and begin to stick into it the red “feathers”. “Thank” is the first…


… then “you” …


… and “for”. Like this.


Then start adding the yellow ones…


… like this.


Step 4

Draw 2 eyes on white paper.


Draw a red beak also, then cut them out.


Apply a little bit of glue on the back of the eyes…


… and glue them in place.


Add the beak in the middle of the face… and your thankful turkey is ready.


Isn’t this turkey a cute one?  And, he’s so smart too…. he tells everyone what you are thankful for.

Technorati Tags: , , , , , , , , , , , , ,

How to Make Pinecone Turkeys

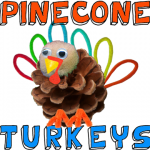
Oh boy, do I have a fun craft for you today perfect for the Thanksgiving season.  Today I’m going to show you how to make Pinecone Turkeys perfect for Thanksgiving.  These pinecone turkeys will look great around the house as Thanksgiving decorations.  Plus, your kids will love to make them.  They are a lot of fun and your kids will have great pride in knowing they made items you could actually put around the house as decorations.  So, grab the materials needed and let’s get started.

Check out our other Thanksgiving Crafts.


How to Make Pinecone Turkeys


Materials Needed

Pinecone

Tan Puffball

Glue

Googly Eyes

Yellow Felt or Foam

Red Felt

Orange Pipe Cleaner

Different Color Pipe Cleaner, Construction Paper or Craft Feathers


Step 1


Get a pinecone.


Get a pinecone.


Step 2


Glue a tan puffball to the top of pinecone.


Glue a tan puffball to the top of pinecone.


Step 3


Glue googly eyes on.


Glue googly eyes on.


Step 4


Cut yellow triangle out of felt or foam and glue on face.


Cut yellow triangle out of felt or foam and glue on face.


Step 5


Draw a #7 like shape on red felt like above picture.  Glue red felt on top of beak.


Draw a #7 like shape on red felt like above picture.  Glue red felt on top of beak.


Step 6


Wrap orange pipe cleaner around pinecone.


Wrap orange pipe cleaner around pinecone.  Then take smaller pieces of pipe cleaner to make claws.


Step 7


Loop pipe cleaners and stick into back of pinecone for feathers.


Loop pipe cleaners and stick into back of pinecone for feathers.  Or, use paper or craft feathers.

And, now you are all finished.  You just made your Pincone Turkey.  Now, use it to decorate your house for Thanksgiving.  Actually, make a few to put around the house….. everyone will love it!!

Technorati Tags: , , , , , , , , , , , ,

How to make a Turkey Brooch

What is the most known symbol of Thanksgiving Day? The turkey, of course! Thanksgiving wouldn’t be Thanksgiving without the Turkey.  So, with that being said…. today I’m going to show you how to make a Turkey Brooch perfect for Thanksgiving.  What better way to show your love for the Thanksgiving Holiday than to parade around town wearing a Turkey Brooch?  So, let’s get started.

Check out our other Thanksgiving Crafts and Jewelry Crafts.

Tutorial offered by Laura from Dacian Moon Handmade . You will need help from an adult for this tutorial.


MATERIALS NEEDED

– white, red, green, terracotta polymer clay (and small parts of pink, black and blue)
– black paint
– craft glue
– cutter
– toothpick
– 1 brooch base


Step 1

Take a piece of white polymer clay.


Condition it .

(To condition polymer clay by hand… simply mix it and squish it with your fingers. You may want to roll it into a log between your palms, fold it in half, and then roll again).

Divide it in 4 parts.


Take 1 part, make a ball of it and flatten it…


Squish an end between two fingers, like this…


… then the other. Now it looks like a petal.


Repeat and make another 2 white petals.


Step 2

Take a piece of green polymer clay…


… condition it and divide it in 4 parts too.


Make two green petals and place them over the white ones, between them.


Step 3

Take the last piece of white clay…


… and make a bar under the petals with it…


… then continue with another two green petals, taking care that their edges are over the white bar too. This will make the brooch stronger.


Step 4

It’s time to make his head, so, take a piece of terracotta clay…


…condition it and make a ball with it. Flatten it.


Squish gently one end to look like this.


Place it in the middle of petals. This is the head.


Step 5

Take the blue clay and condition it. Make two bigger parts and one smaller of it.


Make a ball of one bigger part and flatten it.


Squish it gently on one end to look like this.


Place it beside the head and make two lines on it with the toothpick.


Make another one …


… and a small ball flattened in the middle. Now our turkey has a bow.


Step 6

Make a small heart of the pink clay…


… and place it in the middle of his face.


Over it we will put his nose, made of a small piece of red clay. Make it a roll …


… and squish an end.


Then, using the toothpick, place it over the small heart (this is his beak).


Step 7

Take a smaller piece of black clay…


… and part it in half. Those will be his eyes.


Step 8

Place it on the baking tray, and bake it according to the instructions on the polymer clay package (this depends on the brand you use: fimo, cernit, sculpey…, but usually it is one half of an hour at 230 F or 110 C) – this is the part when you could use a little help from an adult.


Let it cool down.


Step 9

The only thing you should do now is glue the brooch base on the back of our turkey… and, using the black paint and the toothpick, write something on the white bar. It can be anything but I think “How about a cheeseburger?” will be funny.


Now your brooch is ready.  Isn’t it adorable?  How did your turkey turn out?  Make sure to let me know in the comments below.  Add a picture to your comments so I can see your turkey.  I’d love to see how it turned out.

Technorati Tags: , , , , , , , , , , , , , ,

How to Play the Turkey Game – Turkey Printable

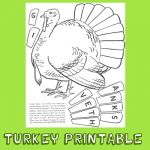
If you are looking for a cute game to occupy the kids during the Thanksgiving Holiday I have one for you.  It’s a Turkey printable that is actually a game too.  Simply print off for the kids and with just a few materials you should be good to go.  No more bored children during the Thanksgiving football games…. just let them play the Turkey game.

Check out our other Thanksgiving Crafts.


How to Play the Turkey Game – Turkey Printable


Materials Needed

Printer & Paper

Brown Construction Paper

Pen or Marker

Glue

Crayons

Scissors


How To:

Print off the Turkey template below.  Click on the image to make larger and to print.


Print off the above Turkey Template


Cut out turkey then color.  Cut slits on broken lines around tail feathers.  Print letters on all feathers.  Paste turkey on brown piece of construction paper, being careful not to paste near the slits.  Cut extra feathers, crayon and print letter on each.  Mix the extra letters.  When they are slipped through the correct slit on the turkey, they spell GIVE THANKS.


Finished Turkey Printable


And, that’s it….  simple and fun.  Gotta love that!!  Enjoy playing the Turkey game.

Technorati Tags: , , , , , , , , , , , ,

How to Make Handprint Turkeys – 4 Methods

One of the easiest and most effective ways to show children how to draw a Turkey is to have them trace their hand.  That method was used when I was a child and they still do it now.  Today I will show you 4 methods to make a Turkey…. all using the children’s handprint.  Try all 4 methods and see which handprint turkey you like best.  I can’t help myself…. I love them all.

Check out our other Thanksgiving Crafts


Method 1


use tempera paint to pain the palm and thumb of the child brown


Materials Needed:

Brown Tempera Paint

Different Colors of Tempera Paint for feathers

Paper

Googly Eyes

Construction Paper

Black Marker

Scissors

Glue


How To:

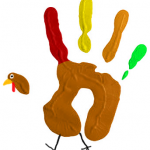
Use tempera paint to paint the palm and thumb of the child’s hand brown and the other fingers different colors for feathers. Then place the child’s hand on paper. Let dry and then add googly eye…a triangle for the beak…and oval for the wattle.  Also, draw legs and feet.


Method 2


Trace the child's hand on different colored paper


Materials Needed:

Brown, Red, Yellow, White and Green Construction Paper

Pencil

Googly Eyes

Scissors

Glue


How To:

Trace the child’s hand on different colored paper. Cut out brown circle and oval for body and head.  Add googly eyes…construction paper triangle beak…oval neck for the wattle….then paste the handprints in the back of turkey for feathers.


Method 3


Cut out a number 8 shape (a smaller circle on top of a bigger circle) out of brown paper


Materials Needed:

Brown Paper

Different Color Construction Paper

Googly Eyes (optional)

Glue

Scissors


How To:

Cut out a number 8 shape (a smaller circle on top of a bigger circle) out of brown paper…or just cut out 2 brown circles.  Cut out construction paper ovals for eyes or use googly eyes.  Cut out a diamond for beak…and then fold it into a triangle for the beak. Cut out oval for the wattle. Cut out lots of different colored construction paper handprints and glue them to the back for feathers.


Method 4


Cut out 2 different sized and colored circles for head and body


Materials Needed:

Different Color Construction Paper

Different Color Paint

Scissors

Glue


How To:

Cut out 2 different sized and colored circles for head and body. Cut out a diamond for beak…and then fold it into a triangle for the beak. Cut out oval for the turkey’s wattle.  Cut out thin rectangles to make the legs and feet. Paint the child’s hand and then place it on the paper for feathers. Use different colors for a nice effect.


There you have it…. 4 different methods for making handprint turkeys.  Which one are you going to make?  Oh heck…. make them all.

Technorati Tags: , , , , , , , , , , , ,