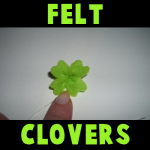
How to Make a Clover with Felt for Saint Patricks Day for Kids

Here are some cute instructions for making felt four leaf clovers Saint Patrick’s Day. Laura from  Dacian Moon Handmade will show you today, how to make a clover out of felt…perfect for Saint Patty’s Day. You can use it to make decorations, or to tie it to a headband or… actually you can make a lot of beautiful things with it.


How to Make a Clover with Felt for Saint Patricks Day for Kids


How to Make a Clover with Felt for Saint Patricks Day for Kids

CRAFTS MATERIALS NEEDED:

– a piece of green felt
– scissors
– needle and thread


IMG_4564


Step 1.

Cut the felt in 4 equal pieces.


IMG_4565


Make a “v” on the middle of top edge of one…


IMG_4566


… then round the corners beside it.


IMG_4567


Do the same for all 4 pieces.


IMG_4568


Step 2.

Start sewing them like in the picture.


IMG_4569


Add the other pieces.


IMG_4570


Bring the two ends together…


IMG_4571


… pull and make a knot. Like this. Make another knot just to be sure.


IMG_4572


Open the “flower” and the clover is ready 😀


IMG_4573


And there you have it, a realistic looking felt clover (or shamrock) to wear on St. Patrick’s Day. I hope that you had fun!

Technorati Tags: , , , , ,

How to Make a Sewn Notebook Cover with Cute Bunny on Top for Girls

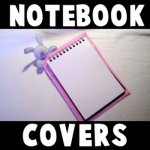
School is about to start yet again and we thought you would love this craft to make a hand-sewn notebook cover. It is a super cute notebook cover that includes a stuffed bunny rabbit at the top. You love to write on it!  Laura from Dacian Moon Handmade  will show you, step by step, how make it.

How to Make a Sewn Notebook Cover with Cute Bunny on Top for Girls


How to Make a Sewn Notebook Cover with Cute Bunny on Top for Girls


CRAFTS MATERIALS NEEDED:

– light colored fabric
– pink felt
– pen
– notebook
– scissors
– pink ribbon
– pink bead for the nose
– instant glue
– filling material
– black paint marker


IMG_7041


Step 1

Fold the felt in half and place the notebook over it.


IMG_7043


Let about 0.5 cm on both parts (left and right) and cut the extra felt.


IMG_7044


Step 2.

Sew the two parts together until you reach about 3/4 of it.


IMG_7046


Measure with the notebook if the height is OK. You should have about 2.5 cm to the notebook spire.


IMG_7047


Step 3.

Put the ribbon here …


IMG_7048


… and sew it in place.


IMG_7049


Like this.


IMG_7051


Step 4.

Continue sewing for another 3 cm then fold the felt backward…


IMG_7052


And sew the parts together. This way, the upper part will be stronger.


IMG_7053


Do the same on the other part.


IMG_7054


The Cover will look like this.


IMG_7055


Now separate the default covers of the notebook and put them between the ribbon and felt.


IMG_7056


Like this.


IMG_7057


This is our notebook 😉 Do you think we can make it cuter?


IMG_7058


Step 5.

Of course! Let’s make a bunny! Draw a head with 2 long ears and two small paws on fabric.


IMG_7059


Cut them out.


IMG_7060


Place it again on fabric and draw the outline. Cut the second bunny out.


IMG_7061


Like this.


IMG_7062


Step 6.

Start sewing the two parts together. Let’s start with an ear.


IMG_7063


When you arrive in this point…


IMG_7064


… prepare the filling material…


IMG_7066


… and fill the ear.


IMG_7067


Then continue to sew until you finish the ear. It is important to sew only a little bit over half, then fill it because if you sew first and then fill, you can’t reach all the corners.


IMG_7068


This is the ear finished.


IMG_7069


Continue with the other ear…


IMG_7070


… the paws, and close the head. Don’t forget to fill it when you sew.


IMG_7071


The bunny head looks like this.


IMG_7072


Step 7.

Choose a point where you want the nose to be…


IMG_7073


… and sew the bead there.


IMG_7074


Like this. (If you prefer, you can glue the bead there)


IMG_7075


We will put the bunny in the corner.


IMG_7076


Sew it in place.


IMG_7077


Like this.


IMG_7078


Add the notebook and you are almost ready.


IMG_7080


Use the paint marker to draw 2 eyes and a mouth for the bunny 😉


IMG_7081


And there you have it…the finished notebook cover…the  bunny will keep you company as you write in it…whether is a journal or a school notebook. I hope that you had a lot of fun!

You Might Also Enjoy Our Other Back to School Crafts

Technorati Tags: , , , , , , ,

How to Make an Afikoman Bag for Passover

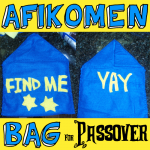
Passover starts in about a week and I thought that some of our Jewish followers might want a Passover craft. Today I will show you how to make an Afikoman Bag, which can then be used to hide Matzah for the little kiddies to search for. Although I sewed this Afikoman Bag, you could use fabric glue to put your Afikoman bag together. Learn how to make it below.


How to Make an Afikomen Bag for Passover


Crafts Materials Needed:

Long Piece of Felt or Fabric

A Second Color of Fabric to Use for Letters and Stars

Either Needle and Thread or Fabric Glue

Scissors

Step 1


step1


step2


You May Use Felt or Fabric, either one is fine. Place a piece of Matza on the Felt and measure out enough felt to place two and a half pieces of matzah. This will be enough felt to make your bag.

Then place the matzah a little bit to the right of the center of the felt. Then fold the felt over the matzah as seen in the picture above.

Step 2


step3


Now sew on either side of the felt (or use fabric glue), as seen in the picture above.


Step 3


step4


Now the right side of the felt will be the flap. You can fold it over now.

Step 4


step4b


Like This.

Step 5


step5


Now Push fabric inwards to form a triangle (in the same fashion you would do with wrapping paper when wrapping a present). Pin the triangle in place with a safety pin or sewing pins, then sew the triangle so that the fabric stays like this…this will be the flap.


This is What the Flap Looks Like When Sewn


step5b


Above is what the flap looks like when open.


step5c


And this is what the flap looks like from the inside.

Step 6


step6


I think yellow and blue are perfect for this craft because it is the colors of Israel and Judaism. Get some yellow felt and cut out some letters. I used Find Me for the outside of the Afikoman bag and Yay for the inside. But I’ve seen ‘Find This’ for the outside and ‘Found It’ on the inside. The normal thing to do is to write Afikoman on the outside or in hebrew  –

אפיקומן

Step 7


step7


Before sewing or gluing letters on, put cardboard into the bag to keep you from sewing bag’s two sides together.

Step 8


finished-afikomen-bag-craft-for-passover


Sew the letters on the front – ‘Find Me’ or ‘Afikoman’ or אפיקומן  or what you wish.

Sew the letters on the inside – ‘Found Me’ or ‘Yay’ or what you wish.

Finish Up


step9


Now wrap some matzah in a cloth napkin and then place in your bag. Close the flap and then hide it someplace. Let kiddies go searching for it. Give the ones who find the matzah some sort of prize. Have fun and Happy Passover!

Technorati Tags: , , , , , , , , , ,


How to Sew a “Lucky Cat” for Saint Patrick’s Day

This is a cute and funny toy made especially for St. Patrick’s Day! 
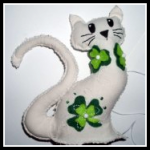
Do you want to learn how to make and sew a stuffed animal named “Lucky Cat” for Saint Patrick’s Day? This stuffed cat is covered in shamrocks and isn’t too tough to make. Learn how to make this kitty cat in the following craft tutorial.

Laura from Dacian Moon Handmade  will show you how to make it, step by step.


How to Sew a Shamrock Lucky Cat


CRAFTS MATERIALS NEEDED:

– white or cream-colored fabric
– light green and dark green felt
– filling material (I use some cotton pads broken into pieces)
– scissors
– needle and threads (white and black)
– black paint marker
– pen
– 3 small white beads
– pencil
– green beads (optional)


IMG_4668


Step 1.

Fold the fabric in half.


IMG_4669


Draw a cat outline, like this…


IMG_4673


… and the tail.


IMG_4674


Cut them out, without unfolding the fabric. This way you will have two cats and two tails.


IMG_4675


Step 2.

Place one cat over the other and start sewing them together. Start on the lower part.


IMG_4676


Go up until you reach the ear.


IMG_4678


Step 3.

Draw one big clover and some smaller on dark green felt. Also, draw them a little bit smaller on light green felt.


IMG_4679


Cut them out.


IMG_4680


Group one big dark clover with one big light clover, and the smaller ones in the same way.


IMG_4681


Step 4.

Choose one place for the big clover…


IMG_4683


… and sew it in place, using white thread.


IMG_4685


Add one white bead in the middle. Be careful not to sew both cats when you sew decorations.


IMG_4687


You can let it like this or you can make some decorative stitches with white thread and green beads


IMG_4689


Like this.


IMG_4691


Choose a place for the small clovers also.


IMG_4693


I put two of them around the cat’s neck, just like a necklace. Don’t forget to add white beads in the middle and to sew only one cat.


IMG_4696


Step 5.

Is time to decorate the head. Place a folded paper or a piece of cardboard between the two cats…


IMG_4698


… and color the eyes and nose with black paint marker.


IMG_4699


Like this.


IMG_4700


Change the thread, and using the black one…


IMG_4701


Sew the whiskers.


IMG_4702


Like this.


IMG_4703


Step 6.

Change the thread back to white and continue to sew the two cats together.


IMG_4705


When you reach the neck is time to fill the head.


IMG_4706


Tamp the filling to fill all the head and the ears. Like this.


IMG_4707


Continue to sew until you almost get down. Here will be the tail, so we must prepare it.


IMG_4709


Step 7.

Place the two tails one over the other…


IMG_4710


.. and start sewing them together from the lower part.


IMG_4711


Go until you reach the tip of the tail and start to sew the other part.


IMG_4712


Stop when you make about 10 cm. Take a piece of filling and roll it between your hands.


IMG_4713


Press it on the stitched part of the tail.


IMG_4714


Continue to fill the tail while sewing the two sides together. It will look like this.


IMG_4715


Step 8.

Place the tail between the two cats, like this.


IMG_4716


Sew it in place.


IMG_4717


Step 9.

Fill the cat’s body.


IMG_4718


sew the two parts together…


IMG_4720


And the cat is ready 😀


IMG_4721


Isn’t this cat adorable!!! I hope you enjoyed the tutorial!

Technorati Tags: , , , , , , , , , , , , ,

How to Make a Winter Angel Christmas Ornament

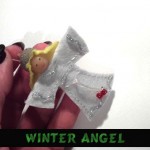
I have a fun Christmas craft for you today.  In this post I will show you how to make a Winter Angel Christmas Ornament.  This Angel Christmas Ornament turns out amazing looking.  It would look spectacular on your Christmas Tree.  You could also make this Winter Angel Christmas Ornament as a gift for your friends and family this Christmas.  They will surely love it.   This will surely be a Christmas Ornament that they will save for a long time….. proudly representing something you made yourself.  So, let’s get started.

Check out our Christmas Crafts.

Laura from Dacian Moon Handmade   will show you how to make this, step by step.


Materials Needed

– 1 disc of white felt
– 1 smaller disc of yellow felt
– 1 acorn cap
– 1 wooden bead
– toothpick
– scissors
– needle and pin
– instant glue
– red and black paint
– silver glitter glue
– 2 red beads


Step 1

Take the wooden bead…


… and stick it on a toothpick.


Like this.


Step 2

Put the toothpick through the middle of the white felt.


Fold the felt in half, like this, and start sewing a dress for your angel.


Like this.


Step 3

Cut the extra felt.


It will look like this.


It is time to shorten the hands / wings.


Like this .


Step 4

Apply a layer of glue on the head…


… and put the yellow disc over it, like this. Note: you should do this quickly because the glue is fast drying.


This is the angel with hair.


Step 5

Apply a layer of glue inside the acorn cap…


… and fix it on the angel’s head over the yellow felt.


Step 6

Put a red bead on a piece of thread…


… and make a knot, like this.


Sew this piece of thread as a belt.


… like this. Then add another bead on the other end and tie the belt.


Step 7

Put the needle (with thread) through the yellow felt, and make a hanger.


Like this.


Decorate your angel with glitter glue, make eyes and mouth with black and red paint and your ornament is ready.


Isn’t this Winter Angel Christmas Ornament simply adorable?  It will look beautiful hanging on your Christmas tree.  It would also make a wonderful gift to a friend or family member.

Technorati Tags: , , , , , , , , , , , , ,

How to Make Pinecone Turkeys

Oh boy, do I have a fun craft for you today perfect for the Thanksgiving season.  Today I’m going to show you how to make Pinecone Turkeys perfect for Thanksgiving.  These pinecone turkeys will look great around the house as Thanksgiving decorations.  Plus, your kids will love to make them.  They are a lot of fun and your kids will have great pride in knowing they made items you could actually put around the house as decorations.  So, grab the materials needed and let’s get started.

Check out our other Thanksgiving Crafts.


How to Make Pinecone Turkeys


Materials Needed

Pinecone

Tan Puffball

Glue

Googly Eyes

Yellow Felt or Foam

Red Felt

Orange Pipe Cleaner

Different Color Pipe Cleaner, Construction Paper or Craft Feathers


Step 1


Get a pinecone.


Get a pinecone.


Step 2


Glue a tan puffball to the top of pinecone.


Glue a tan puffball to the top of pinecone.


Step 3


Glue googly eyes on.


Glue googly eyes on.


Step 4


Cut yellow triangle out of felt or foam and glue on face.


Cut yellow triangle out of felt or foam and glue on face.


Step 5


Draw a #7 like shape on red felt like above picture.  Glue red felt on top of beak.


Draw a #7 like shape on red felt like above picture.  Glue red felt on top of beak.


Step 6


Wrap orange pipe cleaner around pinecone.


Wrap orange pipe cleaner around pinecone.  Then take smaller pieces of pipe cleaner to make claws.


Step 7


Loop pipe cleaners and stick into back of pinecone for feathers.


Loop pipe cleaners and stick into back of pinecone for feathers.  Or, use paper or craft feathers.

And, now you are all finished.  You just made your Pincone Turkey.  Now, use it to decorate your house for Thanksgiving.  Actually, make a few to put around the house….. everyone will love it!!

Technorati Tags: , , , , , , , , , , , ,

How to Make Clothespin Witches

Halloween is later this month.  It is coming up quickly….. so now is the time to decorate your house for Halloween.  Today I’m going to show you how to make Clothespin Witches.  The craft calls for a wooden clothespin.  My suggestion to you is to use the old-fashioned clothespins…. not the “pinch-to-open” ones.  Make a few of these Clothespin Witches to decorate your whole house.   Grab the materials needed and let’s get started.

Check out our other Halloween Crafts.


How to Make Clothespin Witches


Materials Needed

Wooden Clothespin

Green and Red Paint

Black Felt, Paper or Craft Foam

Pencil

Scissors

Stapler

Glue

Red and Yellow Yarn

Stick


Step 1


Paint a wooden clothespin green.


Paint a wooden clothespin green.


Step 2


Draw a big circle on felt, paper or craft foam.


Draw a big circle on felt, paper or craft foam.


Step 3


Cut out the circle.


Cut out the circle.


Step 4


Draw a line thru the center.... both ways.


Draw a line thru the center…. both ways.


Step 5


Cut out one of the pizza slices.


Cut out one of the pizza slices.


Step 6


Staple closed like this.


Staple closed like this.


Step 7


Now push the head thru the hole.


Now push the head thru the hole.


Step 8


Now, your piece looks like this.


Now, your piece looks like this.


Step 9


Paint stripes on legs.


Paint stripes on legs.


Step 10


Cut out a small circle and a pizza slice shape


Cut out a small circle and a pizza slice shape… Use paper, felt or craft foam.


Step 11


Glue pizza slice into cone shape for top of hat.


Glue pizza slice into cone shape for top of hat.


Step 12


Cut slits at bottom of cone.


Cut slits at bottom of cone.


Step 13


Glue slits to top of circle.


Glue slits to top of circle.


Step 14


Fold yarn in half several times


Fold yarn in half several times…


Step 15


Glue yarn on top of head.


Glue yarn on top of head.


Step 16


Now cut looped ends of yarn to make hair.


Now cut looped ends of yarn to make hair.


It should look like this.


Like this.


Step 17


Glue the hat on top of head.


Glue the hat on top of head.


Glue the hat on top of head.


Like this.


Step 18


Find a stick.


Find a stick.


Step 19


 Cut a slit in front of dress.  Then put stick thru clothespin and slit in dress.


Cut a slit in front of dress.  Then put stick thru clothespin and slit in dress…


Step 20


It should look like this.


Like this.


Step 21


Fold some yellow yarn in half a few times


Fold some yellow yarn in half a few times… Like this…


Step 22


Take a 2nd piece of yarn and tie it around folded yarn.


Take a 2nd piece of yarn and tie it around folded yarn.


It should look like this.


Like this.

Step 23


Take loops on each side and cut the loops open.


Take loops on each side and cut the loops open.


It should look like this.


Like this.


Step 24


Tie this on to end of stick with another piece of yarn.


Tie this on to end of stick with another piece of yarn.


It should look like this.


Like this.


Step 25


Finished Clothespin Witch


And, that’s it.  You just finished making a Clothespin Witch.  Isn’t it awesome?!  This will make for a wonderful Halloween Decoration in your house.  Enjoy!!

Technorati Tags: , , , , , , , , , ,

How to Make a Plush Bunny for Easter

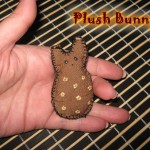
When you think of Easter what is one of the characters you think of?  A bunny, of course.  Well, today I’m going to show you how to make a Plush Bunny.  This bunny is perfect for the upcoming Easter Holiday, but honestly can be made and enjoyed any time of the year.  Made with felt and some cotton for stuffing this bunny is sure to be soft and cuddly.  Make it as big or as small as you would like.  We made our bunny pretty small.  So, grab the materials needed and let’s get started.

Check out our other Easter Crafts.


Materials Needed

– string and needles
– scissors
– felt / fabric
– paper
– pencil
– paint
– 1 toothpick
– wool / cotton – things to stuff (I used 2 cotton pads for that)


Step 1

Draw the pattern on the paper, like this.


Use the scissors to cut it out.


Step 2

Fold the felt in half, place the bunny pattern on it and trace it there.


Step 3

Cut the bunny out of felt (remember, you folded the felt before that so you’ll have 2 bunnies of felt now).


Step 4

Sew the two bunnies starting at the bottom. Use a blanket stitch along the sides.


To make a blanket stitch, push the needle through the fabric then pull the needle through the loop.


Sew as far as you are comfortable before stuffing. The size of the opening will depend on the size of your doll.


Step 5

Prepare your stuffing material: I made little pieces of the cotton pads.


Place the stuffing material in the bunny, taking care to fill all available places.


It should look like that.


Step 6

Sew it shut.


Now the bunny looks like that.


Step 7

Using the toothpick and some paint add eyes and a mouth.


Look how cute he is !
You can continue to decorate it if you feel like it.


Awesome job!!  You just finished your Plush Bunny.  Isn’t it a cutie patootie?  How did your bunny turn out?  Let me know in the comments below.  And, take a picture of it and add that to the comment too… I’d love to see it.

Technorati Tags: , , , , , , , , , , , ,

How to Make a Fish out of a Heart Valentines Day Box

Today I have a fun craft to do with your left over Valentines Day Heart Shaped Box.  I’m going to show you how to make a Fish out of a Heart Valentines Day Box.   This craft is not only a lot of fun, but it is a great way to recycle those used Valentines Day Boxes…. so you don’t have to just throw them away.   And, the fish not only turns out totally cute, it also gives you a secret storage box to store your small secret things in.  Now, that is fun!!  So, grab the materials needed and let’s get started.

Check out How to Make a Kitty Cat out of a Heart Valentines Day Box.


How to Make a Fish out of a Heart Valentines Day Box


Materials Needed

Valentines Heart Box

Black Marker

Red Craft Foam, Felt or Paint

White & Black Craft Foam

Colorful Tissue Paper (2 different colors)

Pencil

Scissors

Glue Stick

Lid or Bowl (for tracing)

Paper Plate

Paper

Glue


Step 1


Get your chocolate hearts box.


Get your chocolate hearts box.


Step 2


Draw lips with backwards E shape.


Draw lips with backwards E shape.


Step 3


I used sticky craft foam square tiles and filled in space in the lips.


I used sticky craft foam square tiles and filled in space in the lips.  Use anything that you want to use though…. even paint or felt.


Step 4


Draw an outline around the lips


Draw an outline around the lips.  Draw curved rectangles for white highlights.


Step 5


Fill curved rectangles with white craft foam.


Fill curved rectangles with white craft foam.


Step 6


Use colorful tissue paper for next part.


Use colorful tissue paper for next part.


Draw circle on a stack of square tissue paper.


Draw circle on a stack of square tissue paper.


Cut out circles.


Cut out circles.


Step 7


Dot glue all over the rest of heart.


Dot glue all over the rest of heart.


Layer circles on top of box and on top of each other.


Layer circles on top of box and on top of each other.


Until it looks like this.


Until it looks like this.


Step 8


Use a lid or bowl to trace a big circle on white foam.


Use a lid or bowl to trace a big circle on white foam.


Trace a smaller circle on black craft foam.


Trace a smaller circle on black craft foam.


Cut out 2 small white circles and glue together like this.


Cut out 2 small white circles and glue together like this.


Step 9


Glue eye on fish face.


Glue eye on fish face.


Step 10


Draw a heart with a rectangle on lef


Draw a heart with a rectangle on left….. do this on a paper plate.


Bend and glue rectangle on to side of heart box furthest from lips.


Bend and glue rectangle on to side of heart box furthest from lips.


Now fish should look like this.


Now fish should look like this.


Step 11


Draw half of a heart on folded paper.


Draw half of a heart on folded paper.


Cut out heart.


Cut out heart.


Cover with tissue paper circles too.


Cover with tissue paper circles too.  Make two of these.


Step 12


Glue fin to fish face.


Glue fin to fish face.

And, your fish is now done. Wasn’t that fun?  Now, you have a secret storage box that is decorated as a fish.  The real question is now ….. what are you going to fill your secret box with?  Enjoy.

Technorati Tags: , , , , , , , , , ,

How to Make Velcro Bullseye Game Rings

Oh boy….. do I have a fun craft for you today!!  I’m going to show you how to make Velcro Bullseye Game Rings.  The ring is made with felt and when you throw a small little Velcro ball at it the ball actually sticks.  The craft is a fun one…. almost as much fun as it is to wear this adorable ring.   This ring craft would be an awesome craft to make party favors for a birthday party.  Imagine the excitement of the kids attending the party when they see they get Velcro Bullseye Game Rings to take home with them.  They’d love it!!

Check out our other Jewelry Crafts.


How to Make Bullseye Game Rings


Materials Needed

Pull Tabs for Juice or Milk Cartons

4 Different Size & Colors of Felt

Glue

Velcro

Small Ball


Step 1


Juice and some milk cartons have pull tabs for when first opened.


Juice and some milk cartons have pull tabs for when first opened.  Grab one of these.


Step 2


Flatten it a bit.


Flatten it a bit.


Step 3


It should now stand like this.


It should now stand like this.


Step 4


Cut out 4 different sized colors of felt.


Cut out 4 different sized colors of felt.


Step 5


Glue 4 pieces of felt together.


Glue 4 pieces of felt together.


Step 6


Glue felt onto front of pull tab.


Glue felt onto front of pull tab.


Step 7


You can stand it up to play.


You can stand it up to play.


Step 8


You can glue a piece of Velcro onto a small ball.


You can glue a piece of Velcro onto a small ball.


Finished Velcro Bullseye Game Ring


Awesome…. you just finished making your Velcro Bullseye Game Ring.  Isn’t it simply adorable?  Plus, you can take off the ring and play the Bullseye Game anytime you want.  Or simply wear the ring and play the game with the ring still on your finger…. So much fun!!

Technorati Tags: , , , , , , , , , , , ,

How to Make a Clothespin Penguin Ornament

I have a fun craft for you today.  I’m going to show you how to make a Clothespin Penguin Ornament.  It turns out so cute and perfectly festive for the Christmas Season.  What would be even cuter is to make a few of the Penguin Ornaments and spread them around the Christmas Tree.  So, go grab a clothespin, old glove and the rest of the materials needed and let’s get started.

Check out our other Christmas Crafts.


How to Make a Clothespin Penguin Ornament


Materials Needed

Clothespin

Paint – White and Black

Felt or Foam – Orange and Black

Black Marker

Scissors

Glue

Old Glove


Step 1


Paint clothespin white.


Paint clothespin white.


Step 2


paint the top of the clothespin black


When painting the clothespin white…. paint the top of the clothespin black.


Step 3


Draw a beak on orange felt or foam


Draw a beak on orange felt or foam by drawing 2 triangles.


Step 4


Cut out and glue beak on white part of penguin


Cut out and glue beak on white part of penguin under eyes that you draw.


Step 5


Cut black seed shaped ovals out of felt or foam


Cut black seed shaped ovals out of felt or foam.


Step 6


Glue black ovals to the sides of clothespin.


Glue black ovals to the sides of clothespin.


Step 7


Cut a finger off of an old glove.


Cut a finger off of an old glove.


Like this


Like this.


Step 8


Fold up bottom of glove finger to look like a hat.


Fold up bottom of glove finger to look like a hat.


Step 9


Put hat on the penguin.


Put hat on the penguin.

Awesome job…. you just finished your Clothespin Penguin Ornament.  How cute is he?!  So cute!!  Now, go hang it on your Christmas tree.  Make a few and spread them around your Christmas tree this Holiday Season.

Technorati Tags: , , , , , , , , , , , , ,

How to Make Pilgrim Girl Puppets

Pilgrims are an important part of Thanksgiving.  After all, if it wasn’t for the Pilgrims we would have no Thanksgiving at all.  Today I will show you how to make a Pilgrim Girl Puppet perfect for the Thanksgiving Holiday.  It is a fun craft that you can make out of things that you probably already have in your home…. such as a shirt sleeve, sock and glove.  So, let’s get started.

Check out our other Thanksgiving Crafts and Puppet Crafts.


How to Make Pilgrim Girl Puppets


Materials Needed

Shirt Sleeve

Sock

Cotton, Filling or Laundry Lint

Rubber Band, String or Yarn

Yarn

Permanent Marker

Glove

White Fabric or Felt

Ribbon

scissors

Glue


Step 1


Cut shirtl sleeve.


Measure 12 – 15 inches from the end of a shirt sleeve…. cut the sleeve.


Step 2


Cut part of sock off.


Cut part of sock off.


Step 3


Fill sock with cotton, filling or laundry lint.


Fill sock with cotton, filling or laundry lint.  Then close with rubber band or tie closed with yarn or string.


Step 4


Glue yarn on top of head for the hair.


Glue yarn on top of head for the hair.  Use permanent marker to draw eyes, nose and mouth.


Step 5


Glue head to top of sleeve.


Glue head to top of sleeve.  Cut a slit on both sides of the sleeve.


Step 6


Push thumb and pinky of glove into slits you made in the sleeve.


Push thumb and pinky of glove into slits you made in the sleeve.


Step 7


Cut a 6 inch by 6 inch piece of white fabric or felt.


Cut a 6 inch by 6 inch piece of white fabric or felt.  Then cut an X shaped slit in the center of this square.


Step 8


Pull square over girl's head


Pull square over girl’s head (that is why we cut the letter X slit).  Glue square to sleeve.


Step 9


Glue white rectangle of felt or fabric to long ribbon for girl's apron.


Glue white rectangle of felt or fabric to long ribbon for girl’s apron.


Step 10


Cut white rectangle of felt.


Cut white rectangle of felt.


Step 11


Curl the ends of the felt.


Curl the ends of the felt.  Now place the white rectangle to top of head as the bonnet and glue into place.  Glue or tie apron to sleeve.


Finished Pilgrim Girl Puppet.


Place hand in puppet.  Use center finger to tip the head.  Use pinky and thumb to move the puppet’s hands.

Now you have your finished Pilgrim Girl Puppet.  Isn’t she a cutie?!  How did you puppet turn out?  Make sure to let me know in the comments below.  You can even take a picture of your puppet and share it with me in the comment.  I’d love to see it.

Technorati Tags: , , , , , , , , , , , ,

How to Make a Mummy Trick or Treat Basket

You know how much thought goes into your child’s costume!!  But, sometimes the treat basket is an afterthought.  I know…. I use to carry my Halloween candy in a pillow case.  But, imagine how cute your child will look carrying this Mummy Trick or Treat Basket.  And, chances are no one else will have the exact basket.  Today I will show you how to make your very own Mummy trick or treat basket.

Also check out our other Halloween Crafts


How to make a Mummy Trick or Treat Basket


Materials Needed:

Black Bucket

White & Black Foam or Felt

White Gauze or Old Sheets

White Paint or Yarn

Glue

Scissors


Step 1


Start off with a black bucket


Start off with a black bucket.


Step 2


Cut and paste a white foam or felt circle for each eye... and a black foam/felt circle inside of it.


Cut and paste a white foam or felt circle for each eye… and a black foam/felt circle inside of it.


Step 3


Wrap gauze or white strips of an old sheet... all around the bucket


Wrap gauze or white strips of an old sheet… all around the bucket… and glue down.  Make sure not to cover all of the eyes… and leave a small spot to add the mouth.


Step 4


Paint the mouth with white or use stripes of white yarn glued down


Paint the mouth with white or use stripes of white yarn glued down.


Finished mummy trick or treat basket


It’s super cute, right?!  And, it’s so festive for Halloween.  If you make this Halloween trick or treat basket craft let me know in the comments how it turned out.  I would love to hear all about it.

Technorati Tags: , , , , , , , ,

How to Make a Frankenstein Trick or Treat Basket

Halloween is coming up and what do the kids love about Halloween more than anything?! Trick or Treating, of course.  Today we will be making a Frankenstein Trick or Treat Basket perfect for collecting candy.  Made from a simple green bucket this Trick or Treat basket will be a huge hit this Halloween season.

Also check out our other Halloween Crafts


How to make a Frankenstein Trick or Treat Basket


Materials Needed:

Green Bucket

Black & White Paint, Felt or Foam

Grey Paint

Black Permanent Marker

White String (if not using Paint)

Egg Carton

Scissors

Glue


Step 1


Buy a green bucket


Buy a green bucket at the Dollar Store.


Step 2


Paint triangles for hair


Choose to either Paint or use Felt or Foam.  If painting, add white glue to the paint to help it stick to the plastic.  Paint triangles for hair OR cut felt/foam triangles to top of bucket for the hair.


Step 3


Paint two white ovals and two black ovals for eyes.


(PAINT OR) Cut out and glue two different sized white ovals and black ovals for eyes.  Leave a space between the hair and eyes for stitches.


Step 4


(PAINT OR) Cut out and glue a sideways letter 'V' shape (filled in with black).


(PAINT OR) Cut out and glue a sideways letter ‘V’ shape (filled in with black).  With a permanent maker, draw a black curved line over the eyes.


Step 5


Draw lines over the curved line with a permanent marker.


Draw lines over the curved line with a permanent marker.  (PAINT OR) glue on white string lines for teeth.


Step 6


Cut off egg carton cups... One for each bolt.  Paint them grey to look like real bolts.


Cut off egg carton cups… One for each bolt.  Paint them grey to look like real bolts.  Glue bolts on.


Finished Frankenstein Trick or Treat Basket


Once finished you should have a very freaky Frankenstein trick or treat basket.  Parade it around the community on Halloween and hear all the wonderful comments you get on it.

Technorati Tags: , , , , , , , ,

How to Make a Mosaic Space Invaders Pixelated Picture from Tiles

Space Invaders was my absolute favorite arcade game to play back in the 80’s.  I use to beg my dad to give me quarters to play Space Invaders…. I could spend hours in front of that game.  Today I will show you how to make a Space Invaders pixelated picture from Tiles.  I hope you have as much fun making the craft as I did playing the game.

Click here for more mosaic tutorials


How to Make a Mosaic Space Invader Pixelated Picture from Tiles


Materials Needed:

Glue

Cardboard or Wood

Tiles or Cut up Squares from Paper or Foam


Materials needed


Here is a pattern for you to print or just look at while you are making your Mosaic Space Invaders Picture.


Pattern for Mosaic Space Invaders


Step 1


Put Glue on First Tile


Put glue on first tile.


Step 2


Place square firmly on cardboard


Place square firmly on cardboard or wood.


Step 3


How to Make a Mosaic Space Invader Pixelated Picture from Tiles


Any child will love putting this mosaic Space Invaders pixelated picture craft together.  But, more than that they will love hanging it proudly for all to check out.

Technorati Tags: , , , , ,

How to Make a Halloween Bean Bag Balloon Pumpkin

If you are looking for new Halloween decorations to put around the house, but are finding the same Halloween decorations at the store as every other year….. I have the perfect Halloween decoration craft for you.  Here I will show you how to make a Halloween bean bag balloon pumpkin perfect for this Halloween season.

Check out our other Halloween Crafts.


How to Make a Halloween Bean Bag Balloon Pumpkin


Materials Needed:

Water Bottle

3 Balloons

Rice or Split Peas

Scissors

Black Felt or Black Marker

Green Clay or Play Doh


Step 1:


Cut water bottle bottom off to make a funnel


Cut water bottle bottom off to make a funnel.


Step 2


Fill balloon to half its size


Fill balloon to half its size.  Wait 15 seconds and then you can deflate the balloon.  This stretches the balloon out.


Step 3


Deflate balloon


This is what the deflated balloon should look like.


Step 4


Stretch the balloon over the top of the bottle.


Stretch the balloon over the top of the bottle.  Place rice or split peas into the cut water bottle…. they will then fill the balloon.


Step 5


Fill up the balloon until it is about this full


Fill up the balloon until it is about this full.


Step 6


Cut off the top of the balloon


Cut off the top of the balloon.


Step 7


Cut bottoms from two more balloons


Cut bottoms from two more balloons.


Step 8


Stretch a balloon over the filled balloon


Stretch a balloon over the filled balloon… covering the side with hole.


Step 9


Stretch 3rd balloon over the 2nd balloon


Stretch 3rd balloon over the 2nd balloon… Again over the side the hole is showing on.


Step 10


This is what your pumpkin bean bag looks like now


This is what your pumpkin bean bag looks like now.


Step 11


Add a triangle for each eye and for the nose


Go to Our – How to Draw a Jack-O-Lantern Drawing Tutorial to draw the face…or just add a triangle for each eye and for the nose.  Draw a smile as well.


Step 12


 Add green clay or play doh stem and leaf to top


Add green clay or play doh stem and leaf to top.


How to Make a Halloween Bean Bag Balloon Pumpkin


And there you go.  You have just made an original Halloween decoration for your house…. a Halloween bean bag balloon pumpkin.  Display it proudly.  And, have a very scary Halloween.

Technorati Tags: , , , , , , ,